Search the Community
Showing results for tags 'wires'.
-
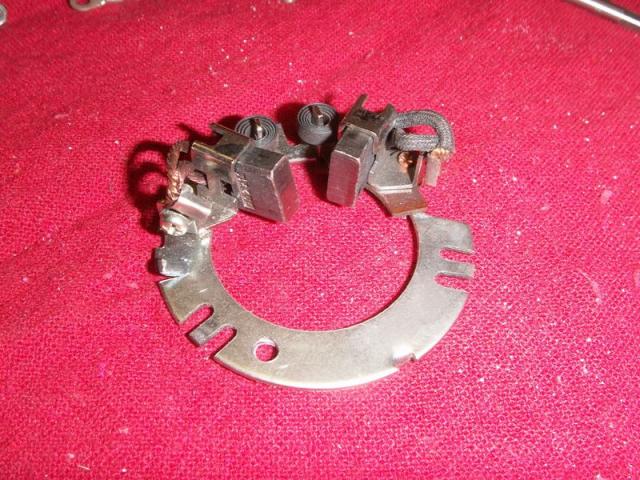
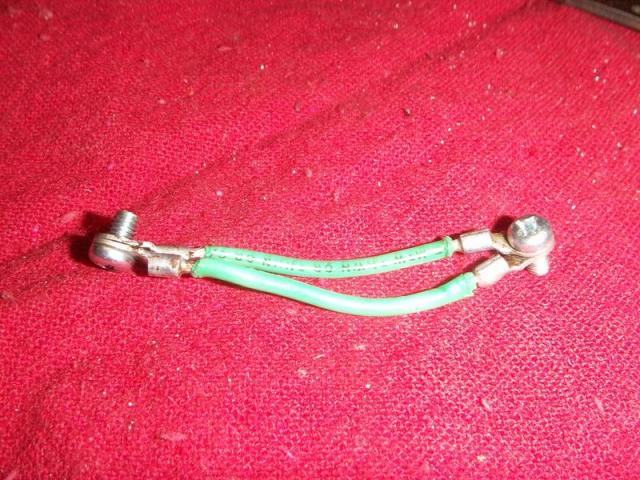
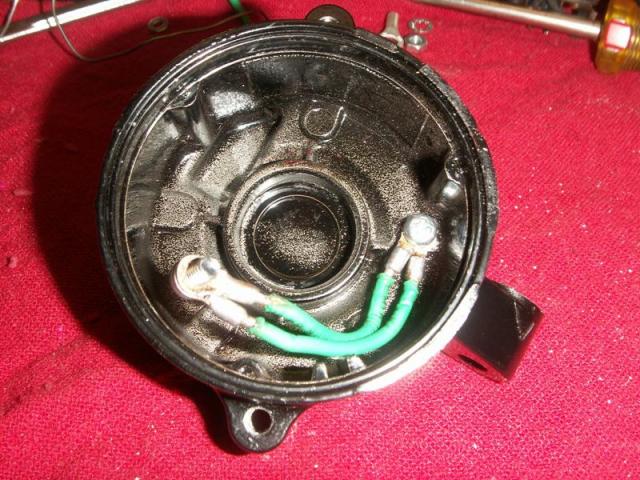
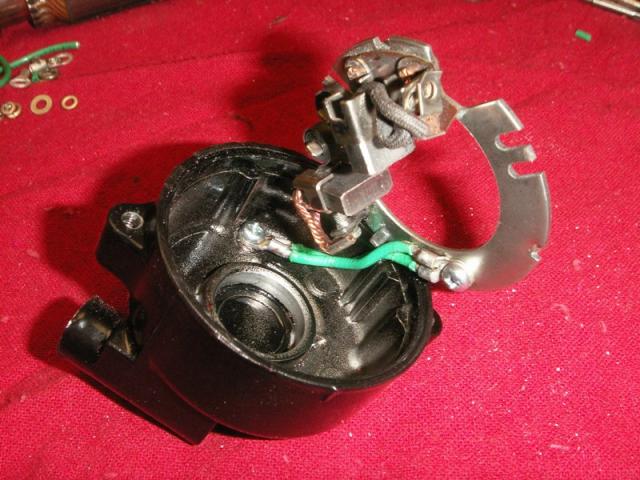
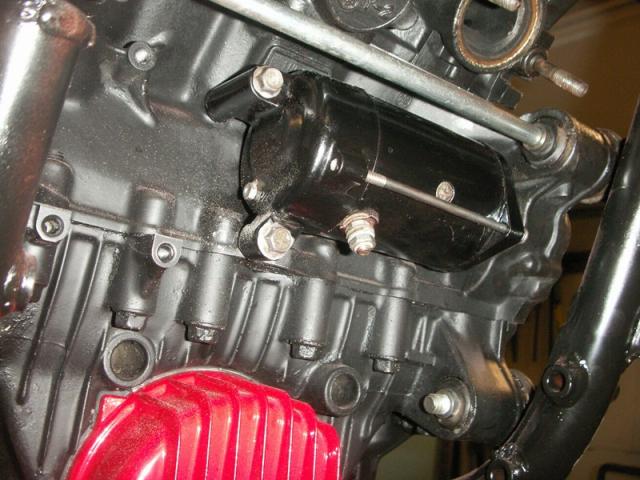
Attached are some pictures of the modification I made to the starter on my 83 1st gen. The purpose of this is to give a better path to ground for the brush plate. Stock version allows a path to ground through the tabs around the plate. Snaggletooth had posted about this mod several weeks ago, but I do not know of any pictures that are available to show it. Gary This shows the location of the drilled & tapped hole. I used a 4mm screw to attach wire with. Hole is at 2 o'clock position. This shows location of hole from outside of cover. The hole in the brush plate is shown at the 7 o'clock position. Picture of grounding wires. I used two 14 gauge wires. The terminals for 12 gauge and up had too large of a mounting lug for mounting screw size I wanted to use. Wires attached to end cover. Wires attached to brush plate. View of starter mounted on engine. I have since added an 8 gauge wire that runs from the bottom mounting bolt for the starter to the right side of the engine block. I attached wire to the block at the same point the main ground wire from the battery attaches.
- 85 replies
-
- dingy
- ground upgrade
-
(and 3 more)
Tagged with:
-
I was wondering if anyone has figured out how to bluetooth their CB into a bluetooth intercom (Scala, Chatterbox, or the like)? I have heard you can do it but it will be a listen only. I want the full CB and think I figured out a way to do it. Just wondering if anyone has beaten me to it. I have good news and bad news. In theory this works, however I need to tweak it some. The problem I have run into is with the volume all the way up you can barley hear the cb. When you key up others can barley hear you. I think the problem lies within the size wires we used. I will tweak this in the up coming weeks. So far this is what I have done. Once again this is needs some tweaks. I wanted to be able to use my stock CB unit in conjunction with my Cardo Scala Rider G4 Power Set. It took me some time but I finally completed the task. I made this product for my Dad’s motorcycle (2007 Yamaha Royal Star Venture), but it should work on any intercom system using a standard 5 pin plug as they are wired the same. The Search: I started searching the internet for a solution to this problem and stumbled across this forum and read many people want this same feature. I think as of now the only option is from J&M and the system cost around $1,000USD! I have also seen where some people used store bought adapters (5 pin to 3.5mm adapter) and in doing so discovered they could only hear the CB. The wiring in the store bought adapters will not allow for a microphone input. The Idea: I located wiring diagrams of the stock 5 pin plug and a product called a Blue Tooth Adapter. The Blue Tooth Adapter (BTA from this point forward) I used is the Cardo BTA II (see link below). You can use other brands but be careful in your choice. The BTA is designed to plug into a non-bluetooth phone and allow the phone to connect to another bluetooth device, like a bluetooth ear mic (or in our case motorcycle blue tooth headset). Make sure you DO NOT buy one that is to transmit only! You will need the device to be capable of both transmitting and receiving. You will also need a 5 pin connecter plug (see link below). The Steps (Please if you are not good with wiring or soldering do not attempt this on your own) Once I had the two items I pulled the top of the BTA. Inside the device you will see a battery, a circuit board, and the coiled wire that has the 2.5mm plug attached to the other end. Three wires connect to the circuit board, on mine they were colored white, red and black. The wires were labeled: white is +microphone, the black is the common ground and the red is +speaker. Be sure to take note what color the wires are and what they do (they may be different for your application). With that taken care of you can reseal the unit. The next step was to cut the 2.5mm plug off the end of the wire. Take the bundled wire and strip off the insulating outer cover. This will reveal the 3 wires you noted in the previous step. Strip the insulation off the 3 wires so you have the bare wire exposed. Using the CB 5 pin wiring diagram (see link below) you may now solder the wires to the individual pins in the 5 pin connector plug. Make sure you solder the wires to their respective locations. In my case the white (microphone wire) will be soldered to the pin labeled 1 (see link below), the black (ground wire) is soldered to pins 4 and 2 (see link below) (this will ground the mic and speakers), and the red (speaker wire) is soldered to pins 5 and 3 (see link below) (this will allow you to hear the CB in both ears). Please if you are not good with wiring or soldering do not attempt this on your own. It takes some knowledge, quite a bit of soldering skill and some specialized tools. You have very little room to work and if not wired correctly it will not work properly. Also, if you use other parts or products other than I have I do not know for sure if they will work. I have not tested any other brand BTA’s or other brand headsets at this time. Thank you J. Yates CB 5 pin plug wiring diagram: http://venturers.org/Tech_Library/attachments/cbwiring.pdf 5 pin plug adapter http://www.frys.com/product/1570803?site=sr:SEARCH:MAIN_RSLT_PG Blue Tooth Adapter: [ame][url=http://www.amazon.com/gp/aw/d.html/ref=redir_mdp_mobile/191-4266561-3880738?a=B000LGUAU8]http://www.amazon.com/gp/aw/d.html/ref=redir_mdp_mobile/191-4266561-3880738?a=B000LGUAU8[/ame] I will update my next steps in days or weeks to come. Wish me luck. J. Yates
-
I read several threads on mounting a garage door opener on the RSV and newer RSTD's. None of them were on the older RSTD's. So here is what I did. http://images.photos1.walmart.com/232323232%7Ffp432%3C9%3Enu%3D33%3B6%3E%3A%3B9%3E238%3EWSNRCG%3D32%3C483%3B958329nu0mrj First I opened up the remote an soldered wires to the activation button. When the cover is closed, the wires come through the whole in the front of the cover. You might have to create one on your remote. http://images.photos1.walmart.com/232323232%7Ffp43332%3Enu%3D33%3B6%3E%3A%3B9%3E238%3EWSNRCG%3D32%3C4843753329nu0mrj Then I found a suitable location for the remote button. I decided that behind the seat near the ignition switch was easy to get at, out of the way, and had plenty of room to work with. http://images.photos1.walmart.com/232323232%7Ffp432%3B6%3Enu%3D33%3B6%3E%3A%3B9%3E238%3EWSNRCG%3D32%3C4843756329nu0mrj I wired a momentary button from Radio Shack ($2.39) and heat shrinked the wires. Make sure the switch is "N O" (normally open) so it only activates when you press the button. http://images.photos1.walmart.com/232323232%7Ffp43335%3Enu%3D33%3B6%3E%3A%3B9%3E238%3EWSNRCG%3D32%3C483%3B959329nu0mrj Next I removed the drivers seat and drilled a hole for the button. Mine needed to be 3/8". http://images.photos1.walmart.com/232323232%7Ffp432%3B%3A%3Enu%3D33%3B6%3E%3A%3B9%3E238%3EWSNRCG%3D32%3C484374%3B329nu0mrj I installed the button. http://images.photos1.walmart.com/232323232%7Ffp43333%3Enu%3D33%3B6%3E%3A%3B9%3E238%3EWSNRCG%3D32%3C4843754329nu0mrj I removed the right side cover and had to relocate the relay from the center mount to the back one to make room for the remote. http://images.photos1.walmart.com/232323232%7Ffp43445%3Enu%3D33%3B6%3E%3A%3B9%3E238%3EWSNRCG%3D32%3C4843755329nu0mrj Relay now on the back mount. http://images.photos1.walmart.com/232323232%7Ffp43332%3Enu%3D33%3B6%3E%3A%3B9%3E238%3EWSNRCG%3D32%3C4846947329nu0mrj I used a zip tie to secure the remote to the two front mounts. Then I connected the button and the remote with bullet connectors to allow me to remove it if necessary for maintenance. http://images.photos1.walmart.com/232323232%7Ffp43453%3Enu%3D33%3B6%3E%3A%3B9%3E238%3EWSNRCG%3D32%3C4843757329nu0mrj Thats it! Simple, out of the way, easy to activate, and less than $3.00 out of my pocket.
-
Hey y'all, I found an easy way to use that white aux power plug located just behind the battery on the left side. Even though the cap does not have the necessary pins in it to make a connection, the pin retaining clips work somewhat like wire clamps. I just stripped the ends from some 18 gauge zip cord and tinned it, then used hemostats (or small needle nose pliers) to insert the wire into the contacts in the bottom plug - they fit very snugly after tinning. Here are a couple of pictures - not the best, but you should be able to see what I am talking about: [ATTACH]16155[/ATTACH] [ATTACH]16154[/ATTACH] Just make sure you insert the wires into the metal contacts in the plug, not the empty spot next to them where the retaining clips are (I think that the second picture actually shows me holding the wires in the wrong hole)! The way the plug cap is designed, the wires are protected from accidentally touching once the cap is put back in place. Also, remember that this plug is only on a 5 amp fuse (located behind the right front cowling). Good luck, Goose
-
I been reading all the earlier post are audio and still confused My cass does not work, radio only on AM and CB dead dont care about CB I would like to do is pull all out.. amp tuner everything but, all those wires what do i do what them and which wires do i use? What is everyone making to fill the big hole if you pull everything out that looks nice? I like listening to FM and i guess i had to be able to down some music mp3 or ipod (haven't done that yet) What a good system to put in? and would i need a amp? My bike the only thing keeping me from a padded room and some music would really help This is 1st post hope it get to the right place. Thanks for any help and pictures would be great
-
Inspired by THIS POST, I installed the Electrical Connection Turn Signal Conversion Kit (EC-01315, bought HERE) on my 2006 Royal Star Tour Deluxe. There was one crucial step that was puzzling, and I made a few false steps. What follows is what I would do if I had to do it over again. I am posting this in the spirit of sharing lessons learned. *Insert more disclaimer stuff* I got a rolling seat for Christmas as well as two magnetic parts dishes. These were great for not losing parts. Spend a minute and organize where you'll put stuff. 1. Put the bike up on a stand. I love the Carbon_One "RSV / RSTD Lift Frame Adapter" as sold HERE, especially with the legs. Puts the bike solidly at a good working height. Note that you will want the bike up in the air, since you will be working inside the rear fender. 2. Remove the blinker lens cover and silicone-glue in the LEDs as per the instructions. Note that although the LEDs are white, they will shine red. 3. We'll do the hard part one side at a time, and for fun's sake I'll pick the left side. The turn stalk is in two parts held together with a bolt. Before you loosen the stalk, remove this bolt to let the halves pull apart. Doing it while the stalk is on the bike is simply more convenient because it is solidly anchored. 4. Go inside the rear fender and unclip the left turn signal wire. There are three thin metal clips that hold the wire inside the fender. Bending them out and freeing the wire will give you slack. Note that dirt may fall out of your fender and into your eyes. Be smarter than me and use eye protection when you look up into a crud caked fender. 5. Remove the two bolts and heavy clip that hold on the left turn stalk. Note that the turn stalk may flop and ding your fender paint. Just be aware. You can push the slack wire out the exposed fender hole. 6. With the turn signals dangling, use a screw driver to pry apart the slot in the outer stalk, allowing you to separate the stalk into two parts. 7. Now, examine what you have and what you have to do. You will need to somehow thread the LED leads past the turn bulb seat and through the stalks. This is the step that stymied me for a while. Once I figured that out, the right side took 15 minutes. There are undoubtedly many solutions, but this is what I did: 8. I removed the bulb, then removed the two screws and thin metal strip that holds the bulb seat. 9. I used a metal skewer to slide from the stalk end into the blinker housing, between the rubber bulb seat and the metal outer housing. The bulb seat seems to be affixed, perhaps with glue but more likely a tight fit and age. I thought I was going to use the skewer to make a hole for the wires to go. Instead, I noticed the bulb seat was moving into the blinker housing. The skewer seemed to have broken whatever bond there was, holding the bulb seat in. Using a pair of pliers, I gave a gentle pull and the bulb seat came free. There were two wires still attached to the bulb seat, so I had to be gentle. 10. With that crucial step completed, I used the supplied vinyl tubing to thread the LED leads through the housing, then through the other part of the stalk. At this point, untwist the LED leads so that they will lay flat between the rubber bulb seat and metal housing. 11. Reinstall the rubber turn signal bulb seat. I ended up having about 2.5" of LED lead sticking out, situated on the bottom of the housing. I don't think it matters much, but make sure you keep plenty of wire showing as you shove the bulb seat back into place. I happened to have a 6mm socket handy, and it fit perfectly into the bulb seat. I used that to press the seat in evenly. I did not get it all the way back in how it was. Perhaps 1mm extra is sticking out and it threatens to contact the bulb. But since the bulb only blinks intermittently, I am unconcerned. If you are concerned, maybe you could take more care than me. *TIP: Use WD-40 to lubricate the outside of the turn signal seat. That will allow the seat to slide in easily and not damage the LED leads. Electrical Connection says that this is the location with the most frequent problems--a pinched wire. They will cut a groove into the seat with a Dremel, but that seems risky to me. See my post below describing the problems I had. 12. I went ahead and reinstalled the amber turn bulb. This involved installing the metal strip and two screws that holds the housing in place. This is when I noticed how slack my attempt to reinstall the bulb seat was. Oh well, the bulb fit in and works. The steps 8-12 above took me 2+ hours to figure out, even with some hints from VentureRider.org. Lots of anguish over this. But the result seems pretty good, and took 15 minutes on the other side. I think making sure the wires are flat is important. 13. I used the skewer inside the supplied vinyl tubing to push the tubing through the rubber gasket holding the wires through the fender. Then I fed the wire through the tubing and into the inside of the fender. Almost home! I pulled out the tubing when it was all fed through. 14. My wife helped me for two minutes as I re-installed the turn stalks. She held it in place while I pulled the slack out of the wire, pushed the wire back over the retaining clips (including the new LED leads), and installed the heavy clip + two bolts. Wiping dirt from my eyes, I crawled out and put the turn stalk halves together using the nut and bolt. It looks like there is some red locktite on this bolt, but I don't have any. I'm not sure anyways. I'll make sure to check the bolt. 15. Remove the license plate to expose wiring. I was greatly surprised to see that there was a bundle of wiring back there. This is, I think, what the instructions in the Shop Tip mean about the "mustache. " I have a mustache, but I don't think my bike does. Anyways, this is where I did all the connections. I snipped the zip-tie holding the bundle together. Maybe there is a better way to unbundle than snipping. Will someone let me know? Separating the bundle and looking at the wires, you can make sense of how the wires come out of holes on the fender from either side. You can see which wires feed the left turn signal and which feed the right turn signal. 16. [Optional] remove the brake light lens cover. That way you can see the blue and yellow wires that operate the turn signal. I found it handy to have that visual color cue as I did the wiring. 17. I used the same piece of vinyl tubing plus the skewer to poke through the fender again and into the license plate area. I pulled the slack out of the LED leads, removed the tubing, and got more dirt in my eyes bending the retaining clips back inside the fender. At this point, the left side wiring is done. If you are nervous (I was), turn on your lights to make sure your turn signal still works. 18. Do the right side, learning from the left side. If you want, you can do the connection stuff for the left side first so that you can see how the turn signal gasket goes back using the right side as a guide. The gaskets for the turn signal lenses constantly fell out for me, and I eventually just learned how they went back. I did the right side wire-routing first, before doing the connections behind the license plate. 19. With the right side done too, you can start the wire connections. I found this part scary, because I am not an electrician. But connecting the supplied heavy red-green-blue wires turned out to be easy. 20. I snapped the T-Tap onto the heavy Blue and Yellow wires from the brake light. 21. I wound together the two green wires from the supplied three-wire strands, and then crimped on a one connector. That's what they mean in the instructions that "The 2 greens can be connected together." (Hey, go down and read Step 30 and make a decision about how much wire you need.) 22. I wound together the two blue wires from the supplied three-wire strands, and then crimped on a one connector. That's what they mean in the instructions that "The 2 blues can be connected together." 23. Now you have a blue and a green connector ready to plug into the T-Taps on the blue and green break wires. What would you do? I assumed the blue wire connector went to the blue wire T-Tap. That turns out to be wrong. The supplied blue wire connects to the T-Tap on the yellow brake wire, and the supplied green wire goes to the T-Tap on the blue brake wire. If you do it backwards (I did), all that happens is that the LEDs come on all the time with brake-strength. If you do it right, they LEDs come on with running-strength, and power up when you pull the brakes. 24. At this point, I completed the instructions for the left side. That means connecting the supplied red wire to the black/white LED lead. Oh, it also means cutting the LED leads to length, and stripping the wire. You also use a T-Tap to connect the black LED lead to the colored turn signal wire. The turn signals have a color wire and a black wire; tap the colored one coming from the correct side of the bike. Left LED lead goes to left colored wire, etc. At this point, I experienced my first real dissatisfaction. The skinny LED lead simply does not want to stay in the crimped connector. I used vise grips to crimp the snot out of it, but I know it will pull out. I plan to get a soldering iron and make sure the connection is solid. Luckily, all I have to do to access these flimsy connections is remove the license plate. 25. Plug in the leads onto the LEDs glued to the left turn signal lens, following the directions. 26. I turned on the bike and, GLORY!, I had a dazzlingly bright red LED running light! Try the turn signals. It works! Pull the brake handle. The LEDs get even brighter (if you connected the blue/green wires correctly; supplied blue=>yellow brake, supplied green=>blue brake). 27. Turned off the bike, stuff the leads into the housing, make sure the gasket is correct, and screw the lens cover back on. The entire left side is done. 28. Do the right side, trying not to grumble too much about the crimped connector. Plug in the leads, test it, and reassemble the lens. Note: while the leads on the right side clearly had a black and white stripe, down at the plug end I really couldn't tell which wire was which. When I tested the light, the LEDs did not come on. Simply switching the plugs made it work. 29. With the wiring all complete now, test it to make sure the functions are working. At this point, I realized the LEDs were burning at full brake-strength all the time. I switched wires. You can never do too much testing. 30. [if you did step 16] Put the brake cover back on. 31. Now put all the wires back into the nook behind the license plate. Reinstall the plate. I realize now that I should have cut the red/green/blue wire bundles, because there is a huge amount of wire trying to be jammed into the small nook. You have maybe 6" of wire when you need only a couple inches. The pre-stripped wire ends were simply too appealing, and I should have cut them. Now I have no spare connectors so I am kinda stuck. I'm going to a electronics/electrical parts store to see if maybe I can find some more connectors. I'll cut the wires when I solder the LED leads. 32. There is no step 32, because after step 31, you are done. Well, at this point you can take pictures and feel a bit of pride. You can also let me know if I screwed something up in these instructions. Sharing lessons-learned is one of the best parts of this site.
- 9 replies
-
- bulb
- led turn signal
-
(and 3 more)
Tagged with:
-
bike is stumbling at idle, dropping down in rpms, them back up. over and over. bike is warm. i replaced the plugs, relatively new wires, new to me tci. any ideas?
-
I am in the middle of changing out the side reflectors for LED's. Now the lights i bought from JPCycles.com came with two wires...a yellow and a black. I have read the other threads and I am curious about something... When i was messing with the wires on the bike, i discovered if i hook one of the wires to the running lights and the other to a turn signal, i get a running light that will flash when i hit the turn signal. Can someone explain why/if it would be bad for the electrical system if i hooked the wires up this way?
-
Bazooka MC-YAM-AMK Amplifier Kit is available from crutchfield and i wonder if anyone here has used this product? i like the idea that it will plug into the system without cutting any wires, however it is a bit $$$$$ pricey$$$ and looking for any info or product reviews thanx mike.
-
One of my harness customers found a video on YOU TUBE that recommended using the Hopkins-46255-Power-Taillight-Converter for connecting a 4 pin trailer harness to the 5 wire 2nd Gen Venture system, I reviewed the video and what info I could find on that converter and recommended that he purchase that unit as it should work. He has the Hoppy now but the color codes on his Hoppy do not match what the instruction sheet I found on line. I am sending him a harness in the morning, but I not able to help him determine which wires on the Hoppy connect to which wires on the harness. If the colors matched the instructions it would be easy, but his colors are different. Has any one else used the Hoppy 46255 on a 2nd Gen? Any help is appreciated.
-
It all started innocently enough. The aluminum crank case covers look bad, so I removed them to polish them up, while I was at sea. I removed the water pump cover, clutch cover, plus the small rear one on the left side (transmission?). I couldn’t get the large front one (stator?) off at the time. While I was waiting for the gaskets to come in, I worked on the large cover. When I finally removed it a small gear fell out. I was able to put it back, hope it isn’t supposed to be in a certain way. I went to remove the screws holding the wires to the cover but no luck. I have the right size screwdriver, but they won’t move. I stopped before I stripped the heads, but I think it won’t take much force before they are striped. What is the easiest way to get these screws out? I can’t get the cover to my workbench, as it is still attached to the bike by the wires. It is free to move around as I try to break the screws free. I tried hammering on the screwdriver while twisting, but was getting nowhere. Help I don't know where to go from here. Bill
-
For the most part, at anything above idle, my stock voltage gauge reads 14ish. Lately, it's been getting up there but it seemed a bit random. Tonight, I checked the wires leading to the R/R and man...did I ever get there just in time. One of the wires from the 3 prong plug had gotten so hot, it not only melted the plug, it heated up the connector enough to slide out of the crimp. One slight tug and it came completely free. I have been going over my bike and re-seating and greasing plugs as I come to them...I was planning on doing this anyway but damn...there was some serious puckering happening when I saw that bare wire. I pulled all the connectors out of the burned and melted plug, cleaned them up and plugged the wires together, without the plug, and insulating them. A quick startup showed the volts at around 14...right off of idle and steady as a rock no matter the load. Moral of the story; check those plugs. If you catch them in time, you may save yourself the time and effort of getting stranded and buying a new R/R.
-
I have nothing displaying on my cmu. Not even when turning ignition on, when it should go thru each item. It was working a month or two ago, but now nothing. Is there a common power wire for the display? The display lights up with the dash lights, but displays nothing else. While putting the bike back together, I did put a small gauge black ground wire on the positive battery terminal. (lesson learned: put down the tools when talking to your 8 year old daughter) The wire melted down, and i followed it to the main negative cable. It was in a factory crimp with a few other grounds. After that, I have had to run new wires on the taillights and brake lights on the positive side, not the ground. No fuses blew, and i don't see any other fried wires. Maybe some damaged wires that I can't see in the harness some where? Time for a harness? Coincidence? sun spots? UFO's?? :confused24:
-
last night i was having issues with not all cylinders running at the same time, i had no to low fire on a rear cylinder so i popped of the cap while running to see if the was any change in idle. and as soon as the cap cleared the plug i got some good zaps so it would seem my caps and wires are no good. where can i get the best replacement?
-
I'm going over my 87 Standard, trying to resolve this miss that the ol' gal acquired. While I'm at it, I'm changing the carb diaphragms, which has needed done for a while, small holes in the first two I changed out. (A much easier job than I thought it'd be) I got a set of replacement spark plug wires, and a set of used coils on the way just in case I need one. The coils don't seem easily accessible, and I'll need to get at them to replace the wires, and I'd like to check the coils themselves while I'm at it. Do I need to remove the entire fairing, or can I get at them by removing the battery or what? I'm sure if I do a search I'll find the checkout procedure for the coils, but if anyone knows the quick and dirty on that, please lemme know. I'll also take a look at the plug for the TCI that I've seen mentioned so much. Any info on not making more of a job of this than need be would be appreciated. Thanks.
-
hello everyone my trobles still contuines i replaced the stater cover gaskit leaking real bad went to start bike will not start i did not disconect the wires to anything any ideals what to ck i pulled a plug no spark bumble bee 1999 rsv
-
It appears I need a stator.. or I think I do. I changed the regulator for the new one and still no charge. When we test the stator with the bike running and the 3 white wires disconnected we get voltage across any combination of 18 to 40 or more AC depending on the RPM so we thought the stator was fine. BUT if we do a continuity test to ground each of the 3 wires are grounding to the bike which I believe they should not be doing.. So If I need a new stator (the one in is was a new one from Montreal 3 years ago) Which one should I get and from where. Skydoc is reluctant to sell me one of his because I have a Mk1 and apparently the cooling is not as efficient so it could burn out. Any ideas are welcome.. any solution would be helpful... Soon would be good as well due to it being riding season and my better half is already complaining. The bike left us stranded 500 Kms from home and it has NEVER failed us like this before. Actually had to trailer it home.. She groaned about that I'm sure Would really like to have a high output IF POSSIBLE..
-
I'm helping a friend with his 83 venture, not charging, at all. At the 3 white wires from the stator, I am getting between 9-11 volts on all white wires, however, when I measure from any white wire from the stator to grd, I am getting continuity. As I understand, there should be no continuity from the stator wires to grd. Also, I have tested the diodes in the rectifier, with a DVOM on the diode test position, and I have continuity in both directions, on all diodes except 2. Again, as I understand, there should only be continuity in one direction of a diode, so that fails the r/r as well. My question is, am I right in these conclusions, or am I missing something. Also, I think this is an aftermarket r/r. It has the 3 white wires, 2 black wires and 2 red wires. Also, there is no brown wire, which I read in previous posts, this is a voltage sense wire for the factory original r/r, not the aftermarkets. All comments will be appreciated, thanks.
- 6 replies
-
- continuity
- r/r
-
(and 3 more)
Tagged with:
-
2007 RSV, been mine nearly 3 weeks. All the lights worked for a while, I assume the rain might have affected something, about 1.5hrs in the rain, noticed a couple days later no passing lights, so maybe or maybe not related. The lights are good, all the fuses that are shown in the owners manual are good. I have a push button switch just left of the 12v acc. plug in the dash that I think may be for these lights, there is no toggle on the light housing like some Ive read about. I can see 2 red wires that arent in the harness going that direction, but I stopped before taking anything loose on the fairing. What is involved to look at this closer? anyone else have a setup like this?
-
I have a 91 venture royale 1300. The computerized monitor, fuel gauge, and clock along with the computer leveling air suspension system is blank and does not work. I am wondering if this is a computer problem? I have traced the wires on the leveling system and they seem to be ok. The only thing that is displayed on that is the PSI sign itself. Nothing else will show. The actual pressure of the front and rear will not display. I can not set the pressure or check the pressure with the automatic adjust on the monitor. It is separate from the cluster on the dash and that is why I am wondering if it is a computer problem? I did buy a instrument cluster on ebay, just in case mine was bad. I did not really think it was, but I got the cluster for 26 bucks and was told everything worked on it. I figured it was a good investment as I have seen them go for 100-800 bucks on ebay. As cheap as I got it for I figured it was worth it as it might come in handy some time. I am leaning towards it being a computer problem tho. Everything to do with a computer read on this bike does not work. Fuel gauge, clock, suspension psi etc. I have not gotten the cluster out yet to trace wires, but have on the leveling system. Everything else works on this bike. All electrical, gauges, lights etc. Anyone have any input on what I need to look for on trouble shooting the computer? Thanks in advance for any input. I intend on tracing the wires on the dash and repairing and fixing any wire or connections as I do, but I am thinking this is a computer problem as it effects other things related to the computer that is not in the cluster. I have this half way tore down tracing wires and it has been a nightmare so far....
-
My '83 Royale with cruise fried the plunger on the brake light switch. I mistakenly ordered the two wire switch, when,of course, I NEED the four wire switch. Given that the four wire switch is several times the cost of the two wire switch, is there some way to use the two wires for the brake light, and do something else with the other two wires to fool the cruise into working? Possibly tying them together to complete the circuit, or applying 12V to one or the other? Any help greatly appreciated!
-
Hi everyone New guy here. I have an '83 Venture Royale with factory cruise control. I need a new front brake light switch. The one I received from Yamaha has only two wires, while the existing one on the bike has 4 wires, and runs through a small block (resistor or capacitor?) before plugging into a four gang block in the headlight shell. The Yamaha dealer I spoke with couldn't find any reference to the different switch, or a part number for it. Anyone had this same problem??
-
I dont usually get stumped on the 1st gen....but I am on this one. This plug was located behind the left side inner/upper faring. It has 2 wires one black and one brown with faint white dash marks....any ideas on what it is
-
.thumb.jpg.176b2ebbe9863175975d94710375c414.jpg)
DA WORK! Blinking LED Side Markers
Cougar posted a topic in Royal Star Venture Tech Talk ('99 - '13)
Thanks to Bill aka Wanna he figured out and helped me set up the relay so that the side markers will also blink/flash , they also work with the emergancy as well. the wires hanging were for my test before I button it up right. enjoy. Jeff



.thumb.jpg.9dfefb49018580a1813c8128f131546e.jpg)


