Search the Community
Showing results for tags 'washer'.
-
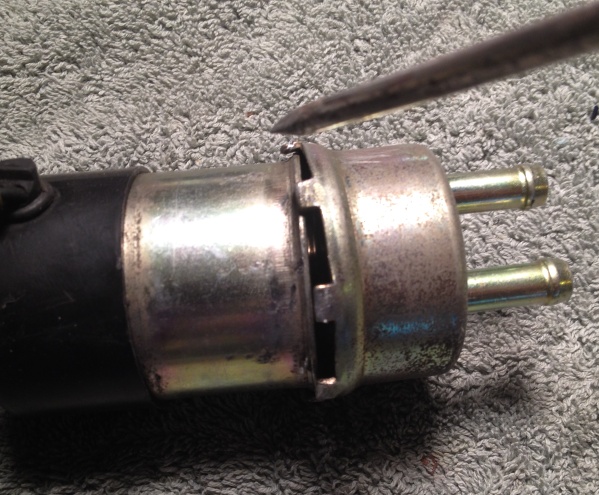
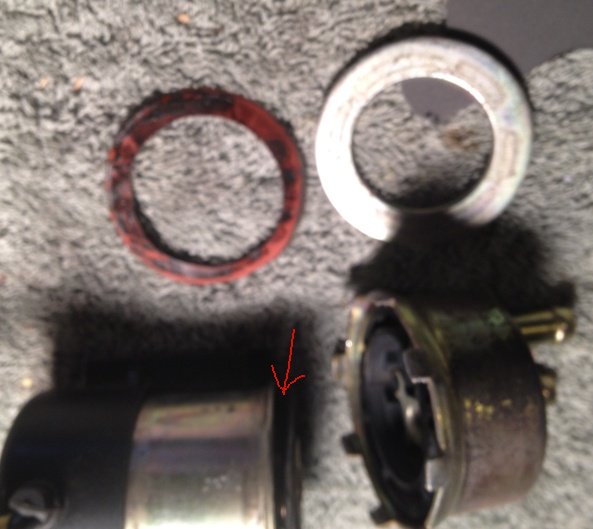
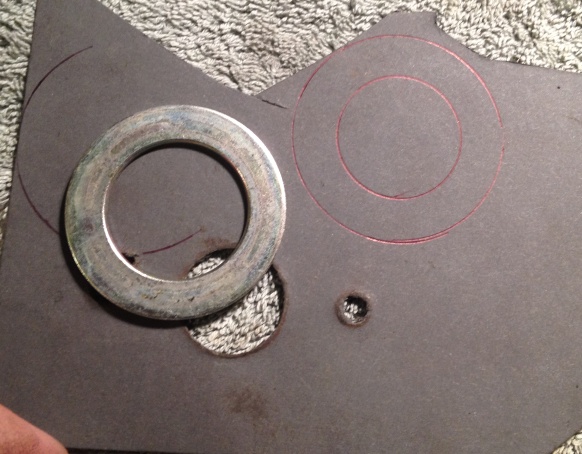
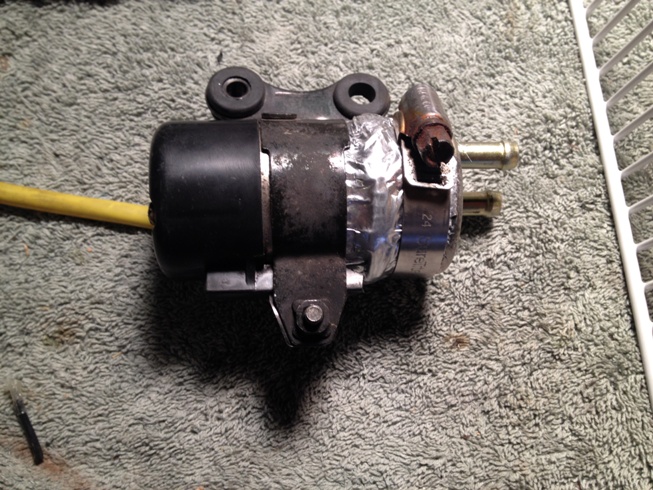
This will be kind of a long one, so read the first paragraph then you will see if you want to skip the first section on fuel pump rebuilding. The other two sections are not very long. If you want to read about gravity feed (fuel pump bypass) go to my next post in this thread. If you want to read about the Cheap Ebay Fuel Pump, go to my third post in this thread. Last week my RSV was leaking lots of fuel while I had it running to warm up for a ride so I had to abandon my ride and figure out what needed fixing. It turned out to be the fuel pump; it was leaking lots of fuel from the seam where the two halves come together. Apparently this is not a common failure and I could not find a diagram of the fuel pump exploded into component parts. It is only listed as a complete assembly, although you can replace the points if needed. New pumps cost approx. $200 for OEM so I began researching what my alternatives would be: Repair, replacement, or bypass Since I could not find a diagram of what’s in the pump, I decided to see if I could have a look for myself. Hopefully I would see something that can be tightened, patched, or replaced! Nothing to lose right? I removed the pump from the bike and took off the metal mounting clamp that secures the pump onto the bike. I wiped the pump clean and concluded that what holds it together are the little tabs that are bent over the middle seam. In this pic I have already pried them open to separate the two halves. (Now I wonder if the first thing I should have tried was to just hammer all the tabs down tighter!) The next pic shows the two halves apart, and a large washer and very thin gasket that were inside. The half on the left has a rubber diaphragm that is ‘pinned’ to the unit at its center, so the metal washer and gasket had to be pulled up from under the diaphragm by flexing the diaphragm through the hole in the washer. I hope I explained that well enough, because I don’t have a good picture of that. Anyway, the washer and gasket went where the red arrow points, with the flimsy little gasket going between the metal washer and the metal pump body. After looking things over, I decided it seemed that the most likely cause of the leak was the little gasket. Did I mention it was really thin, floppy, and flimsy? I tried to put it back together but couldn’t get the washer and gasket over the diaphragm again without distorting or wrinkling the gasket. It looked like it needed to be seated perfectly and in such a tight space, I wasn’t sure I had done it. (To shorten this part of the story up….it didn’t work. Gas still came out of the seam so I took it apart again, still pretty sure the gasket was the problem.) Next, I went to the local Napa and asked if they had thin, gas-proof gasket material, and showed the guy my pump. He went in back (they are an auto repair shop also) and came up with a partial sheet of 1/32 gasket material that he said should work, and gave it to me for free. I traced the washer on the gasket sheet and then cut it out with a razor. I reassembled the pump and hammered the tabs back down. I gently blew into the ‘inlet’ stem and it made kind of a honking noise, which I took as a good sign because no air was coming out of the seams as far as I could tell. I installed it and turned on the key. It made the usual clicks for a moment, then stopped once pressurized, and did not appear to be leaking. I started it and let it run for a few minutes and then turned it off. I felt around the pump and my fingers did not get gas on them. I let it sit for a while longer then felt it again and there was a very small drop on my finger from the underside of the pump. I pulled it out again and looked it over. I wiped it off and blew in it but still no obvious air leak and a good ‘honk’. Then looked at all the metal tabs and realized some of them could be tapped down a little tighter and more evenly. Doing this did seem to tighten things up and may have been good enough, but I decided to do one more thing. I have some metal HVAC tape so I wrapped the pump body with it twice around. I put the mounting clamp around the middle of the pump, which helps tighten the tape like a hose clamp would and put a hose clamp on the other side. See pic I went for a 30 mile test ride, stopping frequently to feel for gas on the pump, and so far it is working. I’ll leave that side cover off next time I ride so I can keep checking until I am satisfied it will hold.
-
just tore down my 88 venture forks to replace seals and it seems someone has replaced them with progressive springs because they do not have the stock look...nor do they have all of the yamaha parts after the top fork plug... when I disassembled the top for plug these springs did not have any spacer, washer or plug between the spring and top cap... Now I need some senior advice for what to do... Can I make a spacer and washer...the spring is just riding on the top plug...Thanks everyone in advance.
-
Hi, I decieded to grease my drive shaft splines and when i got it back together I see there is a gap between the caliper bracket and the washer I think I got the washer in the correct place but don't remember the gap being there ,is there suppose to be this gap ? Thanks
-
I just replaced the shift shaft seal over the weekend and it seemed to go well. I rode 40 miles to work today no problem. On the way home I needed to downshift for slowing traffic, and I could not push the shifter down to get into 4th gear. The only odd thing I noticed when putting the clutch basket assembly back together was that when I put the splined thrust washer on after the clutch basket, the place on the shaft where the thrust washer ends up has no splines. I thought that was strange, but I know I put the washer on in the correct order, after the basket but before the rest of the assembly. The clutch pull at the handlebar did seem not quite as firm tonight, but that could have been my imagination as I was looking for possible causes as I rode. Each time I could not downshift, I waited a few seconds and tried again and it worked. I upshifted with no problem. Any ideas?
-
Any recommendations on how to get a Trex Deck really clean. Currently I just use my pressure washer. It gets it clean ok, but there are still some dirt left behind. My Pressure Washer is rated at 3100 psi.
-
So I replaced my springs with progressives and this is what came out. None of the instructions referenced this piece. Maybe someone might want to referenced this in the Progressive instructions for new comers so it does not throw them like it did me. So when I removed the 17mm cap, picture 1 is what I saw. When I removed it as I pull picture 1 thing out the 4 inch spacer can along with it. After the 4 inch spacer then I pulled the flat washer with the collar. I pulled this thing of picture 1 off the 4 inch spacer. It came off kinda of hard but because the instructions/picture did not show it to discard I put it back in. Also because it had the O-ring I thought it was of some signifcant so I used it. Well I tryed to add the 1/2 inch ABS spacer and it was almost impossible to put the 17mm cap on. So I discard the ABS Spacer. This thing of picture 1 is about 1 inch in length with the flat washer. My 1st ride was pretty stiff. I removed this thing of picture 1 and replaced it with the 1/2 inch spacer with the washer collar. This morning I went a 2nd ride of the same course. Ride is still stiff, there might have been a very very slight improvement. This evening I'm going to remove the 1/2 ABS spacer, maybe I should also remove the washer too. Don't like the idea of the end of the spring butting up against the 17mm cap. At 173 lb, guess I'm a light weight. I sure hope the ride softens up some with no spacers. Oh I have a 91 VR. So for those who need to use a 1 inch spacer, rather than using 1 inch of ABS spacer you might consider the below. This is how I installed it for my 1st ride. Progressive Spring with the tight coil down 1st. Flat washer with the coller going inside the thing of picture 1. then the 17mm cap.
-
I changed my tires, and when putting the rear one back on, I forgot where one of the washers goes. On the right side, there is a washer that goes on one side of the brake mounting bracket or the other. Can someone tell me which side? This is a washer that goes on the rear axle, and it will either be up against the wheel on the right side, or between the swingarm and the brake mounting bracket. I put it up against the wheel, but is seems like there may be too much drag from the brake when I spin the wheel. Thanks for any help.
-
After replacing my tire on my '83 venture, i think i reinstalled my rear wheel incorrectly. If you are looking at the rear from behind, in which order should the washers go on? When i installed them in the order i thought they came off, the wheel would barely turn. Should there be a washer between the caliper bracket and the swing arm? At this time i do not have a washer between the swingarm and caliper bracket, but im afraid it may be wrong? It drives fine, but i want to be sure incase the brakepads are missalligned.
-
I'm putting my 89 back together and I've had a slight case of brain fade. I'm not sure how the "special washer" underneath the center cover of the left side cover goes. I'm pretty sure just from looking at it that it goes in the way I show in the attached picture. Is this correct or do I have it backwards?? I've got it in so that the raised lip on the center opening is 'out'. Frank
-
I am rebuilding a set of forks on my 83 Venture.I have a damaged fork tube(scratched).I bought a set off Ebay but the caliper mounts are different.My question is,can I use the tubes off the newer forks and the bottoms off the old forks?They look very simmilar.I am also planning on using all the parts from the new forks.When I took the tubes out I broke a piece off the washer on the inside of the one tube.It is the one that doesnt come out.90 percent of the washer is still there.Can I still use it?
- 4 replies
-
- fork
- rebuilding
-
(and 3 more)
Tagged with:
-
I'm going to help a friend intall his rear tire on his 1986 venture, and is there a proper way of install the washer/ spacers on the axle. Does anybody have photo or a diagram. thanks in advance
-
I have a simple pressure washer ?. It is related to using the soapy washer option. I thought that all one has to do is to fill a container with appropiate washer fluid and then put the little plastic tube with the nozzel in the container. Start up the pressure washer and when pressing the spray trigger the process will start to suck the washer fluid with the water. I also did make sure the adjustment at the plastic tube nozzel is open to suck up the soapy solution. Any suggestion ?
-

just to clarify a mind that's...
Guest posted a topic in Venture and Venture Royale Tech Talk ('83 - '93)
....full of other things at the moment... Does the oil filter go on the bolt BEFORE the spring and washer (pic 1) OR Does the spring and washer go on the bolt before the oil filter (pic 2) From what I'm viewing on the parts catalogue it looks like pic 2 should be correct but it's not absolutely clear, (to this mind at the moment) and I'm sure I've taken these parts off the bolt in BOTH configurations. And before a sharp eye notices...YES, I've got a new o-ring on the bolt...these pics are off the spare parts that are piling up too quickly around here. -
I just hate it when I have parts left over! So, I just finished repacking the steering head bearings and I'm putting everything back together and I find this 'extra' part. It's a rubber washer (of sorts) with such an odd configuration, you'd think it would be easy to figure where it belongs. I've gone through the manual and every other sort of resource I could find, but I still don't know where to put it. http://i112.photobucket.com/albums/n163/coy55boy/83%20Venture%20Royale/rubberwasher.jpg The inside diameter of the washer is the same as the outside diameter of the ring nut pictured here. But, I can't see any purpose for it when installed that way. The only other possibility I can come up with is that it goes under the bearing cover on top of the upper bearing. If that's the case, I'd like to get confirmation before I button everything up. P.S. '83 Royale (if that makes any difference)
-
After reading through some posts on the problems with the plastic thermostat top , here is my solution. I cut a support washer from a piece of 1/8 plate to fit around the housing. My old top was warped like most of them are and not mating flush with the base. After the washer was put on it is flush all the way around. I feel better about this now. Since I have the motor out its a good time to fix things like that.
-
was checking over my bike and noticed a drop of coolant on top of the rubber boot of clutch bleeder ... took off the fin (it seems tight before removing) and saw a drop of coolant at the rubber washer. the bike is an 07 RSTD, i have put on 21k miles. can i silicone a small washer on the tab on the inside of fin to place additional pressure on the rubber washer or should i replace the washer - if so do you lose enough coolant to warrant refilling the radiator?
-
I live in Fl so my washer and dryer are in my garage the other day I received a call from the sheriffs dept that water was coming out of my house, I got off work early and rushed home to find the hot water side of the washing machine hose split and sprayed water all throughout half the garage it tripped out the hot water heater and dryer plus all the outlets and had Sheetrock falling from the ceiling and walls. I was able to save the table saw and 1 router but lost my porter cable soft start router and dewalt cordless drill, so if you have a washer you do not shut the water off to I recommend buying the stainless braided hoses unless you want to spend money like me.
-
Yep...seat wobble and not front end wobble. Even though the seat is tightened up...I guess my fat A$$ still feels ever so slightly some movement and also some creaking. I am just wondering if anyone else has experienced this? Also...do you think a hard rubber washer between the seat and the mount would both TIGHTEN up the seat and also alleviate the creaking? Any other suggestions (besides losing weight). I weigh about 220lbs.
-
A few out of the dozens of water temp gauge installations have reported leakage at the adapter. I think we have found a cure. I sell the adapters with a 18mm crush washer. The problem occurs where the inside diameter of the washer meets the outside diameter of the adapter. There is a recess machined into the adapter which allows the washer to slide over to one side which will not seal. http://i672.photobucket.com/albums/vv87/dawarren77377/Bike%20shots/waterseal3.jpg?t=1263574491 To solve this issue place a 1/2" ID X 3/32" thick o'ring between the adapter and the crush washer. Make sure the tabs on the washer face away from the o'ring. With the o'ring in place against the washer, the tabs should still engage the threads. http://i672.photobucket.com/albums/vv87/dawarren77377/Bike%20shots/waterseal4.jpg?t=1263574679 http://i672.photobucket.com/albums/vv87/dawarren77377/Bike%20shots/waterseal5.jpg?t=1263574858 http://i672.photobucket.com/albums/vv87/dawarren77377/Bike%20shots/waterseal6.jpg?t=1263574887 The o'ring alone would work if the adapter had a groove machined in it to prevent the o'ring from squishing out (like the water jacket plug removed from the cylinder head). The washer holds the o'ring in place and the o'ring holds the washer centered. http://i672.photobucket.com/albums/vv87/dawarren77377/Bike%20shots/waterseal7.jpg?t=1263574917 The o'ring is available at most hardware/home improvement stores. The one I bought was a #35 o'ring, however all o'ring manufacturers may not use the same number. If anyone who has bought a kit from me needs either the crush washer or the o'ring, let me know. Also, I have received a request to announce what tools I use to remove the water jacket plug and install the adapter. Most use a standard 10mm "L" or Allen style wrench for removal. A 10mm hex bit/adapter to 3/8" drive works well for plug removal. You can put a breaker bar on the hex tool for leverage. I sawed one inch off of a 10mm "L" wrench which I can use a 10mm box wrench or a socket and ratchet. It is important to use a hex that is in good shape. If a rounded hex tool is used and the plugs is damaged, you have problems. I use a 7/8" or 22mm socket with ratchet to install the adapter. If I have a leak or need to tweak the adapter after it is installed, I use a tubing wrench. You don't have to buy an expensive tubing wrench. I bought a $3.00 combination wrench at a pawn shop and ground a 1/4" slot in the box end. This slides over the thermocouple tube easily. I also use a 5/8" (16mm) tubing wrench for the thermocouple nut. Cheers, Ponch
-
I need to know if this is correct. [ATTACH]43583[/ATTACH] [ATTACH]43584[/ATTACH] [ATTACH]43585[/ATTACH] [ATTACH]43586[/ATTACH] [ATTACH]43587[/ATTACH] The thrust washer that is behind the basket that holds all the friction disks , It goes on the splines and then drops onto the flat round part leaving space and wiggles around is this correct ? There are no splines after that and under the clutch basket it self. Just wanted to make sure. Thanks, Jeff
-
Can someone answer and help me with the PCW Clutch Kit Install. I started the job and where there is that wire that holds the metal plate and fiber disc a smaller OD type washer. In the very back it looks like just a smooth machined surface but also maybe a larger OD type washer. The instruction blew over into some old oil and can't read them. Help me from where I'm at please. Thanks
-
A lot of you folks seem to backyard mechanics like I used to be, so... My wifes 01 Nissan Altima's window washer thing is plugged. Someone told me a long time ago that you can't use a bread twisty to clean them anymore, nor a welding tip cleaner, because it will ruin them. So, how does one clean them? Or do I just have to replace it. The one on the passenger side works fine, so I know the pump, etc is okay. craigr
-
As ya'll know I did the "gauge conversion" last spring. After a summer of driving, I found recently that the "main fitting" (that M20-1.50 oil drain plug that replaces the stock plug in the side of the engine that we tap into) was leaking oil. I had used a nylon washer. When I removed it, I found that the threads were quite chewed up ... not stripped but more like "flattened". Like the sharp edge of the thread had been filed down. Any ideas about this? Are these threads not exactly the same as the plug that comes out of that hole? I'm concerned about re-using it now. There seems to still be sufficient thread depth to hold it in but .... to me, it should look normal after unscrewing it. Any thoughts/ideas/suggestions? I wonder if wherever I got the oil plug from that they gave me a wrong one...or is that even possible. What is better than a nylon washer? I'm thinking the washer somehow shrunk from compaction and heat to cause the leak because it was fine for most of the summer. I just noticed this recently after parking the bike for the winter.
-
Just put an e3 tire on the 86 and have been having fits getting the wheel back on. I get it back in the splines on the pumkin but do not have enough room after putting the caliper bracket or push rod back on to place the washer between it and the swingarm. Can't figure out what I am doing wrong. HELP PLEAE. AND THANKS.






.thumb.jpg.176b2ebbe9863175975d94710375c414.jpg)

