Search the Community
Showing results for tags 'trunk'.
-
Last Thursday we received a set of Larry's lateast production run arm rests and I must say Becky is extremely pleased!! I feel a lot better too knowing the armrests won't swing out while we are going around curves and turns which is much more noticible on a trike where we don't lean like 2 wheelers. Installation was a breeze! The hardest part of the operation was drilling holes in the passenger grab rails. I recommend drilling a pilot hole first to make it a tad easier. Our trunk was already installed in the second set of holes so that step didn't need to be done, but in our case I discovered my trunk was not aligned properly for some reason and the passenger controls were right in front of the up tube, whereas on the other side the up tube was quite a ways over from the same point, so I am suspecting either something did not get aligned properly with the trike conversion, or my left passenger grab rail was bent out, or the right bent in, or both! Anyways I ended up drilling new holes in the bottom of my trunk to move it even further back and over about a half inch or so. I would suspect that on a normal RSV this won't be a problem! So, I am highly recommending these to anyone in the market for a set of passenger arm rests. They are high quality and rugged, typical of anything Larry builds! One nice touch is the top of the arm rest is fabric insert with the sides leather. Very nice touch in hot weather so your arms aren't stuck to the leather after a long ride! BTW I now have a set of Diamond R armrests for sale now, $100 or B/O plus shipping...
-
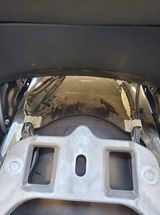
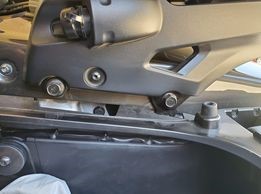
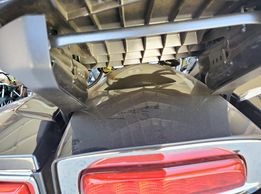
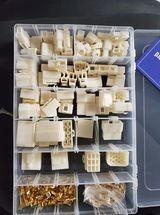
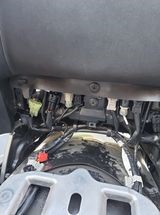
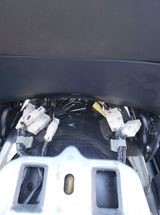
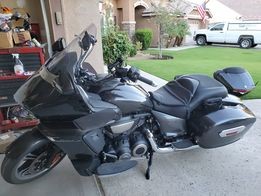
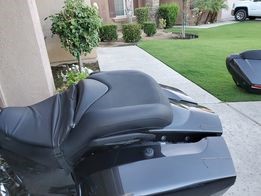
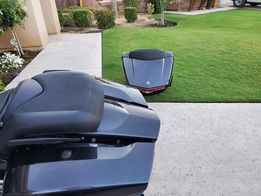
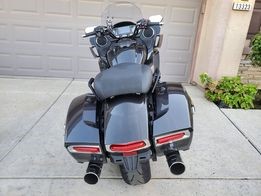
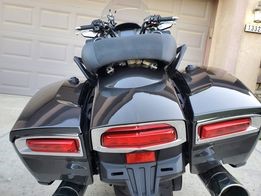
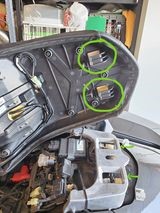
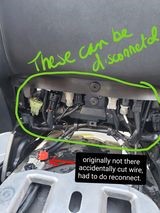
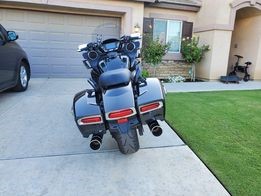
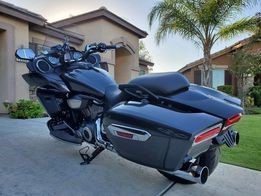
Tu Nguyen - @Tutor - has successfully removed the trunk of the '18 Venture to get the Eluder look. With his assistance and permission I pulled from his Facebook posts to create the post below. I also have this in a MS Word and .MHT file formats. I can also make this a PDF to share a little more easily. He deserves full credit for his efforts. Removing Venture Trunk for Eluder Look Tu Nguyen What started as a question asked by a few became a quest to complete. “Just curious if anyone have removed their trunk. How difficult was it?” I was looking at the mechanic manual and it looks like removing the seat to disconnect the connectors and then removing the 4 bolts that is holding the trunk bracket. I asked for any help, as it would be appreciative. Just trying to have an Eluder look for a bit. Well I did it. Trunk removal successful. Some said ‘nope, can’t do it, too many electronics and many other reasons why we shouldn’t undertake this task. Answering questions from some people on various forums and Facebook groups, I came to a process for completing this vision. From the various comments I answered questions that were brought up concerning parts used, wiring issues, and any error codes when the trunk is remove. So far no problems. ***Also read my reply of IF I COULD DO IT OVER*** Some Cautions that I didn't see: Just be careful when you take the trunk off, don not let it lean back and hit the fender. I don't remember doing it, but there are 2 small dents and scratches where the trunks would of lean back. The trunk is heavy and will definitely cause a dent if falls back to hit the fender. (I'm going to blame the dealership for the scratches and dents just so I feel betterfile:///C:/Users/bpate/AppData/Local/Temp/msohtmlclip1/01/clip_image001.png) ---------------------------------------------------- First, remove the seat and look under the trunk. These are the wires to the trunk. I believe that a quick connect would work. The whole trunk is held in place by the brackets. Left and right is the same. Two bolts per side holding the trunk bracket in place. The back view. Nothing is holding the trunk up beside the main bracket that requires removing 4 bolts. After I disconnected all the connectors, I fired it up and rode around just to make sure no trouble codes came up. No issues so I ordered wire harness connectors I shortened the original wiring harness so the connectors are hidden when disconnected. I used these parts. Each wire was cut in half and connecting a male and female connector to create a quick release. It wasn't bad, but very tedious. There were 31(it's 31 because antenna and CB have shield wires outside of the little wire that acts as ground wire, same as the USB cable) wires to cut. To reconnect male/female connectors it became a tedious 62-connector project, but it was worth the experiment and I love it. In addition, to make sure the wires don't come lose I soldered all the crimping points. I'm planning to get (I still need to research) electrical grease to put in the connector joints to prevent moisture and corrosion. Yes, when you remove the seat, it looks like there are 5 or 6 wire harness, but when you open up the wrapped up bundles, surprise, there are a load of wires I finished doing my quick wiring connects. I soldered all the wire connections so it will not come apart. It was definitely a tedious job. Took probably close to six hours to finish, but I finally did it. After completion, I sealed the ends with silicon so water cannot get in. Here are the results This seat does not cover the connectors. I have a 3M clear adhesive wrap right behind where all the connectors are. Now when I reconnect the trunk all the connectors will not be rubbing on the paint and scratching it. Disconnecting the trunk literally takes less than 30 minutes and 4 bolts is all it takes to remove the trunk. The next issue to address is the part that the Antenna mounts to on an Eluder. I think I want to get it so it can hide the gap between the rear fender and the saddlebags. It fits!!! Eluder seat L molding goes the opposite direction as the Venture seat. Venture L falls inside the hole of the mounting point. Eluder falls behind and slides forward. And yes all your connectors will fit under the mounting point. IF I COULD DO IT OVER: I don't think I would do the rewiring for the disconnect. Looking at the connectors. If you did not want to do a quick disconnects system, you can individually disconnect the connectors. I would take pictures, and maybe mark the connectors so they match and that way you can reroute the wire back together. There are just 9 or 10 connectors that can be removed quickly. In addition, you are not messing with cutting the wires and possibly voiding the warranty. The only wire set that needs to be rewire is the USB and even that if you don't to cut it you can pull it out, but that might be a pain in the butt. Everything else looks like it disconnects. If I remember right. Final Thoughts: The antenna is the only thing left to connect. But even though the connector is not hooked up to an antenna, I still get decent reception. You know how antenna works, I probably can run 2 wires to the connector and let it touch a metal part on the frame and the whole bike will probably act like an antenna. Haven't tried, but right now it gets decent reception. Plus all my music is on a thumb drive connected to the front USB. I use either my thumb drive or Bluetooth my phone over. Also I have radio tuner app on my phone to play pretty much whatever radio station I want. If I had a CB on mine, the only thing I see necessary would be to connect the CB antenna. Final, Final thoughts I timed it and put the trunk back on. It took me a total of 25 minutes. That is removing the Eluder seat, putting on the trunk (tightening the 4 bolts), reconnect the quick connectors, putting the Venture's seat back on, putting all the panels in place. 25 minutes. (If you didn't do the quick connects, add another 10 minutes to connect all the factory connectors back on.) Like I said in my before, I probably would not do the quick connects, just manually disconnect the connectors that's there. So removing the trunk and putting it back on is very do able. SIDE NOTE: Having another person to help put it back on will make it a lot easier. That person can lift and move the trunk in place so you can align the bolts. In addition, when tightening the rear bolts, when you think it's tight it's not. When it felt tight, I looked and there was probably another 1/8 of an inch from the bolt washer to the mount left to go to fully tightening it.
-
http://www.venturerider.org/spoiler/image002.jpg INSTALLATION INSTRUCTIONS Trunk Lid Spoiler w/ Light STR-4XY62-03-XX Royal Star Venture (XVZ1300TF) http://www.venturerider.org/spoiler/image004.jpg Please read and understand these instructions completely before installation to avoid injury to your self or damage to the motorcycle or accessory, Dealer: These instructions contain important information for future reference and must be given to the customer. 1.Parts List: Item Part Name Part Number Description Qty 1 Spoiler W/ Light Molded ABS 1 2 Wire Guide 24” rubber “D” extrusion 1 3 Screws Phillips head self tapping screws 3 4 Flat Washer Steel 3 5 Rubber Washer Rubber 3 6 Drill Guide Plastic Strip 4 7 Drill Template Paper 1 http://www.venturerider.org/spoiler/image006.jpg Fig 1 http://www.venturerider.org/spoiler/image008.jpg Fig 2 http://www.venturerider.org/spoiler/image010.jpg Fig 3 http://www.venturerider.org/spoiler/image012.jpg Fig 4 http://www.venturerider.org/spoiler/image014.jpg Fig 5 http://www.venturerider.org/spoiler/image016.jpg Fig 6 2. Preparation: a) Clean trunk lid thoroughly 3. Installation: a) Place spoiler upside down on workbench use a towel or soft cloth to protect paint. b) Center hole in drill guide with mounting stand off and attach to spoiler with a small piece of tape (fig. 1). Repeat for the remaining 2 mounting stand offs. Locate 4th drill guide under end of light with hole centered on spoiler (fig. 2). This will be used for wire routing. c) Mark the centerline of the lid with of masking tape using latch button as center (fig. 3). d) Center spoiler on trunk lid with back edge just above “Yamaha” logo approximately 2-1/4” from the bottom edge of the trunk lid (fig.4). Using a tape measure level the spoiler on trunk lid by measuring fro the bottom edge of the spoiler to the trunk lid edge at each end of the LED light. These measurements should be equal (fig.5). e) Using masking tape, tape the 4 drill guides to the trunk lid (fig 6). Double check location. f) Gently remove spoiler from trunk lid leaving drill guides in place on lid. g) Using 1/16” drill bit and drill guides carefully drill 4 pilot holes through the drill guides into the trunk lid. Remove drill guides and enlarge holes using 1/4” drill bit. Carefully debur holes. h) Feed the three light wires through the wire routing hole and attach spoiler to lid using self-tapping screws (#3), flat washer (#4) and rubber washer (#5). Tighten securely being careful not to overtighten. NOTE: DO NOT USE LOCKTITE ON MOUNTING HARDWARE. i) Remove passenger backrest, rider and passenger seats and set aside. Cut out drill template (#7) and tape it to the inside of the trunk lid as shown. Carefully drill pilot hole using 1/16” drill bit. Remove template and enlarge hole using 1/4” drill bit. Carefully debur hole. http://www.venturerider.org/spoiler/spoile1.gif Fig #7 j) using a piece of stiff wire (like welding rod) pull light wires through wire guide (#2). Clean inside of trunk lid using isopropyl alcohol. Remove backing from wire guide and adhere guide to inside of trunk lid along path to wire exit hole drilled in step J. k) Route wires through exit hole. Loosen face panel on front panel and carefully route wires behind panel. Tighten panel and replace passenger backrest. l) Dress wires along fender under seat to taillight/Turnsignal connector near battery box. Strip 3/8” from wire ends. m) Unplug the Taillight/Turnsignal Connector. The TRUNK SPOILER LIGHT WIRES will inserted into the “female” Taillight/Turnsignal Connector (fig 8) following the “wire color code below. http://www.venturerider.org/spoiler/image027.jpgRed Orange Black http://www.venturerider.org/spoiler/image025.gif Yellow Blue Black a) Reconnect Taillight/Turnsignal Connector being careful not to dislodge or “short” the wires to one another. Check operation of lights. b) Install seat. 4. Maintenance: Periodically check all fasteners for tightness and re-torque as required. 5. Care and Cleaning: See your Owners Manual 6. Customer Service: For further information see your Yamaha dealer. July 2003 PAK-4XY63-00-XX
-
Hello all, I've got a 2005 Venture but was seriously considering stripping it down to just the saddlebags and windshield cruiser look of the deluxe. Has anyone done this that has photos or insight? The removal of the front fairing and trunk looks difficult but I'm not sure. Cheers for your time! Nice to have found you guys! Robb Reno, NV, U.S.
-
Hello Fellow RSTD riders. I mounted a Wompus Rack and aftermarket trunk to my 05 RSTD last night. Installation was quite simple. I have not had time to ride yet and need my wife to pass judgement on the comfortability. I will let you know what my thoughts are in a day or so. Ride safe!!!
-
While dealing with a broken trunk mount http://www.venturerider.org/forum/showthread.php?123851-MKII-trunk-mount I came across another issue. A while back some one talked about the retainers that support the trunk when it's open not being even, of course mine were not. The right side had been bearing the load. This led to about a 3 inch crack right along the arm rest. To prevent any further stress on the trunk lid I just disconnected both sides and it rest on the seat when opened. I will not be using them anymore.
-
It was probably about a year ago that I picked up a used trunk spoiler. I think I'm going to finally install it and have a question for any of you that have added the Yamaha spoiler to your trunks. It came with rubber washers and flat washers. Does the rubber washer go on top of the trunk or do both go inside?
-
Would like to put a trunk on my 2008 RSTD. What kind and what size do you have?
-
Saw a 2005 RSMV listed for sale at a local dealer. Nothing special about the bike, few extras like passing lamps, trunk rack, etc. Listed price was $11,999.00 I sent an email wishing them luck!
-
I was reading some history about the RSV Millenium Edition. I understand that Yamaha built 1,500 of the 2000 Royal Star Venture Milleniums and 1,000 of them were shipped to the United States. It looks like they were the only Venture model that were a specifically numbered series. The Numbered Tag is on the trunk lid. So, how many of those 1,000 Ventures are still being used on the roads in the U.S.? What number do you have? MM #452
-
I started working to modify my 2006 RSTD to make it more comfy for my wife and to add a little more storage space for long trips. It is a work in progress but so far I've added a Venture trunk mount with grab bars, a third party Harley tour pack and a genuine Harley passenger backrest. I also found a vintage Harley trunk trim piece that I bought on a whim, for little of nothing but it worked out pretty good I think. I also added Harley hooded trim rings to my passing lamps. I've added a nice and loud Steibel air horn that has gotten folk's atttention on more than one occasion. I plan to add some lights to the trunk mount and get the trunk painted to match the bike. Once that's done I plan to start on a batwing fairing. The jury is still out on which one to go with, but I'm kind of a penny pincher and am considering the Stealth at USA trailers. I also added some Road King pipes that sound really sweet! I've got less than $100 in the slip ons, clamps and fabricated nount! Anyway, I thought that I would share my project with you guys and if any of you have suggestions on the fairing, feel free to send them along! PS. Please excuse my shop! I know it's a mess, but it is warm and dry!
-
Here's a few pics of my latest project. Whaddya think??
-
I've a different take to adding a trunk to the RSTD that I was wondering if anybody has tried..... I'd like to use the removeable backrest for the attachement point and fabricate/add a Venture Royal trunk frame to that to create a one piece set-up the would mount the trunk. This way when I don't want or need the trunk I could put the standard back rest in - obviously, I'd need to purchase an extra back rest unit but It would be worth it for the ease of change over. I've seen the trunck frames on ebay for about 200 and I figured a good welding shop could fabricate/join this to the back rest frame. My only concern is if the mounts where the slide-in std. backrest fits are strong enough for the additional weight of the trunk assemby.... Any ideas or experience trying to do this? Thanks!
-
While getting ready to go for a ride today I noticed that one of the braces that support the trunk bracket was broken at the weld. Has anyone had this happen to them? I have pulled everything and have the trunk bracket pulled and ready to go to the Yamaha shop tomorrow as they are closed today. I have attached a picture. This is a 2007 RSV
-
I know that there are other threads for adding lights. I will be using what I feel are the best of the ideas that I have found on this site and others. This is going onto my 88 Venture, (not a Royal) you may need to modify this procedure for your scoot. This project may last all winter as I acquire parts and install them. I will post pics but some buffoon left my camera on my desk at work. The first project is to illuminate the reflector that is on the trunk. I plan to make it a combination of running stop and turn lights. Step one is to figure out how to get the reflector off the trunk. It is mounted with 3 small screws from the inside of the trunk. Sounds easy huh, NOT!!! There is also a piece of double sided tape at each screw plus one more pirce at each outer tip. They used some REALLY strong tape. After a bunch of head scratching and a few failed methods what finally worked was to slide a sheet of .008 thick sheet steel up from the bottom and use the sharp corners to cut through the tape. This worked great and got it off with no damage to anything. Next getting the reflector off of the back. More head scratching to do.
-
NEIGHBOR'S 7 YEAR OLD KID WAS PLAYING IN MY MOTORCYCLE HOUSE AND PUT STUFF IN THE TRUNK OF MY 2006 RAV. HE MUSCLED THE LID SHUT AND NOW IT WON'T RAISE ALL THE WAY AND ONLY STAYS HALF WAY UP. I NOW LOCK THE BUILDING. HOW DO I GET THE THING BACK RIGHT?
-
For those that have the Hannigan conversion, Is it possible to move the top trunk back to the rear or second location to provide more passenger room? Mine looks to be mounted in the first or forward set of holes and looks like it will hit the small lip that is on the Hannigan kit just above the bottom trunk if the top trunk were to be moved back. pa_don
-
I wanted to ask if anyone has ever tried or considered modifying their RSV to make it like an RSTD? I am looking at a used RSV, which the owner has modified with a "quick remove" bracket system that lets the trunk come off. When I looked at it I had the thought of being able to almost turn it into an Tour Deluxe, but still have a back rest for a passenger. With the trunk taken off, does anyone know if it would be possible to outfit an RSV to accept the quick attach/remove sissy bar (with backrest) and luggage rack from a RSTD? (I don't know why, but for some reason that idea/possibility of being able to do that kinda cranks me up!) I would think the Yamaha parts would fit an RSV, but that's just an assumption, I don't really know.... Does anyone have any thoughts or suggestions?
-
I have 1986 Venutre Royale 28K on the clock. Tape deck sounds ok with stock speakers. Is there anyone upgraded the sound system on the 1st GENs. Please tell me what needs to be done. Maybe 12 in in the side saddle bags and the amp in the top center trunk. I would love to make a Rolling Thumpalounger..
-
I got an extra trunk for my '99 from the p.o. and I've got a question. Has anyone though of, or attempted to put speakers in the lower sides of the trunk? I've been trying to come up with a way to get some bigger speakers with a little more umph without putting them in the saddlebag lids, I'm thinking just behind the armrests. Haven't done any exact measurements yet, but I think I might be able to get a 6 1/4" in there. My Chevy Equinox has 6 1/4's w/seperate tweeters and I think that setup would give me about what I'm looking for, no window breaking bass, but just a little more thump. I'd probably lose about 4" on each side inside the trunk, but better there than in the bags. Been spending too much time at night thumbing thru Baggers Magazine I guess.
-
On an 85 trunk there are two rubber feet that fit in two holes in the mounting rack. This is an 85 only item.. Does anyone have a wrecked trunk from and 85 that I could get these "feet" from?
-
Hi, I'm looking to get back to riding after a several year hiatus. I'm looking at a 2003 Venture, and wanted to ask if I could impose on the great members and RSV experts here to tell me if it sounds like a reasonable deal? And I also had a few quick questions about the RSV itself... THE BIKE: It's a 2003 midnight, with custom "silver zoned" paint (see the pics), in seemingly pretty much "like new" condition, and the seller is the original owner. It's got 51K miles, almost all open road miles. It seems to be "loaded", including: a TON of chrome, what seems to be just about every add-on piece of billet chrome Yammy offers, polished/chromed wheels, chromed and polished forks, Khrome Werks pipes, Barons lowering kit, upgraded stereo speakers, Jensen stereo power amp, extra rear lights for brake/running/turn signal. He has also added some kind of modification kit to be able to remove the rear trunk (and has an additional "solo seat") and has installed a secondary antenna hidden in the fairing. (again, see the pics. One of the pics was taken before the custom paint job) I'm going to try to attach a couple of pics, 6 hopefully, and I hope I do this right!! Can anyone suggest anything I should check on or make sure of with a 2003 RSV? Would this bike for $8000 be a reasonable deal? QUESTIONS: Ok, so while I'm imposing on everyone...a few RSV questions: How expensive would it be to have the Barons lowering kit removed, and the bike returned to stock? How hard is it to do? I train with a few motor officers, am lucky enough to be allowed to join them on their obstacle course practice sessions, and I don't like the idea of giving up ground clearance. (I've been told that the Barons kit makes the RSV scrape a LOT easier.) I'm also 6'1", so I think the bike would fit me better without being lowered. Has anyone here modified their RSV to "quick remove" the trunk? Does the RSV handle differently without the trunk? With the trunk off, does anyone know if it would be possible to outfit an RSV to accept the quick attach/remove sissy bar (with backrest) and luggage rack from a RSTD? (I don't know why, but for some reason that idea/possibility of being able to do that kinda cranks me up!) Is it possible to outfit an RSV with the short, "stubby" antenna like a lot of Harley riders do with their Ultras? The 2 antenna on the trunk, I mean? If so, how well do they work? Thank you, all, for your patience...and a special thanks to anyone who might be willing to offer their thoughts! THANKS!!!!!
-
I bought this 2006 Midnight RSV and the previous owner said he never used the CB, I have read all the threads on CB issues, the problem is the CB will come on and I get a CBERR message and it shuts off after about 15 seconds, I've checked all the connections as described on the forum and I do get 12 volts at the connector at the CB unit uder the trunk. Any Ideas?
- 15 replies
-
- checked
- connections
-
(and 3 more)
Tagged with:
-
Wanting to put an RSV Trunk on my 2006 RSTD . Looking at a 99 venture trunk. Thinking it will fit? Will a 2nd gen oem trunk support fit the 99 RSV trunk and my 06 RSTD. The trunk I'm looking at will need a little repair and new paint to match my bike and is pretty expensive. I am aware of the aftermarket trunks and wompus rack, but just don't like the looks. If any one knows of a RSV Trunk for sale anywhere, I'd be interested.
-
I would like to move the trunk back on my 93 Royale trike and its not clear to me how to remove the trunk. I would appreciate it if someone could give me a few hints on where to start.









.thumb.jpg.a3fd2ee0db9ed17c3760fa894d684bdb.jpg)
