Search the Community
Showing results for tags 'tab'.
-
Would like to become a become a full member but have been unable find in the website where to go. The instructions tell me to go to my UserCP could anyone tell me where to find that tab Thanks
- 15 replies
-
- instructions
- membership
-
(and 3 more)
Tagged with:
-
I am currently using a tablet and the search window covers up my chat room tab. Am I the only one with this problem? I assume it is because of my tablet?
-
My bookmark is set to go to; http://www.venturerider.org/forum/ and it works as normal there for me, HOWEVER, when I am at the above location, clicking on the 'FORUM' tab opens the 'ARTICLES' page ( http://www.venturerider.org/forum/content/ ). Subsequent clicks on the 'FORUM' tab returns me to the 'ARTICLES' tab.
-
I need some help. I started off to work last week when my 1996 Royal Star Classic stuck in first gear and wound only shift to neutral and then back to first. I took the cover off and found one of the pins was missing. I have only owned the bike for 8 weeks. The bike has 39,000 on it but before this happened nothing gave me the indication any thing was wrong. It does appear someone has been in side the bike and doing the same thing. The tab was bent out and the pin was missing as already stated. I have some pictures if any one has an Idea where I should go from here it would be greatly appreciated. Thanks. New to the forum.
- 6 replies
-
- bike
- indication
-
(and 3 more)
Tagged with:
-
Today I picked up DenDen's 83 Standard. Some folks here know how well he took care of this bike. He wanted to part ways with the bike since he no longer rides so he made me a deal I couldn't refuse. There's some work to be done of course since it hasn't been on the road in about 4 years. maybe more, but that bike is sure in very good shape for a 29 year old. There's no broken plastic except for one tab on a side panel which should be easy to fix since the tab is there. Mechanically I'll need to fix a water leak somewhere below the radiator, rebuild the forks, & either rebuild the rear master cylinder or replace it, & replace a 8 year old battery. As far as I know at this point those are the things needing attention. Got a few extra parts he tossed in as well. I don't expect to put it on the road till spring so during the next few months & winter I'll be going over this bike bringing the old girl back to pristine condition once again. Larry
-
While working on a friend's bike the other day, he mentioned that the choke wouldn't stay on by itself. After doing some searching on here, I couldn't find an answer as to how to get it to stay on without simply standing there holding the choke knob out. So I decided that there might be others out there with the same problem. Here's the solution. If you lay down on the floor and look up at the choke knob, just behind it(towards the rear of the bike) there is a hex nut that is held in place by a flat thin locking tab. It looks like a very thin flat washer. See picture below. All you have to do is take is a flat blade screwdriver and straighten out the tab that is holding the nut in place. Then with the appropriate wrench or even a pair of plyers, tighten the nut just enough to start holding the choke linkages in place. This shouldn't take tightening but maybe one flat on the nut. Afterwards, bend the tab back over at any place it's most convenient. Now your choke should stay on until you push it back in. Don't over tighten or it will be hard to push back in.
-
Well I finally got to use "Plastex" When removing the front lower cowling to drain and reservice my anti-freeze, I broke off a tab... I ordered the Plastex The link is below if you are interested. It arrived yesterday. Read the instructions and watch a short video they sent with the kit, then dove in. It could not be easier. It is drying as I write. I have some touch up paint, so after it is all dry I am going to paint it over. The pictures below don't look too good, but you can see how the repair went. Like I said "it could not have been easier" http://plastex.net/
-
So I thought with this many people some of you may have an opinion on this. I've been looking to buy a tablet or eReader for my wife. At first I thought one of the new color ereaders would work but being in Canada it narrows it down to the Kobo Vox. The other choices I was looking at were true tablets. Now I have them narrowed down to the Samsung Galaxy Tab 10.1 or iPad 2 and now the Samsung Galaxy Tab 8.9. So which of these? or something else I have not seen? Any comments or thoughts? Sort of comes down to IOS vs Android..
-
Broke fairing open and ended up snapping one of the mount tabs on the chrome windshield trim - but it is the tab on the end with the screw hole in it. Saw the post for fixing the tabs on the inside part of the trim...Will that also work for the end tabs, or do I have to buy a new one? Appreciate any help I can get. MnM
-
When I got my RSV the previous owner had superglued the windshield chrome strip because he had broken off the end mounting tab that the screw goes thru. I poked around and ran across the Plastex kit. This is the first time I have ever used a glue type product and not made a mess. No glue on the fingers...no glue on the table...no glue on the stuff I wasn't trying to glue. I have no doubt that the tab is stronger than it was originally. The price for that part is around 140 bucks... the Plastex was 21 after shipping. I have enough left over to do this repair 100 times. Great product that works!! Frank
-
Ok on my 83 I have a few things I want to clean up for looks. One is on the right side cove. The tab on the tail of the fairing broke so the previous owner just duck taped it in place. I can fix the tab but how do I remove the tape remains without damaging the paint? The second is the windshield, it has like a mild fog to it. How can I get it nice and clear again? Or should I just get a new one? The third is the aluminum has a white oxidation, what do you recomend to remove this and protect it? Thank You, Shaun
-
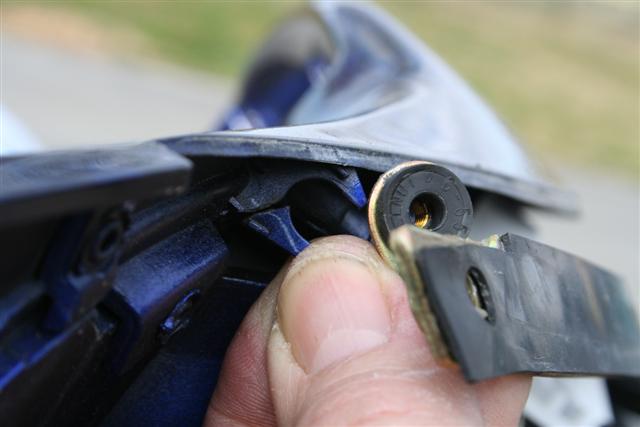
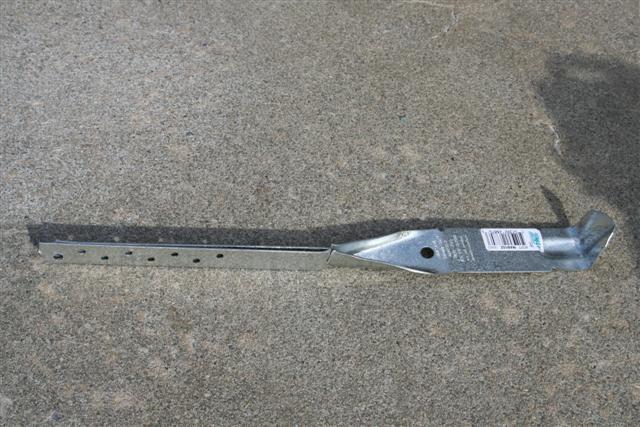
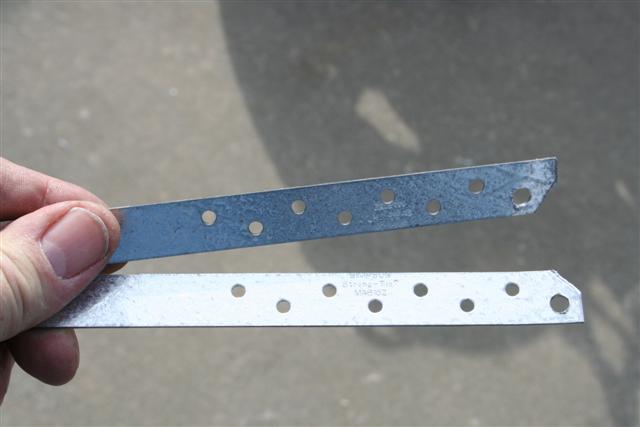
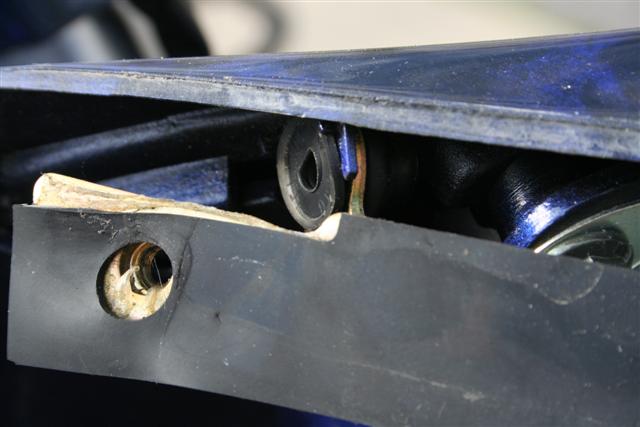
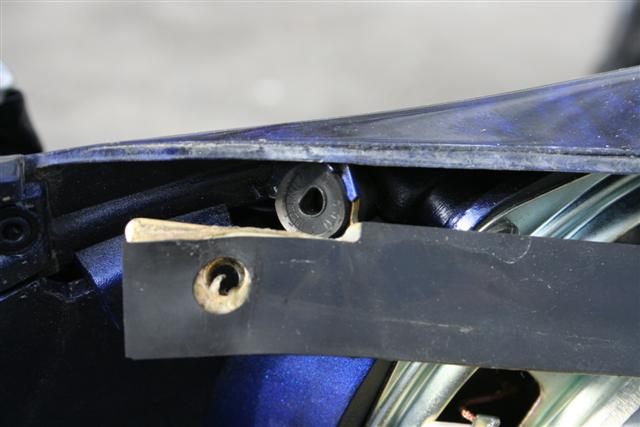
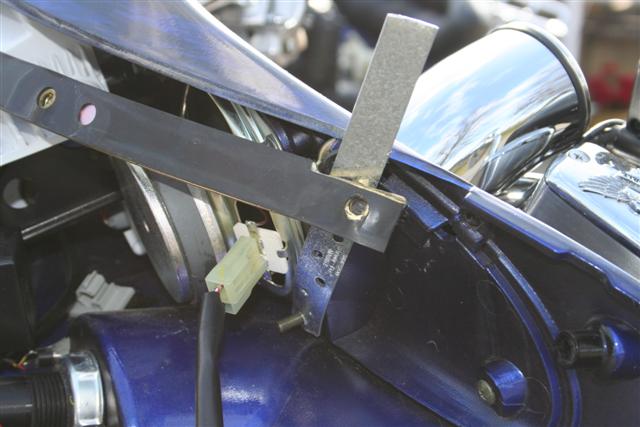
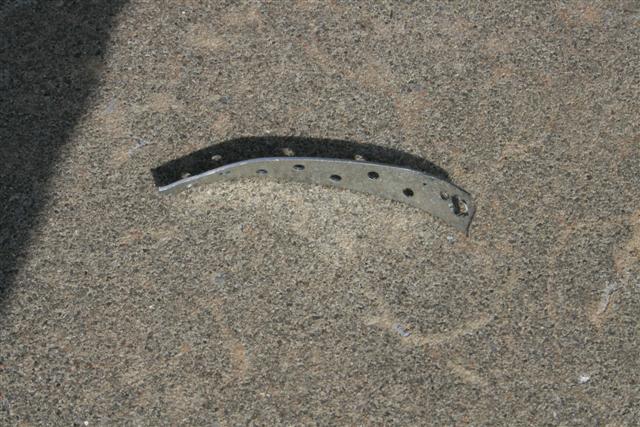
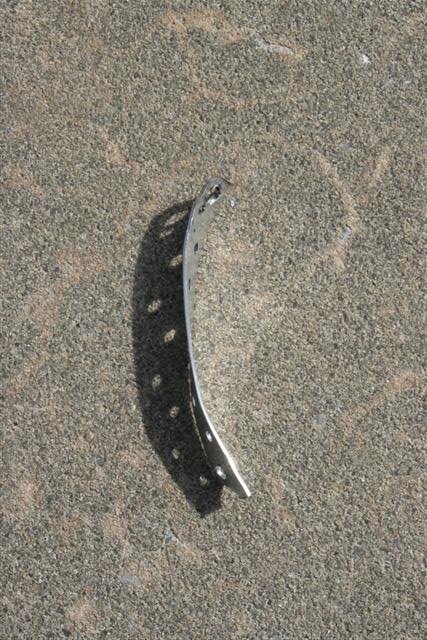
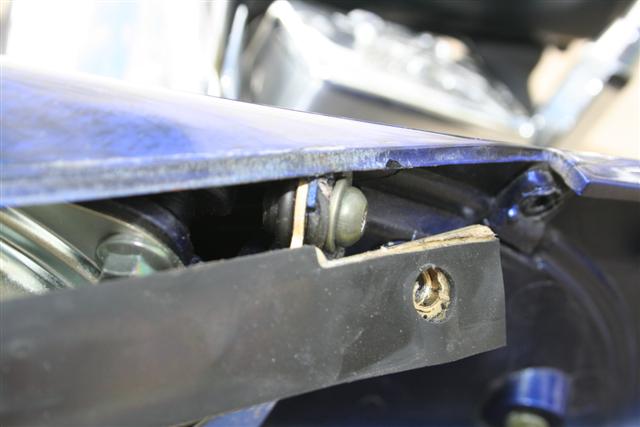
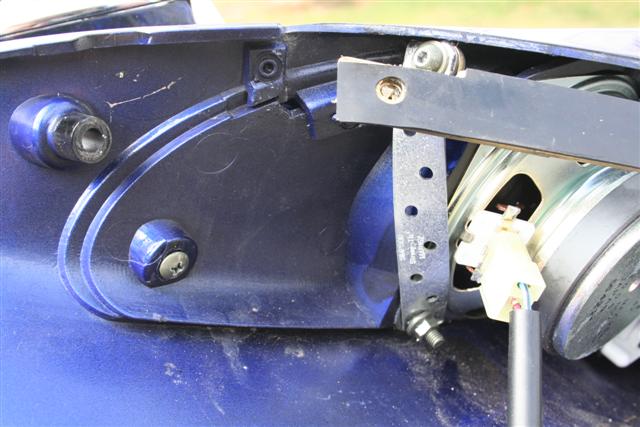
Trust me, if you have a 2nd Gen, you DO have broken tabs on the inner fairing where the ends of the windshield bracket SHOULD be attached! Even if your bike is quite new, they are broken. Here is a picture of what the tabs should look like - I'm holding the broken back piece to show how it would look if it was actually there: [ATTACH]15890[/ATTACH] I'm sure Yamahaha would replace the inner fairing under warranty for this, but frankly, I don't want them to rip my bike apart to do it when the new ones will just break in the first week anyway. The relatively easy solution is to make a brace that will run from the bottom screw on the speaker to the screw in the windshield bracket. When positioned correctly, this will clamp the windshield bracket against the tiny bit of the tab that remains and stop all motion. To start with, you will need a couple of metal straps - they cannot be too thick, but must be more sturdy than hardware tape. I found this bracket in the framing section of the hardware store and just cut the two pieces off: [ATTACH]15891[/ATTACH] [ATTACH]15892[/ATTACH] Put one end on the speaker screw and then cut the bracket to the exact length that will just fit under the top lip of the inner fairing. You will have to use a pair of pliers to twist and curve the strap to fit flush against the rubber grommet that holds the nut. The correct position for the windshield bracket is to have the metal piece behind the fairing tabs, and the front lip of the rubber grommet on the outside of the tab. Here are a couple of pictures of how it should be positioned: [ATTACH]15899[/ATTACH] [ATTACH]15898[/ATTACH] In other words, if the tab was still in one piece, it would slide over the groove in the rubber grommet on the outside of the metal windshield bracket. You will need to make sure the windshield bracket is properly positioned on the remaining piece of the tab before you can mark the correct position for the screw hole in the new brace. Here are pictures of the brace before I cut it to length, the finished brace before mounting, and then a couple of different shots of the brace all fastened in place. [ATTACH]15895[/ATTACH] [ATTACH]15893[/ATTACH] [ATTACH]15894[/ATTACH] [ATTACH]15897[/ATTACH] [ATTACH]15896[/ATTACH] Once you have those new braces in place they work like clamps and everything is rock solid.
-
The rubber grommet that the front tab on the false tank cover fits in on my '86 VR is in pretty bad shape. Anybody got any idea where I can find a new one? Every now and then the tab will back out of the grommet and I'll see the tank cover start to lift while I'm riding down the road. It causes a feeling that is somewhat less than comfortable. Thanks for the help.
-
I just wanted to relate and experience I had today. After our Church's service my wife and I went to Applebee's for lunch. When it came time for the bill the waitress came over with a business card which said "this one's on us". She told us a gentleman at another table picked up oour tab. It was a family with several kids and a grandmother along, never saw these people in our lives. When we thanked him and asked why, he stated to ahve a merry Christmas. Maybe there is hope for this world after all!!
- 14 replies
-
- grandmother
- hope
-
(and 3 more)
Tagged with:
-
I went to the Texas Loan Star Rally this saturday. What a sideshow! I loved it! One of the things I saw where these HD saddle bag guard pouches and bottle holders. http://i521.photobucket.com/albums/w337/Owen064/IMG_0465.jpg I have no room for a cup holder on the handlebars and I have been looking for an answer... http://i521.photobucket.com/albums/w337/Owen064/IMG_0488.jpg I knew they would be too long to fit the RSV but the price was right and there was no sign of 'HD' on it anywhere. I decided to us my degree in Fred-N-Barny engineering to make it fit. I picked up some snaps from the local hardware and using my Fred-N-Barny tools, I managed to come up with a nice addition to the bike. http://i521.photobucket.com/albums/w337/Owen064/IMG_0470.jpg http://i521.photobucket.com/albums/w337/Owen064/IMG_0473.jpg The top portion of the bag snapped right in place and fit fine. Note that these bags come in 'left or right side' versions. This is a 'right' side bag. http://i521.photobucket.com/albums/w337/Owen064/IMG_0471.jpg http://i521.photobucket.com/albums/w337/Owen064/IMG_0474.jpg I simply folded the lower tab over so it fit snugly and using a hollow punch I made the holes for the snaps. http://i521.photobucket.com/albums/w337/Owen064/IMG_0476.jpg After affixing the snaps I trimmed the tab for a better appearance. http://i521.photobucket.com/albums/w337/Owen064/IMG_0477.jpg Here you can also see where I removed 2 original snaps. http://i521.photobucket.com/albums/w337/Owen064/IMG_0478.jpg I am pleased with the results. http://i521.photobucket.com/albums/w337/Owen064/IMG_0480.jpg http://i521.photobucket.com/albums/w337/Owen064/IMG_0481.jpg http://i521.photobucket.com/albums/w337/Owen064/IMG_0483.jpg http://i521.photobucket.com/albums/w337/Owen064/IMG_0486.jpg http://i521.photobucket.com/albums/w337/Owen064/IMG_0487.jpg Now to find a 'left' with only one large pouch.
-
I've read on several occasions where someone mentioned a Yamaha marine supplier who generally had good prices on motorcycle parts....I've used the search tab but didn't see anything useful - anyone remember the name of that supplier or their web address.....thanks.
-
I broke the mounting tab under the gas cap door off so I need a new one. I would really like to find a black one so I don't have to paint it. If you have one let me know. Thanks.
-
The left air vent grill by the handlebars on my 87 Venture broke off and I want to put it back on, the tab broke off where the screw goes. What is the best glue that will hold the tab securely? thanks
-
Greetings everyone. I am a new member with an embarrassing problem. I just recently acquired a 1996 Tour Classic. As the weather here in British Columbia is a little inclement for riding just yet I am tearing it down and giving it a general once over. My problem is I cannot get the wiring harness connector to the speedometer to come apart. I have tried depressing the tab, prying it but cannot get it to release. I have had problems opening connectors in the past but have always figured them out but this one is making me nuts. If someone could let me in on the trick before I snap and get out the side cutters I would be very grateful. Jim
- 4 replies
-
- connectors
- figured
-
(and 3 more)
Tagged with:
-
Does any one know how I screwed up the pictures on Photobucket, this is the first time I've tried using it. My link looks like all the rest but my pictures don't show up until you hit the back to kawoodworth in the albums tab.
- 2 replies
-
- albums
- photobucket
-
(and 3 more)
Tagged with:
-
It used to be that when I clicked on it, it popped up a new, appropriately sized window. Now it opens in another tab, and is not appropriately sized. I haven't changed any settings that I know of. Can it be restored?
- 1 reply
-
- appropriately
- restored
-
(and 3 more)
Tagged with:
-
i recently pulled my carb diaphragms out. i noticed that the "bottom section", of the tubes, were pretty scratched up. the FIX, is to take the "tube" in one hand, press the diaphragm end into your other palm, twist the tube. this re-orients the "tab" in relation to the scratched tube! i do not believe the rubber coated part is actually "glued " to the insert and washer. i believe it is merely a close press fit. some one correct me, if i'm wrong, here. just jt:banana:
- 5 replies
-
- press
- re-orients
-
(and 3 more)
Tagged with:
-
Trust me, if you have a 2nd Gen, you DO have broken tabs on the inner fairing where the ends of the windshield bracket SHOULD be attached! Even if your bike is quite new, they are broken. Here is a picture of what the tabs should look like - I'm holding the broken back piece to show how it would look if it was actually there: I'm sure Yamahaha would replace the inner fairing under warranty for this, but frankly, I don't want them to rip my bike apart to do it when the new ones will just break in the first week anyway. The relatively easy solution is to make a brace that will run from the bottom screw on the speaker to the screw in the windshield bracket. When positioned correctly, this will clamp the windshield bracket against the tiny bit of the tab that remains and stop all motion. To start with, you will need a couple of metal straps - they cannot be too thick, but must be more sturdy than hardware tape. I found this bracket in the framing section of the hardware store and just cut the two pieces off: Put one end on the speaker screw and then cut the bracket to the exact length that will just fit under the top lip of the inner fairing. You will have to use a pair of pliers to twist and curve the strap to fit flush against the rubber grommet that holds the nut. The correct position for the windshield bracket is to have the metal piece behind the fairing tabs, and the front lip of the rubber grommet on the outside of the tab. Here are a couple of pictures of how it should be positioned: In other words, if the tab was still in one piece, it would slide over the groove in the rubber grommet on the outside of the metal windshield bracket. You will need to make sure the windshield bracket is properly positioned on the remaining piece of the tab before you can mark the correct position for the screw hole in the new brace. Here are pictures of the brace before I cut it to length, the finished brace before mounting, and then a couple of different shots of the brace all fastened in place. Once you have those new braces in place they work like clamps and everything is rock solid.
-
Just did a quick fix for my side panel on my 1989 Venture. Thought I would share in case others need the info. Forgive the first picture as it turned out just a little fuzzy, but it is a picture of the original tab. Picture 2 is the tab after the fix. Basically, the tab broke off right at the base, so I cut a little of the tip off, and drilled a hole straight through. Used a 1 inch 6x32 round headed screw with a washer and nut and loctite. Hope it helps someone.


