Search the Community
Showing results for tags 'relay'.
-
I have read the posts on turn signal issues but I am looking for flasher relay and not finding it. Left side upper fairing ?????? Any one, thanks in advance (1989)
-
My cruise won't set so I opened up my Clymer manual and it said to start by checking the continuity of the main switch and set/res buttons, they were fine. But next step is checking the cruise control relay and I can't find a 4 wire connector with the colors it says it should have! I've found the cruise control module but it doesn't have a 4 wire connector. Please help
-
My ignition switch is bad. Must be the second time because I have two keys, never knew I was only supposed to have one. I have seen much talk about adding a relay to take stress off the switch. I would like to put in the relay when I redo the switch. I am fairly handy, but the elecrical side of things is one of my glaring weaknesses. Is there a step by step post that shows how to do this? Any suggestions on where to get the switch? What type of relay to use? Can the switch be cleaned up and keep on using? Thanks, Ross
-
when I push the start button down the lights draw down and it blows the ignition fuse . The main wire going to ignition switch on side of bike gets very hot when key in on position. Any ideas ? I have replace the starter relay and the starter cut out relay Please help...
-
Hey, guys, the manual says to pull the R side faring to get to the relay, I don't see anything that looks like a relay. Can someone tell me where that crazy relay is located? When I push the starter button I hear a repeated clicking (solenoid ?), but starter doesn't do a thing. Battery tests out high side on green scale, after a 45 sec load test it is about 80% on green scale. :think: Monday I went into work early to run some erronds, first 2 times it started like NEW, then it just clicked once and nothing, 4th time I tried to start it, I had to push. Last 2 times it pulled the volt meter down to O, even without hitting the starter button, the meter stayed on O ?!?!?!?!?!?!?!?!?!? I don't get off work again until next Thursday so may not reply till weekend or Thurs. Thankx, Gary C
-
From a saved tech install article... unknown contributor who will probably announce him/herself... With all this talk about adding better horns to our ride I found these and mounted them to my ride in the stock location. Right side just forward and below the passenger foot. These are the one's I used from here: http://www.adventurersworkshop.com/Merchant2/merchant.mvc?Screen=PROD&Product_Code=STEBEL_COMPA CT_CHROME&Category_Code=Stebel_Air_Horns Included are a couple of pic's on how they look on the bike. For mounting the horn I used an "L" bracket Bolted to where the Grounding strap mounts onto the engine. and mounted the relay under the cover just beside the right foot of the passanger. I also have an easy wiring instructions. A. Pink horn wire goes to RELAY POST 85. B. Brown horn wire goes to Relay Post 86. C. Connect one end of a wire to Relay Post 30 and the other end to the Hot side,+, of the compressor D. Connect end of your 20 amp Fused line to Relay Post 87 and the other end to the Hot Post,+, of your Battery. E. Connect the negative,-, on compressor to ground or neg,-, post on battery By using your wiring instructions, does this disconnect the OEM horns? I like your set up and God only knows that the RSV horns leave a lot to be desired. If it is as easy as you say -- then even I can install this thing. http://www.adventurersworkshop.com/Merchant2/merchant.mvc?Screen=PROD&Product_Code=STEBEL_COMPACT_CHROME&Category_Code=Stebel_Air_Horns At 139dB these horns are extremely loud and provide that "rock concert" ringing in your ear if you are too close when it goes off. I've been told that it can be heard almost 3 city blocks away! YEEEOOOWWW! Dimensions The Compact Nautilus chrome horns are 4 3/4" tall, 2 3/4" wide, and 4 1/4" deep. Yes I only had to remove the OEM horn from it's place and then add the new horn where the old one was. The other horn under the faring is still there and still connected and working. As for wiring just follow those instructions and everything will work like it should. The plug on the OEM horn I just cut into 2, their was a small V shaped plastic piece holding the 2 wires together. Once the V piece is cut you can then plug them into the relay directly. I mounted the relay under the battery cover on the side.
-
2009 RSV. The previous owner replaced the self cancelling relay with one that does not cancel. I have the original, and would like to put it back in. I keep forgetting to cancel the turn signal myself. No answers last time I asked this, so maybe it is too stupid a question to bother with.
-
hi friends annie & alan bought my tow-behind trailer. as you know annie & alan are coming back to the good old U.S.A. they will need to have a trailer relay from my house to utadventure home where alan's bike is stored. they will then need the trailer to be in portland, oregon by july. i know this is a little early BUT i would like to add a bit more of a welcome back to our homes and lives. so i would like suggest when the trailer is in your neck of the woods. add something to it of yours, like a pin, decals, bumper stickers, patches, (now be nice), etc. i think there was a trailer relay for them last year. i'am open to any ideas. regards don c.
-
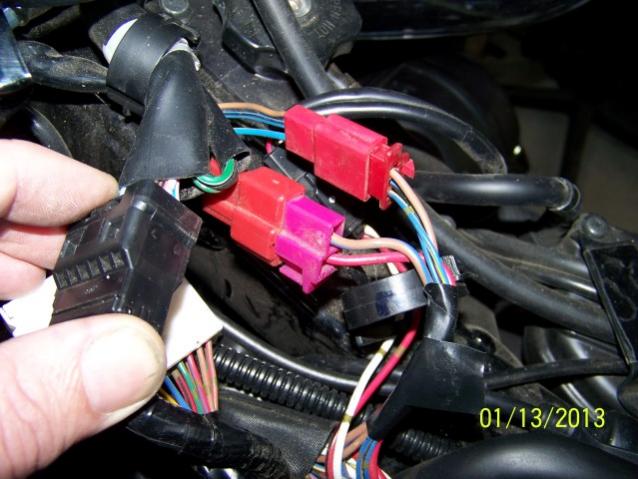
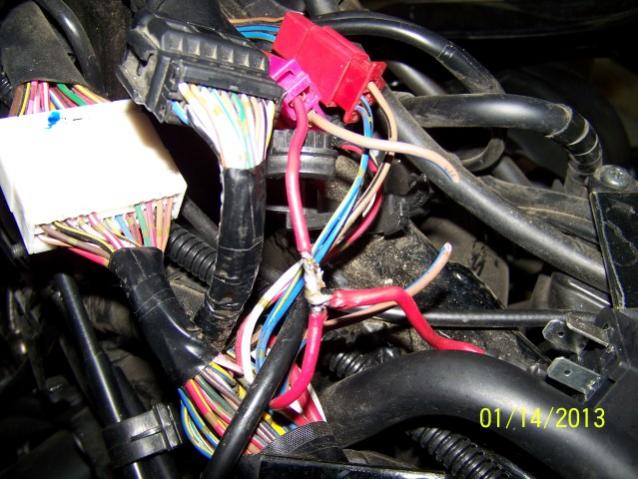
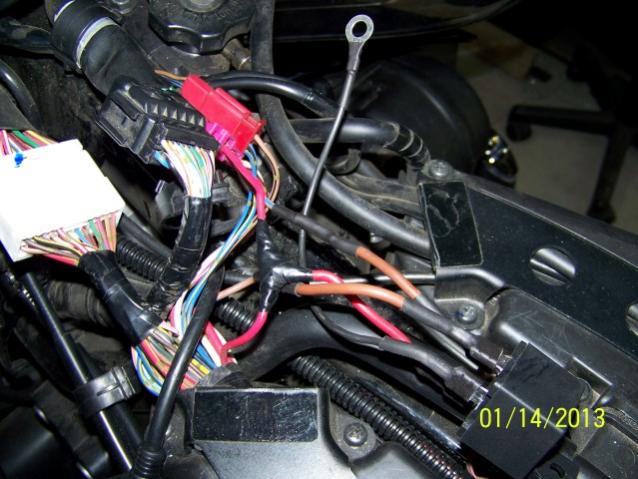
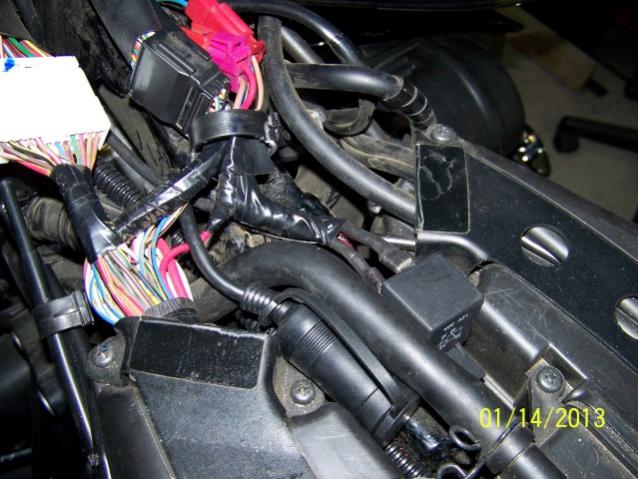
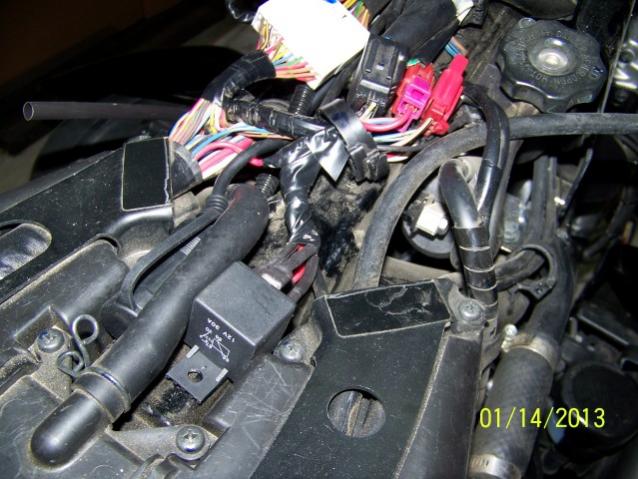
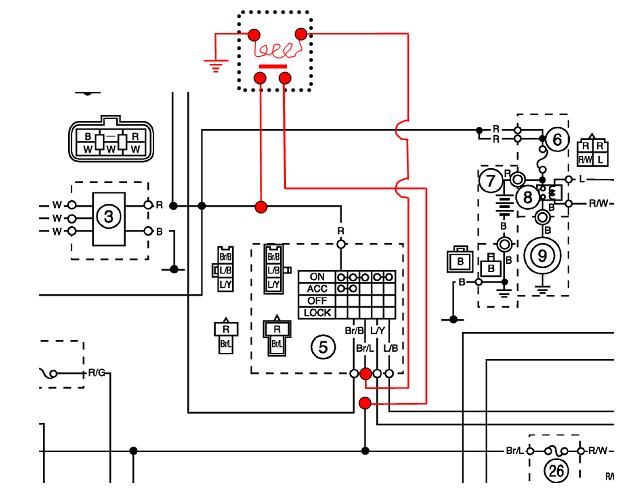
There's been several times members here have by passed their ignition switch due to either switch failures or as a preventive to ward off failures. Today I decided to also do that to my bike and at the same time do a write up on it per a recent posting on this topic. For those who wonder why this is needed or desired the ignition switch has the majority of the power going thru one wire to feed lights and ignition requirements. Needless to say the switches contacts take a beating over time caused by overheating & normal wear & tear. The accessory part of the switch seems to never have this type of failure so this does lend credence to overloading on the one line being feed. By adding in a common 30 amp auto relay to that part of the circuit we can take the majority of the power off the switch before it gets there and route it directly to the line the switch powers, thus saving the switch. You'll need a couple of short 14 gauge wires, push on terminals, shrink wrap, and a 30 amp auto relay to do the job plus a soldering gun and wire stripper. To start you need to remove the drivers seat and gas tank. The gas tank is held on with a single bolt on the end by the seat plus two allen head bolts on the sides up front. Remove the cover by the ignition/gas cap. Disconnect the overflow vent hose and the fuel sender wires. The tank can be lifted off and set down out of the way now. Disconnect the (-) negative cable from the battery as you'll have one wire live otherwise. On top of the engine locate the wire harness coming from the ignition switch. There will be two red plug connectors going through a holder. Pull those out. The one you'll be working on will be the 2 wire one with a pink plug on one end disconnect that plug. Picture 1 shows it well. The next step is to splice a wire to the red wire with 14 gauge leaving it long enough to work with. Refer to picture 2 Cut the brown /blue wire leaving enough at the plug side to work with. Add a short length to both ends of the cut wire. Using a butt connector, soldered, and covered with shrink tubing will give a solid connection as well as protection . Add a female spade terminal to both of those ends. Do the same for the red wire spliced earlier too. Cover with shrink tubing after soldering them. Make a ground wire with a eyelet end on one end and a female terminal on the other. See picture 3. I used the closest bolt holding the radiator fill cap in place to ground the eyelet. The opposite end will attach to the relay. Connect the wires to the relay follows: spliced Red wire fastens to #30 terminal of the relay the brown /blue wire from the switch attaches to #86 terminal on the relay the brown /blue wire going to the harness connects to#87 terminal on the relay the gounding wire attaches to the #85 terminal on the relay. Wrap the wires up with tape and tuck them back into the harness holder. Pics 4 & 5 show the completed job with the relay as tucked in on top of the engine. Note: While this mod will prolong the life of the switch a long time there's always the posibilty that the switch can still fail through normal wear. If it does you can simply connect together the red wire and the brown/blue wire on the harness side to get you home. Some folks take this a step further and add a toggle switch between the two wires. I don't think it's neccassary on newer bikes but if you're experincing any ignition troubles now then I would certainly see the advatage of adding a toggle switch where you can get to it without having to remove the tank.
-
Last week, I noticed that the dash-board turn signal indicator on my '05 RSTD was blinking awfully quickly. I remembered from cars I owned in the past that this might mean a burned out bulb doing something to the circuit (and might even be built into the system to alert the drive to a faulty bulb?). Sure enough, neither the REAR flashers or the rear running lights (same single element bulb) were not working . I checked both bulbs and they looked okay and passed a continuity test. The interesting part of this is that the FRONT turn signals still work. I assumed the turn signal relay, a DENSO 066500-4120 FB257H, might be bad but if so how could the front signals and running lights still be working? So my question to you all is this; does the fact that the front flashers/running lights still work mean that the relay is okay and that the problem with the rear lights must be something else? Perhaps a lose connection elsewhere? Photo of the relay is attached. Thanks for any collective wisdom.
-
87 vr. My cruise control isn't working. Does anyone know the probable cause? When I turn it on, the 'set' and 'resume' lights turn on for about 3 seconds then back off. The 'on' light never turns on. I then turn it off and back on, same thing. I can here the relay clicking.
-
I have rear running lights which are wired directly to the ACC fuse block thru an illuminated switch. (switch lights when rear lights are on) What I want to accomplish is to add a relay feeding this switch and a 2nd switch for my front running lights. I already have the 2nd illuminated switch mounted on the dash.....now I just need to know how to wire it up! I have this wiring diagram for relays (see attachement) but CAN or should I run 2 switches off one relay? and how would I do it?
- 12 replies
-
- 2nd
- illuminated
-
(and 3 more)
Tagged with:
-
Just found a neat ccmbo horn and modulator. The banshee air horn is loud, the relay modulates your head light, and it also let,s you keep the stock horn in play for a friendly "beep beep" at the neighbor. The required relay is optional. The horn can be wired normally. You can choose not to modulate the headlight and the air horn has selectable 1/4 or 1/2 second delay between the beep or the blast. Going to own one as soon as I have a spare $100.
-
Where is the dang thing? The schematic in the book says it has 3 wires, Br, Br/W, and Y/G. But I don't see it. I switch to LED's and want to put in an electronic turn signal relay. Thanks, Bill
- 2 replies
-
- bill
- electronic
-
(and 3 more)
Tagged with:
-
I have to adjust the cable until I hear the relay click, then I can start it. Sometimes it will even have issues immediately if it dies suddenly after starting. I have to go back and do it again. I was having issues getting it started the other day. Not sure if I couldn't hear the click since the battery was low, maybe not enough voltage for the relay. Hoping that's the only issue. But I would like to ride it again. Planning on taking the trip down to Yellowstone before I move. Pretty much the whole reason I bought it, plus I only paid $1000.
-
Did somebody knows where the flashlight relay is located on the Venture 2nd Gen? I don't know if it is below the front fairing or below the side covers? Thanks in advance for any help.
- 2 replies
-
- 2nd
- flashlight
-
(and 3 more)
Tagged with:
-
I'm new to the forum and new to Yamaha as well, and recently acquired an '89 XVZ1300 with 18K miles. Have an issue with an intermittent electrical problem, and would like some experienced opinions regarding likely causes. Initially when I tried to start it I got no response from the start button, yet all lights appeared to function, so I figured either the start button or relay. I jumped the positive battery terminal to the starter side of the relay and she fired right up, confirming the likelyhood of the start button being the culprit. However, as I was pulling away (on a very bumpy gravel drieway) I hit a bump and the dash and headlight went out, bike still running. It was late at night, and I wasn't home, so I turned it around and headed back up the very bumpy driveway. I shut it down, turned the key off and back on, and tried the start button, but no response and no lights (bypassing the solenoid still worked though). At the time I had only an owners manual for a 1200 (have since downloaded the service manual from this website, thank you very much) and noted the grounds for all the accessory lights in question are tied together to one grounding point. I removed several body panels and started rooting around looking for bad connections etceterra. Traced the ground to inside the left upper fairing, and it looked fine. In fact, all of the wiring connections looked pretty clean. This 23 year old machine must have spent most of its mostly dormant life indoors. Anyway, after rooting around and not finding anything out of the ordinary (begging a ride home, getting some sleep and returning with some tools) I tried to start it again and it fired right up, but still no lights. I took the start button apart and it looked fine. I rechecked the wiring harness, fuses, etcetera and found only a couple of clues. First, the fuse for the tail light was hot as hell (and has since melted), which seems to me must be a separate issue, probably a bad ground somewhere on the way to the tail, although I couldn't find anything. Second, I noted a constant low current to the starter relay switch. Unfortunately all I had at the time is a test light (very dim light when voltage detected, not enough to throw the switch), and I haven't had an opportunity to get back into it to check it. Now I figured I better get her home to work in the comfort of my garage, so I put it back together, and pressed start. To my surprise it fired right up, all accessories and lights working. In addition, on the way home I received another clue. The lights and accessories were intermittenly shutting on and off, which seemed to coincide with progressively smaller bumps in the road. I'll give the start button a more thorough examination, which may be the cause of the contant current to the starter relay switch. I'll also try to chase down what I feel is probably a faulty ground in the tail light wiring. I'm thinking possibly the ignition switch. Otherwise I was hoping someone with more experience with these machines might recognize the symptoms and point me in the right direction.
-
Ok So it was not a riding day yesterday so I decided To Adjust my Passing Lights. I had one adjusted last night and and gave up on the second. I went back at the second this AM and got it close enough and when I went to Secure everything.....nothing....no lights! After removing the fairing I checked the fuse I put in the power line by the battery and it was blowen.......Off I go to get a fuse thinking that was my problem. I put in a new fuse and I have power as far as the replay But nothing coming out of it. When I was adjusting the lights I would always have the key off when putting the lamp back in the holder so I didn't short it out that way. And the only movement was moving the lamp housing for adjustment and the darn signal lights turning a little. I have power to the relay #30 & #86 but nothing at #87. "I have no clue about wiring" just checking the basics! Does it sound like a relay issue? The new fuse did not blow? Any Idea Electrical Wizards Out There !!!!! Thanks Keith
-
Need advice to repair or a replacement source for the 'lead switch assembly' in the rear brake reservoir. First time working on a brake issue on this bike so I'll elaborate as best as can with what I've found so far. Inside the reservoir, this assembly has a hollow plastic post with a C clip stopper on the top. The C clip prevents the float from slipping off the post. The float moves freely and stays at the top when fluid is topped up. It appears this float has a magnet attached to the inside circumference of itself that should keep the relay inside the post operated (N/C) for continuity back to the CM. ( I compared this with the front reservoir which works properly. Measured 0 ohm short) With the assembly removed and a meter across the two leads, the float in place and tapping the post with finger a few dozen times, the meter shows intermittent to no continuity. Likely corroded or dirty relay contacts? Is it possible to remove the relay from inside the post without destroying the two wires? I got the rubber/grout collar off but couldn't get the relay loose to pull it out. Could only find this OEM assembly part on-line as discontinued. Everything is reassembled and mechanically works at this point, but the two leads towards the CM are temporarily bridged to keep warning light extinguished. Any help would be appreciated, thanks in advance. (what a better way to spend half of the long week-end eh)
-
was riding, lost turn signals. sudden drop in voltage, limped home. now it want start. help!! i heard about some relay......is this it? where is it? whats the part number? who has one??
-
All, I installed a new set of driving lighhts on my 85 and have been told I should have used a relay, Where could I find the correct relay and am looking for ideas of where to mount one if I need one. Thanks





.thumb.jpg.9dfefb49018580a1813c8128f131546e.jpg)