Search the Community
Showing results for tags 'radiator'.
-
Hi all new member and new RSV owner. Picked up an 04 with 6000 miles on it, looks great, carbs were a bit dirty and pissing gas at first. After a few cleaning attempts they opened up and the thing drove great for about 700 miles. Yesterday I started bogging down after I push it up a bit at highway speed. I lose power, stop riding, wait a few minutes then it starts again pretty fine, except it's backfiring out of the right pipe only when I rev it a bit. This leads me to believe that one of the carbs is flooding when I open up on the highway. This is a bike that sat for about 10 years unused, so I can get if something was making it's way through the fuel system. Would the ignition cables have gotten old from sitting and maybe one of them stop firing at speed all of a sudden? My next consideration is that it's all getting pretty hot. I'm not seeing any warning light, and I wouldn't be getting paranoid if I didn't notice how low the coolant was in it after buying. I topped it up with mixable coolant, but it made me realize, I've never heard a radiator fan on this thing. I've only ever had one other liquid cooled bike and that blower came on as soon as I turned the ignition key. I think I read somewhere that this one only kicks in when a sensor tells it that it's hot enough, but even after riding an hour I pull into a gas station and cut the engine, there's no blower running. Is there a chance my cooling system / warning light is not working and the whole thing is just overheating? Currently stuck in a small town on the Wisconsin/Illinois border so any insight is much appreciated. I'll probably have the tank off today in my motel parking lot but any tips or thoughts of something to look for would be a huge help, thanks! - Jesse
-
The temp has been 102 the last couple days. I've got a 45 min commute to work (mostly interstate). The last 2 days, when I pull up in the parking lot, I can smell antifreeze. These are the times when I wish I could see the engine temp like I could on my last 5 motorcycles. The bike is not leaking any coolant that I can see. It's not smoking. I don't feel any change in performance. Is there any way I can find out if the motor is running too hot? What would y'all do if you smelled antifreeze after a long, hot ride??
- 6 replies
-
- antifreeze
- coolant
-
(and 3 more)
Tagged with:
-
I was thinking there was an after market radiator cap avail for the 1st gens. I did a search and did not come up with anything. It seems like it was a for a Geo or something like that. Any suggestions? RandyA
-
Has anyone used an aftermarket radiator fan that is more efficient; flows more air, etc? Any recommendations? Thanks, Richard in AZ 1988 VR
- 7 replies
-
- aftermarket
- fan
-
(and 3 more)
Tagged with:
-
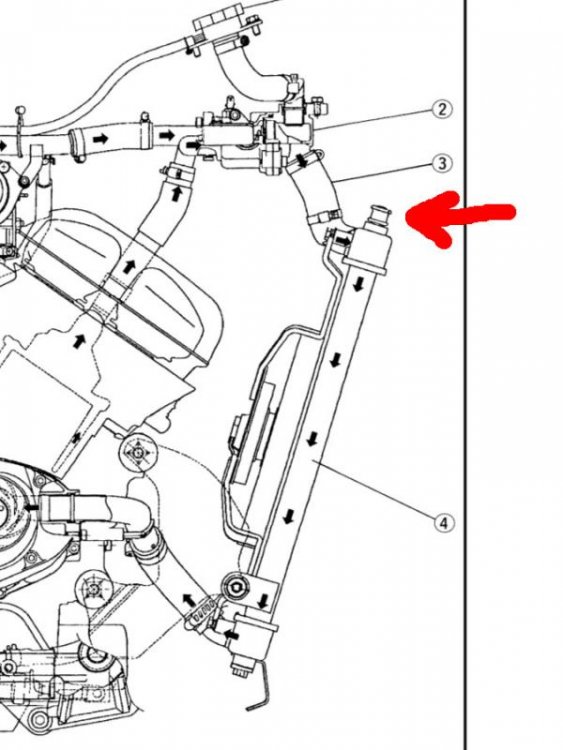
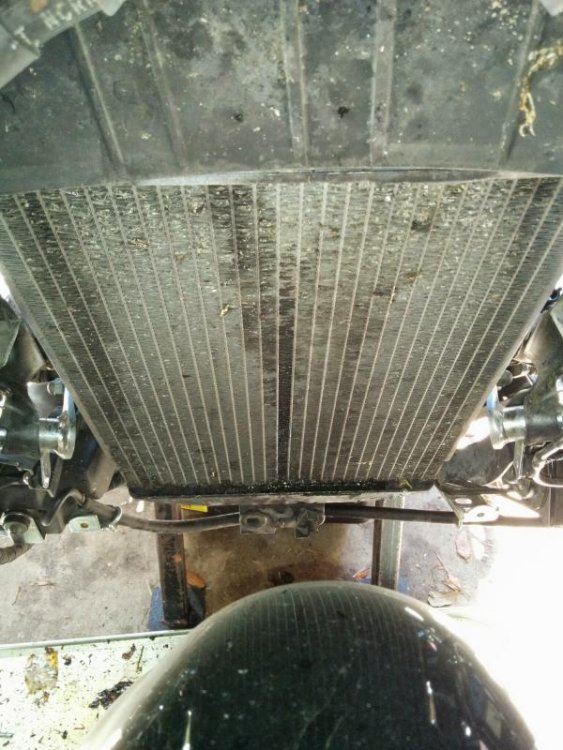
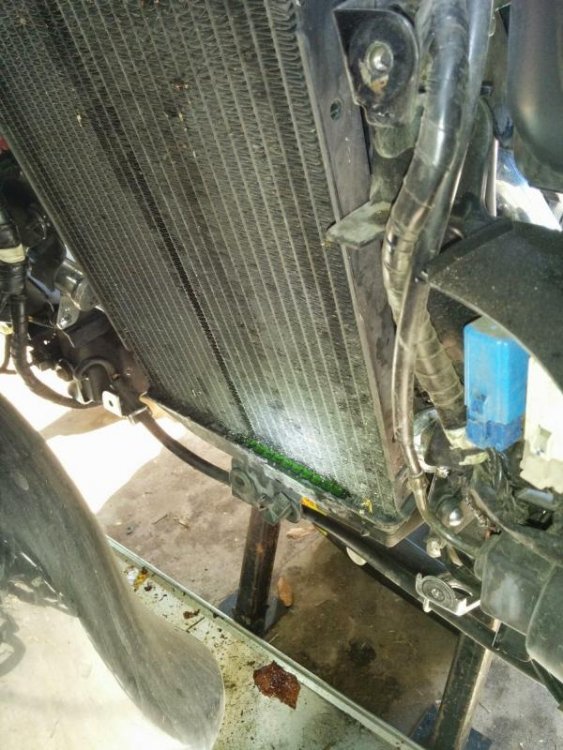
Along with a mysterious oil drip, my 2006 RSTD now features a coolant leak. I doubt it is the radiator, but that's where the leak manifests. There looks like a in front trickle, and I've seen fluid on that stem thing on the top. The trickle seems to come from the stem thing. (See photos) I've looked for visible wetness up top, but can't see any from the sides. I do see "steam" coming from low down... could that condense up top? Before I tear into that front end mess, does this ring a bell with someone? Dave
-
Hi everybody, Just installed my new custom radiator cover by one of our own fine meber venders,[steve Wagner]. If you dont have one of these on your RSV, you have to check it out. Best money I have spent to date on making my 99 look better. Always hated that bare old radiator look. This custom fab fiberglass paintrd to match is awsome. Installs in seconds and looks super expensive.
-
I've had my 1990 Venture about 1/2 a year and put about 5000 miles on so far, no major trouble. However, a few days ago I took a 60 mile trip up I-25 to Denver, 95+ degree heat and 85+ mph most of the way. When The interstate traffic slowed considerably I exited and took city streets the last 10-20 miles. The temp gauge was very close to the red zone for most of the city streets, and was just a little cooler when hammering down the highway. After a few hours I left Denver the temps were cooler, I rode a little slower and the temps were normal and cycle run fine. It has 32,000 miles and coolant level is at the full mark. I beleive the engine fan works. Fuel milage that trip was 37mpg. So, Are these engine temperture extremes normal? Should I be concerned? How do these cycles run in 110 degree weather? (I'll be moving to South CA desert in a few months). Should I look into some service or maintenance work? later, Roy
-
I was wondering how often this should be done and is there a how to on here. I serched but couldn't find one. My bike has three years and 32k on it. Thanks
-
It appears that Wagner is temp on hold until Sept 1, for taking more orders on his Radiator Grill covers. They look great, but can't order one right now. I am NOT into chrome, but want to protect my radiator, so...I made one myself today, and it cost me less than $ 13.00, including tax. Okay, this thread is no good without pictures. Yes, I know that. My question is...other than the Wagner Grill cover, and the chrome one from Diamond, are there any other radiator grill covers out there already available for the Venture/RSTD ??? I am happy with the one I made, but want to check out others. Secondly, does anyone already make a Belly Pan for the Venture/RSTD ??? I was so used to having one on each of my last 5 Goldwings (2 1500's and 3 1800's) that I would like to put one on my RSMTD. I can see that the oil filter and engine cases could really use some protection. I did go to the extent of attempting to fabricate one for myself today, but I was not pleased with the final product. I will continue to research and fabricate, and my end prodcut will be vented via stamped louvers. So, if anyone has info on already made Belly Pans for our bikes, please let me know. Miles
-
Just read through threads about flushing my radiator. What I couldn't find was any answers on if you can use a radiator flush cleaner first before refilling. I have seen where water is used to flush several times before filling with a coolant for aluminum engines. What about a cleaning type radiator flush ?
-
I recently purchased my first Venture, a 1986 VR, and just hours after getting her home I couldn't help but take off a few parts to start cleaning. The bike had sat for a couple of years, only running occasionally, so the dust build up was pretty bad. During the inspection I found that the air box was broken so I'm working of finding a replacement. While I was cleaning and shining today I noticed two small drops of anti freeze under the bike and found a wet spot on the hose between the rad and the thermo housing. Looked like it was on the radiator side at the hose so I started browsing for a new one (Yamaha part # 26H-12578-00-00). All the sites I found stated that part is no longer available. So my question... Is there a substitute for the hose? I scoured VR.org before posting but couldn't find the solution. Your help is greatly appreciated!
-
My new to me 86 has been sitting for at least 4 years. The previous owner only put 400 miles on it last year. Before that the owner died and his wife kept it 3 years before selling it. I don"t know when the last time the radiator has been flushed and the coolant changed so i want to do that before i get into the meat of the riding season. In my owners manual it shows two point to drain the system. a coolant drain cock coming down off the radiator and a drain plug under the water pump. My question: Which of these two points do members use to drain their coolant? Is the drain cock plastic? will it break? or is the plug under the water pump easier to get to and open? I'd love to know who has used either or both and could you only use one or the other? Thanks.
-
I just purchased a Chrome Radiator Grill from ebay and learned that I need spacers for correct installation. Was wonder if someone with one of these might remove a spacer and post the diameter and thickness of the spacer. There is a Mclendons Hardware store near by and they have all sorts of spacers in various sizes. I would also think that a Nylon Spacer would work for it would be far enough away from the Radiator heat. If I can't find the exact size I might be able to find one long spacer and chop saw it to the specific length.
-
This bike came with no owners manual and my search skills are apparently limited. I was wondering what the warning symbol directly below the side stand warning is. Maybe fuel? :confused24:Also I think I'm going to have to change the thermostat. Coolant is flowing through the radiator long before the temp gauge comes up. Then there's the battery warning mod I need to do, which I have found info on.
-
so i have been trying to put the bike back together for about 8 months now and I want to make the bike the priority now but i have come to a stand still. I can't seem to figure out where all the radiator hoses go? and if i can put the radiator on first? or so the hoses have to be on place first? pics would be great.. thanks in advance. mike:225:
-
For some reason my radiator cap ('83) is stuck and i cant get it off. I got as far as turning the cap to line up the notches, then taking a screw driver to pry it up. Still cant get it to budge. Strange, it'll rotate freely but wont come off. I just hate break something and complicate the problem. Any ideas?
-
I left a trail of coolant coming home yesterday. Flashlight exam showed the stuff bubbling out of the front of the radiator! Can this radiator have the core replaced?
-

Installing a radiator cover, HELP
jarrejx posted a topic in Royal Star Venture Tech Talk ('99 - '13)
YamaQman and I are trying to install this radiator grill on his 2001 RSV. It did not come with instructions and we are at a loss as to whether the radiator needs to be removed to complete installation. Does anyone have experience with this grill? It was purchased on ebay from autotrimdirect. Not sure how long it will take to get an answer from them. -
Getting ready to head out to Greensboro this morning and noticed a discoloration on my radiator nothing wet on the floor and the radiator did not feel wet, however I did not want to get 5 hours away and it fail. I rode around the local area for a couple hours still looks the same but no visible leak. So did I just hit big bug or do I have a very slow leak?
-
Can anyone tell me is there a radiator cap on a 05 RSTD mine seams to be a sealed system as there is a thing that resembles a cap but it wont turn as a normal cap
-
ok where do i get some good radiator hoses? i found out i blew the hose from radiator to the engine still not sure how the radiator is. looks clean no holes. i went to a stealer to check on the price they said why you still have one of thoes on the road?? gee what a jerk. said all the hoses would be around $200.00 damn them are expensive hoses. saw some on ebay but still where talking 27 year old hoses. hate to put it back together and keep my fingers crossed that old ones from ebay will hold up. i checked napa auto to see if i could match some up but to many bends in that one for the bike to even come close.. the long one on the bike looks like it was replaced at some time still a tag on it from a dealer in MN? cant read the date though? all the other ones are either real hard or weather checking? and i hate them spring type clamps you squeeze them to get them off and they dont look like they have enough tension to hold the hoses when i go to put them back on?? not in a hurry right now its tore down rags over the engine to protect it. as i have a wedding to attend in MN my daughters. then i will get back to the project at hand. also came accross a free bike a friend has up there. an old yamaha radian?? needs a clutch. it moves but slips. something to do next winter??
-
I recently noticed several small leaks in my 07 RSTD radiator. the amount of coolant which seeps out is very small and seems to stop leaking once the bike is driven. can i add some barr's leak safely.....or please suggest other alternatives. yes the bike is under warranty should i need to take that route.
-
I thought I'd post a few comments for those who have not been through this before. It is not hard as long as you have the proper tools. T-handle allen wrenches are almost mandatory for me - they make turning out the many socket head screws fast and easy. In addition, if you follow the manual (Method #1 below), you really want a set of long ball-end 3/8" drive allen wrenches for use with your ratchet. If you follow the shop manual, the job is pretty straight forward, but you will have one frustrating surprise. I have detailed the full drain procedure first as Method #1, then two slightly modified procedures that some might prefer at the expense of not getting out quite as much of the old coolant. The first steps apply to all three methods: You start by removing the seat, tank, both lower fairings and all three battery covers. Don't forget to remove that top center #3 Philips screw on the middle cover; it is kind of hidden! The cover slips out to the left fairly easily, but you do need to watch down in the middle for hoses and wire bundles that will hang up on the corners. Now you are ready to begin draining the fluid. METHOD #1 - The Complete Drain: The radiator drain bolt is obvious on the bottom left, and getting the overflow tank out is pretty easy too. It is only held on by one bolt and a couple of lugs in rubber grommets. Just use your fingers to push that plastic shield above it up so you can pull the filler neck forward and out to the right side. Some folks prefer to siphon out the overflow tank instead of removing it, but I don't know why; taking it out is MUCH easier than messing with a siphon hose! (But you don't have to remove the center or left side battery covers if you are not going to remove the tank.) Note: If you remove the radiator cap before you take out the radiator drain bolt, the coolant will drain VERY fast with quite a bit of splashing; you may want to let it drain mostly on it's own before you take that cap off! Next you will want to pull the fake cylinder fins off and take out the rubber plugs; use an old spark plug to screw into the plug and pull it out. Each cylinder water jacket holds quite a bit of coolant - seemed like about 1/2 cup each but could have been less - and those fin covers pop off very quickly with a 5mm T-handle. Make sure you leave the right front cover off until you finish with the next step! The frustrating surprise will come when you try to drain the water pump. The drain plug is a 17mm plug angled forward in the bottom of the chrome water pump cover, right next to the bend in the header pipe. The service manual says absolutely nothing about this other than to just take out the plug. Good LUCK! Absolutely no way to get on it with normal tools unless you loosen the header pipe. The good news is that you don't have to actually remove the pipe, just loosen the clamp at the front of the Y joint and remove the two socket head nuts on the header clamp (this is where you will really appreciate the long ball-end allen wrenches for your ratchet!). Once the header pipe is loose enough to pull a bit to the outside near the floor board, it is easy to remove the drain plug with a normal 17mm socket and a wobble extension or u-joint. Now you are ready to put all the drain plugs back in and replace the fin covers (make sure to get that header pipe back in place before you put the right front cover on!). DO NOT over tighten the radiator drain plug - that is all plastic, and the torque spec is ONLY 22 inch pounds. Even with the proper torque wrench, that is so light you can't hardly tell it has clicked, so you could still easily over-tighten and damage it. To me, the right tightness seems to be about what you can do just with your hand on a long 3/8" extension WITHOUT the ratchet. That's it. Only thing left is to mix up 3.5 liters of 50/50 coolant and fill the overflow reservoir to the FULL line, then carefully fill the radiator to the top of the neck. Put the radiator cap back on and run the engine for a minute or so (plenty of fuel in the carbs to do this without the tank) to let the coolant settle, then top off the coolant at the radiator cap. Now put it all back together and take your bike out for a short ride to get the motor fully up to temperature and check for leaks. Then after it completely cools off, check the overflow tank and top up to the Full mark if necessary (if there were any air-pockets left when you filled the coolant, some of the fluid from the overflow tank will be sucked in as the engine cools). METHOD #2 - Skipping the Water Pump Drain (almost as good as #1): Several folks have said they prefer to just drain the radiator and try to flush the rest of the coolant out with distilled water (see posts below), so I include these corner-cutting options as Methods 2 & 3. Drain the radiator and overflow tank as in #1. Now refill the radiator with distilled water (about three liters) and run the engine for at least two minutes. This will not be long enough to heat up the coolant and open the thermostat, but enough coolant will circulate through the vent hols in the thermostat to mostly clear out the water pump and leave only distilled water in it. RE-drain the radiator. Now pull each of the fake fin covers and pop out that little rubber plug. You will notice that coolant that drains from each water jacket still seems bright green, showing the "flush" was incomplete (that's why you are still doing these plugs). With the radiator plug back in and the fin covers back on, it is time to refill with coolant. But this time you have left some distilled water or highly diluted coolant in the engine, so it is best to not use pre-mixed coolant. Add about 1.75 liters of straight coolant, some to the overflow tank (1/2 full) and the rest to the radiator. Now top up both with distilled water and run the engine for a minute to work out any air pockets, then re-top the radiator with distilled water. METHOD #3 - Short and Sweet and Hope For The Best: In this method you skip draining both the water pump AND the cylinder water jackets. You will be leaving some of the old coolant in there to mix with the new, but some folks find this OK. Drain the radiator and overflow tank as in #1. Now refill the radiator with distilled water (about three liters) and run the engine for at least two minutes. This will not be long enough to heat up the coolant and open the thermostat, but enough coolant will circulate through the vent hols in the thermostat to mostly clear out the water pump and leave only distilled water in it. RE-drain the radiator and flush it again just like above. After two flushes you probably noticed a much lighter green color to the water on the last drain, so it is time to add new coolant and button it all back up. But remember, not only are you leaving some water/coolant in the water pump, you are also leaving it in the water jackets too, so you need to use a lower amount of new coolant in the fill. My guess of the right mix would be to add only 1.25 liters of coolant and then top it all off with distilled water. That's it folks, all done for another couple of years! My personal choice is Method #1. Even with the need to loosen the header pipe, it really isn't that difficult, and it doesn't take any more time than adding the engine flushes on the other methods. But whichever method you use, it is certainly better than not changing it at all. So now that the maintenance is done, let's rack up some miles! Enjoy the ride! Goose








.thumb.jpg.e030d8724ef3f2eadc94ab840d0f3801.jpg)
