Search the Community
Showing results for tags 'headlight'.
-
Hi everyone, I've got a 1978 xs750se and after replacing a bad regulator rectifier with a ESR310 from electrosport.com**, I noticed the headlight stopped working. I put a multimeter in the connectors of the headlamp wiring plug and both low beam and high beam are registering 16-17 volts at idle and upwards of 28-30volts when throttle is given. I imagine that this blew the headlight. All the other lights, turn signals function properly still. Think this could be a bad (new) regulator rectifier or there's a wiring issue somewhere along the way? Thanks for your help! It's brutal not riding because of not having a functioning headlight. I've contacted electrosport to inquire about the issue and a possible bad RR but would love your input as well. Thanks.
- 20 replies
-
- electrical
- headlight
-
(and 3 more)
Tagged with:
-
Hi Guys, I'm in the process of upgrading to LED bulbs on one of 86 Venture Royals. I have already converted the headlight and it sure makes a difference. I have read several articles and forum posts of guys who have already done this and there have been several references made to "Jumper the CMU for headlight, running, and brake lights" so the dash warning indicator isn't constantly lit due to the CMU thinking there is a bulb burnt out caused by the greatly reduce electrical draw from the more efficient LED bulbs. Although there is very detailed info about converting to LED's, I have not been able to find details of what the steps are to perform this "Jumper on the CMU". Any experts out there who have already performed this "jumper" process on the CMU that could point me in the right direction of which solder points I need to jumper for Headlight and Brake lights? Thanks in advance!
-
Please help! On the way down to Panama City yesterday my low beam went out along with the driving lights. I still have the high beam, and the headlight fuse is OK. Does anyone have any thoughts or suggestions before I search for the dealer here? Also, if the bulb simply needs changed, how do I do that? The owner's manual and the service manual are not much help...
-
I have an 88 venture. The headlight is not working. From what I can tell the headlight power wire comes from the fuse to the starter switch on the right handle grip. From there it goes to the headlight. I am getting power from the fuse to the switch but nothing out. Is the starter switch a momentary switch that shuts the power off to the headlight when starting? Is there a way that I can clean the switch or something I can do with it. I took it apart and it looked alright to me. If not would it hurt anything to simply by pass the switch. I hate to get into doing thing like that but I have spent way to much on this bike and i am not spending anymore. I will sell it first. Thanks for any help Curtis
-
Dear Owner's Manual: I know you say simply, "If the headlight bulb burns out, replace it as follows. 1. Disconnect the headlight coupler and then remove the headlight bulb cover." 2. Remove the headlight bulb holder by turning it counterclockwise and then remove the defective bulb." Excuse me sir.........I'm stuck back at HOW THE HECK DO I GET AT THE HEADLIGHT COUPLER!?! Anyone? Do I need to remove the fairing? Or just that one allen screw on the headlight chrome trim ring? (I tried that........and nothing else seems to want to pop off.) Or do I hire a tiny little person with tiny little hands, to reach in behind the fairing, in front of the steering head? Tips?
-
I have a '83 standard that I have been altering the electrical system since I got it last year. So far I have added the Shindengen R/R, a cooling fan run timer, a Internatrix security alarm, replaced the fuse box with a ATO style, moved the TCI onto the top of the airbox and today I would like to share the installation of a HID Bi-Xeon headlight. [ATTACH]37353[/ATTACH] I bought the HID kit on Ebay for only $58.00 and the shipping was free from Hong Kong. The package arrived in 6 days! I had followed the previous thread on the projector type headlight replacement but didn't like the change in the front look of the bike. I like the square headlight and I wanted to see if I could find a good H4 HID kit to increase the light output and longevity. I found this kit on Ebay Item number:170371397794 and I went ahead and purchased it. When it arrived, I was pleasantly surprised with the completeness of the kit and the ease of installation. [ATTACH]37354[/ATTACH] I decided to mount the slim ballast in the fairing next to the headlight frame using dual-lock mounting strip (super velcro!!). This makes it very accessable and adds cooling if neccessary. The included relay module (routes 12v direct from battery) was secured behind the left turn signal inside the fairing cavity. I use this space to mount additional relays for my drivinglights, dual fanfare horns and cooling fan timer relays. This space is easily accessed and fairly protected from heat and weather. I had previously installed a 20W halogen (type BA9s) light bulb into the metal headlight reflector. This gave me a daytime running light to reduce the unnecessary useage of the main headlight and reduced the amp draw on the charging system. I incorporated this smaller bulb into the new headlight circuit by installing a rocker switch on the left side fairing next to my 12v receptacle. The rocker switch selects between the 20W halogen daytime running light and the HID low beam setting (daytime or night selection). I have only had the HID system installed a short time but I am very pleased with the function. The HID bulb is tilted in it's socket by a solenoid to change between high beam and low beam. The bulb stays energized all the time so the light output stays constant. The bulb just tilts upward for the high beam. The kit is marketed for motorcycle use so I expect it should stand up to use on the Venture. Only time will tell....
-
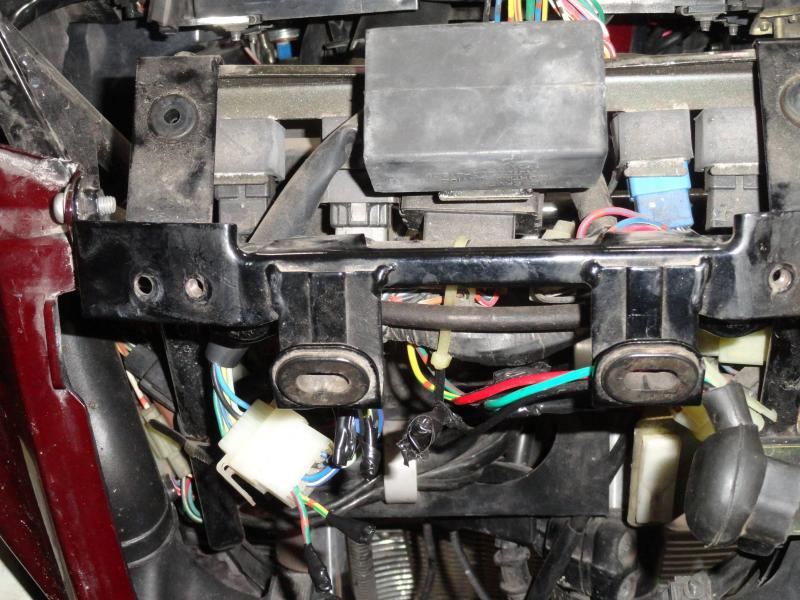
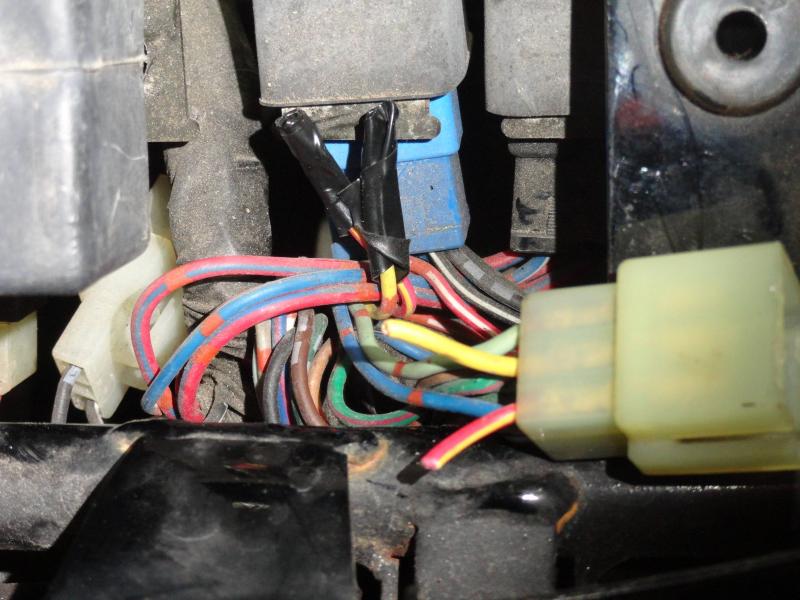
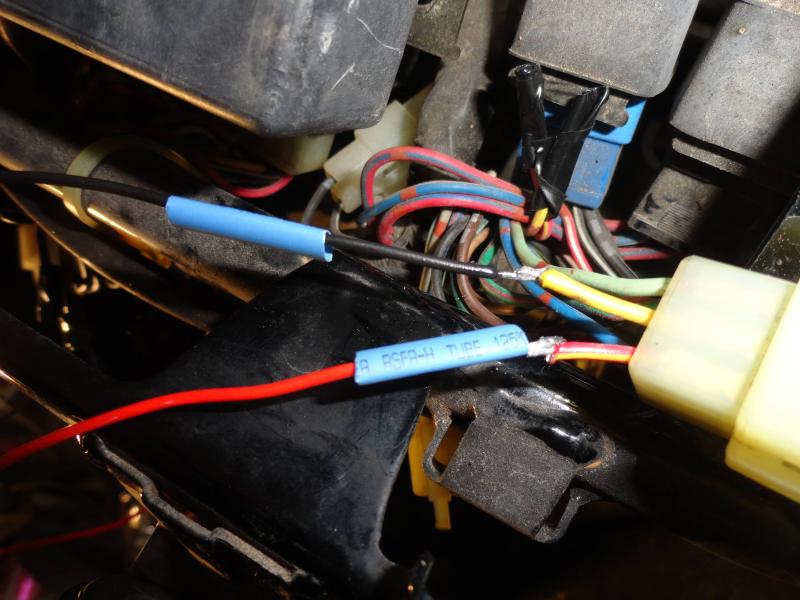
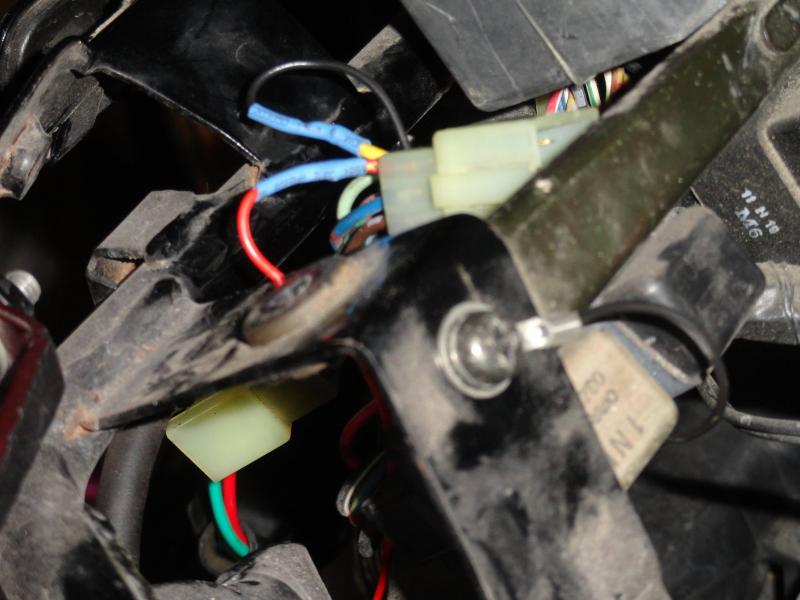
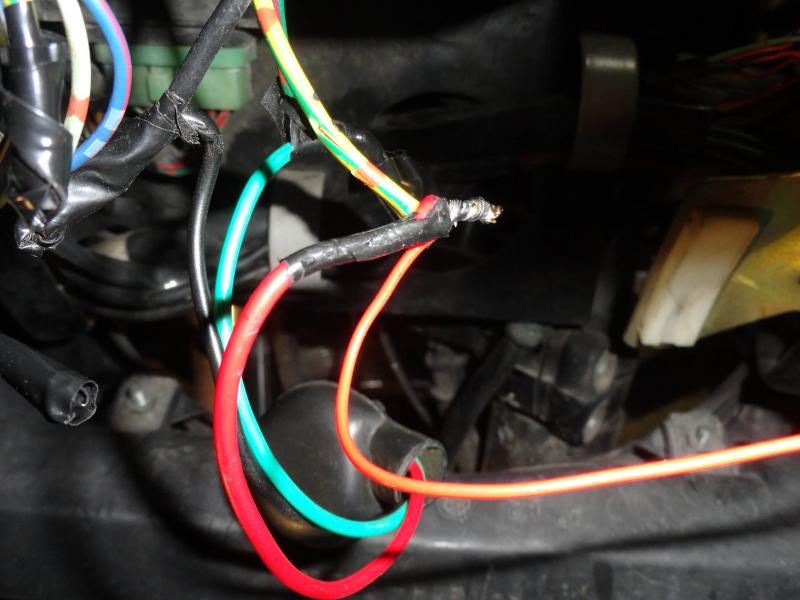
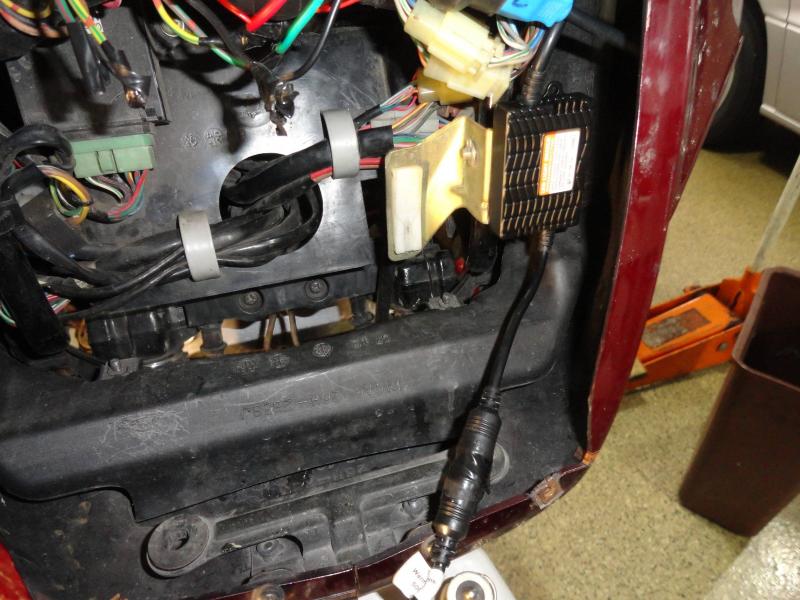
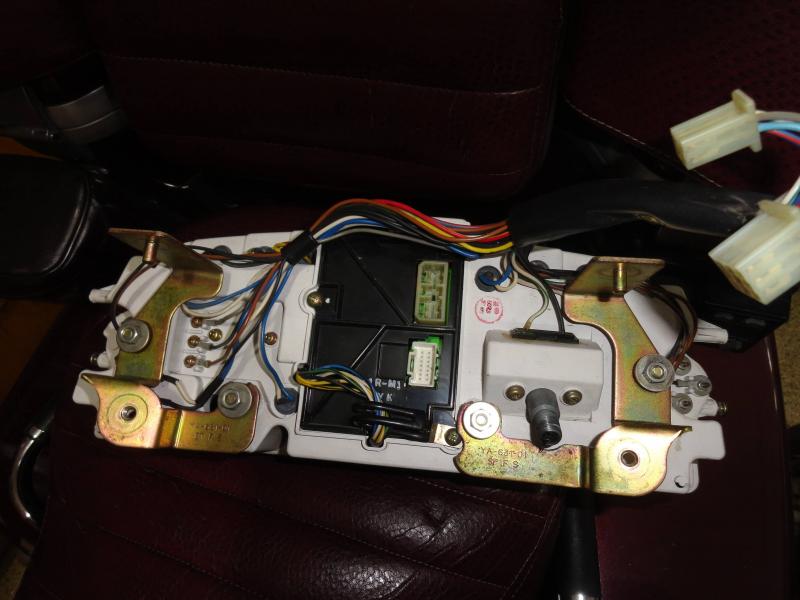
I just bought the SpeedMetal 2200/2400 Lumen LED headlight conversion kit from CycleGear for $60. I don't know he long they'll have this sale, but they have it every so often. I wondered about the light pattern, so I removed the headlight from my bike and took it down to my workshop. I used a big wooden 'C' clamp to position it in a repeatable position. Before I took the Sylvania Silver Star bulb out of the headlight, I applied 13 volts to it and observed the light pattern on the basement wall. I marked the top of the main part of the light beam with a marker, and then repeated this with the high beam. I also marked the workbench where the 'C' clamp was so that I could put it back in the same position. I switched to the LED lamp and powered it up. There appeared to be very little difference in the beam shape or position, but of course the light beam was much brighter. The light beam on low was just a tiny bit higher, and the high beam was more than a bit higher. It looked great. I connected it to the bike, and I had the headlight alarm in the CMS on, and I couldn't switch between high and low beam. Dingy recently showed a picture of the CMS printed circuit board and also where to jumper to eliminate the alarm. http://www.venturerider.org/forum/first-generation-venture-tech-talk/92274-jumper-cmu-leds-bulbs-prevent-warning-light-coming.html Of course, the instrument panel has to be removed from the bike first. It's not a bad job, just take the windshield off and take the screws out for the front turn signals and let them hang by the wires. Look inside the turn signals mounting at the openings to the sides of the instrument panel. On each side you will see 2 phillips screws that hold the instrument panel cover to the instrument panel. Take the 2 that prevent the cover from sliding upward completely out, and loosen the 2 screws that prevent the cover from sliding toward the rear of the bike. Then just slide the cover toward the rear of the bike. To remove the instrument panel, using a 1/4” ratchet, long extension, universal joint, and 10mm socket, reach upward from the headlight opening and remove the 2 bolts from the bottom of the instrument panel. DO NOT REMOVE THE NUTS---they just hold the brackets to the instrument panel. Also when I had the bolts out of the threads, but still in the hole, I reached in from the top with a magnet tool and prevented the bolts and washers from falling when I pulled the socket off the bolt. Looking through the headlight opening, towards the left side of the bike (look right into the opening) you will find 2 connectors for the instrument panel---disconnect them. Disconnect the speedometer cable, and then pick up the instrument panel slightly to slide the top pins out of the grommets, and move the panel towards the rear of the bike slightly. Reach in and disconnect the 2 connectors on the back of the CMS (BTW, CMS=Computer Monitor System). Now remove the instrument panel. Place a soft cloth on the work bench and set the panel down face down. Take the screws out that mount the CMS, and remove the CMS. Take it out as 1 piece, there is no need to slide it apart yet. Lift the side that has the wire bracket under a screw first, and then when it's clear of the hole, slide it towards where the wire bracket was mounted. You'll see that the other side has a clear plastic piece on it that allows the panel bulb to illuminate the CMS. Separate the CMS but be careful. One board has a connector that can be pulled to separate that board. However 2 boards have a ribbon cable that you can't easily remove, so don't stress this area too much. The CMS light monitors have a magnetic proximity switch wrapped with a coil of wire. The lamp current flows through the coil, and creates a magnetic field, that closes the proximity switches. You need to solder a small piece of wire across the proximity switches for high and low beam headlights. Dingy has arrows pointing to the correct places to put the jumpers. Then re-assemble the CMS and re-install it in the instrument panel. (see picture of the back of instrument panel) (See picture #1) You can see the RLU (Reserve Lighting Unit) at the top of the picture. Follow the wiring out of it to the connector. On the motorcycle side of the connector, cut and tape the G/R, Y/G, and the light green wires (the light green isn't shown in the picture). Now, you'll be able to switch between high and low beam, and the HEADLIGHT white lamp on the instrument panel won't come on, but the blue high-beam light on the instrument panel won't work. To get that working, on the motorcycle side of the instrument panel connector, cut the Y and the R/Y wires leaving about 2” of them still on the connector. Tape the 2 wires not in the connector (that you just cut). Using two 12” lengths of 16-20 gauge connect them to the Y and the R/Y wires from the connector. I soldered mine and used shrink tubing to insulate them, but you could use butt connectors. (picture #2) Connect the Yellow wire to ground. I used a terminal and put it under the screw in the picture (picture #3). Shorten the wire before putting the terminal on it. Connect the R/Y wire to the headlight high beam lead (Y/R). On my bike, I've replaced the headlight socket, so I had soldered and taped connections to the new socket. I just untaped mine, wrapped the R/Y around the previous connection, soldered it and then taped it again. If you still have the original headlight socket, use a pocket knife and strip a short length of the Y/R wire, wrap the R/Y wire around the bare wire, solder it and tape it. (picture #4) This completes the necessary wiring changes and your LED headlight should work on both high and low beams, and you should have no alarms. Also, your blue high beam light should work. Now you need to mount the LED light control module. In picture #4 you can see where I mounted mine. Then when I was installing the headlight into the bike, I saw that the control module was hitting the side of the headlight. I ended up using a heat gun to get the double sided adhesive pad to release and then I moved the control unit about 1/4” more to the left side of the bike. The connector between the LED bulb and the control panel has a lock nut, but on mine the lock nut wouldn't stay tight. To cure this, I wrapped the connector with electrical tape to prevent the nut from loosening. Now it's time to install the headlight. Position the original headlight and the LED to control module wiring so that they won't get pinched by the headlight and the height adjusting mechanism. Last night I rode the bike for a bit to 'test' the headlight---Low beam was a lot brighter than the OEM bulb, and the pattern seemed a bit wider. Nobody flashed their lights at me though. It's not a road burner. However when I rode along side of a car with halogen headlights, his beams looked like they were made by candles. The high beam wasn't that much better than the low beam. The high beam pattern seems to be pretty high.
-
Here I go... New to me Trike & now I need to Check it over, setup & add-ons: 1) Get out the Mecury Carb-Sync - checked OK - no need to adjust 2) removed stock ignition & replaced with DynaTek 3000 - set on performance profile 3 with red line of 7,500 rpm 3) removed stock clutch pressure plate - installed/converted to Barnett Clutch Spring Conversion plate (good old purple) 4) checked out HID headlight kit - decided against it 5) ordered Signal Dynamics Diamond Star headlight modulator 6) ordered Diamond Star Plug & Play harness 7) ordered Hella H4 100/80 Halon watt bulb for headlight 8) ordered qty.4 NGK DPR8EIX-9 Iridium IX Spark Plugs 9) one passing lamp failed so I checked out converting to lens & H3 Halogen bulbs - decided against it & needed rewiring 10) ordered qty.2 Passing Lamp Bulbs - Bulbrite HX36PAR36WFL 36-Watt Halogen/Xenon Sealed Beam PAR36 10) ordered 5-layer felt lined Trike cover - using/covering Trike with my old cover used on my Z4 11) ordered custom license plate GhostR Now I'm preparing to move add-ons from old bike to new bike when these parts get in & I have a nice weather day. I'll continue this as I progress. JohnB
-
I just recieved my headlight AND brake light modulators. Where did you all mount yours and make the connections???? I heard you can access the brake light wiring under the seat.....and I'm going to be mounting the Yamaha passing lamps at the same time (useing the relay), so I assume I'll have to seperate the fairing....and that's Probably where I'll install the headlight modulator. Any tips or advise would be GREATLY appreciated. Thanks all!!
-
I have in perfect condition the Jack Daniels Old No 7 headlight visor and passing lamp visors off my 2nd gen. I'm looking to swap them out for a plain set. To my knowledge, Ronnie, the previous owner had used Harley spot lights as his driving lights. They appear to be the same size as the Yamaha ones but I can't verifiy that the passing visors will fit. If anyone is willing to trade for the whole set, or even just the headlight visor let me know. http://i278.photobucket.com/albums/kk86/jason1gp/venture/IMG_1924.jpg
-
Do any of you have this light in the 5 or 6k lighting range and if so how do you like it. http://www.motorcyclehidxenonlights.com/Yamaha-XV1300-HID-Xenon-Lights/ My driving lights are L.E.D. and very bright and make my headlight dim and look yellow I see better with the driving lights on. So I am looking at installing a new headlight. I like the Kuryakyn phase 7 L.E.D. a friend has it on his Harley, but I cannot find any info to mount it on a Yamaha Venture. Your knowledge would be appreciated.......Ron
-
Stopped at the grocery store after work with everything working normal. Came out, fired up the VR and no headlight and dashlights no CMS backlight. Engine started OK, turn signals, tail light and brake light were working OK too. Checked the fuse box found no blown fuses or weak or corroded holders. Wiggled and pulled the start button. Also checked the headlight bulb which was good. Are the headlight and dash lights connected in some manner or did I win the lottery and get two problems at once? I'm at a loss. Any ideas? I need to ride this thing to work tomorrow morning.
-
How do I remove the chrome ring around the headlight? The bike (RS Venture) has the chrome visors on all the lights and I bumped the visor on the headlight and it came off. I need to get the chrome ring off to put the visor back on. I removed the bolt at the bottom, but something is still holding on. I need your help. Thank you! Owen.
-
I'm sure I should have known this but..... I was installing my new ClearView screen which requires removing (at least partially) the front fairing piece. I've had that off once before but this time I notice that there is a knob on the left side way down near the bottom of the fairing for adjusting the headlight. Don't know why I never saw it before.
-
I am working on an 88 venture and have a fault on the display...it is when the headlight on low beam....I soldered all the connections in the CMS...but when the low beam light is on the warning light is on and the display shows the headlight...any information would be great...Thanks in advance.
-
I was Messing with my project car when something inside my head clicked. My bike is still disassembled and I ran into the house all greasy to grab my headlight housing and run back to the garage... I am upgrading my Fiero GT from using a single ugly 80's headlight to dual Hella projector headlights. Guess what, they will fit in the Venture's opening and I believe there is enough depth for them to fit completely. Problem is, this will delay my getting the bike on the road so I am looking at another option.... Does anyone have a front headlight assembly they are willing to sell cheap, give or loan to me so I can have a metal bracket designed to upgrade our 1gen headlights? I have a machine shop at my disposal as well as a laser cutter to design a bracket that can slip into the existing assembly and hold the two Hella modules. I can get them set apart side by side just enough to fit in the rubber mounting ring. I have seen these lights in action and they would make a HUGE improvement and the way I am thinking of installing them they would still use the adjuster on the dash and even be removeable to restore the bike back to stock. Plug and play in a way. These are DOT legal lights so the upgrade would be 100% legal in the USA. and it would make a HUGE difference in lighting on the road and reduction of glare in the eyes of the oncoming traffic. The lamps are not cheap. I paid $69.00 each for mine (4 on my car)
-
I've read on this happening to others and could use a little input. My 03 Venture I have installed an HID headlight bulb I installed as instructed running Power and ground from Battery installing a switch with a small dash light to insure power and plugged into the original headlight connector, Now it lights right off but will go out some times as soon as I hit the road others times later down the road, once I get rolling on down a long ride it seems to stay though I haven't gone far when sun is down. I had noticed that the old h4 bulb(55w-100w) would seam to go dim then brighten before but had thought it only got bright when charging system kicked in as my driving lights work to keep road lit so maybe it was going out also. Now in my years of spinning wrenches though the years to me it sounds like a bad ground any input would help thanks.
-
Does anyone know if the " silver bucket" inside the headlight assembly comes out ...im installing a "led" headlight from "trucklite"???????????
-
I need some help...I just recently switched to LED turn, run and brake lighting. They work great thanks to Custom Dynamics. I also changed my driving lights to LED Sun spots and they too are great. So here's the problem: I have a Phase 7 LED headlight to replace the original, but HOW DO YOU OR CAN YOU REMOVE THE METAL HOUSING BUCKET FROM THE GLASS? I need the housing in order to mount the new LED bulb. Is this possible because without the metal housing I cannot mount the new LED bulb? If I cannot use the metal housing can anyone shed some light on a possible alternate solution. I really cannot use the LED driving lights with a regular headlight bulb because it doesn't look good at all. Thanks in advance:) Jakbag
-
Just reassembling my '86 VR and have a stupid question about the little bracket located beneath the front of the fairing. This bracket has a grommet on each end that appears to slide up over two pins protruding from the bottom of the headlight assembly. My problem is this: I hang the left side of the fairing on the bike, and all the mounting holes line up perfectly. All, that is, except this little bracket. Per the shop manual, there is a screw on each fairing half that secures to the fairing. It appears that the grommet on each side should slide up and over the headlight "pin". I have tried assembling it with and without the bracket attached to the fairing and either way, it doesn't fit. It's missing alignment with the headlight pins by almost 1/2"...maybe more like 3/8". Strange as it may seem, the fairing will not "stretch" enough to compensate for this. Does the headlight have to come off in order to get everything to align, and then reinstall the headlight bucket? Or am I somehow just assembling something in the wrong order? The bracket will only go on one way, unless I'm missing something. Has me baffled!
- 7 replies
-
- assembling
- bracket
-
(and 3 more)
Tagged with:
-
Hello everyone, I hope someone can help me with this problem. I have a 86 VR that I just got a couple of days ago, this is my first big street bike, anyhow, when I picked the bike up everything worked fine, I could tell right away carbs need cleaned and battery is draining fast. I got the bike home and went to start it for a friend, I noticed the dash lights were not working, I'm referring to the lights that light up the speedo and tach, the lights above for blinkers and such worked fine, so I walked to the front of the bike to find that the headlight was not working. I checked the fuse and bulb, both looked fine to me.I went out the next day after work and the lights worked, now tonight they stopped working again. Electrical is not my thing, I tried looking at the wiring diagram on this site, might as well been written in japanese.Is this happening because the battery is junk? Is there a relay that deals with the headlight? Any help would be awesome,thanks
-
I bought this really nice aftermarket headlight that was advertised as fitting an RSV using my existing bracket. Problem is you have to remove the mounts that are welded onto the metal headlight case of the stock headlight and glue them onto the plastic housing of the replacement headlight. Not wanting to destroy my stock headlight before I fit the new one, and not wanting to pay $50 plus shipping from Pinwall, I thought I would check to see if anybody has a broken one setting around that I can canabalize for the mounts...


.thumb.jpg.ce61bc94739efc1059157f86c7216f78.jpg)

.thumb.jpg.f728770fad1ac7ebf6a720ed6af3a09c.jpg)


