Search the Community
Showing results for tags 'carburetor'.
-
Does anyone have tips and tricks to drop the 4 carb assembly down on the rubber manifolds. I don't like forcing them. The engine is v'd around the crankshaft, and the carbs are in a V setup along the length of the bike, so the manifolds are too close together if you just try dropping them down. Tips and trick. Already tried warming the manifolds with a heat gun..
- 2 replies
-
- carburetor
- manifolds
-
(and 1 more)
Tagged with:
-
HI! New to this site. Looks like a bunch of good information. I am looking to purchase a '99 XVZ1300 Royal Star Venture for about $3700. I was reading up on the specs and noted this bike has carburetors. Aren't carbs hard to maintain? I have a good shop - how often would I need maintenance on the carbs? Thanks for your insights. Aaron
- 4 replies
-
- carburetor
- maintenance
-
(and 1 more)
Tagged with:
-
1989 XVZ13 63K Miles. Purchased 2 years ago and finally got suspension and other troubles sorted. I've been getting a few weekend close-to-home miles over last 2 months. 2-4 hour rides max. (I don't trust her yet). Bike has developed (or I just began to notice?) a low RPM miss. Under low throttle acceleration at about 3600RPM I hear popping from exhaust then, as RPM increases to around 4000, a 4th cylinder appears to engage and bike smooths out. Closing throttle from high RPM results in a backfiring fit as it slows through about 4500RPM - very predictable. At constant cruise any RPM bike vibrates and sounds like a 3 cylinder machine. At Wide Open Throttle, bike is "notchy" with moderate acceleration up to about 4000RPM then Oh My Dear God! It appears to discover the 4th cylinder and earns its reputation. It's producing 37MPG over the last 8 tanks of gas. Not right. Mucho Seafoam thru unit: ~10% of every 2nd tank has been miracle juice. Figure 8 tanks is enough to fix the "bad gas" scenario & do all the chemistry cleaning possible on the bike with Seafoam. Another solvent recommendation before fiddling with her guts? What should I be looking for, do, check, buy, etc.? A reference to a thread covering my problem is probably all you need to post - I simply can't whittle down my search enough to find the right / best one. I'd love to hear any advice that anyone has to give me - lord knows I'm not much of a mechanic: witness installing 3 used mono shocks all resulting in too high a ride height only to find the linkages that came with the replacement shocks were ALL different than the original. Pull original linkage off of blown shock, install new shock into old linkage and install onto bike and, Presto! FIXED! Arrrgh!
- 13 replies
-
- advice
- carburetor
-
(and 3 more)
Tagged with:
-
Just in case anybody is looking for a D.I.Y. 4 cylinder carburetor synchronizer, I made one the other day and it worked great. I filled it with some trans fluid and it was VERY sensitive and worked great. I put some pics of it in my gallery. The pics might be enough to tell ya how I did it. But if you have any questions, I can give ya all the details.
- 35 replies
-
- carburetor
- cylinder
-
(and 3 more)
Tagged with:
-
Which style of carburetor synchronizer do you think is better? The kind with vacuum gauges or the kind with mercury filled tubes? Or whichever kind of Hg alternative they're using these days. Would the gauges be as accurate? I don/t really want to worry about losing the Hg or other fluid either like many here have done on accident.
- 15 replies
-
- carburetor
- gauges
-
(and 3 more)
Tagged with:
-
Carburetor fuel leak. I have an intermittent or random fuel leak (R/S) from carburetor, #3 or #4 air vent hose on a 2006 Yamaha RSTD. Sometimes I can ride for 50 miles before it leaks and other time less than 7 miles. I have tried a can of Sea Foam without success. At idle there has never been a fuel leak problem… only occurs at road speed. The Yamaha owner’s manual indicates the carbs are Mikuni type BDSR32 X4. I have been unable to locate any information on these units on the Internet. What do these numbers mean and how do I find out the type of carburetors I have on this motorcycle. Any suggestions to solve this “nagging” fuel leak problem without removing the carburetors (a last resort) would be appreciated. Thanks – 2 Flights
- 3 replies
-
- carburetor
- carburetors
-
(and 3 more)
Tagged with:
-
Idle speed adjustment – RPM’s (2006 RSTD) I am seeking guidance on the correct procedure to check/adjust engine idle speed before doing a carburetor synchronization on my “06” RSTD. What specific equipment is needed (timing light with RPM feature, etc.) to properly set the idle speed? I have downloaded the file (Free bird) from this site (Tech Library) for doing this carburetor synchronization. Specific instructions are appreciated. There is nothing like avoiding the pitfalls of life in motorcycle care and maintenance with sharing the wisdom of others who have been there and successfully done that. Thanks 2Flights
- 1 reply
-
- carburetor
- idle
-
(and 3 more)
Tagged with:
-
I have never worked on 2ed gen ventures so I need a little help. Some one has pulled the brass plugs on the Carburetor and adjusted the mixture and the owner wants me to help him make an adjustment. I have to admit that I have no Idea where the mixture screws are on the Carburetor. Can some one tell me where to look? Fred
- 5 replies
-
- adjustment
- admit
-
(and 3 more)
Tagged with:
-
I have a 1983 Venture Royale. I believe that I have a stuck float on the front left carburetor. I tried a can of seafoam but no success. When I turn the bike over the fuel runs out a hose that is just below the tank. Anybody have any suggestions. Any help would be appreciated. Cant wait to get back on the Highway.
- 8 replies
-
- carburetor
- hose
-
(and 3 more)
Tagged with:
-
Well, I'm finally back from Iraq and took the bike out today. Ran fine except for a little overheating... The coolant reservoir showed fine, but when I opened the radiator it was very low. Added some coolant and the bike ran cool. I think there may be a small leak as I noticed a few drops of coolant on my right toe. While returning home, I had a fall off of power, kind of a bogging down when I got off the freeway. had to run it in 2nd to get home and keep the rpms around 4k. When I got home I noticed some fuel leaking in front of the rear wheel. I had that problem when I first got the bike, but can't recall how I fixed it. I also noticed the right rear spark plug wire had come loose and reinstalled it. After restarting the bike, It would try to stall unless I very slowly applied throttle... too fast, it bogged down and died. I pulled off the air cleaner and noticed that the two carb slides on the left side of the bike were stuck open. and I mean stuck. pushing the slide on #1 wouldn't open it at all. #2 would push open but not close back. Noticed some "backfiring" from the right side carbs also I've been searching the forums for about 2 hours now, and I think I'm at the point where I'm imagining everything I read could be the problem. I definitely need to check the diaphragms, and I need to search a bit more about how to drain and clean the bowls. I need to check the tank for rust and water. I'm not really wanting to do a full carb rebuild/cleaning, but worst case I'll mentally prepare for it. Does anyone here have any other Ideas or Input? perhaps a pointer to some good writeups? I do have the service manual and have found a good how-to for the diaphrams so far. Thanks, Mark
- 6 replies
-
- carburetor
- diaphram
-
(and 3 more)
Tagged with:
-
I plan to do my own maintenance for the 600 mile service recommendation. I can do the oil change, final drive oil, and do a whole lot of safety checks. There is one thing that I am not so sure off...is the carburetor synchronization. How is this accomplished? Is there a special tool? and/or is it necessary this early in the life of the motorcycle?
- 4 replies
-
- accomplished
- carburetor
-
(and 3 more)
Tagged with:
-
First let me say that I am not the originator of this information. While at Don's maintenance day, one of our members was running around with a pair of needle-nose pliers adjusting the carb linkage tabs on various bikes. I am very sorry that I do not remember who this was, as I was concentrating very hard on syncing carbs and trying to keep from wilting in the heat! I did hear enough about it while he was working on a bike next to me that I remembered to check my own bikes when I got home. Glad I did. So let's get the real person identified here so he gets proper credit! Background: Our chokes are really just an enriching circuit that makes the bike run rich while the knob is pulled out. If you look under the tank at the choke knob, you can easily see the linkage and how it moves. In this first picture you can see that linkage on the left side of the bike, and just above the throttle spring you can see the tab the goes up to engage a brass plunger: [ATTACH]18696[/ATTACH] Here is a closeup of just that tab and plunger. You can clearly see how the metal tab is touching the inside shoulder of the plunger, forcing it all the way closed when the choke knob is pushed in. This is the correct position for the tab when the choke is closed: [ATTACH]18697[/ATTACH] As you begin to pull out the choke knob, those tabs move through that notch and begin to push against the head of the plungers to pull it out of the carb, activating the enriching circuit and making the engine run better when it is cold. The free play afforded by the notch probably just makes the bike less sensitive to slight position changes of the choke knob. Those pictures were from my 07 RSV, and all four choke tabs looked fine. Now here is a picture of what I found on 3 of the four carbs on my 05 RSV: [ATTACH]18695[/ATTACH] Besides the fact that it is dirty and nasty, notice how the tab is touching the head of the plunger while the choke is supposed to be off. At the very least this is not ensuring the plunger is all the way in, and worse, it is probably actually preventing it from closing. In that case, the result could be poor fuel mileage, rough idling in the heat, fouled plugs, etc. Those tabs are very soft metal, so if any of yours do not look right, just use a pair of needle-nose pliers to slightly bend the tab to rest up against the inside shoulder of the brass plunger when the choke knob is all the way in. If you have the Yamaha chrome carb covers on your bike, you will need to remove them to see all four tabs. I do not yet know how this fix has affected my fuel mileage, but I will report back after I have had a chance to run a tank or two through it on the open road. Goose
- 5 replies
-
- carburetor
- choke
-
(and 3 more)
Tagged with:
-
I just want to convey my appreciation of the information submitted by Cougar on carburetor removal. This BBS system would not allow me to post a 'thank-you' directly. http://www.venturerider.org/forum/showthread.php?t=7830
- 4 replies
-
- bbs
- carburetor
-
(and 3 more)
Tagged with:
-
I have a question that is puzzeling me and maybe one of the great mechanics can answer it for me. What is the purpose of the carburetor heater? Do these things go bad? If one were to go bad,or if the relay were to go bad, how would you know it?
- 15 replies
-
- bad
- carburetor
-
(and 2 more)
Tagged with:
-
Just in case anybody is looking for a D.I.Y. 4 cylinder carburetor synchronizer, I made one the other day and it worked great. I filled it with some trans fluid and it was VERY sensitive and worked great. I put some pics of it in my gallery. The pics might be enough to tell ya how I did it. But if you have any questions, I can give ya all the details.
- 3 replies
-
- carburetor
- cylinder
-
(and 3 more)
Tagged with:
-
I'm suspecting that the newer V-Maxes probably use a throttle position sensor on the carburetors, and I figure the older ones didn't. Can anyone verify whether the newer ones really do or not and what year they started being used?
- 11 replies
-
- carburetor
- started
-
(and 3 more)
Tagged with:
-
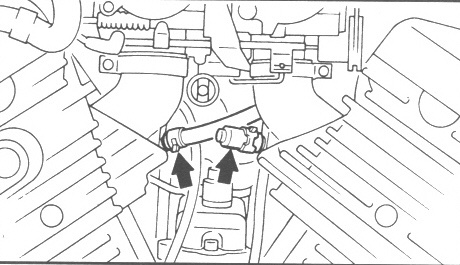
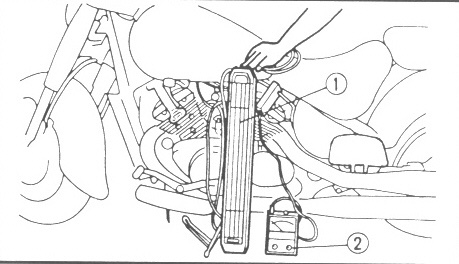
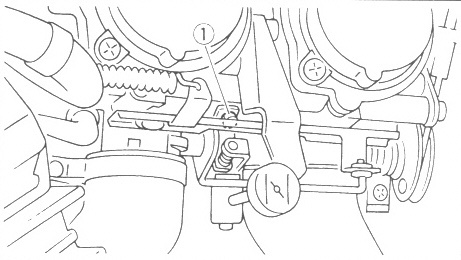
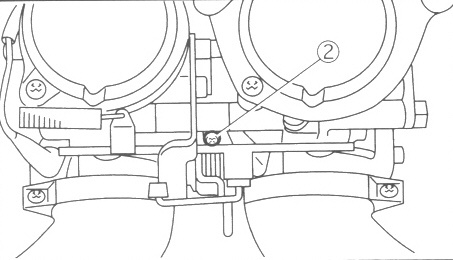
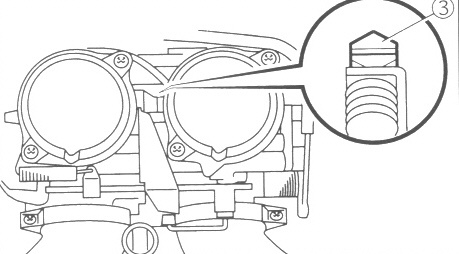
Synchronizing The Carburetors WARNING! Please be aware that the Yamaha Service Manual has the procedure for syncing the carburetors WRONG. The manual indicates that screw 1 is used to sync carb 1 to carb 2 and that screw 3 is used to sync carb 3 to carb 2. That is opposite of what it should be. The following is the correct procedure. NOTE: Prior to synchronizing the carburetors, the valve clearance and the engine idling speed should be properly adjusted and the ignition timing should be checked. 1. Stand the motorcycle on a level surface. NOTE: Place the motorcycle on a suitable stand. 2. Remove vacuum plugs. 3. Install: Adapters Vacuum gauge (Fig.2) Engine tachometer (Fig.2) to the spark plug lead of cyl. #1. Vacuum gauge: YU-08030-A, 90890-03094 (These are Yamaha part numbers. Any suitable mercury sticks, or other suitable gauges are just fine) Engine tachometer: YU-08036-A, 90890-03113 (Yamaha part numbers. Any suitable tachometer will work. A tachometer is not absolutely required 4. Start the engine and let it warm up for several minutes. 5. Check engine idling speed. If out of specification, adjust to 950 to 1050 RPM. Refer to "ADJUSTING THE ENGINE IDLING SPEED". in your service manual 6. Adjust carburetor synchronization. A. (Fig.3) Synchronize carburetor #1 to carburetor #2 by turning the synchronizing screw (3) in either direction until both gauges read the same. NOTE: After each step, rev the engine two or three times, each time for less than a second, and check the synchronization again. B.Synchronize carburetor #4 to carburetor #3 by turning the synchronizing screw (2) in either direction until both gauges read the same. NOTE: Turning screw clockwise raises carburetor #4 and lowers carburetor #3. C. Synchronize carburetor #2 to carburetor #3 by turning the synchronizing screw (1) in either direction until both gauges read the same. NOTE: Turning screw clockwise raises carburetor #3 and lowers carburetor #2. Vacuum pressure at engine idling speed is 37 kPa (280 mmHg). NOTE: The difference in vacuum pressure between two carburetors should not exceed 1.33 kPa (10.0 mmHg, 0.4 inHg). 7. Check engine idling speed. If out of specification, adjust. 8. Stop the engine and remove the measuring equipment. Yamaha then recommends the following. 9. Adjust: Throttle cable free play Refer to "ADJUSTING THE THROTTLE CABLE FREE PLAY". Throttle cable free play (at the flange of the throttle, grip) 4 - 6 mm (0.16 - 0.24 in) 10. Install vacuum plugs.
-
I know a few of you here own or have owned a Roadstar. What size of carburetor do they have, and are they downdraft or sidedraft style? I'm not where I can look at one.
- 2 replies
-
- carburetor
- roadstar
-
(and 3 more)
Tagged with:
-
Carburetor maintenance I have used this procedure for over 15 years on all types of carburetors from lawn mowers to high performance cars and have always had good results as long as the carburetor was in good mechanical order. Cleaning the carburetors will not help a carburetor with a worn nozzle or a leaky diaphragm on a slide. The carburetor cleaner I use is berryman b-12 chemtool in the spray can and the pint size can, but any good carburetor cleaner should work if you can get it in a spray and pint can. Cleaning the carburetors Place the bike on the center stand and remove the cover of the air cleaner and the filter exposing the top of the carburetors, start the engine and open the throttle to make sure the slides are all moving; if one or more of the slides fails to move you may have a broken diaphragm or a clogged jet. Use the spray can to clean the insides of the carburetors spraying into the jets at the top and the throat of the carburetors . If the engine stalls restart and continue until it looks clean. Replace the filter and cover, now turn the gas tank valve to the off position and restart the engine and run it until it stops. Remove the supply hose (top hose) from the fuel pump and replace it with a suitable sized hose long enough to reach the ground and put it into the pint can of cleaner. Now turn the key on and allow the fuel pump to fill the carburetors before trying to start the engine. (note the fuel pump has a safety feature and you may have to turn the key off and on until the pump fills the carburetors) Start the engine using the choke to keep the engine running about 1000 rpm and allow it to run for about 5 min., then go get a cup of coffee or clean the outsides of the carburetors to use up the can of spray, waiting about 20 min. Restart the engine and (*) use the throttle to increase the rpm and work all the moving parts of the carburetors, the run for 4 min. and wait for another 20 min. if you used the spray on the outside of the carburetors be sure to re- oil the moving parts with a light machine oil and if all of the slides worked when you tested them you can re connect the fuel line while your waiting. when the time has past you can turn the gas valve to the on or reserve position and open the drain valves on the carburetors (lower right on each carburetor) when the carburetors are empty close the valves and turn the key on to fill the carburetors with fuel. also if you are storing the bike for the winter you could drain the carburetors and not restart the engine. (*)IF one or more of the slides did not move when you tested them you should re-test them at this time by removing the air cleaner cover and filter and watching the slides. If one of them are still not moving, note the problem slide and turn off the engine. Remove the cover plate and inspect the diaphragm then carefully remove the spring and slide from the carburetor. Before continuing we suggest you use eye protection. You will see a jet in the upper right side of the opening place the nozzle of the spray can against this jet cover the opening with your hand so that the excess spray won't get in your eyes and give it a good shot; cleaner should come out of the top of the carburetor. if it seems clear then wipe off the slide and the hole it came out of and reassemble the slide making sure that you replace the diaphragm exactly as you found it! Fred J. Vogt Throttle cables The throttle cables on the Venture can cause you some grief if they brake on your vacation or even on a 100 mile Sunday ride if your 50 miles from home. There are four cables that are used to control the carburetors and they use a push/pull method; that is they use a positive return on the throttle that dose not rely on the return spring to shut down the carburetors. there is a fifth cable that is used by the Venture curse which will disable the curse if it fails. all five cables connect together at the control box and you can view it by looking up behind the left hand fairing at the front of the bike. I have not found a way to replace these cables with out removing the left fairing, radio and the black plastic shield behind the radio. This could be done with the tools in the tool kit supplied with your Venture, so you could repair the cables if you had a spare. Although any of the five cables could brake, most of the failures I have heard of are the two cables that connect the hand throttle to the control box. these cables normally fail at the hand throttle on the handle bars because they are worked more and are exposed to water and dust, more then the ones at the control box because the cables are in side. If the return cable brakes it will not stop you, but you will notice that the Engine will lose RPMs slower than normal and the hand throttle will feel funny. Maintenance of the cables is simple and should be done every 10,000 miles or once a year. To check and oil the throttle cables disassemble the hand throttle, clean and use A drop of light machine oil (sewing machine oil) work it in and reassemble the throttle. Just in case you have a problem before you get a chance to check the cables here are some thoughts on how to get home or to a repair shop. You could use the choke lever to increase the RPMS then get the bike over 35 mph, set the curse and use it to increase your speed. You could also get the MTS towing package offered through MTA and be only a phone call away from help. Fred Vogt MTA 1037
-
- cables
- carburetor
-
(and 3 more)
Tagged with:

