Search the Community
Showing results for tags 'bracket'.
-
Want to get an 8x20 toyhauler and haul my RSV. I'm looking for advice on a wheel chock for the front tire. I'd like something I can secure to the floor somehow to keep it from sliding, but when removed I don't want a big bracket sitting there that I constantly stub my toe on! Any advice will be greatly appreciated. Thanks...JR
-
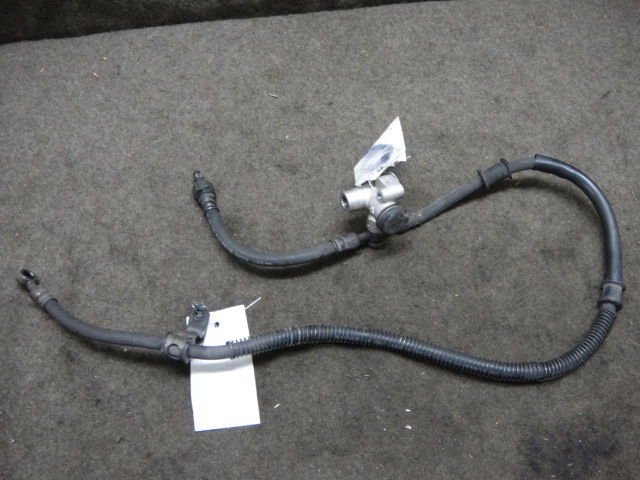
Hello all, In trying to help with bleeding of the linked brakes I bought a brake line with the bleeder from an '89 Venture Royale on ebay. It didn't come with a mounting bracket for the bleeder, and I can't figure out from the parts house diagrams what I need to mount it. Can someone take a picture or point it out to me on a parts diagram? I figure I may be able to find one in a parts or bolts lot that are listed on ebay. This is the line I have, bracket would be for the top end of the line. Thanks, Merry Christmas to all, and to all, a good ride! Richard
-
While getting ready to go for a ride today I noticed that one of the braces that support the trunk bracket was broken at the weld. Has anyone had this happen to them? I have pulled everything and have the trunk bracket pulled and ready to go to the Yamaha shop tomorrow as they are closed today. I have attached a picture. This is a 2007 RSV
-
there has been some renewed interest in my detachable tour pack bracket and i am in process of having six made (three already sold). they are glossy black powder coated with mounting hardware. price is $225.00 and you pay shipping. i will have three left, so if you are interested give me a shout. buz http://i42.tinypic.com/1hcpk0.jpg http://i41.tinypic.com/5n55pu.jpg http://i40.tinypic.com/rw6fqw.jpg
- 5 replies
-
- bracket
- detachable
-
(and 3 more)
Tagged with:
-
Finally got around to installing my Memphis Shades Batwing. I ordered a generic one off of EBAY for a 9" headlight, bought the quick release brackets from Wayne, and made a custom bracket to attach the batwing to the quick release bracket. Took it for a quick ride and I like it.
-
I think I finally got it altogether. What you'll get: 2 side covers,laser cut, mirror stainless 1 stainless bracket for left side 2 spacers glued to the back of the right side cover 4 stainless screws to attach the covers (metric) 2 replacement bolts to attach the left side bracket 2 washers for the above bolts 2 spacers for the above bolts 1 banjo bolt, if you need to replace the one sticking out from the rear brake master. 2 crush washers for above banjo bolt. Instructions: On the left side you need to remove the 2 bolts on top of the middle gear. You can store these for another purpose. Install the 2 new bolts from the package with the bracket as shown. Spacers go down first, then the bracket, facing out, and the the supplied washers and bolts. Torque to 17 ft lbs. On the right side you might need to remove the banjo bolt that is facing the outside from the rear master cylinder and replace it with the thinner headed banjo supplied. The supplied crush washers are also thinner, so use all supplied components. This is necessary as the OEM banjo sticks out too far to make a nice flat installation. You will need to bleed the rear brakes again, so before tightening the banjo, pump a bit of fluid through the joint to eliminate as much air as possible. Total cost will be $150 or less, including shipping. Please indicate if you want to join in the party. Once I have a count, I can then get a firm price for the stainless, let you know the actual cost and get your money before we make them. This will be a one time only deal. Sorry about the dirty scoot, I've been too busy trying to put this together to worry much about it.
-
While quenching a thirst at the local watering hole, I started describing my problem with fellow rider. The bartender advised he, had a friend who could probable help me out. To make a long story short, his friend came by my house with his truck and tig wielded my bracket in place. He also helped remove a galled bolt. For this he charged me $40. I considered this a bargain as the local dealer wanted $520 for a new bracket but offered me a deal of $399 as I was a good customer. With the tax that would have come to $440!
-
Ok Guys, I know the plans or dimensions for this horn bracket are our here somewhere, but I'll be damned if I can find it. I've built several and even have one one the left side of my bike for Dual Stebels. And I thought I had made patterns, but I can't find them either. So can anyone point me to the post that first showed this bracket? Thanks, Rick
-
So, you've removed the running lights to make repairs under the fairing and the 2 spacers between the bike's bracket and the lights mounting bar fell out. And then, you're fustrated trying to get them back in place when re-installing the lights. Not easy, huh? But, here's the million dollar's worth solution to simplify the process: First coat one side of the spacers with excessive amounts of "Silicon Ruber Sealant". Next, run the bolts through the spacers and just slightly attach the bolts to the bike's bracket. Then press lightly on the spacers to make total contact. Leave it alone now until the next day. Now, as the bolts are removed, the spacers stay in place and the lights can easily be put back in place. That's it! All ready to ride again! Owen.
-
I had previously posted a query about how to repair the broken rear trunk lock bracket which broke off the lid. A lot of suggestions forwarded and a lot of attempts 'attempted' but they failed unfortunately.. Even using the ABS glue and sealant, making a slurry trick didn't work (poor man's welding). No matter what I had tried, a day's ride and vibes would break the bond. I can now happily say I have the lock bracket glued and secured in place for the past 2 weeks with a lot of locking useage, variable heat and humidity and vibes to really put the test to it and it's a good bond.. this one ain't going to come apart. Ultra Bond Plastic Expoxy... It comes in a purple package, comes in the typical 2 parts mini-containers. You brush on one liquid to both parts and let dry 30 secs, and then apply a bead to one part, and press together for 30 secs.. full solid bond in 24 hours as most 2 part epoxies do.. I tried to find an online image of the package to make it easier for others to locate but to no avail.. Oh and when they say "caution, bonds skin instantly" they mean it.. kewl. The product causes the two parts to melt and bond, basically 'welding' to each other very nicely. So, after 2 weeks, the bracket is rock solid and shows no signs of fatigue or re-cracking. I still have the package in the trunk, if someone is desperate enough to need to see it I can do a pic and post it.. etc.. FYI to a fix that actually worked.. =)
-
Hi, I decieded to grease my drive shaft splines and when i got it back together I see there is a gap between the caliper bracket and the washer I think I got the washer in the correct place but don't remember the gap being there ,is there suppose to be this gap ? Thanks
-
http://venturerider.org/forum/picture.php?albumid=1039&pictureid=6985I mounted my Stebel in front, I made a bracket from scrap that mounts above ( I slid it behind) my driving light bracket. I did run a clear hose on it and will in the future find some chrome plumbing and bend it up and run it into the fairing to keep dirt and moisture out of the horn. http://venturerider.org/forum/picture.php?albumid=1039&pictureid=6986 http://venturerider.org/forum/picture.php?albumid=1039&pictureid=6984
-
I need one of the metal braces/brackets for my 88 trunk It's on the right side (looking from the rear of the bike) It's the offset "L" shaped bracket that runs up the front side of the base section, bends towards the center of the bottom and has the flared plate on the end with 4 mounting holes Mine is broken in two, PO had it welded (badly) and it broke again. If anyone has one , please let me know and we'll work something out. Thanks
-
Somebody can help on how is the best and carefull way to remove the HD pipes to reinstall the original ones? I already remove the clamp, but seems that the inner pipe didn't moved at all when I can see that the bracket on the back already moved at least 3/4". Even the buffer is out, but I don't want to scratch anything. Thanks, Carlos :stirthepot:
-
Lary, your stainless steel horn bracket is finished first class. The only thing is that the bracket is approximately 5/8" to short on the ground bolt leg requiring the use of a spacer. Restoring a 99 RSV for a customer and found the above today. I personally think spacers are tacky. RIDER FIRST, HARLEY OWNER SECOND.......
-
Just reassembling my '86 VR and have a stupid question about the little bracket located beneath the front of the fairing. This bracket has a grommet on each end that appears to slide up over two pins protruding from the bottom of the headlight assembly. My problem is this: I hang the left side of the fairing on the bike, and all the mounting holes line up perfectly. All, that is, except this little bracket. Per the shop manual, there is a screw on each fairing half that secures to the fairing. It appears that the grommet on each side should slide up and over the headlight "pin". I have tried assembling it with and without the bracket attached to the fairing and either way, it doesn't fit. It's missing alignment with the headlight pins by almost 1/2"...maybe more like 3/8". Strange as it may seem, the fairing will not "stretch" enough to compensate for this. Does the headlight have to come off in order to get everything to align, and then reinstall the headlight bucket? Or am I somehow just assembling something in the wrong order? The bracket will only go on one way, unless I'm missing something. Has me baffled!
- 7 replies
-
- assembling
- bracket
-
(and 3 more)
Tagged with:
-
I bought and after market, Harley tour pack and the back rest offered by the manufacturer. The back rest has brackets and the lid needed to be drilled for the back rest brackets. Okay, have that. Between the back rest bracket and the bracket that bolts to the lid, they provided a rubber insulator. This turns out to be a rubber bushing of about 1 " in length with the head of a bolt embedded in each end, giving threads sticking out each end of the rubber bushing. The problem is, I haven't even finished my mounting bracket for the bike and the bolts are popping out of the rubber already. What does everyone use? I considered a piece of all thread in each of the three locations, with jam nuts on each side of the bracket. What have others done for this?
-
I am new to the RSTD, couple of months on an '06. Love the bike, except the seat and that is going to repaired soon, and the pipes. It has the 4-2-4 Big Nasty's on it and is just too loud for MY taste. I picked up a set of RK mufflers, had 500 miles on them, for $20.00 yesterday. I know I will need a bracket. I have all of hte clamps, just need a bracket. I have a pretty well equipped shop and can build one if I had the dimensions. Can someone give me the length and bolt spacing needed? I know it has a couple of bends that I can work out. Would sure appreciate the help. Barry
-
This is how I fixed my broken windshield bracket tabs on my 2004 RSV. I used a wire tie around the speaker boss and wrapped it around the windshield bracket. i cut a piece of rubber off the windshield bracket so the wire tie would be flush.
-
R/R fell off... I think
Dizzle223 posted a topic in Venture and Venture Royale Tech Talk ('83 - '93)
After taking the long way home from work last night my brakes felt a little funny. While inspecting the rear brake pads, which I noticed are non-existent, I saw what I think is the R/R laying against the drive shaft housing and the frame. After pulling the left side panel and the pass. foot rest mounting bracket I disconnected the two wire bundles and tried to pull the R/R out. It was still partially attached by one bolt to the bracket that holds the rear exhaust hanger but only barely hanging on. It was not attached all to the front but the bolt was still there? When I first bought the bike a few weeks ago I noticed that the left exhaust/muffler was not even with the right side when looking at the bike from the rear. After comptimpating this for several hours I think I've determined the following.... at some point the R/R loosened and the front portion fell down by the drive shaft housing causing it to push against the frame when the rear suspension travels up and down. (note the broke fins and fin marks on the drive shaft) Which in turn pushed against the mounting bracket forcing it outward. (note the chipped paint and rust marks on the bracket) So my question(s) is.... #1. Is this the R/R #2. Will the couple of broken fins on the back be an issue #3. Can I/would you straighten that bracket to even up the mufflers #4 Can someone send or post of pic of the rear of their bike so I can see the alignment of the exhaust #4. What brake pads are recommended for my 86 VR As always, any and all comments and suggestions are greatly appreciated! -
Whats a reasonable price to pay for some Harley pipes and what does the bracket for mounting them to my venture sell for
-
I have a project I'm working on. My 84 has a very small trunk and I have the mounting bracket for an 85 trunk. I've also determined that any MkII trunk will fit the 85 hardware. The only thing I'm missing now is the antenna bracket. It needs to be longer than the 84. Questions are.... Does the MkII bracket fit on the 85 mounting rack? Does anyone have one they would be willing to part with? Failing that at least I would know if I could look at ANY MKII on eBay...
-
Just bought a 93 VR and center stand is wired up. Looked in manual and can't find a picture of the missing parts. I have a "c" shaped bracket and spring in trunk that went somewhere. Any help? PLEASE... lol:fingers-crossed-emo
-
Anyone have 1 or 2 helmet locks that bolt to the RSV trunk mounting bracket that I could get?? Thank's Joe
- 2 replies
-
- bracket
- fingers-crossed-emo
-
(and 3 more)
Tagged with:
-
I changed my tires, and when putting the rear one back on, I forgot where one of the washers goes. On the right side, there is a washer that goes on one side of the brake mounting bracket or the other. Can someone tell me which side? This is a washer that goes on the rear axle, and it will either be up against the wheel on the right side, or between the swingarm and the brake mounting bracket. I put it up against the wheel, but is seems like there may be too much drag from the brake when I spin the wheel. Thanks for any help.