Search the Community
Showing results for tags 'block'.
-

Upper Wind deflector for 06 RSTD
Guest posted a topic in Royal Star and Royal Star Tour Deluxe Tech Talk
Does anyone have information on good looking & functional upper wind deflectors for a 06 RSTD? I am trying to block the cold wind off of my knees. -
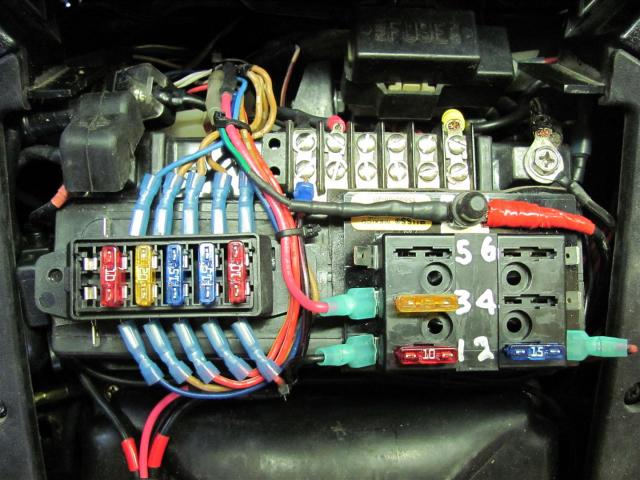
The old fuse block ain't doin' it anymore. Aside from the corrosion that keeps coming back time after time, yesterday one of the fuse holders broke off, so the fuse won't be held now. Luckily, it was the ACC fuse!! Who's got a good setup on their ride?? I'd like to move over to the newer auto fuses. I've tried a few different fuse blocks, but can't find one that is small enough to fit under the faux cover. Any ideas, manufacturers, parts stores???
-
I've been looking at the various fuse block threads on here and have noted the occasional reference to clearance issues. Most of the replacement ATC fuse blocks I have found so far are between 1.3" and 1.5". Has anyone actually figured out how much room there is between the battery and the top cover?
-
Have seeb that in a fair amount of user pics, the TCI/CDI box is on top of the air box under the false tank. I'm guessing this is done to keep the unit cool, as it wouldn't be sitting directly over the engine. Is this a model year difference (I've got a Mk2 87) or is it a after-market user modification? In mine, it looks like its mounted to a frame rail. I noticed this as I've been looking at wiring and fuse block upgrade threads, and saw the box, and wasn't sure if it was an aftermarket or moving the original. Can't find a thread talking about it, so figured I would have to ask. Glenn in Tucson
-
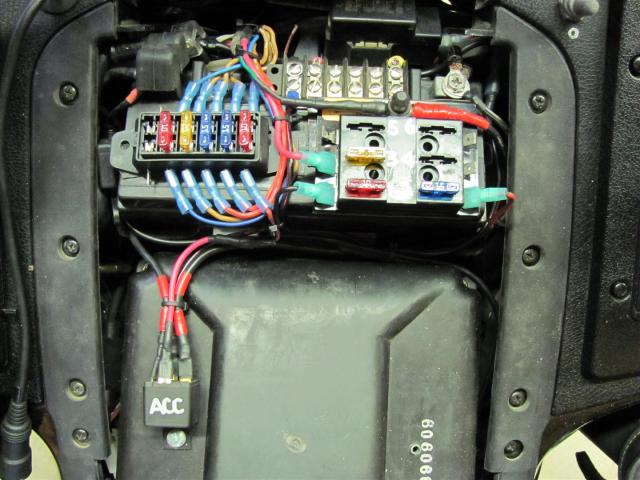
I experienced electrical gremlins last fall on my 1990 Royale. Strange behaviors. Too intermittent to diagnose specifically, but there seemed to be some relationship to the ignition switch and/or the "IGNITION" fused circuit. I know that ignition switch problems are not very frequent on First Generation Ventures, unlike the Second Gens, never the less I felt I may be having an issue with mine. So to cure possible problems with IGNITION fuse and the ignition switch, I replaced the OEM fuse block with a new fuse block that accepts ATC fuses and I added an "ACCESSORIES" auxiliary block. This auxiliary accessories fuse block is only energized when ignition switch is at ACC or ON. To prevent excessive current draw through the ignition switch, I fed the auxiliary accessories block via a 30Amp relay and 10GAuge wire. When the OEM ACC circuit is energized by the ignition switch, the relay is energized, closing the circuit from the battery to the positive lug post on the auxiliary accessories fuse block. To avoid grounding issues for added accessories, I created a common grounding terminal strip. This terminal strip is connected to the negative post of the battery with a short length of 10GA wire. The terminals on the terminal strip are electrically connected to each other with a heavy brass buss. The fuse blocks and terminal strip are mounted to the unvented maintenance free battery with double face foam "Gorilla" tape. The battery top presented a smooth surface for mounting via tape. This method probably wouldn't work for conventional batteries. I relocated the MAIN fuse to just in front of the Positive battery post. I relocated the CLASS fuse holder to under the other OEM fuse block that contains the AUDIO, BACKUP,etc. fuses for now, but I intend to utilize the remaining fuse position on the new "main fuse block" for the CLASS. Thank you, Earl for the fuse block.
- 21 replies
-
- accessories
- block
-
(and 3 more)
Tagged with:
-

Fuseblock Upgrade Revisited
stanG posted a topic in Venture and Venture Royale Tech Talk ('83 - '93)
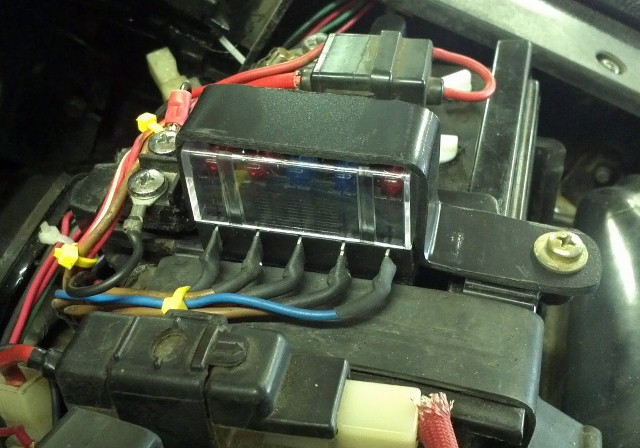
I have recently done away with the glass fuse holder in favor of the ATC fuse block from Littlefuse (part# 350417BP). I picked up my block from O'Reilly Auto Parts but they are available from other sources. I decided to just replace the block, making the least amount of change to stock as possible. Installing the block is pretty straight forward. I just clipped the wires off the old terminals and then soldered them in place on the new block finishing out with heat shrink over the exposed terminal ends and then an application of liquid tape for further protection. I also cut the accessory terminal block from the original holder so that I could continue to use the stock setup. In a departure from other installations, to keep everthing in place and sercure the terminal block, I fabricated a plastic strip from ABS, perfectly forming it to the block with the cover on. Using ABS cement I attached the terminal block to the strip. I used a plastic welder to heat the ABS where the plastic needed to be bent and formed it over a block of wood, holding it place until it cooled sufficiently to retain it's shape. The strip fits into the original front slot in the stock mount and secures with the stock screw in the rear holding everything in place tightly. There are no clearance issues with the false tank cover and it slipped right into place. -
These are the pictures of my new fuse block. The block came off of the ebay site for about $10 or $12. The fuses are in the exact order as they were originally in except the accessory fuse was moved from the top to the bottom by extending that wire, by doing this I got more slack in the cables to put on the new crimp connectors.In moving the accessory fuse to the bottom I was also able to jump to the next fuse possession which gives me the benefit of adding another fuse for another accessory but you will have to remember not to go over the 10 amp total for both accessory fuses. I removed the old glass fuse block and used the bottom screw to mount the new fuse block and drilled another hole in the battery mounting bracket and used a brass screw and nuts to mount the top of the new fuse block. This brass screw became my accessory ground and strain relied for the bikes cable assembly. The new fuse block came with a cover but it was too tall to allow for the bikes top cover to mount so I had to leave it off. I did use dialectic grease on all the connections. I did this last year and have been very happy with it. I got a lot of the ideas from other posts on Venture Rider.
-
http://www.jpcycles.com/product/800-578 I am planning a trip to Houghton, MI (from Dubuque, IA) Tuesday and figured the stock seat could use some reinforcement. I rode around the block and I think I like it. I will give a ride report next week when I get to dah UP eh.
-
Hi guys, so I'm smoke testing my prog springs, R1 rotors, EBC HH's front and rear, new rear EBC. I thought I'd follow everyone's lead and ditch the power robbing AD's. I'd talked to Skydoc and I know he's busy now so I thought I'd fashion a couple of my own. Cut out some steel and lined the opening with gasket maker. Sat overnight. Loaded up prog springs and 13.5oz 10wt each leg tightened everything up. Dropped off center stand and SPLAT! I was wearing at least $6 of my $10 fork oil. Blasted out from the block plates. I had those things cranked down! I should have taken a picture so I could nominate myself for "Worst Bel-Ray Rep Of The Year." Even worse after I rode 8 miles. I'm starting to assume the o rings are necessary? I hate to tote the AD's around just to act as a cover Has anybody else made any? What's the key? Thanks! (I know this is pretty ugly but I'm kinda in a hurry as I'm going to Germany next year and am not sure what kind of space I'm going to have.)
-
The time is getting closer where our block of booked rooms at the New Grand hotel will be gone, so if youre thinking of attending please call the New Grand and book your room making sure that you tell them that your with the Venture group. Also got to the website at www.kruisnthekootenays.ca and register so that we know youre coming so we can plan things like meals. Thanks, Brian, Rick and Nina
-
Hi everyone New guy here. I have an '83 Venture Royale with factory cruise control. I need a new front brake light switch. The one I received from Yamaha has only two wires, while the existing one on the bike has 4 wires, and runs through a small block (resistor or capacitor?) before plugging into a four gang block in the headlight shell. The Yamaha dealer I spoke with couldn't find any reference to the different switch, or a part number for it. Anyone had this same problem??
-
I started this here because I know a lot aren't paying much attention to garage thread now. I got doors from Wayne Dalton. I can follow most instructions but these are tuff. The one thing I can't find is what size opening do I need to start my framing. Jambs and header I can handle but what size do I set them?? Jambs go flush with edge of block but how wide?? 8 ft doors but different type doors require different size openings to accommodate the hardware. I need width of opening in block and height to hang header. Can anybody prove how dumb I am?? www.dasma.com tech data sheet # 161 Connecting Garage Door Jambs to Building Framing.
-
I have to make decision on building TODAY!! Finally gets here and rushing me but I want to get it DONE!! Question is; Metal or block building??? He claims he can bring block in for close to price of metal. I'm thinking block has a lot of advantages but hard to finish inside once up? Any thoughts quickly?? I have to let him know this evening!!!!
-
As I get things together to do my fuse block install, various relay bypasses and, hopefully, repair of my ignition switch, I noticed something in a couple of other threads on the subject. When someone talked of installing a fuse block next to the battery so that accessories can be run off that rather than off the battery terminal, there were a couple of suggestions to put an in line fuse between the battery and new fuse block. Why? I mean, it is a fuse block - don't those fuses give you the protection you need? Why have a fuse between the battery and fuse block? There may be a good reason, but I just don't see it. Anyone? Andy
-
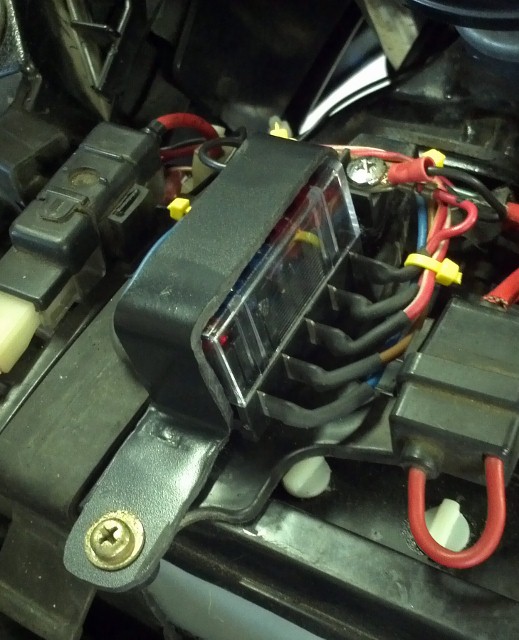
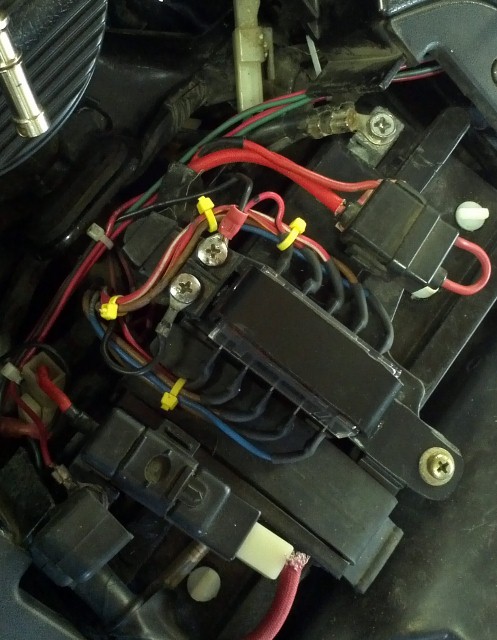
I mentioned in an earlier thread that my ignition switch has started to go (Have to wiggle it around to get things going). I am now attempting to install a fuse block (ATC style - 6 positions) and some relays (Driving lights, headlight) to avoid a repeat of this problem. I also plan on installing a switched bypass - just in case. In the meantime, I ran across a thread where someone disassembled their ignition switch, cleaned it and reinstalled it. I was wondering if this is worth the trouble? Will it last or die an early death? I read another thread that stated that sanding the contacts might remove all or most of any coating they had leading to an early failure. If this is true, I see no reason to do that much work only to have to replace the switch later. The stores in this area are light on parts so I had to get a 6 fuse block. It's a bit big, and trying to fit it near the battery is tricky. I'm thinking of attaching it by means of a hook and loop fastener to the rear fender just behind the driver's seat. The only other available spot is under the front of the driver's seat over the various vent hoses. As far as I can tell, the seat doesn't press it against the hoses but it is still a tight fit. The fender seems like a better option. I've attached pics of the block and the two potential mounting spots. If I go for the fender, I will have to attach something to the bottom of the block to fit between the existing wires - sort of a smaller pedestal. Squeezing it under those wires would make a fuse change too difficult. Does anyone see a disadvantage to the fender mount? There should be enough weather protection but I could try to fabricate some kind of cover to give it a bit more protection if necessary. Sorry this is so long, but I want to get it right the first time. I hadn't planned on this and had been saving towards the upgraded clutch kit, which I also need. Now this has thrown me a bit of a curve as dollars are a bit tight these days- as most of us know only too well! Andy
-
OK..Forks are drained, anti dive parts are off. Before I do anything else stupid....I figured I'd ask first. the brackets where the cross over hose connects up near the triple tree. Is that supposed to just slide off? I can't see any kind of clamp but when I try to remove the forks they get hung up on that bracket (with a clunk) so it sounds like a lip in the way. With Skydoc's block off plates, there is a set of bolts with a hole drilled thru them. I am thinking they go in place of the hoses? They came with 2 brass washers for each bolt...do I use 2 on one hose replacement bolt ? Once the forks are out...how do I get to the bearings. (that's what I figured out....still need help with cross over hoses....they are supposed to be removed when I do the block off plates yes? Am I getting over analytical or paranoid.....YES I AM!
-
i am going to replace the old "glass fuse" block with spade type fuses. my question is "are all circuits energized by one main positive wire, or are there different power inputs from other circuits, that energize a certain fuse"? just jt:confused24:
-
I did a fork rebuild on my '84 and polished the fork tubes while I had it torn down. Earl came up with his Block Off Plates for the anti-dives while I was in the middle of all this so I picked up a set. I wanted the ugly butt anti-dives gone. So today I had it all finished up and back on the bike. Got to admit, it slicked the forks up real nice. Thanks Earl for the time and effort you spent on these.
- 5 replies
-
- anti-dives
- block
-
(and 3 more)
Tagged with:
-
'Mom, may I take the dog for a walk around the block?' Mom replies, 'No, because she is in heat.' 'What's that mean?' asked the child. 'Go ask your father. I think he's in the garage.' The little girl goes to the garage and says, 'Dad, may I take Belle for a walk around the block? I asked Mom, but she said the dog was in heat, and to come to you.' Dad said, 'Bring Belle over here.' He took a rag, soaked it with gasoline, and scrubbed the dog's backside with it to disguise the scent, and said 'OK, you can go now, but keep Belle on the leash and only go one time round the block.' The little girl left and returned a few minutes later with no dog on the leash. Surprised, Dad asked, 'Where's Belle?' (YOU'RE GONNA LOVE THIS!!!!!!!! ! ) The little girl said, 'She ran out of gas about halfway down the block, so another dog is pushing her home.'
-
Got motor back into frame this weekend. Encountered another small issue mounting up the VBoost intakes though. I had the block face milled down .040", this is to raise compression. The block needed to be milled due to there not being enough material on the heads to do this. When the block is milled (or the heads for that matter), it lowers the heads by the amount taken off. Also moves heads inward at the 35 deg angle from vertical. The VBoost intake is a rather rigid unit that did not react well to its mounting holes getting moved. I could not get the screws started. I had to ream the mounting holes in the intakes out 3/64" to allow the screws to engage. Fortunately with the VBoost's rigid intake, the carb rack should mount up fairly good. This same head head movement will also create some additional fitment issue with the exhaust system, but it will be easier (I hope) to deal with. Next is onward to getting carbs mounted on intakes. Rick Butler gave me a heads up that the carb pull cable bracket will need modified to clear the frame, due to the taller intakes, but I know that is coming. Already had to modify the "twinkie" to get the cooling hose on it oriented different. May be going to put a Lithium battery in it to allow the bigger VMax air box to fit up. These new batteries are on back order so I may need to work around the air box issue. And, yes I am replacing that old red fuel line this year !! Gary
-
Anyone have a 1300, 1200 may also work, block that is split in half, I need some help on the location of the two oil nozzles in the care halves. When I sent block to machine shop, top & bottom, because they cleaned them, I took everything out. Including the two small oil nozzles & tossed them in a baggie. Well when cleaning stuff I realized they were different and I can't tell which one goes in which hole. 1st picture is attached of two nozzles. Left one is brass color with phillips slot, other is silver with straight slot. 2nd picture is of case top, and 3rd is of case bottom, locations for these. The 88 parts fiche indicates they both go into the bottom case. The service manual doesn't mention them that I can find. And, the VMax is different. The motor DVD mentions them but doesn't show them. The 83 1200 fiche shows them going into the case where I am 99.9% sure they go, but doesn't show the difference. Gary
-
We stopped to visit our good friends Brad and Lonna and let Brad take our new Mercedes for a ride around the block. I think he really liked it too.
-
Contrary to what we were led to believe last fall, this winter (so far) is turning out to be a lot nicer. Yesterday's high was 14 Celcius. Forecast for the up coming 14 days is looking pretty good. During my short 2 block walk for lunch today I saw 4 guys on bikes. With any luck I will get a chance to get out on the scoot over the coming weekend! [ATTACH]53395[/ATTACH]
-
While sitting here in the office I have the local news network on in the background. What used to be an occassional report has been getting very common. Motorcycle vs. what ever they can hit..... Not just once a day, but several times a day... basically during commuter hours. This morning's was a fatality. I tell ya it's getting so I don't want to go around the block on two wheels... Even while riding around in the truck or 'Burb watching the crazies, I look around and I'm thankful I'm in a cage..... It's ridiculous.


