
Search the Community
Showing results for tags 'hole'.
-
 Just looking for everyones take on the carb slide vacum hole location when reassembling carb slides on my 87. It looks like they should point down at 6:00.
 -
 Hello All, First I have searched to no avail for Gen II carb diaphragm replacement vendors or fixes. Found the thread to spray on rubber stuff:think: for a temp fix. While taking apart carbs on my 99 RSV to clean today, I may have put the carb slider cap on a TAD wrong, to say the diaphragm was pinched and a small hole is now in the material at the bend where it seats on carb body. It may have already been there, not for sure.... ANYWAY I need one. Help? Man those carbs were dirty..... Thank you in advance...Looking for new one. Directions? Also, the fuel mixture screws are obviously not set the same. Inside the throat of the carb body where the screw (or hole) is present, One is thru enough to cut yourself on, while the others are barely or not at all... I am not a carb expert. Directions to setting these properly? Thanks, James:bowdown:
 -
There is always a loop hole ain't there. Mike
-
 Just replaced the battery in my 86 VR, I noticed the battery that came out of the bike had a wire coming out of the top of the battery, what does this wire do? The new battery has no wire or a hole for the old wire to go into, do I need to drill a hole?Thanks.
 -
A separate thread to post any and all pictures to the IR 2012, so that is going to be easy for others to find them. It 'll be in the Watering Hole for now, I will move it in a week or so to it's proper spot.
-
I was riding back from the "big smoke" yesterday and smelled gasoline... started wondering, and then the bike sputtered when I accelerated. I pulled into the first parking lot I could find and as my wife jumped off, she exclaimed, "it's pouring out the bottom!" The fuel was running out as if the tank has a 1/4" hole tapped into it. As I shut her down, (bike, not wife) she stopped dripping. I traced the leak to the carb "overflow" tubes. After pulling off the air cleaner assembly, so I could see what's happening there, I started the bike again. The front right and rear left carbs were leaking out of the little hole on the rim, and then out the tubes. I figured there must have been some dirt in the tank and it has plugged stuff in there. So, I finger plugged the leaking hole in the rim and blew back into the leaking hose... I did this for all four carbs and she fired up and ran nice while sitting there. I did not assemble the air box because it was dark and I was using a limited number of tools (and didn't want to dis-assemble the bike in the mall parking lot) so I tried to run it without the air box... she did not run well - I'm assuming she was getting too much air. My son came down with the trailer and dragged us home - we got home at 2AM... but got here safely. Thank God. So, where do I go from here? Is it time to pull the carbs off and clean/rebuild? If I clean the tank, clean the carbs, and re-assemble will I be ok? She was running real good up until last night... HELP
-
I was contemplating changing the diaphragms on my 96 RSTC since you all made look so easy at MD, I looked at Sirius website and it listed the SD-1 for all XVZ1300 and XVZ13 models of venture, I sent them an email and asked if they would fit the XVZ13ATH Royal Star and they replied ...sure... but if they don't we'll take em back. I being an anal engineer type, sent back an email asking if they were sure as the ventures and some of the stars had different size carbs, like the 28MM and the 32MM ...the reply was they only carry one size. My concern is that they are missing the hole in the tab and the OD dimension for the DS-1 was 72MM which is wider across than my entire cover. Am I correct on this and if so does anyone know where to get the smaller diaphragms only?
-
Could some one please give me the measurements for a Diamond R Receiver ? I need some measurements from you kind folks pleaseeeeee. ? Thank you in advance..... [ATTACH]67619[/ATTACH] [ATTACH]67618[/ATTACH] A. Measurement from front to rear, measuring on the top side. B. Thickness of the receiver bar. C. Measurement from top to bottom of the receiver on the front side, not including the thickness. D. Measurement from top to the center of the pin hole. E. Pin hole size ? F. How wide is the receiver from one side to the other ? James
-
As i was cleaning the bike today I pulled out a very small hose that is connected to the water pump but was not connected to anything on the other end. It's shown on page 5-14 of the manual connected to the pump is this a weep hole for the seal or should it be connected somewhere else. I just put it back down beside the frame where it was.
-
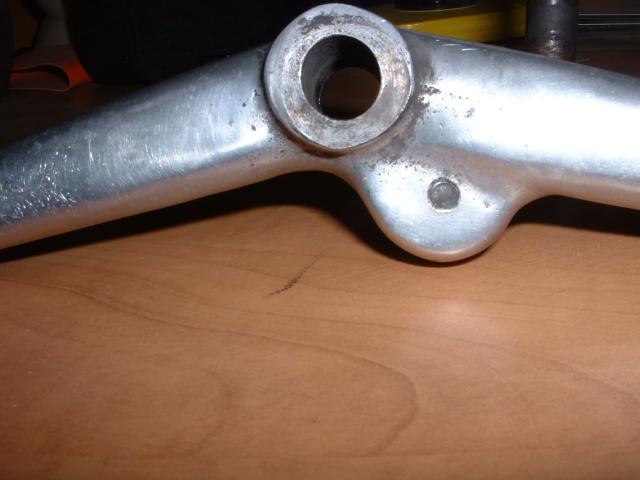
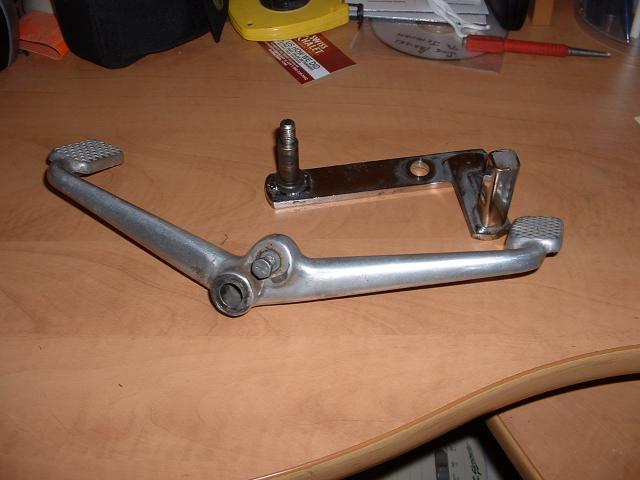
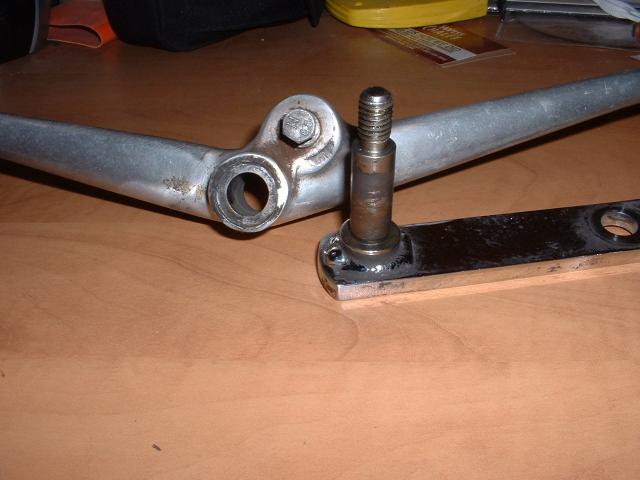
The heel toe shifter on my 83 is flopping around on the shaft. The hole in the aluminum shifter body has gone oval shape and it makes shifting less "secure" if that's the right word. Feels uncomfortable in that I'm not really sure I AM getting to the desired gear or if the shifter just moved under my foot. (I've rarely missed a shift...but you know what I mean.) Is installing a bushing something I can do myself? I don't really want to pay for an expensive machinist job! I am assuming I drill out the hole in the aluminum shifter to the outside diameter of a bushing that would fit tight over the shaft. What would stop the hole from wearing out again? Where does someone buy bushings?

-
 Okay, I finally got around to looking at my RSTD exahust tips. I wanted to turn them around so they looked like most of the pictures in the reviews I've read. I feel that it makes the bike look longer, lol. I found what looks like a set screw hole at the bottom of the muffler housing. However, I tried several allen wrenches and those that fit in the hole didn't grab anything and other wrenches were just to big. I guess I knocked off those particular brain cells when I was younger. What am I missing? ps. no picture yet. I added a drivers backrest, my gps mount and wiring but that is about it. 2007 RSTD. All help would be appreciated.
 -
 One of the screw holes used for securing the top cover on my clutch master cylinder is stripped. The screw is fine. Its the hole that is boogered. I currently have a slightly longer screw in there which did bite but I am not happy with it. Has anyone tried repairing the hole with a heli-coil or Does any one have a master cylinder that I can buy? Thanks, Ray
 -
.thumb.jpg.176b2ebbe9863175975d94710375c414.jpg) [attach]64269[/attach] [attach]64270[/attach] [attach]64271[/attach] Drill the middle hole of the flap to go over the pin Also remove in that same area the rest of the backing inside the fender tip. [attach]64272[/attach] [attach]64273[/attach] Trim the top away until your happy [attach]64274[/attach] I use a little goop as well (love the stuff) LOL and I also used the clamps to help push the flap tighter agienst the fender I also has to drill the hole on each side just a little bit to get the bolt back through. [attach]64275[/attach] [attach]64276[/attach] Enjoy, Jeff
[attach]64269[/attach] [attach]64270[/attach] [attach]64271[/attach] Drill the middle hole of the flap to go over the pin Also remove in that same area the rest of the backing inside the fender tip. [attach]64272[/attach] [attach]64273[/attach] Trim the top away until your happy [attach]64274[/attach] I use a little goop as well (love the stuff) LOL and I also used the clamps to help push the flap tighter agienst the fender I also has to drill the hole on each side just a little bit to get the bolt back through. [attach]64275[/attach] [attach]64276[/attach] Enjoy, Jeff -
I'm thinking about installing a new head unit in my venture. It already has an old aftermarket Vetter radio in it, but my question is, am I just going to have to cut a bigger hole in the cover for the new head unit to fit inside? I couldn't find any info on this. Does anyone have any experience doing this?
-
I got this bike (83 Venture) about 6 months ago and ever since I have been hunting a very loud annoying whistle in the fairing. I have moved duct tape from this vent to that port over the chrome strip under the windshield but could never find it. this last Friday coming home from a ride I went to shift and as I moved my hand over the clutch lever the sound changed, so I kept moving my hand around that area until I found it. there is a hole on the under side of the ball end of the clutch lever. once I covered the hole half of the noise went away so I covered the brake lever hole also and SILENCE IS GOLDEN GOLDEN. It sounded so good not to hear that noise (in stereo) I had to take a 350 mile round trip on Saturday to watch one of my grandsons play football. I almost turned my wife into a Popsicle. We didn't get headed back for home until after dark and the temp dropped to 40. But there was no whistle.
-
Is anyone making these now. I got the original one from the guy in FL and there is a hole worn through it. If someone wants to attempt it I could send the old one to them.
-
we are in michigan for the weekend and twice yesterday a vacuum built up in the gas tank and the bike quit while going down the road. I pulled the rubber vent hose off the top of the tank and blew through it and it is not plugged. trying to blow through the nipple on the top of the tank does not seem to be letting air in but the hole is very small. I can't say for sure if it is plugged and can't find anything small enough to push through the hole. any suggestions. got lucky yestday and the bike did not shut off going down 75. if anyone has any suggestions on how to check the vent let me know.
-
Does anyone know what size tap I would need to retap a hole in my windsheld bracket I have one that seems cross threaded? Thanks
-
 Add me to the list of those looking to find that Yami engineer that desperately needs my size 13 planted where the sun don't shine. So I read up all of the info I could find about changing the diodes in the TCI. I acquired a bunch of diodes for the job. Got all of the necessary tools ready. And dive in head first. There were some threads that made it sound like it would be not to bad to get the TCI out. I started with the suggestion that it can be done from the bottom without having to remove the air box, so that is where I went first. It should have been an ommen but the very first screw that I touched to remove the lower air scoop the hex hole stripped out, kind of my own fault, the last time I had that piece off to do an oil change I noted that the holes were very rusted and not much hex was left. Not a big deal, grab the Dremel with a cut off wheel and grind a slot for a flat blade screw driver. I took off the rest of the recommended parts to gain access to the TCI and sure enough, there it was starring at me. I thought Cool this ain't so bad. YEA RIGHT! I grab my Phillips bit and a ratchet to get the screws out, only to find out that someone must have been after the TCI once before, the screws were completely rounded out. By using the trick of putting some grinding compound on the tip of the bit to get extra traction I was able to get out the screw on the right side of the bike. The left screw just was not going to come out no matter what tricks I tried, none of which is helped by the fact that you can not even see the screw head. Enter plan 2; So since I can not get to that screw from the bottom I go ahead and pull out the air box. Cool now I can see more of the TCI but still can not get to that last screw. Enter plan 3; Grab a hack saw blade and go ahead and cut off the tab from the side of the TCI, (ain't NO way I am mounting it back up in that god awful place anyhow) Now that the TCI is out I'm off to the house and back into the A/C to do the diode swap. I took out the screws to reveal the bottom of the PCB. then take out the screws to release the PCB from the other half of the case and once again grab my trusty Dremel and make the cut to get the case open. Low and behold there are the diodes. every thing in the TCI looks like bran new, I was expecting to see the big globs of corrosion around the diodes like others have posted, but no these are clean and shiny looking like bran new. This got me to thinking, I wonder if the PO had the TCI replaced at some point before I got the bike and that is why the screws were stripped out. So I pondered this for a few minutes, should I just put it back together or doe the diode swap while I am in there???????? I finally decided to do the swap and was able to do the whole job without lifting any pads. I cleaned the board of all flux and other residue and reapplied a conformal coating to protect the circuits from moisture. I did notice that once I got the cover to the TCI off that there was a small puddle of water inside of the TCI!!!! I had washed the bike two days earlier. So I put a bead of sealant all around the perimeter of the case and sealed up the new seam that I created and sealed up the 2 small holes that Yami put there for no purpose other than to allow water in. Now time to put it all back together. First thing was to plug in the TCI and make sure that the bike still runs, WooHoo, it started right up and all 4 pipes got hot. So per the ideas posted here I cut a hole thru the inside of the faring and pulled the wire harness for the TCI thru the hole. It is plenty long to reach. then I got out some splices and heat shrink to repair the white with green stripe wire that I managed to cut thru while making the hole in the faring. oopie! I used some Velcro strips to attach the TCI to the inside of the faring. While I was in there I cleaned out all of the mouse droppings and nut and seed shells that the mice had left there for me. WTF the dang mouse was still in there. Well at least it is dead, that explains the "aromas" that I had been noticing when sitting a red lights. Got that mess all cleaned up, the rest of the reassembly went quite quickly and uneventfully. Once more start it up to make sure everything still works and Yippee, it does. So at least I don't have to worry about this issue for another 24 years. Now if it will just cool off enough so that I can take it for a ride. OK Rant over...... Back to you regularly scheduled programing.
 -
I said I had some extra parts and such for sale and posted it on the watering hole forum as I have seen others do. I went back later to read it and found it had been moved. Where was it moved and why? I can't find it. Reno
-
While pulling & greasing the steering head bearings, I found a small (3/16) hole leading to the upper frame member. Can anyone think of a good reason not to plug this hole. The thought is to put a zerk fitting on the side of the head and be done with pulling this bugger apart to grease the bearings. I think the hole is there to releave pressure while assembling the frame. Since the frame is complete - plug the hole.
-
Hey wingers, has anybody out there tried a Packit Rak OR one of the similar rigs that mounts to a trailer hitch? I'm looking for more carrying space (more room for momma's stuff and a small cooler) and really would prefer NOT to trailer... I've had a guy I met at a shop rave about the packit set up, but I'm not sure I want a hole in the rear fender:confused24: (though on HIS bike he had a reflector that covered the hole when the rack wasn't installed.!) Anyway, any thoughts or ideas would be appreciated!!
-
It's another. First I have the mini-stroke and wind up with 6 months off work (that part i'm not complaining about) but now they have screwed up my pay somehow. I've spent 2 days trying to get that straightened out. So that puts me in the hole and knocks me out of the M/D trip. I was soooo looking forward to that. So maybe next year again. You all have fun and enjoy the sunshine and cold drinks.
-
I need the rubber "cap" or flap or cover that goes over the clutch bleeder access hole on my 84. Anyone got one?
-
>> A man, while playing on the front nine of a complicated golf course >> became confused as to where he was on the course. >> >> Looking around, he saw a lady playing ahead of him. >> >> He walked up to her, explained his confusion and asked her if she knew >> what hole he was playing. >> >> 'I'm on the 7th hole,' she replied, 'and you are a hole behind me. So >> you must be on the 6th hole.' >> >> He thanked her and went back to his golf. >> On the back nine, the same thing happened and he >> approached her again >> with the same request. >> >> 'I'm on number 14, and you're still a hole behind, so you must be on >> the 13th hole.' >> >> Once again he thanked her and returned to his play. >> >> He finished his round and went to the clubhouse where he saw the same >> lady sitting at the end of the bar. >> >> He asked the bartender if he knew the lady. >> >> The bartender said that she was a sales lady and played the course >> often. >> >> He approached her and said, 'Let me buy you a drink in appreciation >> for your help. I understand that you're in the sales profession. I'm in >> sales also. What do you sell?' >> >> 'I'll tell you, but you're going to laugh,' she replied. >> >> 'No, I won't.' >> >> 'Well, if you must know,' she answered, 'I work for Tampax.' >> >> With that, he laughed so hard he lost his balance and fell off the >> bar stool. >> >> 'See,' she said. 'I knew you'd laugh!' >> >> 'That's not what I'm laughing at,' he replied, 'I'm a salesman for >> Preparation H, so I'm still a hole behind you.


.thumb.JPG.86d9722f4ac86bdebadb2b456a9ec8b6.JPG)