


Snaggletooth
-
Posts
4,545 -
Joined
-
Last visited
Content Type
Profiles
Forums
Gallery
Events
Store
Everything posted by Snaggletooth
-
You remember way back when that you helped me out on the 4 1/2" Drag Specialty driving lights I was trying to mount on the brackets you made? I sent you the frame mounting brackets while you were still in MI and you added a gusset to them to stiffen them up. I think those brackets got more miles on them than my bike did that year. They ended up in Texas when you headed south and you and Ponch finshed them up and even powered coated them for me. Well that project died out as the lights were pretty heavy and big and caught a lot of wind and they would shake so bad going down the road it would knock the filiments out of the headlights. I gave up and went back to the smaller and lighter lights. For a while. I liked those DS lights. So back to the drawing board. I think I've nailed it. I fabbed up a set of prototype braces out of aluminum tubing and installed them on the bike with the DS lights. No more shakey at all. Even at highway speeds they are solid. Finally. So now to make a set out of SS tubing and finish this up. They don't look too bad and do clear the lower fairing and the foot wings with plenty of room to spare. That was the whole problem before. No where to really mount any type of brace that would clear everything. I'll go with function over form on this one. So your efforts to help me out were not wasted. It paid off in the end. Thank you once again. Mike
-
Whew! That was close. Thanks for the reminder.
-
I'm afraid I have to agree with Ruffy on the quality of the Batteries Plus unit. No luck with them in the past. The AGM's are known for having an extremely low discharge rate when not being used. I've had my DEKA now ....going into its third season. It has NEVER been on a tender and even sitting on the shelf for the winter season it does not require a charge to top it off. Seeing 9 volts......that battery ain't coming back to full charge I'm afraid. If there was a parasitic drain on the battery that would do it. The clock should not even affect an AGM. Being on a charger over night........I'd suspect the battery is the whole problem. Mike
-
If I'm on track with the right hole, that is an adjustment screw. Gently turn it in until you just feel it seat lightly......do not tighten it!.....and then back it out 2 1/2 turns for a starting point. Now the actual carb bowl drain screw that allows you to drain the bowls is off to the right side of the carb body and sits at an angle. It had a brass screw inside. You can see that clearly. You open that one up and that allows the gas to drain from the black rubber tubes that stick out of the carb rack support bracket. That one you want to snug up a bit after draining the bowls or the drain tube will drip. I can post a pic or two in a bit. Mike Updated: Ok, there is the pic. Arrow on left is the pilot screw. Like I said.. light bottom out then 2 1/2 turns out for close. Arrow on right is the bowl drain screw. Hope that helps.
-
Thanks Don, I'll look into Caswells again. I buy the tank sealer and some polishing products from them now and then. Good folks to deal with. That epoxy tank sealer is great stuff. Did mine a couple years ago and then three more tanks for friends over the winter. I looked into some of their plating kits last fall but decided to not to go that route. Just don't have the type of workspace for that stuff. Just to strip.....might be fine. Gonna do a little test with Okiestars idea to. Might work. Thanks for the suggestions guys. Mike
-
Gary, trying to get the "chrome plating" off some plastic parts. So you're talking about removing badges right?
-

am I getting ripped off ?
Snaggletooth replied to Gogosa's topic in Royal Star Venture Tech Talk ('99 - '13)
I spent a lil over $300.00 on parts alone to rebuild the carbs on my bike......but it's an '84. That was all new floats, diaphragms, needles, seals and valves. With an '07....not even close to needing that kind of work. With little trust of dealer shops I'd bet the carbs wouldn't even get taken off the bike. -
I got a couple new projects starting up and sending some parts to the platers to have the old chrome stripped so I can clean them up and paint them. The thing is I also have some parts that are plastic that were "chromed" and I need to remove that also. Any suggestions on removing that without damaging the plastic? Other than a lot of scraping and sanding? Thanks Mike
-
am I getting ripped off ?
Snaggletooth replied to Gogosa's topic in Royal Star Venture Tech Talk ('99 - '13)
And that is why we call them Stealerships ya know. Don't seem right does it? Like Randy said, dose it with Sea Foam and run it for a bit to let it get into the carbs. Then let it sit overnight and soak. Then take it out and run it like it's a rental. If it's an '07 and only 3200 miles......it ain't been ridden much at all. Carbs and lines are gummed up. Sea Foam it the best product to take care of that. If ya dose it heavy keep in mind a fresh set of plugs will be in order after it clears up. Get that done and do the carb sync and it should in in good shape. Then enjoy the bike. Mike -
Group Order Ebay Venture Patch Last Call
Snaggletooth replied to GolfVenture's topic in Watering Hole
PayPal sent. Thanks for setting this up. Mike -
From the album: '84 Venture Royale
-
I went with the Avon Venoms 3 years ago primarly for the grip and the load rating. I'm 285 lbs. and ride solo most the time. I've got over 17,000 miles on them now and just at the wear bar and no signs of cracking. I watch my tire pressure very closely. Seems to have worked ok seeing the mileage I got out of them. I'm ordering another set soon and torn between the Avons again or chaging to the E3's.
-
There was the time I was stopped at an intersection waiting for the light to turn green and the bike started to rev up all by itself and I started smelling gas. I looked down and saw I was sitting in a good sized puddle of gas. A float had hung up and was blowing fuel out the overflow like crazy. The bike was up to about 4,500 when the light turned green. Time to move or get run over. So off I went with a gas slick rear tire on an asphalt street. Most interesting launch on this bike I have ever had. It had to be entertaining for the folks behind me.
-
Off topic...lil car crisis.. lil help?
Snaggletooth replied to Snaggletooth's topic in Watering Hole
Hi guys. Again thanks for more ideas on this. Royalstar....that was one of the reasons I farmed it out to a friend. Just getting to the pump to pull the rest of the lines and replace the pump involves removing the A/C and other items. Along with the possible other issues line a clogged pickup, a bad line etc. I just don't have the time for it. And my friend has a shop that is set up better to get under the car and chase lines. Piston, good point. I remember now about the there being some problem like that. That is one thing I can check before the tow truck picks it up today. I'm not going to grumble about working on my bike ever again. LOL! Cars are a PITA!!! -
Skydoc_17's Block Off Plates....Nice touch.
Snaggletooth replied to Snaggletooth's topic in Watering Hole
What? Work? You poor devil! Sorry to hear that. But after 2 1/2 years you are probably a lil excited. And 5 AM? You better get your butt to bed. Congrats on the job friend. Welcome back to the rat race. Mike -
Off topic...lil car crisis.. lil help?
Snaggletooth replied to Snaggletooth's topic in Watering Hole
Well it's over. I was convinced the ignition module was heating up and cutting out as he said it only did it after he'd been driving for a while. He came and got the car for a while before I had really dug into it and then called and said it had done it again. He was about 4 blocks away and made it back. It died in my driveway as he pulled in. I threw my tester on it and it was firing like crazy. Lots of good spark. So much for that train of thought. I pulled the fuel filter and it was not clogged with debris as I thought it might be, but nothing was going to go through it either. Dead stop. I had pumped gas out of the feed line this morning to check the gas and it looked fine. I had him spin it and there was no fuel forthcoming from the feed line. Nuttin. So I assume the restriction at the fuel filter was too much for the old pump and killed it off. So I gave him the good news and showed him what would be involved in changing the pump. I even hooked him up with a buddy who has more time on his hands than I do. A lot of work to install a $35.00 pump. The tow truck will be here in the morning to take it over to my friends place. Kids going to need to work some overtime to fix this one. -
Skydoc_17's Block Off Plates....Nice touch.
Snaggletooth replied to Snaggletooth's topic in Watering Hole
Hi Earl. I got rid of those anti-dive lines, what, two years ago. Just something else to leak. Never missed them. When I opened up the forks this time I found the preload on the Progressives had compressed a bit. About 1/4 of an inch. I cut a new set of spacers at 3/4 inch and installed them. My daugther said I looked like an angry monkey when she came out while I was putting the fork caps back in. I can imagine. Not easy but got them in. With the added preload and 10 wt oil it sure feels better. Will know more about the way it rides tomorrow. -
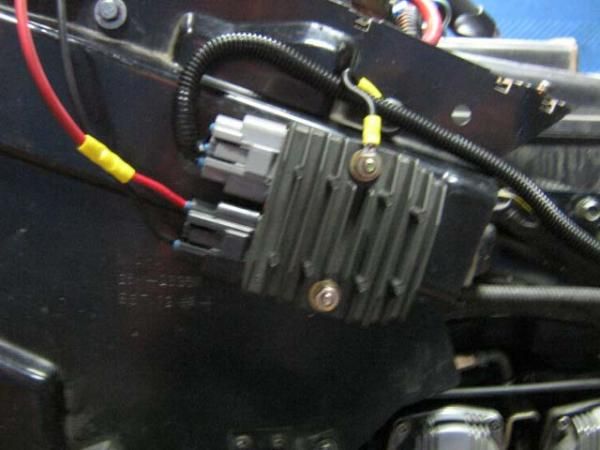
Ok, I finally got around to installing the Shindegen R/R that Dano hooked me up with a while back. Game plan.....under the seat install. No problem. Yeah right. Seems to be a lil tight under there or maybe my big tail section has just compessed it more than it should be. Maybe. But I ended up installing it inside the left fairing mounted on the black inner fairing. I got rid of the amp for the cassette deck long ago and had a lil room to play with there. So I got it mounted up tonight and ran the new harness and capped the old wire and fired it up. Don't fret about the connectors.....it will all be soldered together tomorrow. I know some of you have done this mod already but I was impressed with the output and how stable the charge was. The OEM R/R would always show a bit on ramping up and down on the digtal volt meter. Not this thing. I didn't get a good reading at idle yet as the bike was cold and I didn't run it very long but when I reved it up it jump right to 14.4 and sat there. No ramping at all. I threw on the two 65 watt driving lights (the true test) and it dropped to 14.2. And sat there. No ramping. Not bad. So between Buckeyes upgrade stator, the Shindengen R/R and the DEKA AGM battery I don't think it can get any better than this. Great combination. Some days ya win one. Mike
-
I did a fork rebuild on my '84 and polished the fork tubes while I had it torn down. Earl came up with his Block Off Plates for the anti-dives while I was in the middle of all this so I picked up a set. I wanted the ugly butt anti-dives gone. So today I had it all finished up and back on the bike. Got to admit, it slicked the forks up real nice. Thanks Earl for the time and effort you spent on these.
-
Off topic...lil car crisis.. lil help?
Snaggletooth replied to Snaggletooth's topic in Watering Hole
I pumped out about a pint of gas and it looks clean. Going to install a new fuel filter anyway. But at this point it looks like the ignition module is the culprit. Going to replace the distributor cap, rotor and ignition module and that will hopefully resolve the issue. He's getting off cheap. Under $80.00 for parts. I just installed a new ignition module in my Lincoln and that was $240.00 for it alone. Yikes. Thanks for the suggestions and advice. Mike -
Nice setup there Earl. Looks good. To bad it only works on the MKII.
-
As far as the CB.....look and see if somebody stuck a pin though your coax to. That was an old trick to shut somebuddy up in the old days.
-
Starter crunching
Snaggletooth replied to BlueVenture87's topic in Venture and Venture Royale Tech Talk ('83 - '93)
There ya go. Now that's what I call service!! Hi Dan!! -
Starter crunching
Snaggletooth replied to BlueVenture87's topic in Venture and Venture Royale Tech Talk ('83 - '93)
PM Dano, He does the starter clutch mod for us. I had him do mine in 2/2010. Perfect fix. No issues anymore at all. I'd blown out two clutches before he did mine. Costs a bit more than a new OEM. but not much more and you will never have to replace it again. There is thread around here some where on it. Mike -
Off topic...lil car crisis.. lil help?
Snaggletooth replied to Snaggletooth's topic in Watering Hole
Thanks Goat, that's what I needed to know. Now that I've been thinking about it some of that model had issues with toasting the dist rotors to. That would cause similiar problem. Along with the converter, or fuel pump, or ignition module, or ah hell.......let it be something simple this week. Gotta run. Thanks guys Mike