zagger
-
Posts
558 -
Joined
-
Last visited
Content Type
Profiles
Forums
Gallery
Events
Store
Everything posted by zagger
-
Thanks, nice of you to post that. Gonna head out for a big ride on Sunday - kind of like working at a big trade show with lots of visitors and discussions. zag
-
Very true. I went crazy last fall and tried to turn off the gas for the first time. The plastic valve end just shattered and I ended up having to drain the tank and put in a new valve. My new master plan is to just leave it alone! zag
-

Remove and replace tires at home
zagger replied to dna9656's topic in Venture and Venture Royale Tech Talk ('83 - '93)
I would recommend asking other riders what they do and see if you can discover someone with equipment that does all of this for a low price. I found a guy who retired from a shop and has all of the professional equipment to remove and install tires and spin balance everything. Of course, the wheel has to be off the bike since he doesn't want to screw around for the $20 that he charges. Only takes a few minutes. He doesn't dispose of the old tire either, so I have to bring it to the town dump and pay a couple of bucks to get rid of it. I hope that he keeps doing this for years to come and I don't have to search out someone new! zag -
I like Beachbum's analysis. I recently had a tire valve totally crap out and simply blow air. Valve cores certainly are not expensive, but when they go to hell the air just shoots out. Fortunately, my bike was in the garage when this happened and I just ran up to the hardware store and bought a pack of 4 new cores. You do need a little tool to unscrew the core and put in a new one. Luckily I had an old metal valve cap that had the little end (what is that called?) which engages with the top of the valve core. Fix took a few seconds and the tire pressure is holding. Cap with tool is like these: https://www.amazon.com/Farmunion-50pcs-Chrome-Slotted-Remover/dp/B01K4JH0MC/ref=sr_1_2_sspa?s=automotive&ie=UTF8&qid=1538315971&sr=1-2-spons&keywords=valve+cap+with+core+tool&psc=1 They certainly are affordable - 50 of them for $10 and you only need one! zag PS I didn't notice - here are 10 for $3. https://www.amazon.com/dp/B018I3L3W4/ref=psdc_3152433011_t1_B01K4JH0MC
-
I have also given up climbing trees while holding a running chainsaw. A friend was up in a tree with a running chainsaw and he made the mistake of tying the chainsaw to his belt with a short section of rope. I guess it made sense when he was climbing up and the saw wasn't running. But then he started the saw. At one point he slipped and dropped the saw which then swung back and forth taking chunks out of his legs while it idled back down. Very messy. zag
-
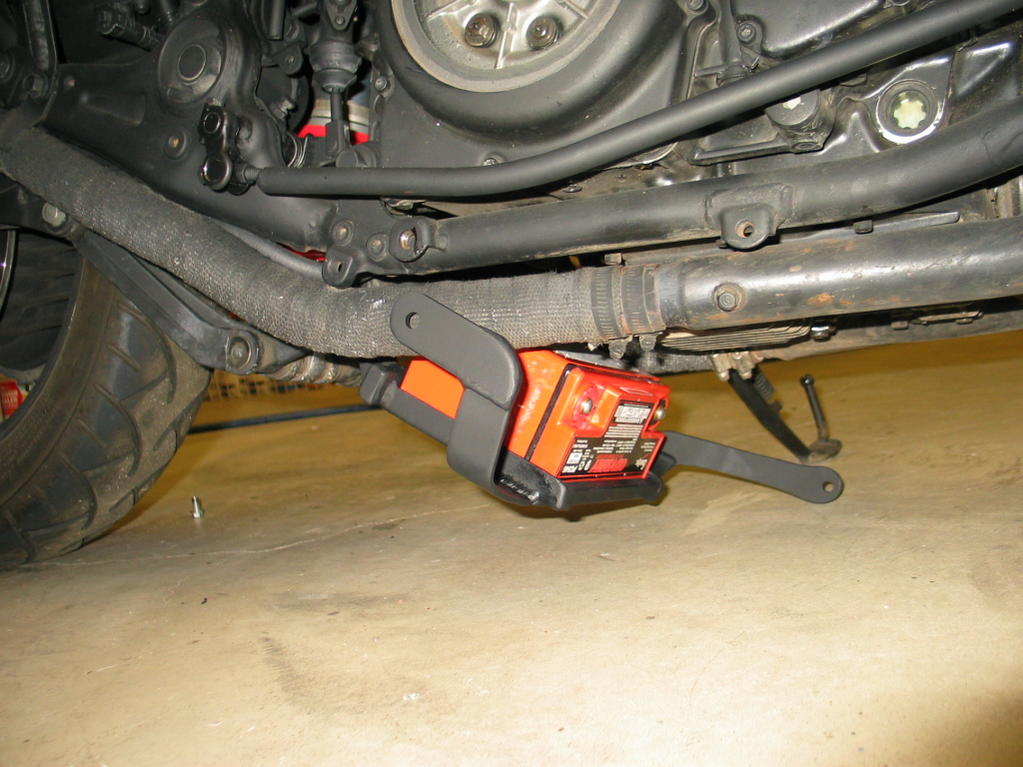
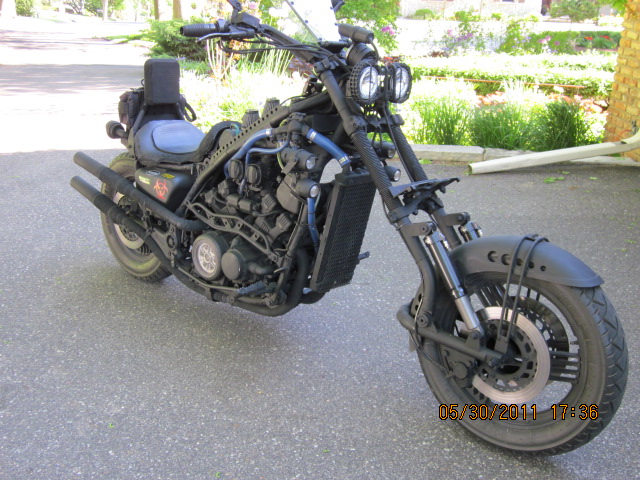
The gas tank is under the seat - the stock 1983 Gen1 location. A small section rises up just in front of the seat, that is where the gas cap is located. The gas tank is one of the few things that I didn't change! In fact, it was the main reason why I bought the bike from Crashed Toys. The stock Gen1 bike has a plastic housing that looks like a standard gas tank but actually encloses the air filter, battery, and the front little bit of the gas tank. Of course, the gas tank has a very complicated, strange shape which is needed to fit down under the seat and out on both sides. I didn't like having a heavy battery sitting up so high in the bike and so I built a metal rack which sits under the transmission and holds the battery. The rack hinges down so the battery can be accessed. Although the total bike weight is pretty high, it "feels" much lighter because the weight sits very low. zag

-
Looks brand new! Nice. zag
-
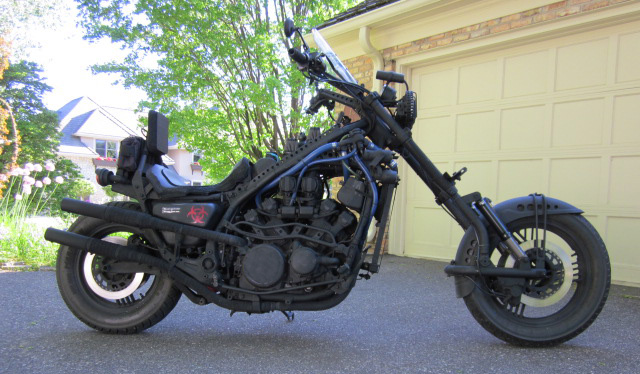
Went to the show - pretty darned cold riding today. Only two bikes there, my black beast and a chrome and shine Bucky Badger chopper (Univ. of Wisconsin logo stuff). Lots of fancy cars. Talked for quite awhile with a guy showing a 1930's hot rod with a huge V8 topped off with a big supercharger - around 600 horsepower. Nice car but might be difficult to stay in the posted speed limits! It reminded me that I originally planned to mount a supercharger on the black beast - one reason why I wanted the intakes to be open and not covered by a gas tank. But after riding it and seeing just how fast it is, I decided not to risk breaking the engine with a blower. I already have a difficult time keeping within the posted speed limit. Turned out that they were only giving trophies for cars and tractors (lots of antique tractors were there). So after I drank enough beer to float a barge, I headed for home. Got back just in time to head to the dump with my wife's garden debris before it closed. Lucky me! zag PS And now it is raining. It was good that I left a bit early. Riding on highways in the rain is one of my least favorite activities!
-
Thanks Cowpuc! zag
-
Even though we are supposed to get a freezing frost tonight, there is a car/truck/bike show in a nearby small town tomorrow. I think that I will enter the black beast just to see what happens. Not a big deal, but it could be funny. The chrome and sparkle paint folks are never quite sure what to think about flat black. Around here, the riding season is closing down fast. A week from this Sunday is the fall Crud Run which is sort of the "end" of riding season. Probably will have 2000-3000 bikes on the back roads outside of Madison WI. The ride goes from Pine Bluff to Leland with everyone following whatever route they like. Bars are at both ends of the ride so everyone just gets a beer and walks around looking at bikes. Makes for a nice day. The Slimey Cruds (where I'm a member) meet every week all year round to drink beer and yak. I've probably mentioned all of this in the past, but it is on my mind since the seasons are changing fast. zaghttp://www.thesabregroup.com/forum/get_attachment.php?webtag=THESABREGROUP&hash=7a20e47f0f43cfa4646ab464887af3f1&filename=IMG_3021.JPG
-
Windshield question
zagger replied to Beachbum's topic in Venture and Venture Royale Tech Talk ('83 - '93)
One option, which I have done for myself, is to buy the taller windshield and then cut it down so that your eyes are just looking over it when you are in your normal riding position. Looking through the shield is always bad due to bugs stuck on the surface. Mark it with tape for the correct height and then cover it with masking tape and draw whatever nice curve for the top edge that you like. I bent a metal yardstick against the surface to give me a nice curve to trace with a pencil onto the tape. The plexi cuts easily with a bandsaw (I would avoid saws that have a back & forth motion since they are likely to crack the plastic) and then you can clean up the edge and fit it closely to your marked line with a belt sander. After you take off all of the tape, you can hand sand the edge of the plexi to get rid of the rough corners along the cut (being careful to not scratch up either surface). If you don't have a bandsaw, then perhaps you can find a shop to make the cut - takes less than a minute. Hand held belt sanders are not super expensive and buying one wouldn't be too crazy. Once the shield is at a height where you can look over it and see the road ahead, try riding the bike and check for buffeting. If you reach up over your head with one hand while riding, you can easily feel the turbulence that will shake your head. As long as the turbulence is an inch or two above your helmet, you should be good to go. Note that the faster you go, the closer the turbulence will get to your head. If you do have buffeting, the airflow can be raised by adding lowers on the front forks. I did all of this on my Honda Sabre and my windshield/fairing situation is totally comfortable. My Venture is completely different and I had zero issues with buffeting even though the shield is very small. Good luck! zag -
Ok, I will be the retard. RTE = Right to Education? So, go ahead and educate me. zag
-
If they help you see the road and be seen by cars, then they are perfect! You might want to just hit the brackets with some black Krylon spray paint from the hardware store - dries super fast. I have 4 headlights and 2 tail lights and haven't had any issues with generated electrical power. zag
-
It has been a few days and I just checked the tire pressure again. Down a couple psi, but naturally I lost a little when the gauge wasn't perfectly aligned with the valve on the first attempt and some air got out. At this point, I'm not going to take off the wheel and have the tire reseated. Seems like my issue has been caused by a leaky tire valve. zag
-
Hey Condor, Oil level is probably just a function of the bike angle. On the other hand - do you enjoy having your legs jammed up underneath you? I've been on some long trips with BMW riders and noticed them trying to shake out their legs on straight stretches of roads. The cylinders sticking out on each side pretty much prevent leg movement forward to a more relaxed position. I cannot imagine why I might want one. zag
-
Sometimes I'm drinking some wine while reading posts. How's it going for you? zag
-
I have to wonder where the water from dehumidifying goes! Maybe it drips down the back of your neck and helps keep you cool? zag
-
Tire info. What's the latest and greatest or tired and true for 07 RSV.
zagger replied to Shadowhawk's topic in Watering Hole
Well, who knows. I've put a LOT of miles on Metzeler tires on two different bikes without any issues. In fact, I'm reluctant to try anything else since they have been so reliable. I have zero idea why others have seen problems. zag -
Hey VentureFar, What is "distinctive urban styling"? I guess that I must be too much of a country rube. zag
-
It sure seems like my leak is gone. I keep checking the pressure every day. It has gone down a little but that loss might be caused by my inability to get the tire gauge on the valve without a little loss of air. I think I will let it sit for a few days and then check it again. zag
-
I know that this is very frustrating. Until this morning, I never suspected the tire valve. Seemed like the leak was too small. When the valve finally failed, I was happy to go get a new valve core. Hoping that this solves the problem. zag
-
Hey Bob, Thanks for the input. I'm gonna just see what the tire pressure looks like tomorrow morning. If it is stable, I'll figure that the problem is fixed. If it goes down, I'll be spraying soapy water like you suggest. Thanks again, zag
-
Thanks for the help MiCarl! I just got back from the hardware store with valve cores - $2 for four of them. Screwed one in and pumped up the tire. Seems good. I'll recheck the pressure tomorrow just to be sure. After struggling with this for a year or more (assuming that the leak was somewhere along the tire bead) I'm more than ready to have this issue go away. Until the tire valve started leaking like crazy this morning, I hadn't suspected that the valve was the problem. Hope this simple fix does it! zag
-
My '83 venture's front tire has been slowly leaking air for a year or more. I thought that the tire was leaking around the rim and I just checked it every 4 or 5 days and topped off the tire pressure. Less of a hassle than removing the wheel and having the tire reseated. This morning I checked the pressure and it was zero. Normally it has been in the high 20's or so. I added air but when the pressure got up a bit, the valve was obviously just blowing it right back out. Seems to be a real pain to get a new valve. I just went to a dealer and ordered a new '83 stock valve but it won't come in for a few days. I asked about just replacing the valve core and the guy just laughed. Are there valve cores available someplace? I looked on Amazon and ebay and didn't see anything. I'm starting to wonder if I should have a personal stock of valves just in case the other wheel gives out. I'd appreciate any advice on this. zag
-
Sorry to hear. I'm really chicken to ride after dark on the roads around here. Too much chance of a close encounter. Had one jump over my front wheel but somehow miss my windshield. Too close. zag