zagger
-
Posts
558 -
Joined
-
Last visited
Content Type
Profiles
Forums
Gallery
Events
Store
Everything posted by zagger
-
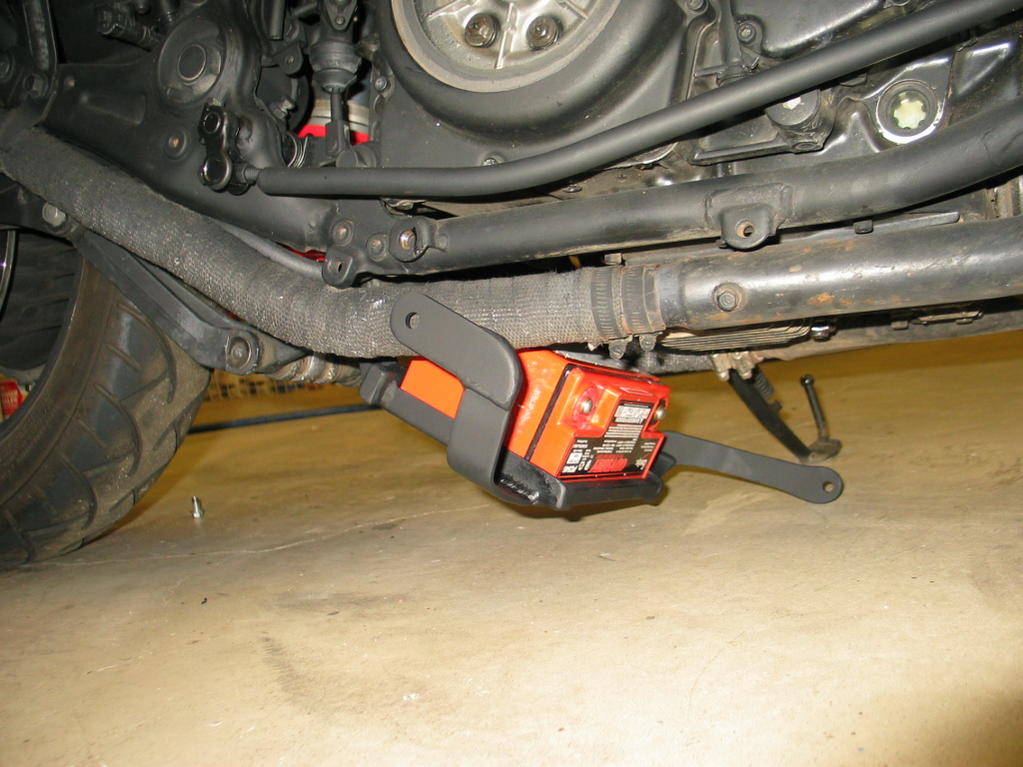
 Dave, If you compare the pressure drop of the stock air box and your replacement filters, I believe that you will discover that the new filters have a lower pressure drop than the stock setup. Problem is that the carbs are designed to work with the stock filter box not your new filters. Perhaps this difference can be handled with some internal carb changes - or maybe not. Years ago, when I did my mods, it didn't seem like there were carb modifications available to handle the inlet filter pressure changes. I fixed the situation by putting airflow restrictors (basically large washers with a machined ID) inside each filter. I did quite a few airflow pressure drop calculations in an effort to figure out what was needed. Here is a picture which shows my intake filters. The bottle in between the intakes is the crankcase "schmutz" collector which traps junk from the crankcase (I probably should mention that I also have a filtered fresh air inlet to supply fresh air into the crankcase). zag
-
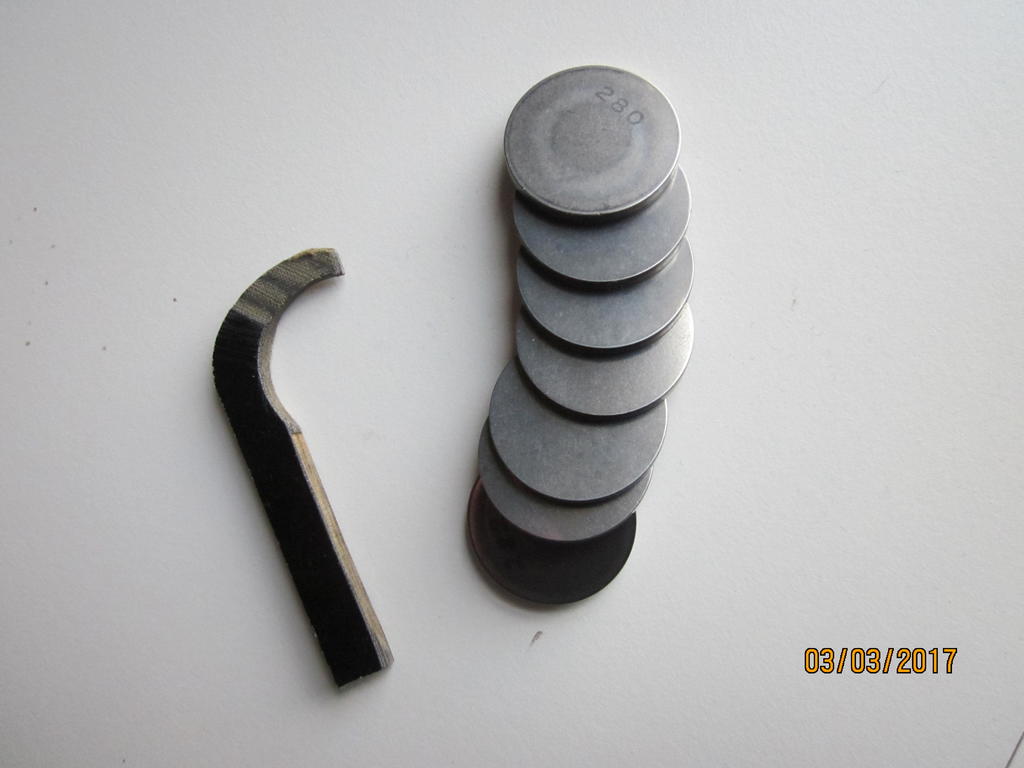
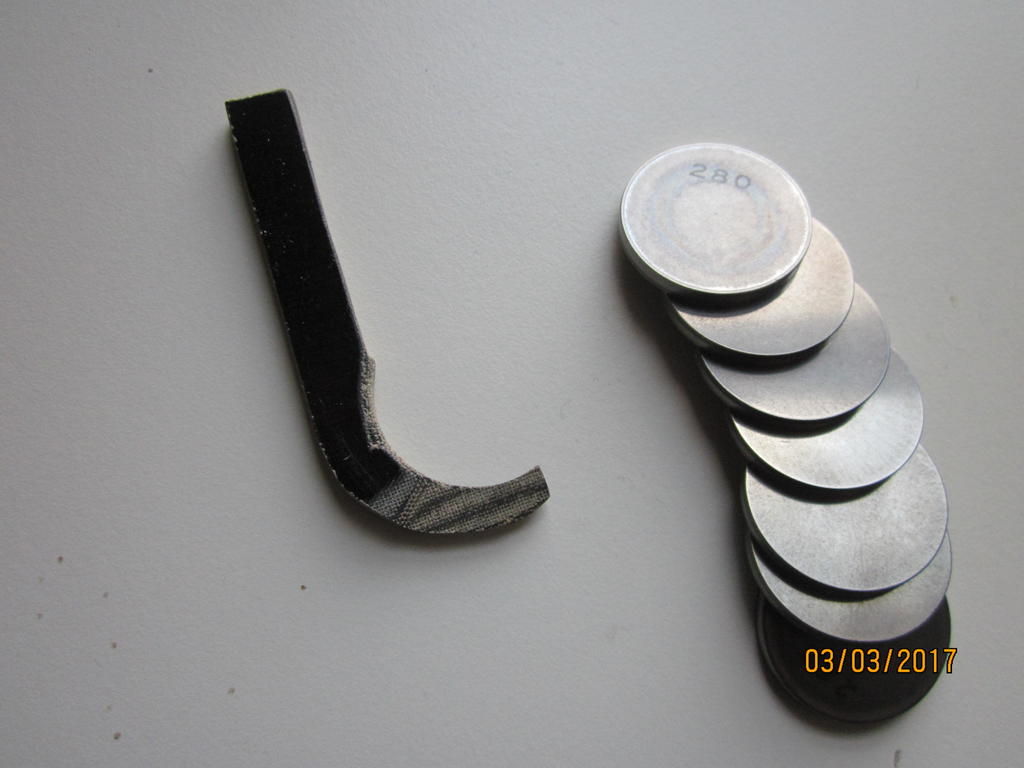
Dave, Here is a picture of the tool (and some shims) I made using a small piece of phenolic (mine was fabric filled) but I imagine that you could use metal or something else. zag
-
Hey Dave, Good question since the blowby muck does need to go someplace. I ran my vent line into a sealed metal bottle which was set up to separate the muck from the gases. The muck stays in the bottle so that it can be cleaned out when I'm in the mood. Here is a picture of my Venture: zag
-
I totally agree. I restricted flow through the four intake air filters by adding a large steel washer inside the neck of each air filter. I machined the ID of the washer to set the intake pressure drop so that I could use stock jetting. Power is good and mileage is in the mid-forties. I believe that the ID is quite important and you cannot simply stick in whatever standard washer you happen to find. I looked through my notes from 10 years ago and it appears that the hole size I used is 1 inch. I have lots of pages of pressure drop calculations and comparisons to the inlet size on the stock filter box. The washer orifice size inside each air filter sets the intake pressure drop, but I should mention that I also have Vboost valves from a Vmax and have found that the best setting for general riding is to have these valves just slightly cracked open. This setting slightly distributes each cylinder intake pulse a little bit beyond the single carb that would supply air/gas in a normal Venture. Obviously, this setup slightly affects the intake pressure drop calculations and the airflow numbers through a single carb. I only mention this to give you a complete picture of my situation. Heavy rain entering the filters might become a problem if you are stopped. On my bike, the filters are somewhat protected by the bike frame, headlights, etc. but I cannot say if that is enough protection for a real soaker. Of course, I try to avoid riding motorcycles in heavy rain anyway! If the bike needs to sit outside in the rain, I have four plastic drinking cups stored in the bike bag which can be placed over the filters to prevent water from entering. My filters point upward so it is not a problem for the plastic cups to just sit there. zag
-
Very few Ventures have been modified to this degree and I doubt that there are any threads which detail the process. I would suggest that you simply build what you like and get the instrumentation to measure air/fuel ratios and figure out how to make it run right. zag
-
Warm=dead. Hmmm. Wonder why. Got out today in the sunshine and was cruising at 60mph on back roads posted at 30mph. Felt Gooooooood. zag
-
1986 Free the Venture Restoration
zagger replied to Asher1877's topic in Venture and Venture Royale Tech Talk ('83 - '93)
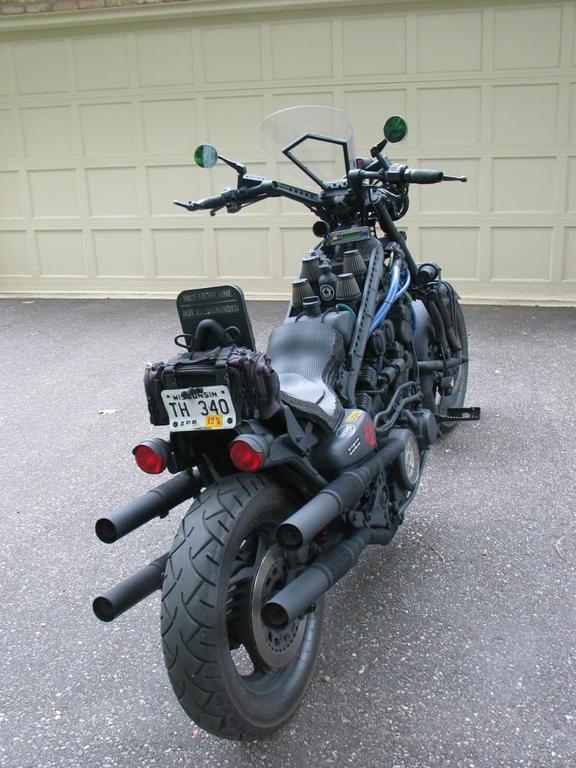
Trying to put your bike back to mint condition is a nightmare - for me at least. Think about going more radical. I bought my '83 after it was crashed with zero intentions to bring it back to mint condition. It does make a great custom bike, however. Mine became a chopped ratbike which is great to ride and gets lots of attention at any bike gathering. 99% of riders have zero idea of what they are looking at. Overall, it was a fun project and the bike is fast and great to ride. I just thought I might try to expand your thoughts a little bit on what you are trying to achieve. zag
-
A new twist on the single carb swap
zagger replied to PKR Customs's topic in Venture and Venture Royale Tech Talk ('83 - '93)
Hey PKR, I like your carb setup very much. Based on your "seat of the pants" dyno, how would you judge the power compared to the standard 4 carb setup? If the power seems to be more, why do you suppose that is true? My Venture has manually variable Vboost valves and it is noticeable that partially opening the valves boosts engine performance in normal riding. I'm wondering if your carb is effectively providing the extra air/fuel that the engine can use in normal riding conditions. Anyway - nice job! zag -
Calling electrical gurus
zagger replied to Bassett's topic in Venture and Venture Royale Tech Talk ('83 - '93)
But heat shrink with internal sealant (my strong preference) probably needs to be ordered from someplace that stocks it. Lots of places have it, just do a google search. I would be very surprised if any normal retail store had it in stock - or even had any idea what heat shrink with sealant is! IMO, using standard heat shrink intended for indoor use, will allow water to wick up into the electrical joint and eventually create problems. zag -
Calling electrical gurus
zagger replied to Bassett's topic in Venture and Venture Royale Tech Talk ('83 - '93)
I agree 100% with baylensman. I soldered all of my wiring connections and covered them with heat shrink tubing which has an internal sealant that melts around the soldered joint. I forget where I ordered the special tubing, but I imagine that you can find it someplace online - just order a bunch of sizes so that you will have whatever you need. Although it sounds kind of permanent, the sealant can be cracked open once the heat shrink is sliced with a razor blade. If you really need a crimp type connector, do yourself a favor and solder the connector onto the wire after making the crimp. If the crimp connector has plastic insulation, the insulation will need to be pulled off before using the connector. After joining the connectors, put heat shrink over the connectors and wires to protect it. The best sort of connector for this are the "bullet" type connectors (a cylindrical shape). By the way, getting a decent soldering iron with a variety of tips will be a help. I don't think it is a good plan to try getting by with the cheapo soldering irons - like the $7.99 ones sold by Walmart. Note that you need some kind of hot air "gun" for blowing onto the heat shrink tubing. I've had good luck with a standard hot air blower designed for paint removal which has a knob for setting the temperature. There isn't one correct answer for "what wiring to save". It depends on how many things you plan to strip out of the bike - those things don't need wiring! The basic functions are pretty obvious and everything else is optional. For example: I put in a new non-air rear spring/shock so I don't have anything related to operation of the CLASS system. I ditched all safety/warning related functions except that I did wire up a neutral indicator light, everything else was removed. On my bike, I identified every wire before cutting it out. I put masking tape on the remaining wire stubs identifying what it was, just in case I needed to reconnect anything. The Venture has a serious pile of wiring and I took my time making modifications. On the subject of wiring, using tin plated, stranded wires will make soldering MUCH easier and more reliable. Junk wire, which is simply stranded copper can be purchased a lot of places but I suggest ordering some decent stuff which will solder easily. Bare copper is hard to solder unless you scrape or sand off the oxidation on the copper - a serious pain. zag -
Just out of curiosity, is there any way to get tickets that are cheaper than the normal $18/person? Seems like there are a bunch of dubious websites offering $4 discounts on tickets if you do something or the other with them - but I'd rather not be spammed to death for $4. Just wondering if there is some way to get legit tickets on the cheap. If you have been there in previous years, any recollection of what parking costs? zag
-
I will bet he was referring to the Progressive International Motorcycle Shows. Next one is this coming weekend just outside of Chicago: http://www.rosemont.com/desconvention/events/progressive-international-chicago-motorcycle-show-/ I've also got the itch to get out and check out bikes. I think that I will wait another week and head over to Milwaukee for the "Mama Tried" bike show. http://mamatriedshow.com/ All custom stuff. zag
-
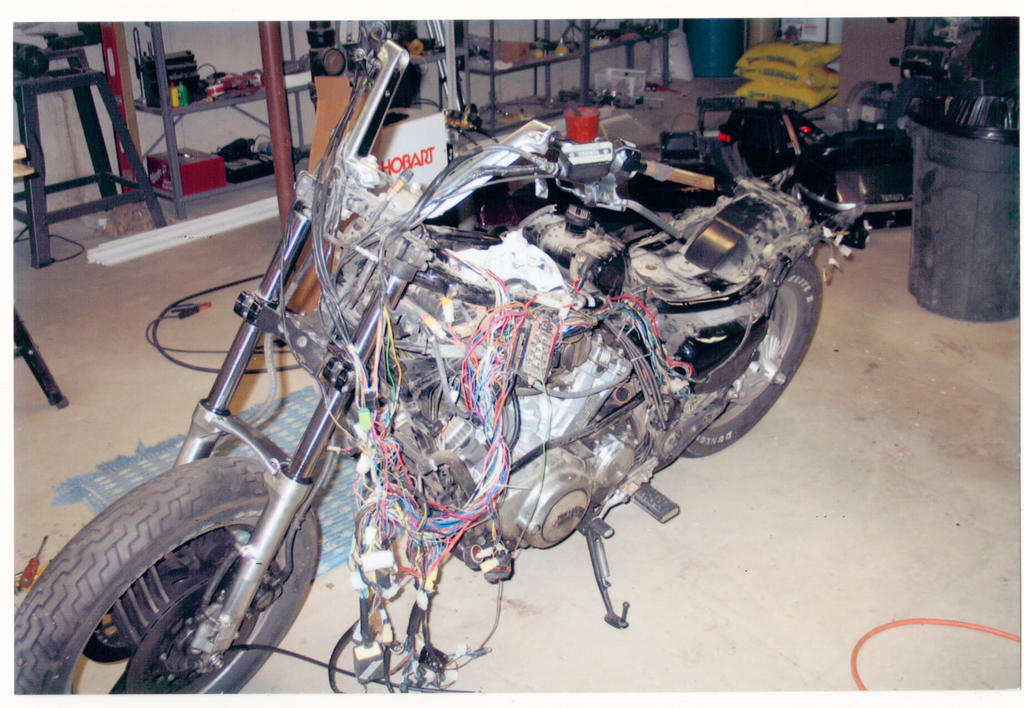
I packed all everything into the area just ahead of the carb intakes and made a cover for the stuff. I did eliminate about 90% of the electrical wiring, relays, and whatever - kept just the necessary things and made new wiring that was short and clean. If you try to keep all of the stock wiring (picture below) then you will have a real mess. zag
-
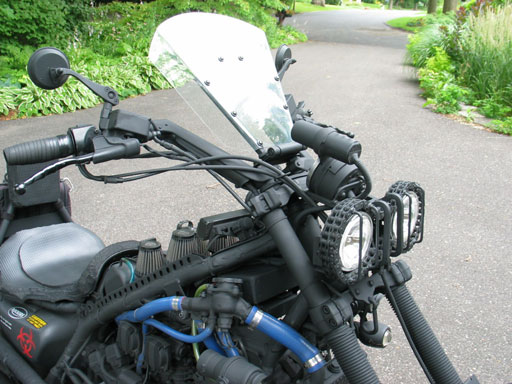
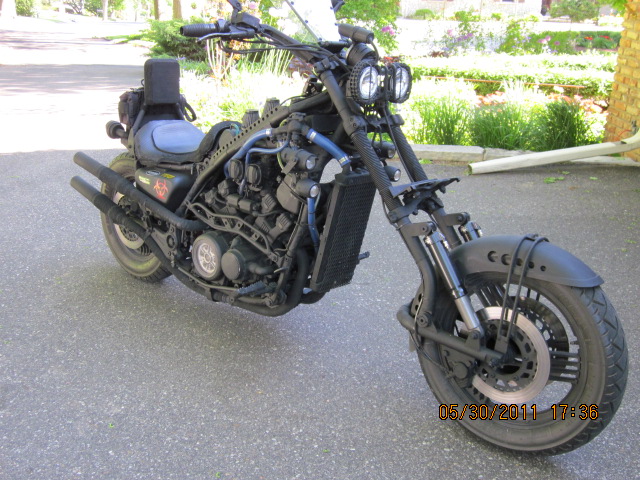
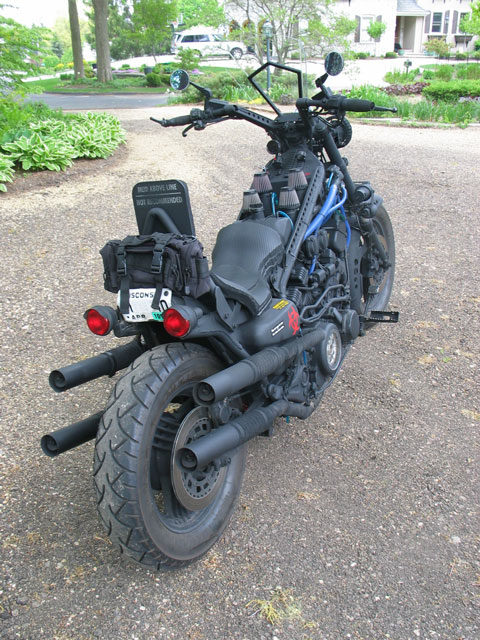
Digital tach (cable driven speedo was from some other bike), headlights (two pairs actually, one pair to act as high beams and one pair to act as low beams but got a ticket for not having my "headlights" on so I put lower wattage bulbs in the upper ones and keep all four on when riding), double tail lights which also act as turn signals, front turn signals, and one puny little battery operated LED light to shine on the license plate. The rear brake lights/turn signals actually came off a British Landrover and were never intended to handle both functions on a bike so I had to rebuild the guts of the lights to handle different bulbs. I tried to minimize the housings around lights and yet have them be watertight. This pushed me into using non-motorcycle parts. The stock Venture radiator is short and wider than the current bike - so I used a Honda VTX radiator (mounted upside down) and built a new mount for the fan. I don't have any warning lights (high beam, temp, whatever). The key switch is just a simple industrial on/off switch turned by a simple plastic "key" which can be removed. Almost forgot, there is also a powered mount for a Garmin gps near the air filters. zag PS The pictures recovered (above post) are the very first ones I took. The current front forks with leading link suspension are completely different. Straight extended forks give very slow handling.
-
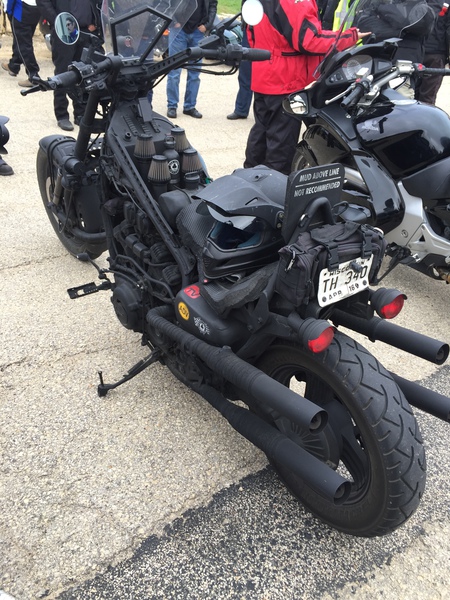
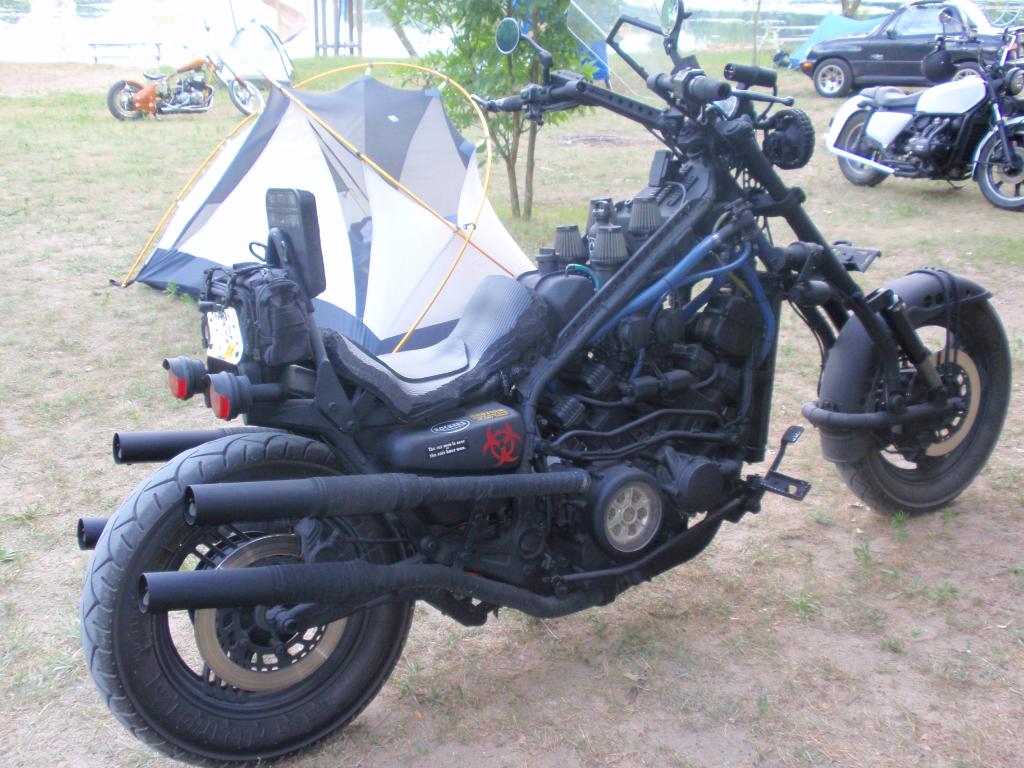
Hi - here are a couple of pictures of my 83. More of a chopper than a bobber. Fuel tank is stock (under the seat). Lower section of the handlebars are basically stock but the ends are custom. Battery is mounted horizontally under the engine. Added Vboost from a Vmax (doubles air and gas by connecting each intake to two carbs) but it is operated with a bicycle shift lever mounted on the end of the left handlebar. Bike has very low CG and good handling. The leading link suspension for the front wheel reduces the trail dimension down to 3", about what a sportbike might have. I first tried extended hydraulic forks but the handling was very slow (long trail dimension) so I built a new front end with a custom leading link. The clear cover over the clutch lets you see the parts whizzing around inside. I had so many people ask if I had used Harley components, I welded up the mounting of the headlights using an old primary chain from a Harley - but it turned out that the joke was on me since few Harley riders seem to know that their engine uses a primary chain to connect to the transmission! zag
-
Yup. Lots of snow - followed by rain all Christmas day - followed by a sunny day at forty-something degrees (F) which gradually dropped to the mid-twenties. And winds gusting to 40mph. Guess it's better than the -10F temps we had a few days ago, but not by much! zag
-
Great area for riding! I look forward to seeing everyone there. zag
-
Hey Casey, My 83 Venture has vboost valves with manual control. I used a bicycle shift lever mounted on the end of the left handlebar to provide the means to manually open and shut the vboost valves. Heads and cams are stock venture. The bicycle shifter has several "clicks" between closed and fully open and I have found that the engine runs best for general riding with the valves just slightly opened (one click) all of the time. I cannot say that I've ever experienced the vboost rush of power - likely because my RPM's are generally too low to require the extra air/gas. Or maybe the stock heads and cams just cannot make use of the extra juice - I really don't know. I've never ridden a VMax and cannot compare my setup with the real thing. The boost valves do add some extra height to the intake system - not a problem for my bike but it might be a problem with a stock airbox. Good luck. zag
-
Maybe someone does, but not me. zag
-
Thanks. I cannot think of any changes that I would enjoy - so I guess that it is done! zag
-
Geeesh. It would be nice if he could spell "competition". zag
-
the new guy needs some help
zagger replied to skruphy's topic in Venture and Venture Royale Tech Talk ('83 - '93)
Four exhaust pipes will require internal baffles. I made the back pressure adjustable with big washers mounted onto rods that go across the exhaust outlet. Rotating the washers opens or closes the exhaust flow. Getting individual carbs to work correctly probably will also require disks with machined openings mounted into the intakes. No restrictions on the intakes will likely be a problem. zag
-
"Back to my main point though, this bike does not make an easy chop or Bob." Might not be easy, but once you have taken off all the unnecessary stuff the bike is faster and handles great. The center of gravity is very low which makes it feel much lighter than it really is. I even moved the battery down below the transmission to help keep the weight positioned low. zag
-
In just 6 more years the 1st gens in WI can start to wear Antique plates. In WI Antique plates are for vehicles that are 40+ model years old. Except per the DMV: A vehicle with Antique license plates can only be driven for special occasions, such as display and parade purposes, or for necessary testing, maintenance and storage purposes. I'm gonna guess that hauling ass down back roads isn't a special occasion! zag
-
Since you are planning to tackle lots of things on the bike, the second gear issue really isn't that much more effort to fix. I bought mine without the second gear problem but tore it down enough to replace the split washer thingy with a new hardened one. The old one was pretty deeply worn but hadn't quite become a problem. Of course, the engine does have to come out of the frame to get it apart enough for this work. And you need to rig up a way to compress the big stiff spring that puts constant load on the washer. After all that, sticking in the new part takes only a second! I guess you can ride without second gear, but why do it if you can simply fix the problem? It has been quite a few years, but I doubt that it took more than a couple of evenings work since the bike was already in pieces. zag