zagger
-
Posts
558 -
Joined
-
Last visited
Content Type
Profiles
Forums
Gallery
Events
Store
Everything posted by zagger
-
It gets wet! But it is a sealed battery and doesn't complain about its dirty and wet life down under the engine. zag
-
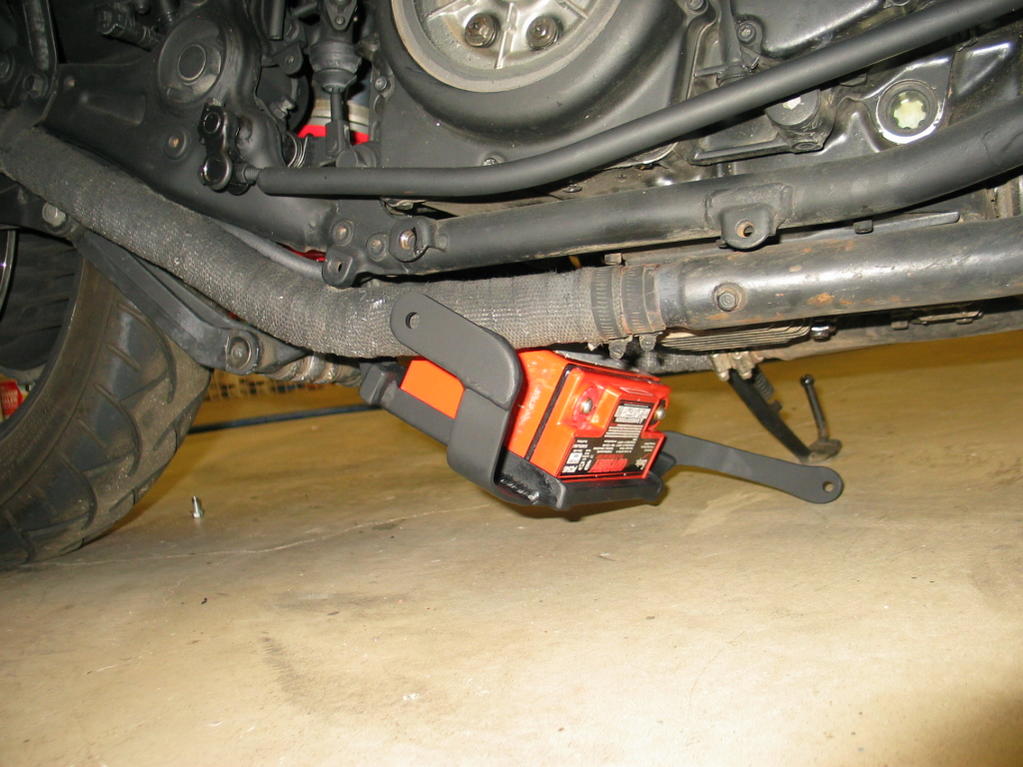
Here you go. I used existing threaded connections to the frame, which is why the hinged frame has strangely shaped attachment arms. zag

-
One of the simplest ways to reduce the apparent weight of an early venture is to relocate the heavy battery to a new position which is lower in the bike. I put mine below the transmission on a metal rack which hinges downward for access to the battery. From a riding perspective, my venture feels like it weighs less than another bike I own which is actually a couple of hundred pounds lighter. Just a thought. zag
-
Looks good! What is under the cover that looks like a standard gas tank? zag
-

Jets, airbox, and pipes
zagger replied to Bassett's topic in Venture and Venture Royale Tech Talk ('83 - '93)
I guess that kloppenberg's method would be as good as any. Of course, the single filter will load up with crud four times faster than having four individual filters (which I used). Depending on the complexity of the manifold, I would assume that each carb would need a separate and unique flow restrictor. If each carb is connected to a filter in the same way, a single flow restrictor design would work for all of them. zag -
Jets, airbox, and pipes
zagger replied to Bassett's topic in Venture and Venture Royale Tech Talk ('83 - '93)
Hey Bassett, I certainly agree on ditching the airbox. If you go to individual filters for each intake, they will make your carb unhappy since it is expecting a larger pressure drop on the intakes. Perhaps things have changed over the years, but I wasn't aware of carb jets, etc. which might have been used to help with the loss of intake pressure drop caused by removing the stock filter. I made airflow restrictors out of steel washers. The ID of the washers has to be machined to the correct dimension. This has the effect of putting the carbs back into their normal operating range. zag -
You might just think about the option of completely removing all of the plastic and not trying to repair it. I bought my bike after someone had crashed and rolled it - pretty well removing any thought of restoring it. I had intended to strip it down anyway, so all of the smashed plastic wasn't a problem for me. Just thought I should toss that thought out there. zag
-
After years of not messing with it, a year ago I suddenly had a bright thought that I should be turning off the gas before storing it for the winter. Trying to turn the little plastic shaft, I promptly snapped it completely off and was forced to drain the tank and install a new valve. I've gone back to my original operating procedure of just forgetting about it! zag
-
Going to buy another one....
zagger replied to mcompton1973's topic in Venture and Venture Royale Tech Talk ('83 - '93)
I've done the 2nd gear repair. If you do the work, it isn't very expensive but it does require plenty of effort. I certainly can understand why a shop would charge quite a bit for the work involved. Enough years have gone by since I did the work so that I don't really remember the pain! The two little retainer thingies which have worn grooves made a nice addition to my shop mobile which contains all of the really nasty/stupid/crazy engineering failures that I've fixed. The latest addition is a brass Y plumbing fitting connected to my washing machine which recently broke in half and flooded part of the first floor of my house and part of the basement. Luckily, I don't know who was responsible for the design! The broken pieces will be added to my mobile of insanity. zag -
No idea why your entire post didn't show. But replies have been pretty limited. So, does it run - sorry just joking - I'm gonna guess that it has a few issues. What do you have planned to get it back on the road? zag BTW, Google maps doesn't seem to know about Papillion, AK. Where are you?
-
VERY good! zag
-
FYI: The morleysmuscle link seems to have a problem.
-
Dave, I used a sealed Odyssey PC545MJ battery (http://www.odysseybatteries.com/batteries/pc545_series.htm) which lays on its side on top of a hinged metal rack. With the front of the rack resting on the floor, I strap the battery to the rack (the rack is designed to fit closely around the battery to prevent it from sliding around) and attach the cables. Then I lift the front of the rack up until I can thread in the two bolts which hold it up (located on each side). I used two existing threaded attachment points on the side of the bike frame but you could weld on whatever you like. When the battery is sitting on the frame under the bike (under the transmission section) it is flush with the bottom of the bike frame and cannot be seen without peering up under the bike. I used the metal jacketed version of the battery simply to add a little protection from road debris, rocks, whatever. Moving a heavy item like the battery to a very low mounting spot from the stock location where is sits up high does help to lower the overall CG. zag
-
It only looks dirty due to the lighting in the picture. These filters can hold quite a bit of crud and none of them are due for a cleaning anytime soon. Of course, since they sit out in the air right in front of the rider, it is easy to notice when they are due. I spray them with some cleaner stuff and the dirt easily rinses off. I blow them off with compressed air and let dry before reapplying the filter oil. Lot's better than just tossing them all in the trash! zag
-
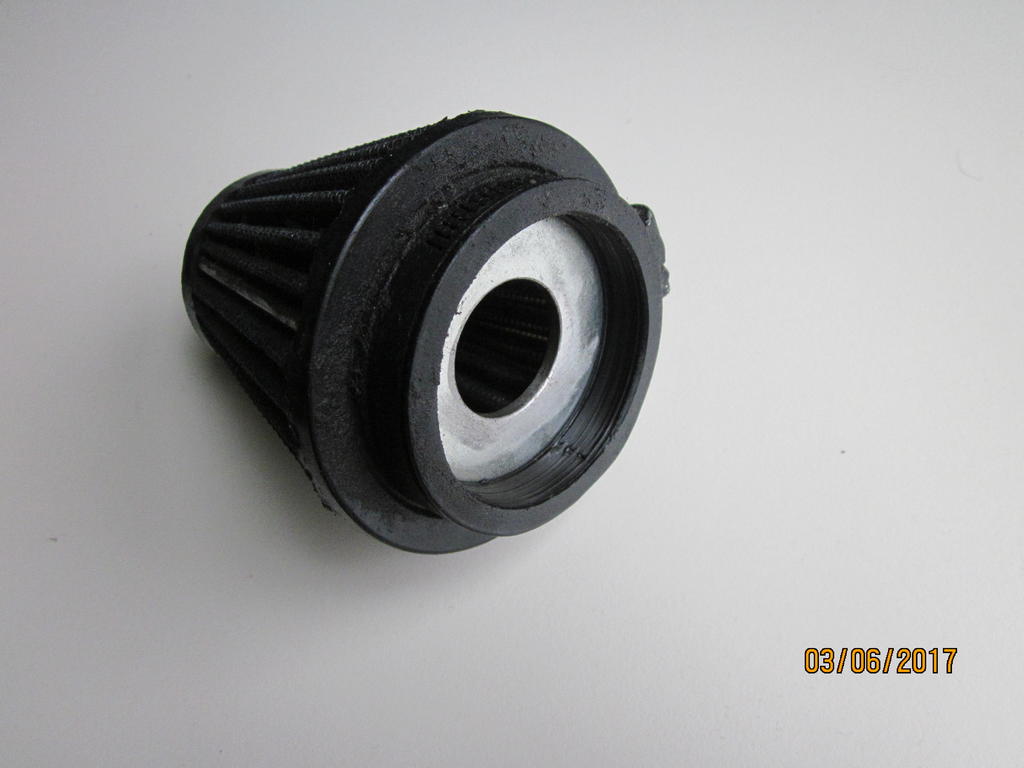
Hey Dave, I checked my notes and calculations from years ago and decided I better pull off a filter just to be sure that I didn't give you bad information. The washer ID is 1" and each carb has its own filter. My filters are K&N and look like this one: http://www.knfilters.com/search/product.aspx?prod=RU-2580 I'm not sure of the K&N part number, but you would need to use one that fits your intake anyway. These filters are cleanable and need to be sprayed with a special K&N filter oil after cleaning. zag
-
Hey Dave, I thought that I should pass on one thought that you might want to keep in the back of your mind during your building process. The Venture engine is relatively "flat" compared to other motorcycle engines and its weight sits fairly low. Meaning that the overall motorcycle CG (center of gravity) can be quite low if all the other stuff can be removed. A low CG is very nice since it makes the overall bike weight seem to be much lighter than it really is. Compared to a Vtwin cruiser that I own (which actually weighs less), my Venture feels much lighter from the rider's perspective. So - my suggestion is to remove whatever you can and move anything heavy (like the battery) to a position as low as possible. For example, I moved my battery down below the transmission just to help with this. zag
-
It probably depends on what you plan to paint it with. I used rattle can Krylon flat black (ULTRA flat actually!) - this paint is both easy to spray and easy to patch up with new paint - but easy to damage with some solvents. Cleaning metal parts with soap & water and/or a solvent like acetone or MEK is likely to be good enough. I'm not an expert painter but I make up for it by using paints which are easy to touch up with fresh coats. Actually, it surprises me how well my crappy painting has weathered lots of outdoor exposure over nearly 10 years. I guess that the paint job on a "ratbike" should have a certain level of rattiness! Of course, I painted parts on a piecemeal basis - when the part was completed, I painted it. I cannot imagine trying to get a professional paint job done on all of the parts as you slowly complete each little thing. Just so you know, inhaling paint fumes is not good. For routine painting of small parts, I made a crude spray paint "booth" out of a large cardboard box with ductwork and a fan to vent the fumes out a basement window. I would spray a part, close the cardboard flaps, and let the paint dry while the fan vented fumes outside. zag
-
Dave, The inlet into the collection bottle is on the bottom of the bottle. Inside the bottle, the inlet fitting sticks up 2 or 3 inches above the bottom of the bottle. The outlet for gases is on the side of the bottle close to the top. The outlet connects to a hose which is routed down below the engine (to outside air). It is pretty easy for me to see the system work. I originally put a clear window over the clutch - just for the "cool" factor of seeing it whizzing around. When the engine is cold, quite a bit of visible blow-by schmutz can be seen on the window. After running down the road - allowing the engine to warm up and some air flow through the crankcase - the window becomes completely clear. The total amount of blow by collected in the bottle isn't huge. It can be easily wiped out with about 1/2 of a typical paper towel - I made a crude pair of metal "tweezers" to reach inside the bottle and hold the towel. zag
-
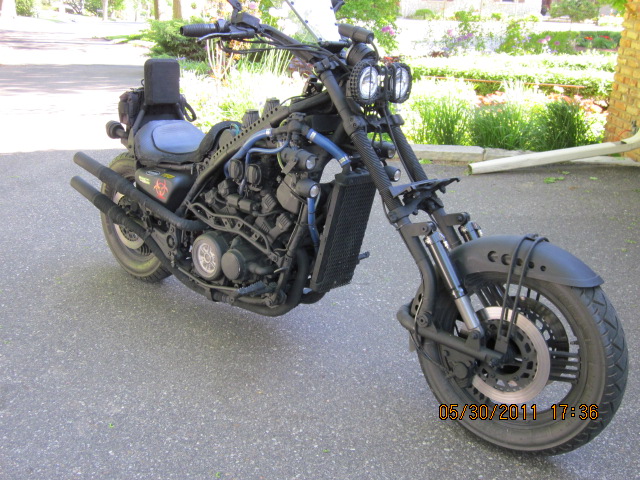
Dave, If you compare the pressure drop of the stock air box and your replacement filters, I believe that you will discover that the new filters have a lower pressure drop than the stock setup. Problem is that the carbs are designed to work with the stock filter box not your new filters. Perhaps this difference can be handled with some internal carb changes - or maybe not. Years ago, when I did my mods, it didn't seem like there were carb modifications available to handle the inlet filter pressure changes. I fixed the situation by putting airflow restrictors (basically large washers with a machined ID) inside each filter. I did quite a few airflow pressure drop calculations in an effort to figure out what was needed. Here is a picture which shows my intake filters. The bottle in between the intakes is the crankcase "schmutz" collector which traps junk from the crankcase (I probably should mention that I also have a filtered fresh air inlet to supply fresh air into the crankcase). zag
-
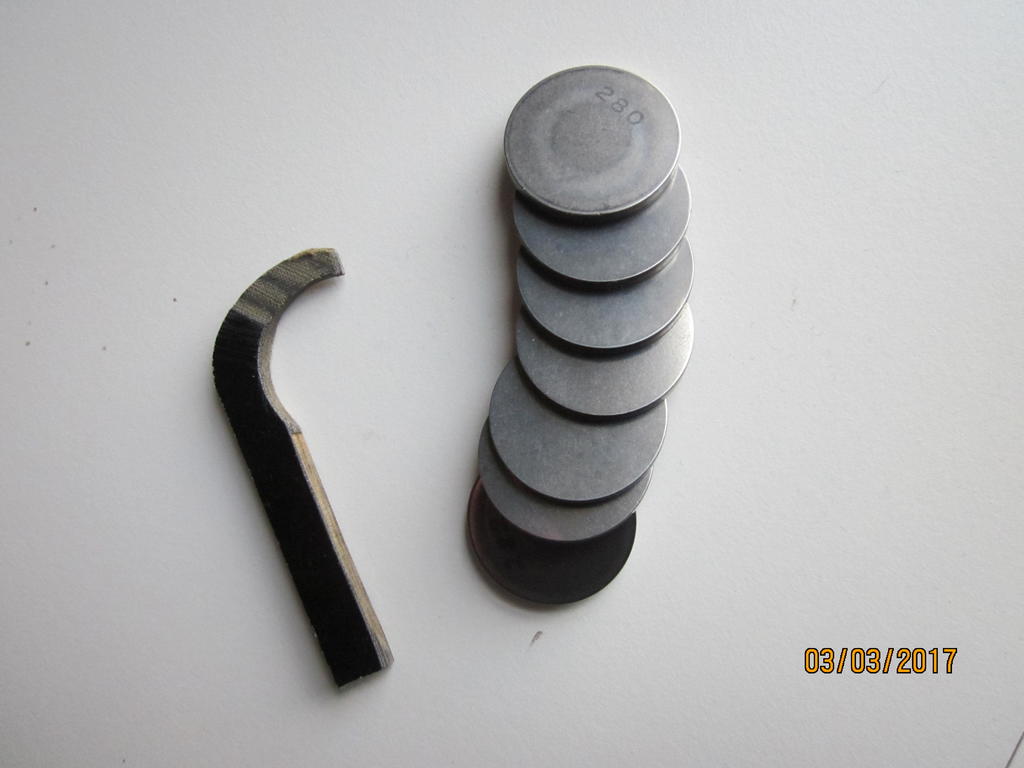
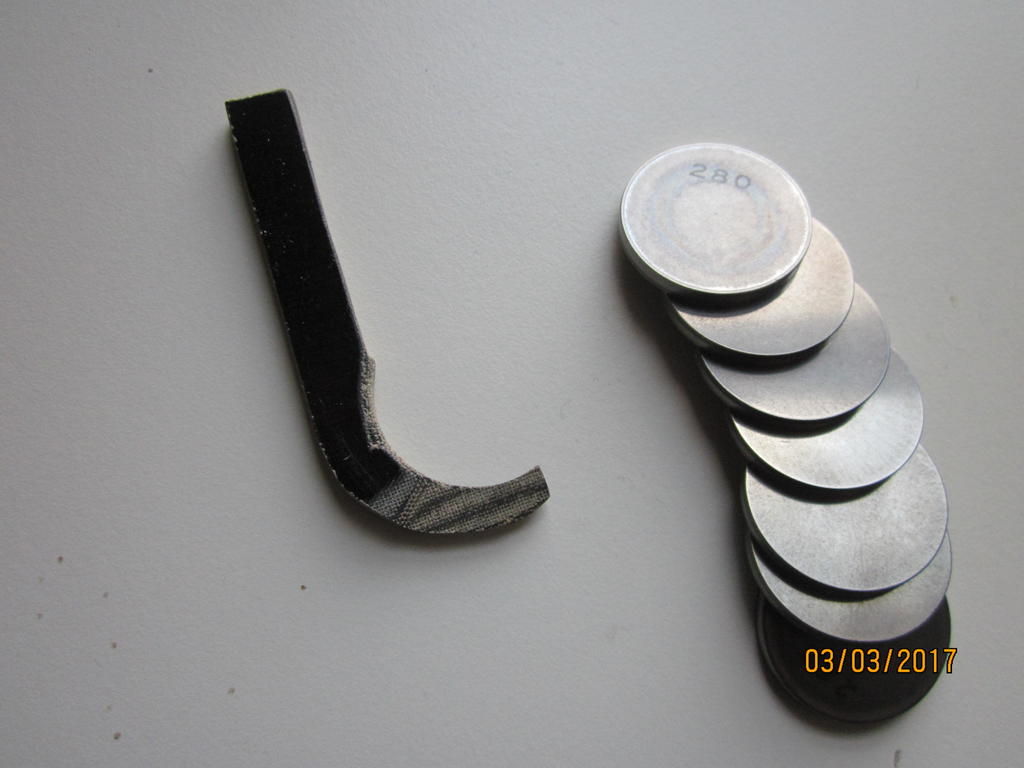
Dave, Here is a picture of the tool (and some shims) I made using a small piece of phenolic (mine was fabric filled) but I imagine that you could use metal or something else. zag
-
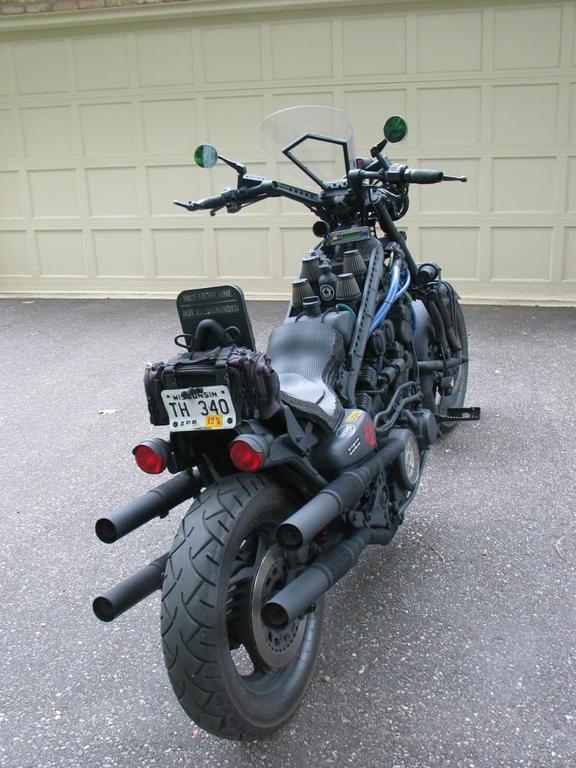
Hey Dave, Good question since the blowby muck does need to go someplace. I ran my vent line into a sealed metal bottle which was set up to separate the muck from the gases. The muck stays in the bottle so that it can be cleaned out when I'm in the mood. Here is a picture of my Venture: zag
-
I totally agree. I restricted flow through the four intake air filters by adding a large steel washer inside the neck of each air filter. I machined the ID of the washer to set the intake pressure drop so that I could use stock jetting. Power is good and mileage is in the mid-forties. I believe that the ID is quite important and you cannot simply stick in whatever standard washer you happen to find. I looked through my notes from 10 years ago and it appears that the hole size I used is 1 inch. I have lots of pages of pressure drop calculations and comparisons to the inlet size on the stock filter box. The washer orifice size inside each air filter sets the intake pressure drop, but I should mention that I also have Vboost valves from a Vmax and have found that the best setting for general riding is to have these valves just slightly cracked open. This setting slightly distributes each cylinder intake pulse a little bit beyond the single carb that would supply air/gas in a normal Venture. Obviously, this setup slightly affects the intake pressure drop calculations and the airflow numbers through a single carb. I only mention this to give you a complete picture of my situation. Heavy rain entering the filters might become a problem if you are stopped. On my bike, the filters are somewhat protected by the bike frame, headlights, etc. but I cannot say if that is enough protection for a real soaker. Of course, I try to avoid riding motorcycles in heavy rain anyway! If the bike needs to sit outside in the rain, I have four plastic drinking cups stored in the bike bag which can be placed over the filters to prevent water from entering. My filters point upward so it is not a problem for the plastic cups to just sit there. zag
-
Very few Ventures have been modified to this degree and I doubt that there are any threads which detail the process. I would suggest that you simply build what you like and get the instrumentation to measure air/fuel ratios and figure out how to make it run right. zag
-
Warm=dead. Hmmm. Wonder why. Got out today in the sunshine and was cruising at 60mph on back roads posted at 30mph. Felt Gooooooood. zag
-
1986 Free the Venture Restoration
zagger replied to Asher1877's topic in Venture and Venture Royale Tech Talk ('83 - '93)
Trying to put your bike back to mint condition is a nightmare - for me at least. Think about going more radical. I bought my '83 after it was crashed with zero intentions to bring it back to mint condition. It does make a great custom bike, however. Mine became a chopped ratbike which is great to ride and gets lots of attention at any bike gathering. 99% of riders have zero idea of what they are looking at. Overall, it was a fun project and the bike is fast and great to ride. I just thought I might try to expand your thoughts a little bit on what you are trying to achieve. zag