-
Posts
239 -
Joined
-
Last visited
Content Type
Profiles
Forums
Gallery
Events
Store
Everything posted by stanG
-
Open for business... I'm looking to take on a few re-cover jobs for members if you are interested. PM me to dicuss what you have and what you want. Not having that sticky vinyl is a REAL PLUS!
-
Well the seat is done. I'm pleased with the results but I would make a few minor adjustments to the process and the fittment on the next go-round. No doubt the hardest part was sewing up the backrest as there is some tricky alignment for the side pieces and when you look at the individual pieces they dont look like they fit together. Using the index marks from the original was essential to getting it right. I would have to say that if you are not experienced at sewing this would be a tough one. Attached is a photo of the finished product. As far as comfort, it feels good sitting on it in the garage but I don't have any road time on it yet. I did replace the foam in the cover (sandwiched in to create the stitch pattern) with 1/2" 2.2 lb medium density foam. I expect this will provide a little better ride on the long runs.
-
Using an industial machine and #92 polyester thread. I will try to document the sewing procedure during the assembly as it has to sewn in a specific order. The trickiest part was making the pattern from the old seat.
-
Update and thanks to reddevilmedic for the seat cover to use as a pattern. The vinyl is cut and ready for sewing. I probably will get to it later this week. Running some samples through the Consew 226 now make sure the stitching is right.
-
Pm sent with info. Based on my success, (if any) I might be will willing to take on a few more. If the results are good I will post an update.
-
Hello... Does anybody have an old seat cover for an 83-85 they would like to give up for use as a pattern? I am looking to recover my seat and sew one up myself. It doesn't need to be in great shape just good enough to disassemble and trace the pattern. I would like to then post the pattern back to the site for future use.
-
I'm north of Port Sanilac along M-25. Sorry, no photos from inside.
-
Has anybody used this windshield as a replacement and is it a decent quality for the price? http://www.ebay.com/itm/83-93-Yamaha-XVZ-1200-1300-Venture-Royale-WINDSHIELD?item=140815088391&cmd=ViewItem&_trksid=p5197.m7&_trkparms=algo%3DLVI%26itu%3DUCI%26otn%3D2%26po%3DLVI%26ps%3D63%26clkid%3D1624150924259620255
-
I had to stop here at least for the photo op while on a trip along Lake Huron this weekend. A side benefit was that the food was good too.
-
Well we weren't real hard on the throttle as we were back roading it and there was a good deal of traffic, however, I do like to open it up to get to road speed. I think you would agree that it's real hard NOT to crack the throttle on these bikes! Around home average driving I get about 45-47, doesn't matter if I am alone or riding two up. Average rpms at road speed is about 3700.
-
I just completed a 600 mile jaunt around the northern lower peninsula of Michigan on my 83 first gen and was pleasantly surprised by the mileage. 51.25 average on the whole 600!!! This is the best I've had since installing new diaphragms and Skydoc's needle shim kit earlier this year. Anybody else getting this kind of mileage?
-
The radio itself seems OK, however I am geting a little RF interfence that you can hear when the RPM's rise. I am not sure if this is coming from the antenna or if the radio itself does not have enough sheilding to keep out the RF from the coil packs. I will experimenting with a new antenna in the next couple of weeks and I'll get back to you.
-

Explain This Please
stanG replied to kevin5549's topic in Venture and Venture Royale Tech Talk ('83 - '93)
I recently had this same problem. The switch for the rear pedal was sticking. As was suggested, I sprayed some contact cleaner and lube into it and it was just fine. You may also want to check the spring and the adjuster tension. -
I have plugged in a standard USB flash drive with mp3's and it played them fine. I don't think it will play directly from an Ipod via USB, however, you could use a 3.5mm stereo patch cable to connect the headphone jack of any player or phone to the AUX input.
-
This is the entire radio. The company does also make a couple others as you point out that have a surface mounted remote control with the electronics in another housing that you can mount at another location. I was just impressed with the simplicity of this unit and its size was perfect for the stock panel.
-
I have attached the wiring diagram for the pad and the relay
-
The radio does not come with an antenna. I used the stock antenna on my 83. The radio does have scan and mute but you would have to open it up and modify it to get it to work. There are no stock connections to remotely control those functions.
-
I found this little marine radio when looking for something to replace my stock radio in the VR. The radio is the Prospec Electronics MIL-PRV15. It is a compact all aluminum watertight housing that fits in a 3" round hole and is held in place by a U-shaped bracket from the back. The amp is 40W x 4 and has plenty of power to light up the stock speakers. You also have the ability to plug in a USB flash drive with your favorite MP3's as a source or use the AUX in jacks. Prospec also makes a moisture proof USB-AUX jack that I opted for to bring the USB and AUX jacks to the radio panel. I grabbed the radio for $99.95 at overtons.com. I got the remote jack at the company's website for another $20 plus shipping. http://www.prospecelectronics.com/product_info.php?products_id=136 The LED switch in the lower right is connected to a DPDT relay that routes the output to either the speakers or to the headset cable. I also added a 20dB pad (diagram on request) to the headset output to limit the volume to the headset.
-

Carb overflows after sync
stanG replied to stanG's topic in Venture and Venture Royale Tech Talk ('83 - '93)
Following up on this... I have replaced the diaphragms and re-synced the carbs. The bike running very well now and the overflow problem is gone. Fuel mileage has increased to 42-43 mpg. -

Carb overflows after sync
stanG replied to stanG's topic in Venture and Venture Royale Tech Talk ('83 - '93)
Float bowl needles are good and no... I didn't add the needle shim ;-). I have already sent an email out for the diaphragms to Sirius. I think you are confirming what I already suspected. -

Carb overflows after sync
stanG replied to stanG's topic in Venture and Venture Royale Tech Talk ('83 - '93)
Don't think so. Remember, the problem goes away when the carbs are unbalanced and I have put over a 1,000 miles on it since all the major carb work. -
I’m looking for some help with a carburetor issue on my 83 VR. The carbs have been off, completely cleaned, jet blocks removed and cleaned, float levels set to factory specs and the low speed jets set to 2.5 turns. I have also installed the needle shim kit from Skydoc_17. Prior to the shim kit the mileage was about 38-39 mpg. The bike was running fine with no issues but the carbs had not yet been synced. Using a Morgan Carbtune, the initial setting showed the #2 carb (rear left) significantly higher than the rest. After adjustment, I was able to balance everything out using the proper procedure. Initial test ride indicated good performance with no issues. A couple days later I rode the bike to work allowing it to warm up only a short time with the choke cracked about 25%. When I took off from the house I left the choke on for about a half mile then shut it off. Within the next half mile the bike appear to be flooding out and dumping some gas out of the overflow on one of the left side carbs. After the engine warmed up completely the flooding seemed to diminish. At lower rpms in 5th you could smell some gas but it was not coming out of the overflow. When I got home I pulled the side covers and put the Carbtune back on to check sync and it was OK. I noticed that there was a slight amount of gas on the top of the #1 and #2 carbs that looked like it was coming out of the air cleaner boot. I then reset the sync to the original setting where the #2 carb was reading higher vacuum and took another test ride. No issues and the gas on the top of the carbs was gone. One thing that I have not done is replace the slider diaphragms. Could this be a contributing factor to this problem or is there something else I should be taking a look at?
-

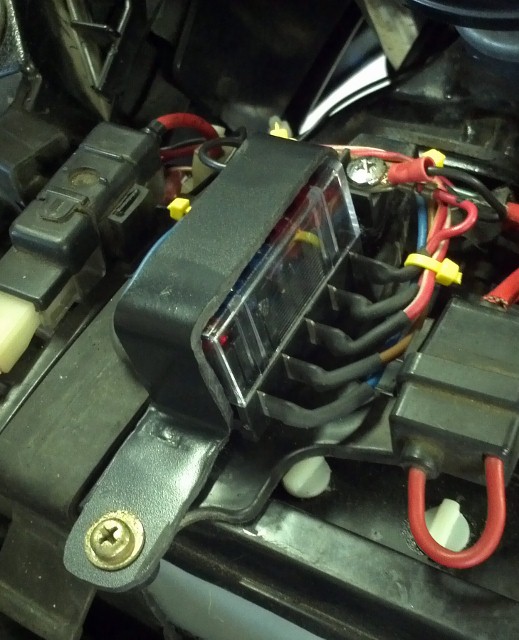
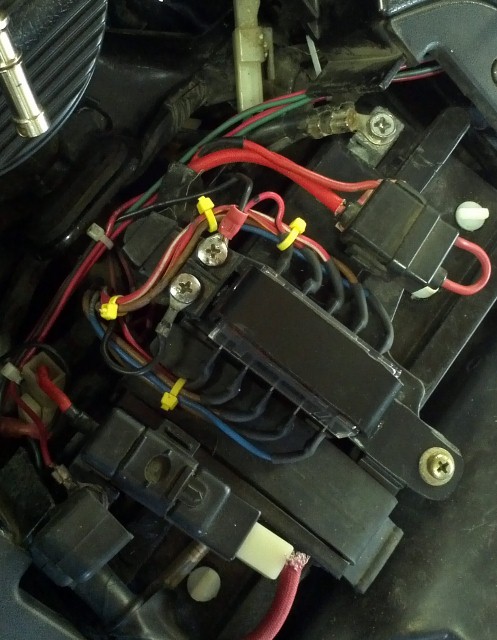
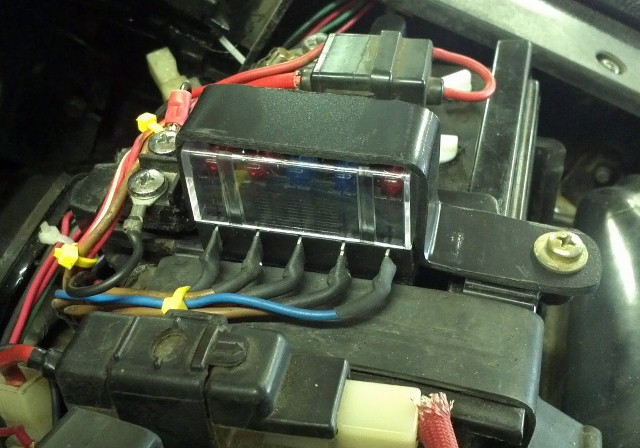
Fuseblock Upgrade Revisited
stanG posted a topic in Venture and Venture Royale Tech Talk ('83 - '93)
I have recently done away with the glass fuse holder in favor of the ATC fuse block from Littlefuse (part# 350417BP). I picked up my block from O'Reilly Auto Parts but they are available from other sources. I decided to just replace the block, making the least amount of change to stock as possible. Installing the block is pretty straight forward. I just clipped the wires off the old terminals and then soldered them in place on the new block finishing out with heat shrink over the exposed terminal ends and then an application of liquid tape for further protection. I also cut the accessory terminal block from the original holder so that I could continue to use the stock setup. In a departure from other installations, to keep everthing in place and sercure the terminal block, I fabricated a plastic strip from ABS, perfectly forming it to the block with the cover on. Using ABS cement I attached the terminal block to the strip. I used a plastic welder to heat the ABS where the plastic needed to be bent and formed it over a block of wood, holding it place until it cooled sufficiently to retain it's shape. The strip fits into the original front slot in the stock mount and secures with the stock screw in the rear holding everything in place tightly. There are no clearance issues with the false tank cover and it slipped right into place. -
Unfortunately I do not have pics of the undercutting, however there is a thread on this forum that I was able to find. http://www.venturerider.org/forum/showthread.php?t=21023&highlight=undercut
-
I had my brother, who is a supervisor at a precision grinding shop, do the gears. He set up a jig to do both 2nd and 5th using a grinding stone and an end mill. The bike had about 55k on it when I bought it as a basket case and it was already skipping. You could use second if you didn't get on it hard. I have pretty much gone through the entire bike now and am confident it will be a good runner this season. I think I am going to look for another basket case for next winter's project.


