saddlebum
-
Posts
6,866 -
Joined
-
Last visited
-
Days Won
169
Content Type
Profiles
Forums
Gallery
Events
Store
Everything posted by saddlebum
-

CB displaying 7
saddlebum replied to Pasta Burner's topic in Venture and Venture Royale Tech Talk ('83 - '93)
For cry'n out loud get you mind out-a-da-keg -
CB displaying 7
saddlebum replied to Pasta Burner's topic in Venture and Venture Royale Tech Talk ('83 - '93)
I came up with the idea some years ago after getting tired of chasing stuff across the floor. As far as using a spray 1st with a straw, I should have suggested that as well as I too often do that (my Bad) My personal preference for that is ACF50 https://learchem.com/products/acf-50.html available through amazon, aircraft spruce and many motorcycle dealers. -
I while back there was a thread revolving around carriyng spare fuel. I was watching itch boots when I noticed she is using bag type fuel bladders during her currant trip through South Africa, so I did some on line searches and found some interesting info. Here are two links to two of the site I found. Thought it very interesting. Nice thing is you can nicely back them away when empty yet still have them on hand should you suddenly need them to go for fuel. https://www.giantloopmoto.com/product/gas-bag-fuel-safe-bladder/ https://www.frontaer.com/extra-motorcycle-fuel-tanks/
-
So what your saying is your hijacking the thread into a discussion about how to straighten the curls out of ones hair But since you and Rio share the same wiry hair and him being a terrier He can probably tell you it could be an exercise in futility
-
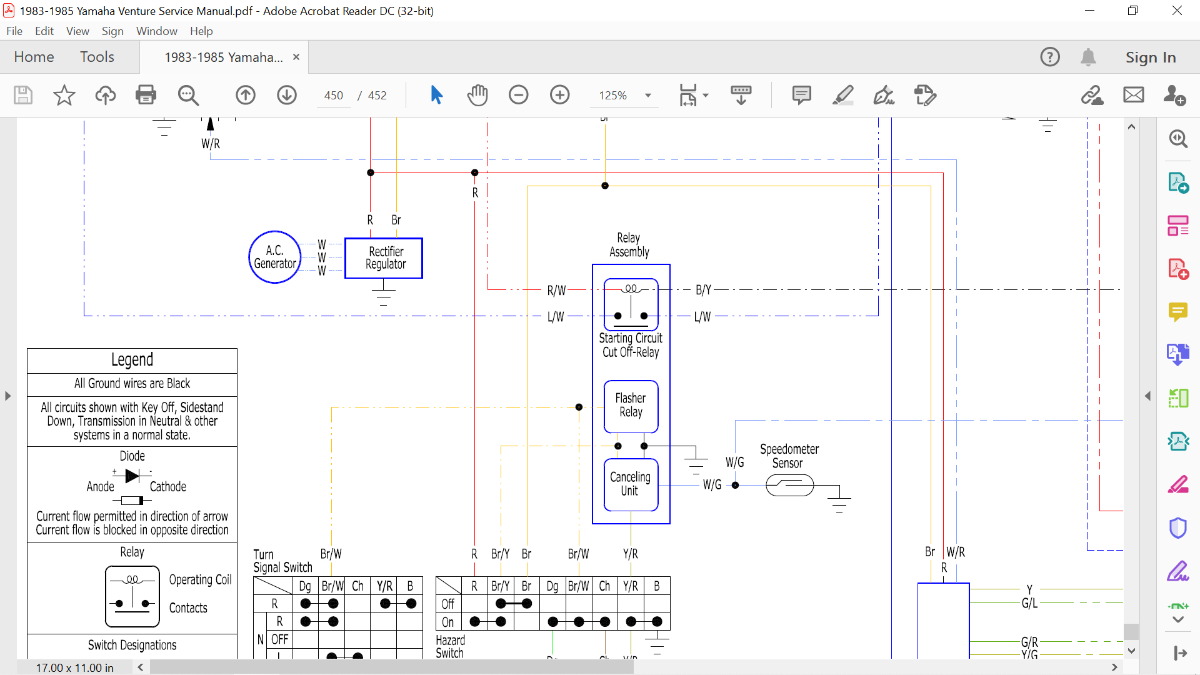
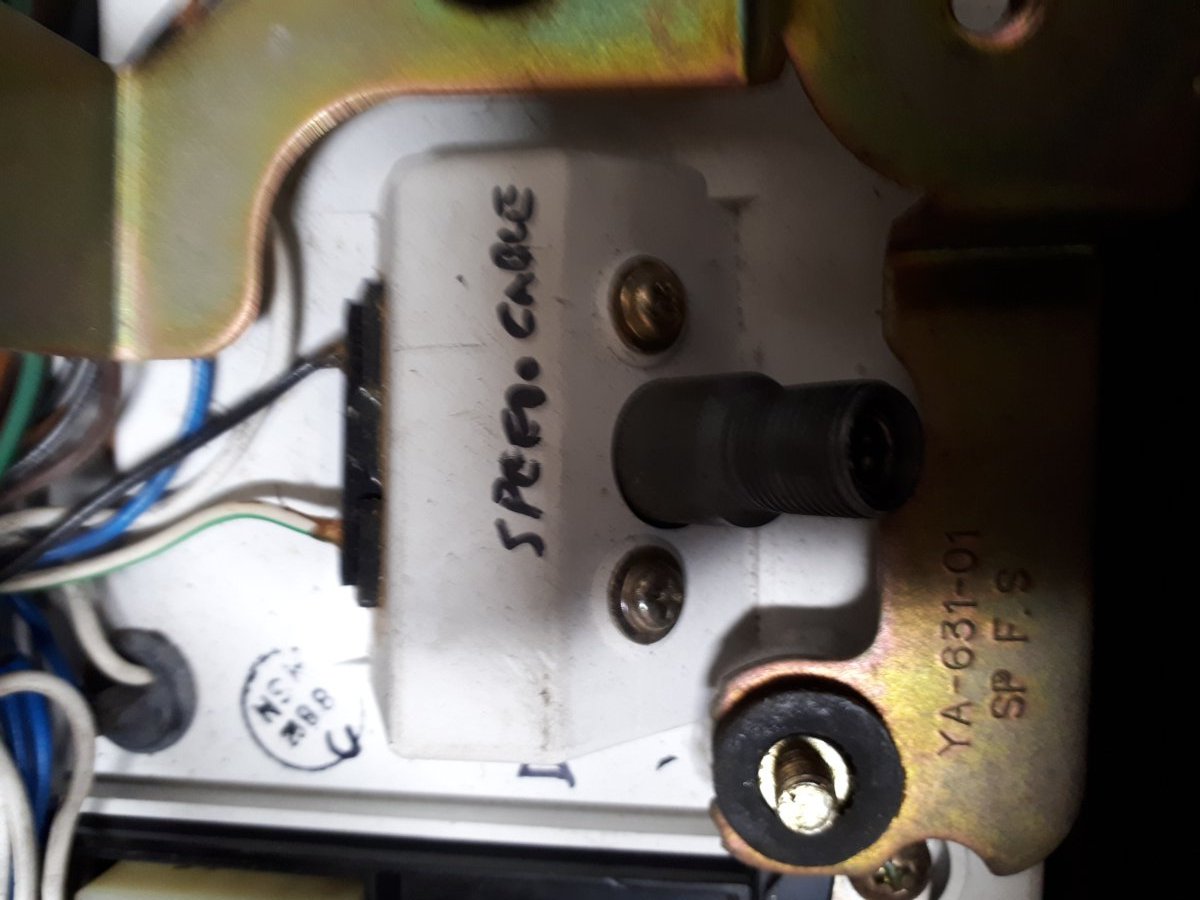
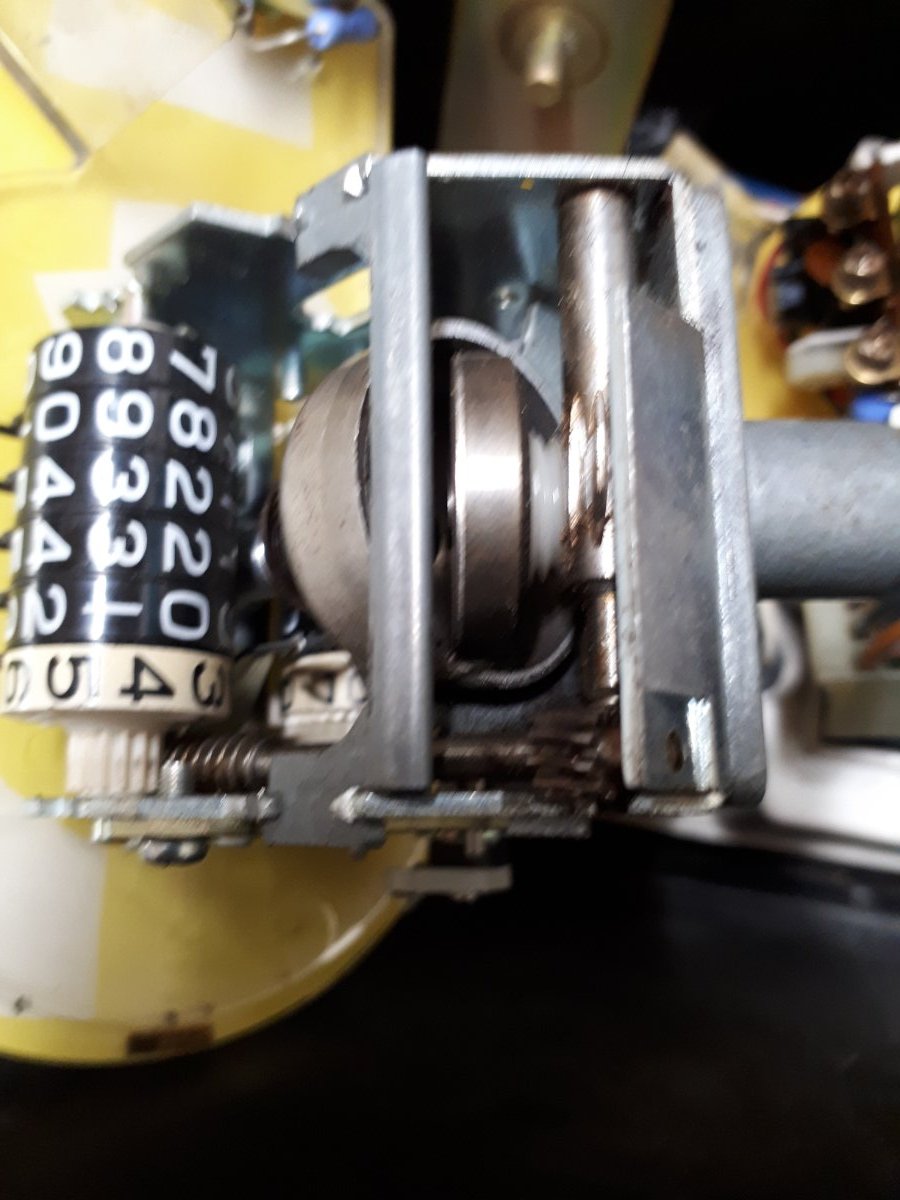
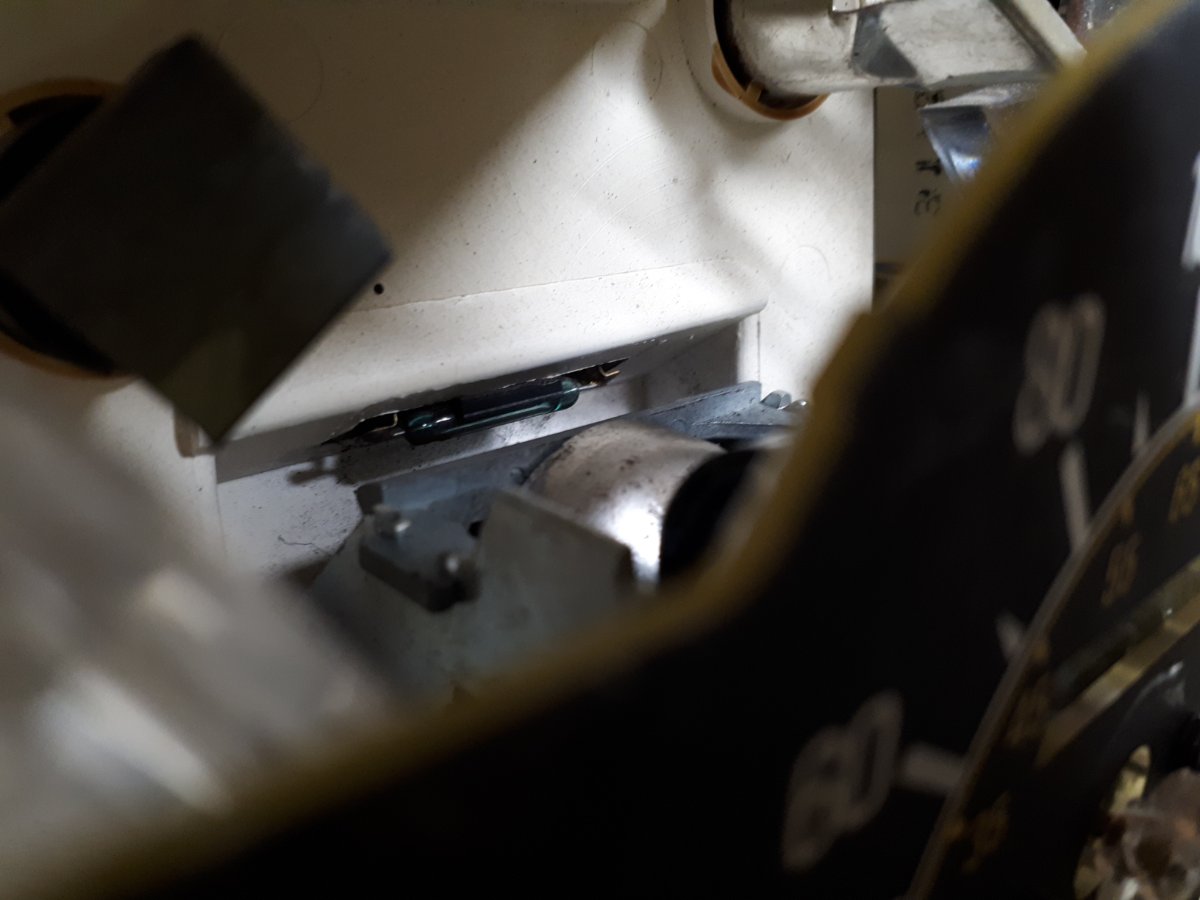
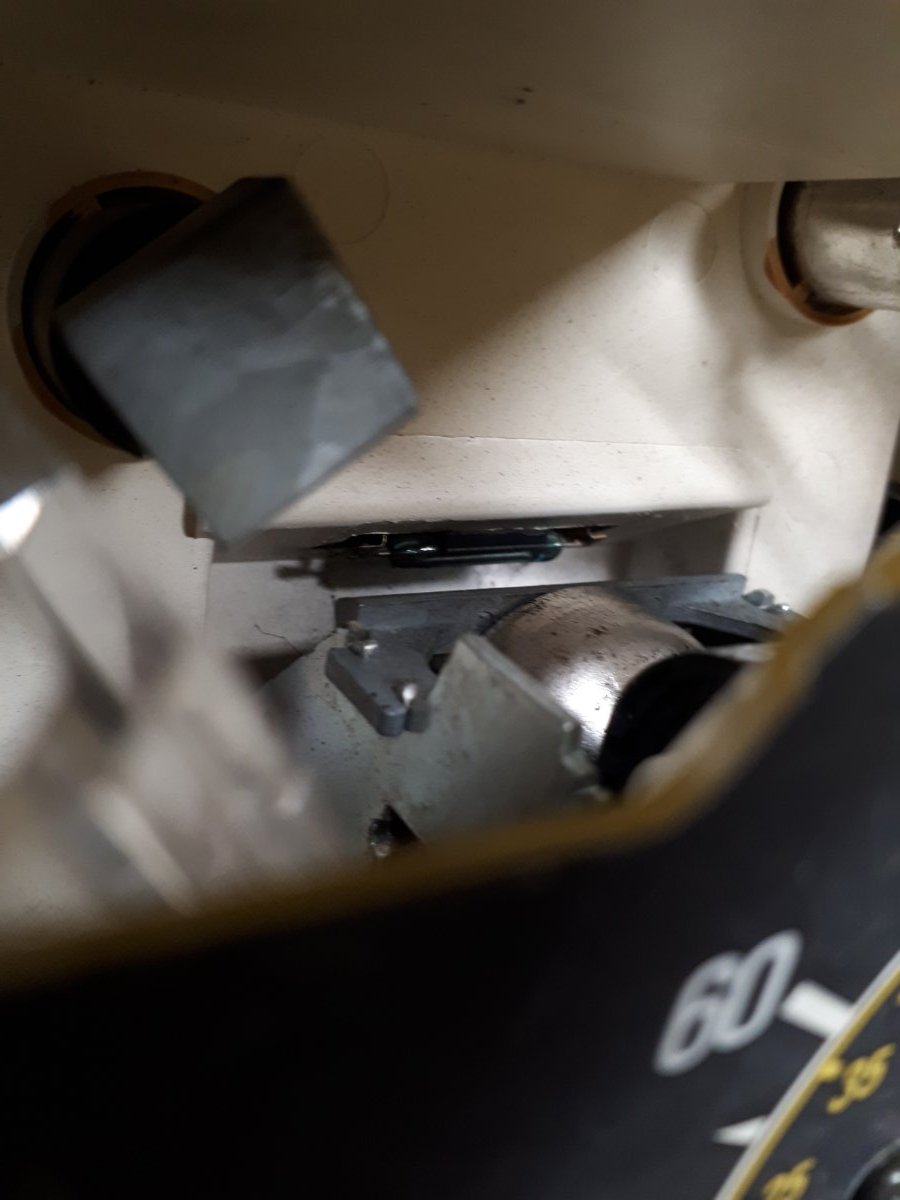
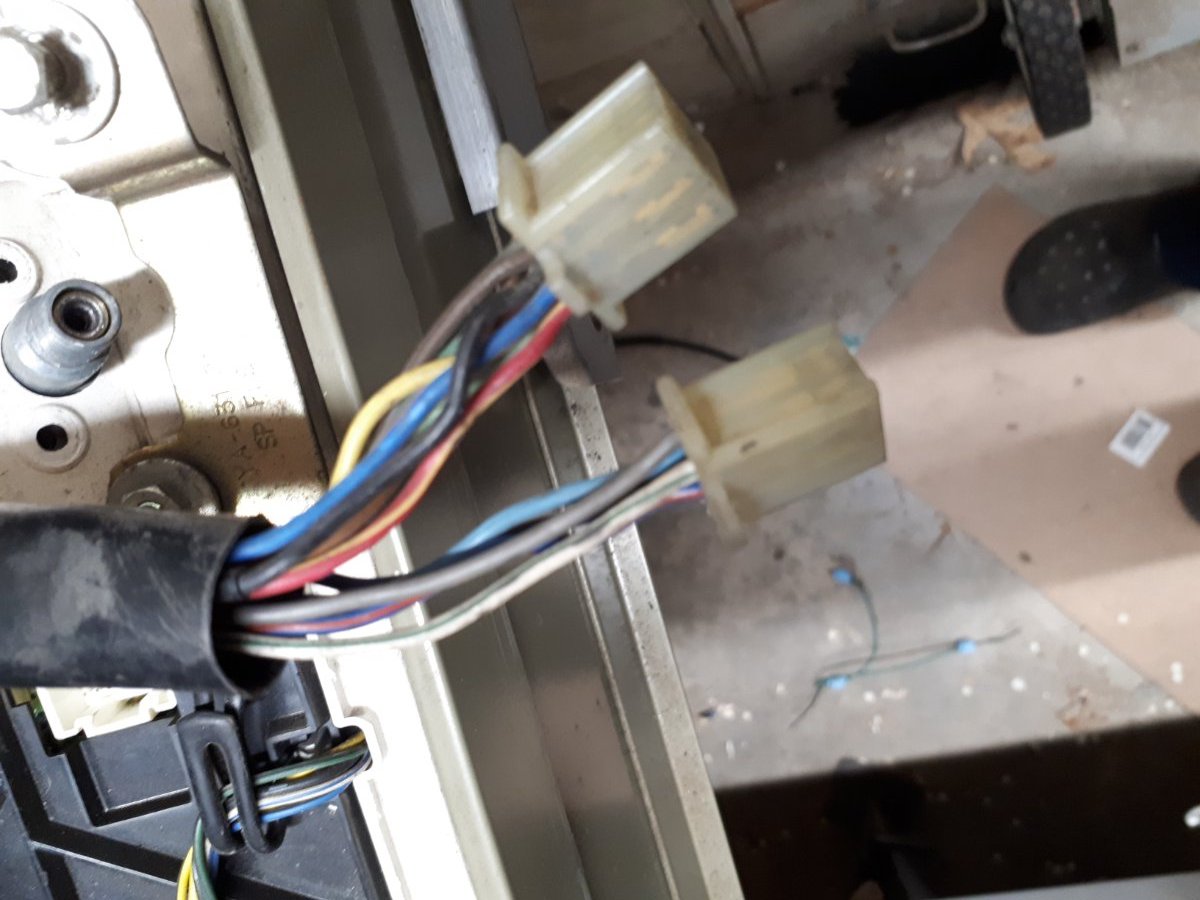
@Bono The speed sensing switch is a leaf switch built into the instrument panel back cover. With the speedometer assembly installed in the cluster this switch sits close to the spinning magnet within the speedometer head where the cable connects to the speedometer. The rotating speed of the magnet is what triggers the switch. You can test it by disconnecting the related connectors and hooking an ohmmeter to the wires ( it should be the white/green wire in one plug and the black wire in the other plug see pics ). With the front wheel off the ground spin the wheel and watch the ohmmeter for a change or disconnect the cable at the wheel and use a variable speed drill Make sure the drill is spinning in the right direction. Now I cannot be sure if this applies to both MK-1 and 2 or only to MK-2

-
It only got great after a certain someone and her cheese cakes moved down there
-
CB displaying 7
saddlebum replied to Pasta Burner's topic in Venture and Venture Royale Tech Talk ('83 - '93)
Ok lets start with A) It has nothing to do with the intercom but to get full function you need a headset or at the very least a mic attached to the connector by the fuel tank cover or the passenger hook. B) Without a head set or mike you can still monitor calls or conversations within the channel you are set on you just cannot reply. So now as far as your issue goes I would begin with carefully removing, taking apart and cleaning the switch assembly on the left handlebar. sometimes the transmit switch gets sticky or dirty and this leaves the CB confused as to whether it should be in transmit mode or receive mode. When I say take apart carefully it is because the parts inside are small and springy and would love to disappear into the parallel universe only to re-appear weeks or months later after you scrambled to buy beg or steal replacement pieces. I often park the bike on a thick old blanket or sleeping bag to eliminate the bounce away across the floor factor. If this does not solve the issue than dig in and check all connectors related to the CB for bad or dirty connections. Finally if still not resolved try another CB possibly borrow one if you can if that solves the issue than replace it. -
Clutch basket markings
saddlebum replied to jryan's topic in Royal Star Venture Tech Talk ('99 - '13)
If you do this with the bike on the side stand you normally do not need to drain the oil. You may loose a small amount depending on the lean of the bike but it is usually a barely noticeable amount. With regards to the markings on the clutch basket they seem to only apply to using the OEM clutch pack which has a marking on one tab of each disc to align with the marking on the basket. You can ignore the markings when using The Barnett clutch pack. -
When using automotive oils you need to be aware of what additives may be added to the oil. Some of these are not clutch friendly.
-
I need to move! Too much urban noise here for me to sleep with open windows. Guess that is why I so enjoy my back country canoe trips. Despite the hard work of paddling and portaging I always come home refreshed from sleeping outdoors and grabbing an early morning swim in chemical free water before starting each day.
-
Front turn signal bulb size
saddlebum replied to NotAhd's topic in Royal Star Venture Tech Talk ('99 - '13)
Just get the OEM bulb number either from the bulb or your owners manual and check an LED cross reference chart. such as https://www.jpcycles.com/2007-yamaha-royal-star-venture-midnight-xvz1300tfm/taillight-and-turn-signal-bulbs -
So when you say tyme did you mean time or thyme? Not sure if you are looking for an extension of time here or if your trying to spice yourself up a little
-
Don't forget to lower the rad level when you do this test or instead of sucking in air it will be coolant you draw in. With regards to the water pump Normally one check is to measure the clearance between the water pump fins of the impeller and the machined housing surface. If this clearance is too great it would indicate an improperly mounted impeller or worn housing surface. unfortunately I have yet to find a maximum clearance spec for the water pump on this bike. In cases like this and given that coolant is the same viscosity in all engines, I would often use the spec of a water pump that is similar in construction with a somewhat similar cooling system size as well going on the theory that regardless of the pump make, you require a certain clearance in order to move the coolant efficiently and I would use that spec as somewhat of a guide line.
-
Brother I have worked with a few versions of the combustion test tool including one the has two test chambers https://www.amazon.com/UView-560000-Combustion-Leak-Tester/dp/B000NPDL76/ref=pd_lpo_469_img_1/134-8601521-0099460?_encoding=UTF8&pd_rd_i=B000NPDL76&pd_rd_r=e3cf816d-714e-4c76-9585-1c67c499aa08&pd_rd_w=5BOpt&pd_rd_wg=9fsPj&pf_rd_p=a0d6e967-6561-454c-84f8-2ce2c92b79a6&pf_rd_r=8EE26WP6ZX3KJT7GW7QS&psc=1&refRID=8EE26WP6ZX3KJT7GW7QS But the one you showed has to be the fanciest looking one.I ever saw. I swear who ever designed it borrowed the idea from they way some toilet bowels have the plumbing cast into the ceramic bowel LOL.
-
Just a humble suggestion I always leave mine on reserve accept when maybe doing a long trip. The reason for this and this is JMHO is that the way the valve works is by switching between a tall pickup tube and a short pickup tube. When left to Normal fuel is only drawn through the tall pickup tube allowing for a greater amount of impurities (such as Water through condensation or other means ) to build up in the tank. I have even seen the shorter tube clog up because of lack of use. Then if all of sudden you go to use reserve you begin to pick up a greater amount of impurities or because of clogging you get no fuel at all. By always running the bike on reserve or constantly switching back and forth you help to reduce the odds of such a thing happening.
-
I agree with Marcarl in that I would replace and eliminate the thermostat. You can take it if you like and put it in a cold pot of water with a thermometer then heat the water and see at what temp it fully opens or if it even opens at all. This will give you a good idea if it is sticking. However whether it tests bad or good since you have it out I would still replace it. The testing would be more to see if the thermostat could be part of the problem. If you have access to a cooling system pressure tester You could pressurize the cooling system leave it sit and see if the pressure drops off at an abnormal rate. If it does and you can find no external leaks you could have an internal leak such as a head gasket. Secondly with the cap removed warm up the bike and watch for an abnormal amount of bubbling. Here too you could connect the pressure tester (while the engine is hot ) but instead of pumping it up watch for an abnormal or quick pressure build up this two could indicate a head gasket or cracked head as well.( Let the engine cool down before removing the tester) Another test I use which is not common to most people not in the mechanical trades, but very effective is to test for combustion gasses in the cooling system. This done with the engine warmed and the coolant level slightly lowered in the rad then a special tool such as for example https://www.lislecorp.com/specialty-tools/combustion-leak-detector is used to draw air from the top of the slightly drained rad through a liquid which will turn colour, if any combustion gases are present in the cooling system. After warming the engine you would install the tool, then crack the throttle about ten times, after which you would draw the trapped air up through the liquid in the tool and watch for a colour change of the liquid in the glass vial. Many auto parts dealers carry this tool should you wish to give it a go. I would also check the integrity of the fins on the rad. If they have come loose from the tubes than rad cooling efficiency is compromised. Lightly sliding you finger along the fins should detect whether they are secure to the tubes or come loose from the tubes. A worn water pump can also be an issue. If the impeller is defective or if there is too much wear between the impeller and housing.
-
I have used both Nelson Rigg partial and Dowco full four season covers and in both cases XL was a perfect fit. I have also purchased cheaper no name brand covers and found I needed to use XXL. For some reason aftermarket covers seem be slightly smaller.
-
Check out Nelson Rigg https://www.nelsonrigg.com/motorcycle-covers?cff_29[]=43727569736572 They make a whole line of quality covers from four season heavy duty to light weight dust covers. You can purchase them direct on line or through many motorcycle parts and accessory distributors. I have two of their covers and am very pleased with them.
-
Improving My Brakes
saddlebum replied to Idrys's topic in Venture and Venture Royale Tech Talk ('83 - '93)
Just to be clear @Pasta Burner the only reason I purchase my second set of lines locally Instead of from @skydoc_17had to do with customs. A $265.00 windshield cost me over $400.00 thanks to customs. If I were were living in the USA I would get them through Skydoc. he has always stood behind his stuff and is very forthcoming with advice and knowledge. In the past when I made a purchase from him, I would order ahead of time and then meet him at one of the Rally's to collect my purchase or have it relayed through another member but since travel is an issue right now I have had to make other choices. I also de-linked because for the same reasons as Skydoc. I once entered came to an intersection were the pavement had a dusting of sand on it. I applied my rear brake and and the front end slid out on me. Thinking I applied to much foot brake I released then reapplied even gentler but the same thing happened. After the second failure to stop without almost going down it was too late for a third attempt so I laid on the throttle after a quick look both ways and shot through the intersection. At the time the bike was fairly new to me and I had no idea the front brake was linked to the rear. Later I got home and started investigating my bike and found the the left front functioned with the rear. Started thinking up ways of changing this when I came across Skydocs de-linking kit. Now my brakes work independently they way I want them to and no more front wheel lock up on loose gravel or silt -
Improving My Brakes
saddlebum replied to Idrys's topic in Venture and Venture Royale Tech Talk ('83 - '93)
Sky doc is where I got my brake lines from. I purchased his de-linking kit. I purchase my clutch lines from a local shop by me as well as had other lines made up for another venture I was repairing for someone else. Initially I went to a hydraulic hose and fitting place who directed me to a place called Northern Performance here in Burlington Ontario.The reason they sent me there was that although they could make the lines they were not DOT certified for hydraulic Brake line were Northern Performance was. I simply took them the old lines and they duplicated them in stainless. -
If the self cancelling signal stops self cancelling the fault would lie either with the self canceling relay unit or the speed sensor/switch. Usually the relay unit. Self cancelling occurs either 10 seconds after you start moving or within approx 500 feet whichever comes first when driving at slow speeds or by distance when driving at high speeds. To get at the relay or speed sensor you need to remove the head light. Mine has quit as well but for all it takes to cancel manually I can't be bothered getting into it. specially once you decide which is at fault you then have to find the parts to fix it.
-
What India is going through right now No country should suffer and all because of what I am told by Indian neighbors of mine with Family in India that it has a lot to do with bad handling and bad polices. It makes me sad when innocent children must suffer the results of bad choices. https://www.theglobeandmail.com/world/article-indias-tide-of-covid-19-deaths-leaves-huge-numbers-of-orphaned/
-
The wire is actually very simple to remove and/or install but as of your most recent explanation of the noise and keeping in mind this is only an educated guess, I would be inclined to think it has to do with movement between the tabs on the clutch discs and the slots they fit into on the clutch basket. Often with wear the begin to get a little sloppy. Chances are it is not something to get too concerned about.
-
Not that I ever recall hearing anything like that, which may be clutch related, I doubt it has anything to do with the wire. I would be more inclined to think it is the lash between the clutch disk fingers and the the splines in the clutch hub and basket or maybe some gear lash in the transmission. To know better I would have to hear it though. its even possible to be coming from the drive line if it has a worn u-joint which again I doubt or excessive gear lash between ring gear and pinion. Finally it may be nothing at all just normal drive-line behavior. .