.JPG.97d34da93fc67655234eb6371e3710e9.JPG)

Prairiehammer
-
Posts
3,621 -
Joined
-
Last visited
Content Type
Profiles
Forums
Gallery
Events
Store
Everything posted by Prairiehammer
-
 Lewis, that muffler gasket has gone through several renditions and part numbers over the decades. Currently, the part number is 3JJ-14653-00. Before that it was 47G-14653-00. Before that it was 1L9-14714-01. AND before THAT it was 1L9-14714-00. My point is: don't limit yourself to finding just the current part number. For instance, I found NOS PN. 1L9-14714-01 on eBay for $14.99 with free shipping. Here: http://www.ebay.com/itm/New-NOS-Yamaha-1976-83-Various-1986-90-YX600-Exhaust-Gasket-1L9-14714-01-00-/171893472105?hash=item2805a63b69&vxp=mtr Edit: I found the 3JJ-14653-00 "fibrous" gasket at =custom"]Partsnmore for $8.50 each, however shipping for two was another $15+. It is in the XJ750 parts section. Scroll down the page that I linked. DonB made some of those gaskets from copper pipe. Here is a thread:http://www.venturerider.org/forum/showthread.php?38717-gaskets-for-collector&highlight=copper+exhaust
 -
Now that I can vouch for your attendance at the New York Rally, Dave, you should update your signature map to include New York. It was nice putting a face to the name. Oh, wait! I never had a name to put a face to. What, this is like your second post under the "Venturing Sole" moniker. Tooch and I can't say we enjoyed the conversation with you Saturday night around the campfire...since you didn't say anything. Just smiled and listened, I guess.
-
For your 1991 Venture, look for grips that fit Honda GL1500 or GL1800. The First Gen Venture and Honda both have 7/8" bars and are longer than most 7/8" bar grips at 5.75". There are few sellers of grips specifically for the First Gen Venture, because the Venture has not been a current model for more than 25 years. But of course the Honda GL1800 is still being made and there is a huge accessory market for the GL. If you simply buy a set of grips that you like and they are marketed for the GL1500/1800, the grips will fit the First Gen Venture well. Be aware that many sellers do not differentiate between the First Gen Venture and the Second Gen Venture. When a seller says "Venture" these days, they are most likely selling Second Gen Venture accessories. The Second Gen Ventures use 1" bars. Grips for the Second Gen will not fit on the First Gen. When you get your grips, make sure you put the left grip on the left and the right grip on the right. Sounds obvious, but sometimes the grips are not marked as to right or left. The right and the left grips are not the same size.
-
A huge time-saver (and toll saver) is to take Interstate 39 to Interstate 80, then east on I-80, I-94. The worst stretch will be around Gary.
-
I accepted your request, Cowpuc. NOW you have to include a photo on your Facebook profile, so all the rest of us can see your lopeared mug. (You know the rules).
-
That is a great deal.
-
Thermostat seal??
Prairiehammer replied to bobber's topic in Venture and Venture Royale Tech Talk ('83 - '93)
The pictured seal 11H-12412-00 is proper for the XVZ12 and XVZ13 and the 1985-1997 VMX12. The 1998-2007 VMX12 takes the seal 11H-12412-01. I don't know why or what Yamaha changed on the part, but usually, the difference between **-*****-00 and **-*****-01 parts are incremental and usually do not preclude interchanging the two different parts. At least one parts site says that the 11H-12412-00 has been replaced with 11H-12412-01. That indicates to me that the two are interchangeable, but Yamaha doesn't say that. -
The pictured caliper will work. But the list that the seller says is of compatible bikes is incorrect.
-
The color of the R6 is not a good indicator of brake caliper compatibility. For instance, there was a blue 2001 R6 with calipers that you can use.
-
Just in case anyone was wondering, I made it home safe and sound from the WNY Mini-rally. Stayed with Dingy and his wife Sunday night. Bucked a 30 mph headwind yesterday, all day, but pleasant temps and sunny skies. Fifteen hundred and nineteen miles on the 25 year old Tuxedo. I want to commend and thank the WNY hosts and attendees for a PERFECT event. Enjoyed the activities, the rides and the camaraderie immensely. (Even if the Marlon Brando cap was not the clincher for the Fifties costume. Congratulations to Steamer.)
-
Gonna do a "mini Iron Butt" ride to get there tomorrow. Weather be damned!
-
1986 Venture Royale Issues
Prairiehammer replied to Tatonka82's topic in Venture and Venture Royale Tech Talk ('83 - '93)
DOT3 or DOT 4 brake fluid. No brand preference. Just a FYI: When dealing with brake fluid around these Ventures, treat the brake fluid as if it were a plastic eating acid, because it is. Protect the bike with impermeable plastic and absorbent towels or such. Immediately wash any spills from the bike with copious amounts of soapy water and clear water rinse. Because spilled brake fluid will migrate into cracks and crevices and remain invisible, but will cause irreparable harm to the ABS plastic. -
Carl, consider Jordan, Ontario. Beautiful wine country. Just 6 miles west of St. Catharines. Three campgrounds within 2 miles. Hotels might be more of a problem, though. Jordan has a couple of "inns" and a B&B, but St. Catharines has more hotels. Been a long time since I was there (1985). We camped at Big Valley CG and enjoyed my first Buffalo Wings ever at the Jordan House. Great time.
-
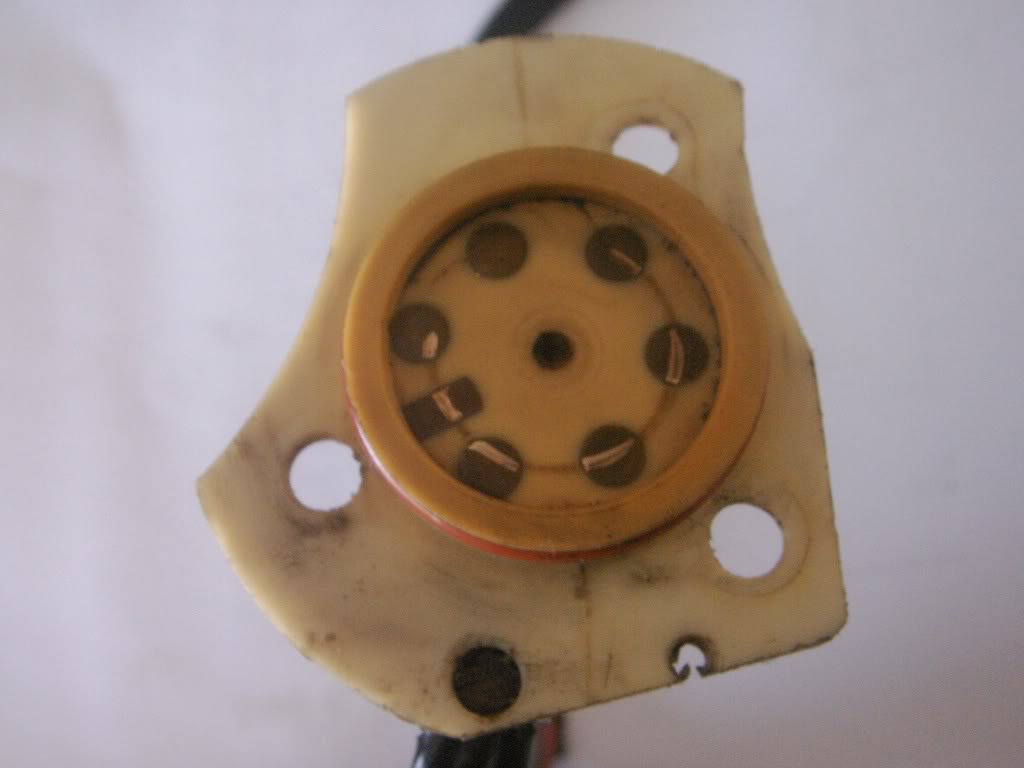
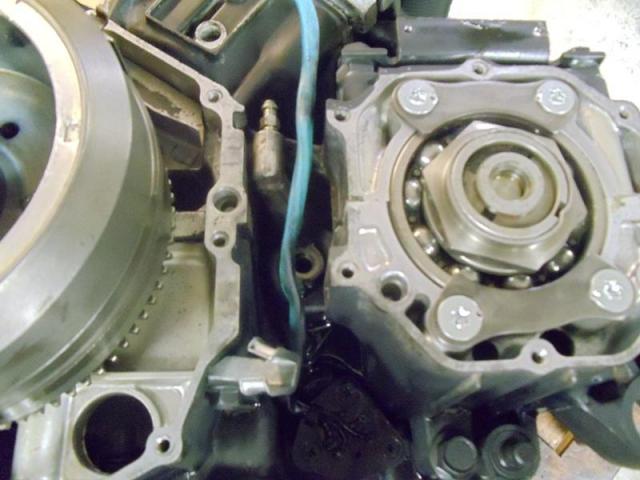
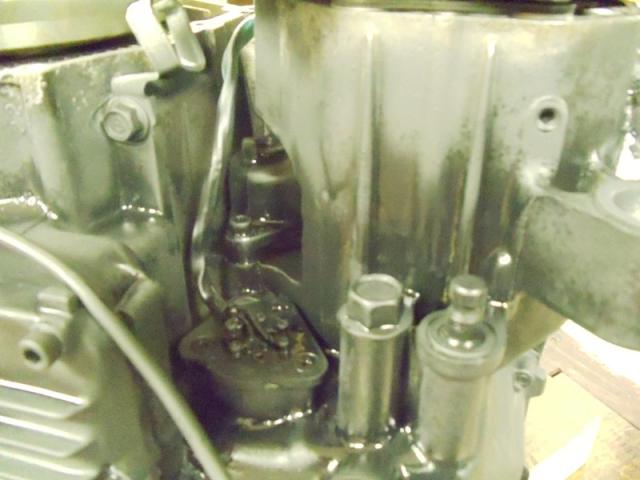
Gear shift indicator
Prairiehammer replied to taz112's topic in Venture and Venture Royale Tech Talk ('83 - '93)
The gear shift indicator is located behind the middle gear cover, below the clutch slave cylinder. Three countersunk Phillips type screws fasten the indicator to the crankcase. Remove the indicator and the pin and spring should fall out.
-
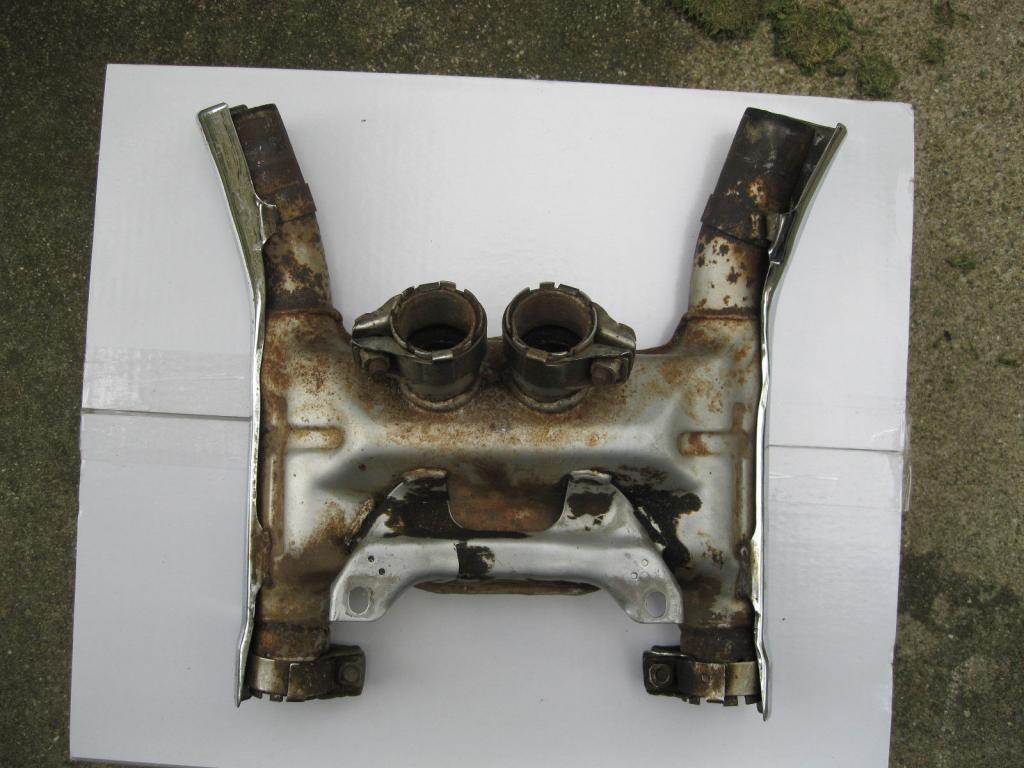
exhaust collector options
Prairiehammer replied to jimmyenglish's topic in Venture and Venture Royale Tech Talk ('83 - '93)
I just scored a seemingly good condition collector for $60 (Buy it NOW) with free shipping. The mounting bracket is cracked and the seller says that the internal baffle is loose, but examination of the "nipples" and the welds shows little deterioration. I'm posting this not as a gloat (well, maybe a little) but as advice. Be patient and diligently check eBay daily. http://www.ebay.com/itm/161796037467?_trksid=p2057872.m2749.l2649&ssPageName=STRK%3AMEBIDX%3AIT
-
That time of year (mid-October) is a great time for riding in the northern tier states...sometimes. Other times it can be pretty miserable, snow even. We often vacation in early October in the Wisconsin Northwoods. Sometimes it is beautiful...sunny and low Seventies. Other times it is snowing and low Thirties. Just sayin'.
-
Gear shift indicator
Prairiehammer replied to taz112's topic in Venture and Venture Royale Tech Talk ('83 - '93)
You may be correct Gary, but there have been more than one instance when the "neutral point" fails to make reliable contact with the copper contacts on the gear shift indicator array, simply because of its worn, shortened size and shape and/or because of a weak spring. While on the sidestand the "angle of the dangle" causes the pin to make fairly good contact because gravity is pulling the pin into better position against the gear indicator switch contacts. When the bike is raised to vertical, the pin slides away from the indicator contacts. -
Gear shift indicator
Prairiehammer replied to taz112's topic in Venture and Venture Royale Tech Talk ('83 - '93)
Commonly, the brass pin that slides around on the shift indicator "switch" gets worn and flattened from its rounded shape when new, resulting in intermittent contact. The pin is spring loaded and the spring may become fatigued and not supply sufficient pressure to make good contact with the gear shift indicator switch. Replace the pin. Yamaha calls it a "neutral point", old PN 278-18542-00-00, new PN 4UN-18542-00-00. While you have it apart, replace the spring as well, old PN 90501-06022-00, new PN 90501-06022-00. -
improving front brakes,01 rsv
Prairiehammer replied to cruiserlover's topic in Royal Star Venture Tech Talk ('99 - '13)
@pegscraper (2008) has first hand knowledge of the importance of the proper master cylinder bore. Not theory, not conjecture, but real life experience in the first person. Follows is his write-up: Well, here's the report on the R1/R6 calipers. I had installed them a couple weeks ago, and put some riding time on them. They seemed adequate. I could feel that they operated differently, but I can't say they felt like any real improvement. The difference I was feeling was that the brakes would engage sooner in the lever travel. It took a lot of hand effort to operate them, which is not an issue for me. But they just didn't feel like they were stopping me any better. I was less than excited. I was beginning to think I was chasing ghosts, that I was simply expecting too much out of an 800 lb. bike. Squeeze had said here that the R1/R6 calipers were designed to be used with a 14mm master cylinder, where our bikes have a 5/8" master cylinder stock (real close to 16mm). What that means is that with our bigger diameter master cylinder, the caliper pistons will move farther for a given amount of master cylinder piston (or brake lever) travel. To say it another way, it means that the mechanical advantage of the master cylinder over the caliper pistons is reduced. Squeeze suggested that I get the 14mm master cylinder with which these calipers were designed to be used and give that a try. With that, the master cylinder will travel farther for a given amount of caliper piston travel, and the mechanical advantage at the brake lever will be increased. So I got one and got it installed today, and went for a ride. MAMMA MIA HOLY MOTHER OF MOSES what a set of brakes! Good gravy! I was beginning to think it wasn't possible for any brakes at all to have this kind of stopping power on a bike this heavy. I did a number of quick stops, and as I learned the new feel of these brakes, I did a few from 60 mph where I braked all the way down to a dead stop. I heard creaks and groans from stress in the front end of this bike I've never heard before. I was half afraid I was going to wind up standing on the front tire. Even one tiny pebble under the front tire at that point probably would have spelled major disaster. The real test now would be to put some time on these brakes, and then go back to the stock setup and see if I thought the braking power dropped. One can often be convinced that they see whatever result it is that they want to see in a case like this. I may or may not do that, but I'll put some time on these first to really get used to them. I really don't think I'm off base though. This is too great of a difference to be imagining things. Needless to say, I'd recommend this modification to anyone who wishes they had more stopping power out of their front brakes. It turns out that my bike already had four piston front calipers. In fact, I learned that they are the same thing as V Max front calipers. V Max owners have been doing this R1/R6 front caliper swap for quite a while now. Second gen RSVs and RSTDs have only two piston front brake calipers. I can't think that they're even as good as what I had. I used R1/R6 calipers on mine. Those anodized colored aluminum bore plugs don't really look right on our bikes. That's a sportbike look. I already had big chrome caliper covers on mine, which will require a little tweak to clear the new hose location and I will put them back on. At the very least one would want to put the small calipers covers on, which are still available. A slightly better way to go would be to use the calipers from newer Roadstars or Roadliners or Stratoliners or even Raiders. Some Warrior calipers may work, but the newest model of Warrior has gone to a different style of caliper. All these calipers from these models already have chrome bore plugs in them, and some of them have the whole caliper chromed. These wouldn't need any covers at all. Some of them have black bodies and some are natural aluminum color. The 'Liners and Raiders have a different style of bore plug than the Roadstars. It's all just a difference in looks. They're all four piston calipers with 100mm mounting bolt spacing. Any of them would work here. Just make sure to get ones that have the same basic mounting bolt and body configuration. If they look like they will fit, they will. There is a newer style of caliper filtering into Y's bikes that will not fit, but when you look at them, it is obvious that they are a different style. I'm not going to take the time to figure out all the years and models which will have the calipers that we need. Just make sure to match up a similar body style. As far as the 14mm master cylinders go, the Roadstars' and Warriors' master cylinders are identical to ours in looks, except that they have the different piston diameter - at least the ones with this style of caliper do. The piston diameter is cast right into the back of the reservoir next to the fluid inspection window, where you can see it from the seat. It will be either 14 or 5/8, so you can tell what you're looking at even if the thing is off of the bike. There are brushed aluminum with a clear finish units available, and the midnights have chromed units, so pick whatever matches your bike. The Raiders' and 'Liners' master cylinders have a different style to them and wouldn't match the looks of our bikes. The only other minor issue is that because of the new brake hose mounting location on these calipers, now the existing brake hoses are a shade too long, and require a twist in them to mount which makes them buckle out a little bit. If it doesn't bother you, then they're fine. But hoses from a Roadstar with these calipers would probably fit against the bike a little better. Now might be a good time to go to braided hoses. The big chrome caliper covers from Show Chrome made to fit our bikes might not fit now with these calipers, because of the new brake hose mounting location. But I'd bet that the model designed to fit the Roadstars that have these calipers would now fit. Now let's see some of the rest of you do this and hear reports from someone else. There's no substitute for good brakes. Just do it. -
1986 Venture Royale Issues
Prairiehammer replied to Tatonka82's topic in Venture and Venture Royale Tech Talk ('83 - '93)
Depends on what part of the C.L.A.S.S. (air leveling system) is not working. Does the controller light up and display anything besides "psi"? As Marcarl says, the CLASS can be operated only when the keyed ignition switch is at the ACC position. If the controller does not turn on, check the CLASS fuse. It is a glass fuse within a rubber waterproof in-line fuse holder. Again as Carl says; probably requires a fluid flush and bleed of the clutch hydraulic system. I lost the capability to disengage the clutch completely on my then new to me 1990 when I was riding it home from the seller's business. Old water contaminated fluid was the cause.
-
Try this: CLASS System Compressor Ring Repair I was having problems with the CLASS air compressor on my '88 Royale. From 0 psi, it would pump the rear shock to about 52 psi before giving an error E3, “compressor on too long”. Repeating the attempt to increase pressure resulted in about a 1 psi increase before stopping with an E2 error, “air pressure not increasing”. It appeared that the compressor was running, but could not produce enough pressure to satisfy the CLASS computer's diagnostics. When a reciprocating piston engine loses compression it may be caused by a blown head gasket, leaking valves, worn piston rings or internal damage. Disassembly of the CLASS compressor was in order to determine the apparent lack of compression. Removing the assembly was pretty easy. There are three electrical connectors to remove, one to the compressor motor, one to the bleed valve and one to the manifold assembly. Remove the banjo fittings for the front and rear air lines. (Caution: reduce the pressure to 7 PSI before doing this). Then the whole compressor/valve/drier assembly lifts out off the studs that the cover attaches to. Next, remove the air line from the compressor to the drier. Disconnect the fitting at the valve, then loosen the clamp for the drier and remove the air line fitting on the drier that goes to the compressor. With the air line now disconnected, remove the compressor from its mounting bracket. Now, one can fit a wrench to remove the air line. Clamp the compressor in a vice, with the compressor head facing up. Remove four head bolts/screws and remove the head. Two thin pieces of metal form a reed valve at the intake port. Remove them. The body of the compressor contains a sintered metal insert that acts as a cylinder. The cylinder head seals to that insert via an O-ring. Re-orient the compressor in the vice so that the motor is straight up. There are six screws facing upwards. The middle two secure the motor to the body and do not need to be removed. I removed the outer four screws and separated the compressor case. The motor side has a simple gear reduction from the motor with a small crank pin sticking out. The piston and rod will be lying in the bottom half of the case. I pulled the cylinder/piston assembly from the head and pulled the piston from the cylinder. After washing everything in solvent, I could see no damage. The piston has a single Teflon looking piston ring on it. The piston ring didn't seem to stick out much from the skirt. I was confident that Yamaha did not sell a replacement. I wondered how I could make the ring thicker. Some oil rings on automotive engines are multi-piece. They have a wavy steel spring that fits in the groove, and then the oil ring sits on top of that wavy spring. The spring presses against the oil rings forcing them outward. So, I took a piece of paper and cut a string 1 7/8" long (the circumference of the piston ring groove) by 1/8", the width of the ring) and placed it in the groove and then put the ring on top of it. I slid the piston back into the cylinder. It was too tight. I measured the thickness of the paper as .005". I went on a hunt and found some thin tissue paper. It measured just a touch over .001". I cut a strip from this tissue paper. I put the piston in the cylinder and felt a little bit of resistance, not too much. I lubricated the piston with a very light coat of Vaseline and replaced the piston in the cylinder and reinstalled the cylinder in the compressor housing. I smeared molybdenum grease on the crank pin and a thin coat of RTV on the mating surfaces on the compressor housing and reassembled the compressor, making sure that the crank pin went into the piston rod. I cleaned the reed valve inserts as well as the head. I installed the reed valve inserts in the recess at the top of the cylinder, observing that the alignment notch was properly oriented. I cleaned the head and put a thin coat of Vaseline on the intake port and on the O-ring. I couldn't readily figure out how to clean the exhaust port. There is a bolt on the top of the head that presses on a spring that closes the exhaust port. I removed the bolt and the spring, but the valve stayed in. I put the head back on and tightened the screws. I reassembled everything and installed the assembly on the bike. I flipped the ignition to the “accessory” position and depressed the “H” (high) button. The digital readout indicated that the compressor pumped up to 70 psi and shut off; as designed. I bled the pressure down to 43 psi. Again, commanding high pressure, the compressor pumped back up to 70 psi indicated with no errors. Since I have aftermarket Progressive® springs in the front forks and like the handling with no air pressure in the forks, I left the front air line disconnected. I capped that air line by placing two rubber washers, one on each side of the banjo fitting, and bolting them together with a 1/4" bolt and two steel washers. That will keep any dirt or moisture out of the air lines. On the valve side, I bought an M8x1.0 bolt and cut it short, probably 15-20mm and screwed that into the valve body, seating it against the o-ring. I saved the banjo bolt in the event I wished to return the CLASS function. The whole operation took less than an hour and didn't require any special tools, other than a micrometer to measure the paper ring spacer. Larry Piekarski
-
Technically, no. Second Generation Venture started in 1999. But, any XVZ13 from 1996-2013 (Royal Star, Royal Star Tour Deluxe OR Royal Star Venture) should have the desired four brush starter.
-
Ahem. Would there, by chance, be anyone younger than most of us to enjoy the "Hot Sex" with? The old fogeys seem to call it quits around dusk (past their bedtime). Or is it still gonna be "Hot Sex" but only as long as all are sleeping by nine PM.
-
83 Fuel pump
Prairiehammer replied to tufftom4's topic in Venture and Venture Royale Tech Talk ('83 - '93)
The fuel pump is a "on demand" reciprocating pump. When the demand is satisfied, the pump ceases to pump. -
Not sure which bike gets the blue dot brakes....
Prairiehammer replied to Great White's topic in Watering Hole
Perhaps "HH" pads on the FJ would be enough of an improvement? Put the R6 calipers on the Venture.