Rob Swallows
-
Posts
198 -
Joined
-
Last visited
Content Type
Profiles
Forums
Gallery
Events
Store
Everything posted by Rob Swallows
-
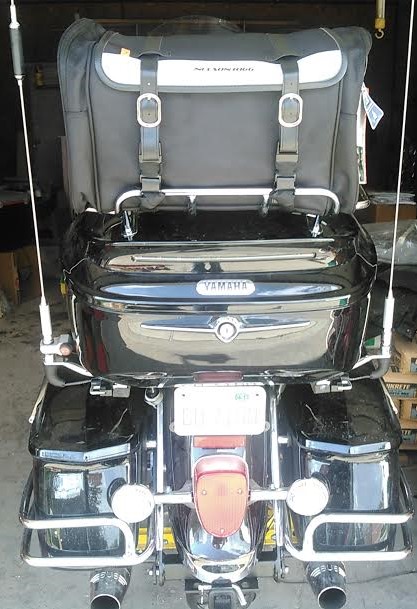
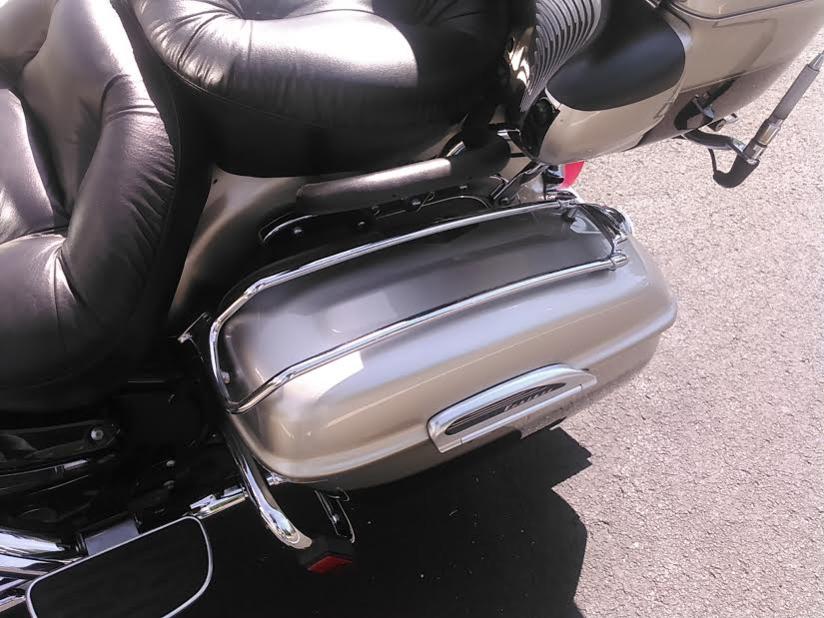
My wife decided we needed additional dry, and easily removable storage for the bike. This is what I came home from work to find: It also has a completely waterproof cover that slips on easily and the mount fits well after the retention straps are adjusted correctly. This will be great to store that stuff you wish to remove as a unit and take into a shelter, (for instance) as a single unit. Two quick snap retainers and it lifts right off the luggage rack. Just as easy to reinstall too with no further adjustments needed.

-
I'm using a gravity feed gun and 10 PSi was what was suggested for the base color coat so I stayed with that pressure. The gun is HVLP and has a max rating of 45 PSI. The air compressor has a 135 PSI max and between the gauges on the compressor output and the gauge at the gun it is hard to read below 10 PSI so requires guessing to fine tune below 10 PSI. The gun is new from home depot ($49.95) and came with two tips and caps a 1.4mm and cap were in the gun but also had a 1.8mm & cap and rod. Would the rod in the gun and the extra rod correspond to the two different size tips or are they the same size? The reducer I used with the base coat is LIMCO LR12 medium reducer. I don't know if it is URETHANE or not and the chemical mix on the label does not mention urethane. The mixing cups I got with the materials were quart size cups. The smallest mix ration for 4.1 was way too much material for what I'm painting (the front fairing, 1/2 of the lower fairing and the trunk lid). So I mixed a smaller amount at 2 parts clear coat and 1/2 part activator and put 4 coats on the 1/2 lower fairing and poured the rest of what was in the pot out. I hate wasting material but did not want to spray the other pieces until I figured out why orange peeling. No disrespect taken. I agree not ideal so I've been trying to paint early in the morning before the temperature gets too hot but down here in the south the humidity is still pretty high. Since I don't have access to a climate controlled paint booth I've been doing this in the garage. The only solution I know to do is paint at night where the temp is lower. The product instruction said 7 minutes between coats so I used a kitchen timer. I've been using a soft foam block with paper and is seems to work ok. I'm not confident enough to use a power sander so I've been hand sanding so I could judge my progress slower. It sounds as if you are using a single stage compressor with onboard gauges. One gauge is to monitor tank pressure, (receiver), and the other is an approximation of regulated output pressure prior to the air discharge line. If you are not feeding your spray gun with either 3/8", or 1/2" air line, you are defeating the purpose of the HVLP equipment as 5/16" airline has too much internal restriction to flow air adequately. The "knockoff" spray guns the home centers market are of marginal quality out of the box and I'm obviously not a fan of them. You are correct in assumption a 1.8mm fluid tip requires the corresponding needle and air cap both for proper atomization. "Urethane Grade" reducers are of much higher quality when manufactured than non graded material. It will state on the product package it is "Urethane Grade". Basically it is manufactured with a much less moisture content than conventional. Moisture is what helps "kick" polyisocyanate materials, (your hardener) over and using non "urethane grade" reducer induces variable(s) into the mix which are uncontrolled. This can lead to problems obviously mostly related to proper drying/curing of the topcoats. 10psi on basecoat? WOW!!! That should really be light and iridescent in the face for certain. 4.5-6psi is very common to use in the automotive refinish market for blending and color match with 7-10psi used to bust up the clearcoats. You always set atomization pressure on a spray gun with the trigger pulled back and freely flowing air. Don't be discharging paint but with the trigger pulled back, adjust the spray gun mounted gauge to the proper pressure you are looking for. Set the fan, (width of spray pattern), then fill the fan, (amount of paint applied). Remain back from the surface about 10 inches, and overlap your spray travel about 50% with each pass. Takes practice so don't get discouraged and practice on scrap first. Humidity is where the compensation comes into play with blending solvents. You don't want a fast drying product as the paint will dry with a milky or hazy surface called "Blush". You can't get rid of it as it's moisture trapped in the film. A slow dry allows the moisture to evaporate from the coating but dry time is slow. Nature of the beast really. The slow dry time makes for high solid topcoats liking to run.....Temperature is much easier to compensate for than humidity but once familiar with the materials to be used, it's becomes second nature. I always wait about 20 minutes between coats in both the base and clear stages. Never a problem with heat, humidity or anything of the like. Always better to take a little extra time and be happy with the final result than the alternative. I'm unfamiliar with any of the material you mention. I've always been around the automotive refinish market and have used just about every nationally know brand out there at one time or another. I'm assuming you are using paint marketed as "Acrylic Urethane" and if not the rules for "Acrylic Enamel" are basically the same except ratios are not near as critical. Acrylic enamel "hardener" is a cross linking product not as good as acrylic urethane paint, but much better than straight acrylic enamel paint by itself. I know it's confusing for certain. I can speak this fluently but I've been around the collision repair industry for a few years. Label directions are usually good, but direct experience is usually better for me. You might ask any auto body shop for a few pointers in your area. Not being a competitor to them and wanting to do something for yourself may garner some direct experience in your locale. PM you phone number and I'll give you a call tomorrow. Sometimes it a bunch easier to talk direct as my mind goes a little faster than my fingers.....
-
You are compounding your own problem running that high of spray pressure unless using a suction feed gun. What is happening is the atomization pattern is much too fine resulting in free overspray into the air which is cutting down on actual material application rate. This finer atomization results in a very fast "flash off" time for the coating as it is too thinly placed. Personally I use a 1.7mm tip and matching cap but my spray guns are not what we would call "budget" as they cost several hundred dollars each. I use a 1.3mm, or 1.4mm tip and corresponding air cap for base and mid coats, and a 1.7mm tip with corresponding air cap for the high solids clearcoat. That being stated, I "move" and don't dwell around what I'm painting so I'm not removing runs, drips, errors..... 4:1:1 will work just fine and it's typically what I use. There will be two or three selections of urethane graded reducer and use the one suited for the temperature you plan to apply in. I typically mix and blend them myself but unless experienced, it's not suggested. Be precise with your intermixing ratios and use cups for this purpose. "Mixit" is a great brand of cup. 90+ degrees is not the best temperature to start out with I'll tell you right up front. Far too much compensation needed for satisfactory results to the novice. No disrespect meant but materials aren't cheap as I'm certain you've ascertained so mistakes get costly very quickly. A final note would be to allow 20 minutes of flash time between clear coats. I usually apply two coats which measure about six mil when dry deposition. This allows block sanding down level and buffing to a high and deep luster. Although I used wool pads for years, foam waffle pads are my preference by far nowadays. This is personal preference but the heat you can put into the panel with a foam pad really cuts well and cleans up nice. I use the same materials addressed earlier although with an air sander to color sand except in high crowns and sharp corners/edges. My motto is "no professionals" so don't consider myself anything of the type. I do like to paint cars and restore antique heavy trucks as a sideline hobby:
-
Many of your 421 High solids clear coats do not readily reference a reducer additive. I'm not familiar with the product you show. However that being said a generic urethane grade reducer can be added to 10 to 15% by volume to allow better flow out in high temperature humidity conditions. 800 grit paper will work just fine followed up with the finer grits mentioned earlier. Just takes a little bit more elbow grease. In about a gallon to a gallon and a half of water give the water a quick squirt of dishwashing soap, that will act as a lubricant greatly easing your sanding effort. If using a conventional spray gun go about 65 PSI at the air cap, if using HVLP about 10% of that six and a half to 7 PSI is great with a 1.4 millimeter fluid tip. Don't rush the job
-
Orange Peel is from lack of flow out of the top coat. Add slower reducer. Do not over reduce the sprayable mixture. Severe Orange Peel is best cut out with 600 grit wet followed by 1500 grit followed by 2000 or 3000 Grit. Buffing compound to use is called micro fine finishing which is a 3M product use a foam pad low-speed buffer 1725 RPM or adjustable low speed.
-

Need some measurements or recommendations:
Rob Swallows replied to Rob Swallows's topic in Trailer Talk
Back from powder coat and all installed perfectly. Almost like it was engineered to fit there..... -
Anybody have something like these? http://www.ebay.com/itm/222120502965?_trksid=p2055119.m1438.l2649&ssPageName=STRK%3AMEBIDX%3AIT I talked to a couple of folks I know whom ride and one has the set liking it very well and the other is planning to purchase the same based on the other's comments. My wife favors the black color and has visited their website. Whatever she decides to go with I'll get a matching set and keep my older ones for riding solo. Thanks, Rob
-
Carburator Kits:
Rob Swallows replied to Rob Swallows's topic in Royal Star Venture Tech Talk ('99 - '13)
After receiving the correct parts, I've now rebuilt all four carbs complete. I found a Yamaha dealership whom distributes OEM parts at 30% off list so went that way instead of a/m and boy what a difference this has made. Everything fit without guess work and I'm hoping the bike finally runs as it should after I get everything optimized. I hate that with these small engines you cannot just order a "kit" and everything you need be included but rather piece everything separately, but I'm just a small molecule in a large gene pool out there. I installed new diaphragms, all new seals and rings and the jets I could readily remove from the castings. Everything metal went into the dunk tank and is clean. I hated to take everything apart but with digital film being so inexpensive these days, it wasn't too bad to photograph for reference on how to put it all back together again. Hopefully the first of the week I'll get them reinstalled onto the bike and running. I've mostly pulled a major service routine, (addressed earlier) on the balance and the hitch is done, so wanting to move to the next step, (whatever that is). I'm thinking our first outing is going to visit the Door County Maritime Museum up on Sturgeon Bay in Wisconsin https://www.google.com/maps/place/Door+County+Maritime+Museum/@44.8303969,-87.3847515,17z/data=!4m15!1m9!2m8!1smaritime+museum!3m6!1smaritime+museum!2sDoor+County,+WI!3s0x881d7d8d95ac61d3:0xb4d3cfdf4c832d1c!4m2!1d-87.3770488!2d44.8341302!3m4!1s0x881d50087932a475:0x4c874af27ad3d4c2!8m2!3d44.8302883!4d-87.3829406 . Been wanting to see that for a while now and it might be a nice little "jaunt" for a weekend only being about 400 miles. I have friends in Sheboygan I could overnight with to break it up if need be. We'll see early next week with planning on how the bike performs. Thanks, Rob -
Looks like I am starting a new life adventure
Rob Swallows replied to M61A1MECH's topic in Watering Hole
That sounds interesting for certain. I can "punch out" at my election but after so many years of fixing what's broken to get aircraft around the country, I don't know what I'll do when retired. The "canned" answer is "whatever you want", but I don't know what that is..... Thinking my wife and I will go on a long bike journey to try and figure it out. Rob -
I'll be calling later in the evening. Hope to be in touch with both you guys shortly. Thanks, Rob
-
My wife and I were discussing rain gear this afternoon in anticipation of our trip. I've read online about PVC, polyurethane, and polypropylene with the benefits and detractors of each. I don't really mind the cost but rather have a good product that works. I have a rain suit picked up several years ago from Rural King Stores and sure wish I could find a mate for it to fit my wife but they no longer carry them..... What do you folks use being easy to put on and take off, and not kill you with overheating yet is waterproof to withstand riding in a driving rain? Thanks, Rob
-
Thanks for the post. That's along the lines I'm thinking. I too may find a set of those larger red tail lamps for mine as it's kinda dim back there I think. Rob
-
She's actually a lot nicer person than I. In my opinion, better too. Rob
-
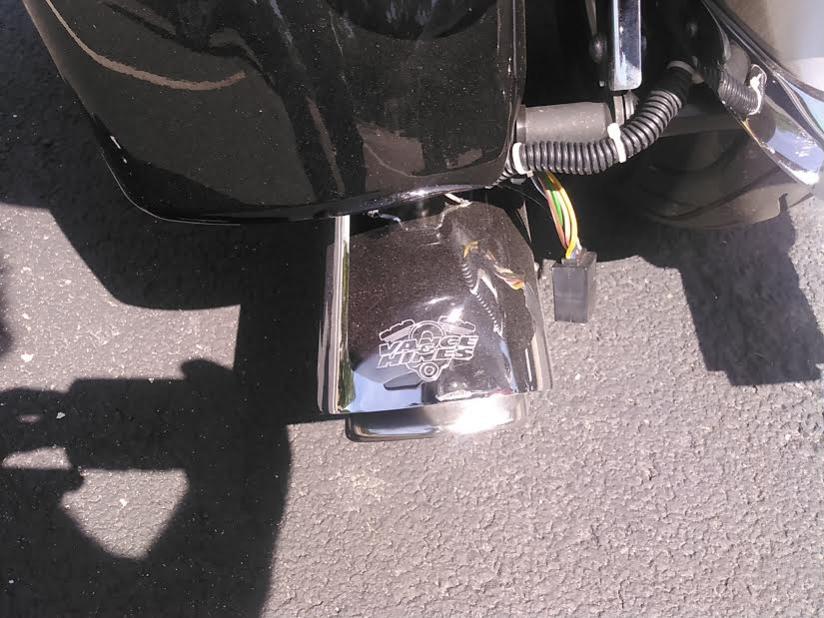
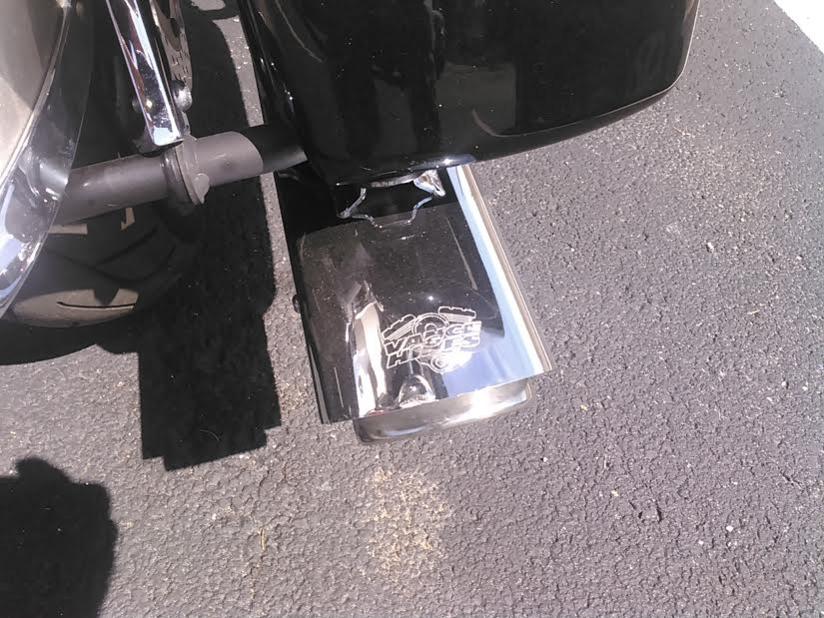
I'm thinking of modifying my aluminum hitch insert which shows support for "Children's Hospitals" to include flag mountings in both the vertical, and 45 degree planes. I'm not certain of flag sizes but probably not really large as they are short lived along with the other concerns at speed.
-
You betcha. I get up around the quad cities a bit for work when they have problems on the airfield and you're not too far out of the way there. On my/our trips I'll be posting itinerary and maybe a few of us can meet along the way(s).
-
Her opposition is based upon "never seeing them except in a parade". I don't know and see them everywhere on bikes. Not a big deal at all but another touch which shows support for the country and the POW cause. Personally I grew up around Mack trucks and highly favor the brand, (pre 1980). Certainly no fights ensuing about it or anything like that. I just won't install anything without being in the same boat as it's a shared asset so to speak. Married at 18 and 38 years into this, I'm not about to change now as it works for both. Rob
-
I'm wanting to install three folding flag poles onto our bike. Wife is not for it at all for some reason. Of course a "stars and bars", a POW, and citing I rebuild antique "Mack" heavy trucks, a corporate flag of this brand, (which I have). Maybe if you folks chime in I can convince her for allowance as the bike is joint ownership and we really don't do things in opposition to the other. Looks like our first trip together in many years on the motorcycle is going to be to the upper portion of Wisconsin to some point up there on Lake Michigan. Maybe rent a cabin and attend a fish boil. Looks to be just under 400 miles and we can break it up by stopping at friend's along the way, and son's house in Chicagoland up and back. This of course is just a warm up for our long trip later in the year. I can't convince her to set out of the long trip on an unproven bike which has been setting for five full years..... Thanks, Rob
-
Bolted my receiver hitch onto the bike.
-
Need some measurements or recommendations:
Rob Swallows replied to Rob Swallows's topic in Trailer Talk
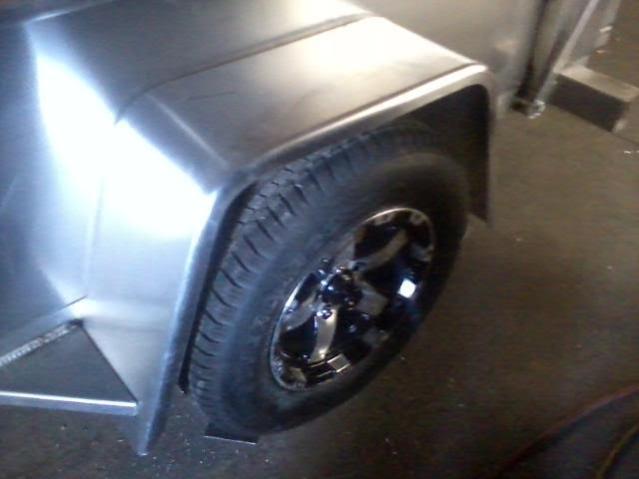
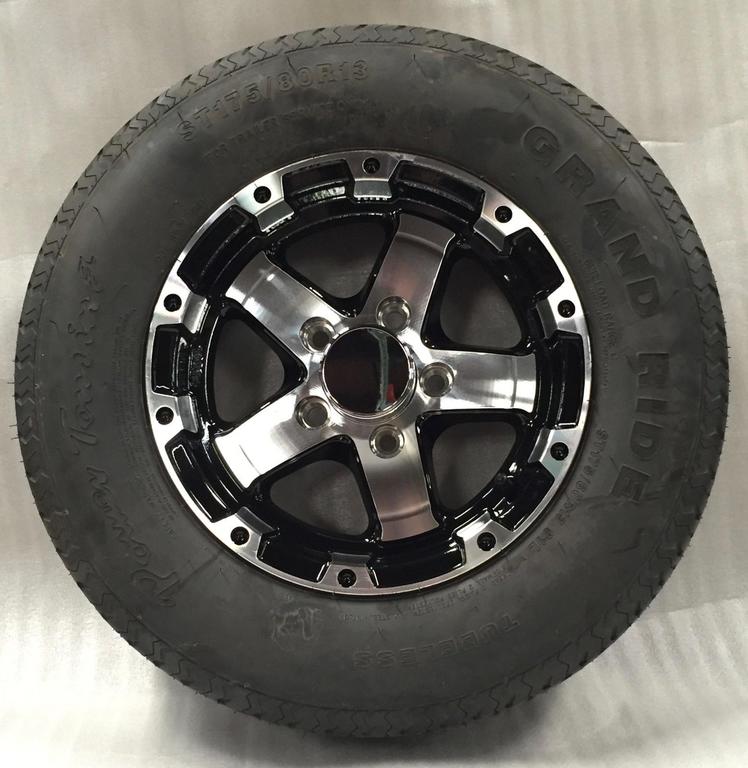
No photos this time but the safety chain anchor plate is installed and two 3/4" holes drilled into it for chain anchor ports. It's welded on there solid and the welds cleaned up so going to shop tomorrow. Also drilled the 1/2" hole through the insert and it aligns good with the receiver. All fits well on the bike so I'm calling it good. I did not install a top plate as the bottom anchor plate is burned in there pretty good so I don't see any horizontal, or vertical deflection of the receiver happening. On another note, here are the tire and fender combination I've ordered: Here is a better photo of the rims: Although the trailer will be a smooth plywood box I'm thinking of painting it silver with black accents, or the other way around. Should go with the bike well either way. All the lights are LED with side markers high and low on the sides and rear, and low on the front so I'm not blinded at night, (jury is out on this one). The interior will be illuminated with six, or eight LED lamps as I used in my trunk which should prove to be very low profile and bright. It's coming together. Hopefully get down to grab some carburetor kits tomorrow after work as I'm local the balance of this month. Thanks, Rob
-
Need some measurements or recommendations:
Rob Swallows replied to Rob Swallows's topic in Trailer Talk
The welds I put down should be near full penetration into the substrate as the heat was almost to spray transfer mode and they too are sealed to preclude rusting. Know what you mean about the powder coating and film thickness. I've had this guy do work in the past and he really does know what he's doing. I know he uses a rubber plug to seal the openings prior to attaching the coating which is removed before baking. My insert is 1.25" solid as that's what was on the shelf. I may run with it and may not. It's a lot heavier than needed in this application for sure but will probably be expended as a template if I find another which is lighter in weight. I don't think there is any 1/8" stock in the shop; only 1/4" for certain which is what I'd planned to use. You're probably right about the top plate being unneeded in this application, but the safety chain attachment plate will be mounted on the bottom side with 1.0" diameter holes for the chain hooks to grab into. Thanks for your insight on building this thing. Rob -
Carburator Kits:
Rob Swallows replied to Rob Swallows's topic in Royal Star Venture Tech Talk ('99 - '13)
I do like it when it's running well. Think I've got the heavy feeling addressed as the steering head bearings were very loose, not knocking but put the handlebars about 20 degrees off center and they would just fall to the stop on the right, and barely any push, (cable resistance) to the left. Tightened them up and wanting to see it makes any difference. I'm a foster kid; never knew birth parents. Raised by working class in south St. Louis and know what you mean by "left it's marks". -
Once the front fairing is dropped down is there enough room to mount a box which measures about 3.5" wide, 5" long, and 1" thick standing on the 5" length pointed fore and aft? Wanting to test out a radar detector and want to bury the processor assembly in the fairing. Cops are getting bad about them in some places.
-
Shamed into submission:
-
Windshield swirls
Rob Swallows replied to Dwayne45133's topic in Royal Star Venture Tech Talk ('99 - '13)
We used to get that in the Navy also and it did work well. It went on like a liquid wax and you let it haze then buffed it off IIRC. The stuff I now use is a spray goes on white, dries clear then buffed off. Does a great job on plastic canopy's of light aircraft which usually don't use glass windscreens.