V7Goose
-
Posts
3,588 -
Joined
-
Last visited
Content Type
Profiles
Forums
Gallery
Events
Store
Everything posted by V7Goose
-
First thing to check is the valve core. Easiest way to to put a little spit on your finger tip and wipe it over the valve stem to get a thin film over the opening. If it lows a bubble or pops, you either need to tighten the core or replace it. Sounds like you may have too much air coming out for the spit method, so if you cannot get a film to cover the valve stem opening this way, try a drop of dish washing detergent on your finger instead. Good luck, Goose
-
From the picture, I'd swear that tire is 10 years old! But your date code is the 23rd week of 2005. And SW Moto Tire sells so many of these things, they are almost certain to have new tires in stock. I can't tell you what happened, but it sure wasn't Armorall - that will PREVENT the age cracking, not cause it. From what the dealers have told me, Avon has the best warranty of all tire companies, and they stand behind it. If it has a 2005 date code, they really need to fix this! Good luck, Goose
-
Each tire has a load rating. Your manual specified the minimum appropriate load rating for each tire. I would not go below that, no matter what the tire size. I believe the Venom MT90 is over the stock rating, but I don't know about any other tire. No reason to buy Avon's if you don't like them; there are lots of tire options out there. Goose
-
Dunlop does make the narrower front tire - the size is 130/90. Personally, I'd suggest the Avon Venoms purchased through Southwest Moto Tires in Tucson AZ. Best prices you are likely to find (they include shipping free if ordering two tires). If they don't ship to that funny land up north, I'd bet you can find a member here that is within striking distance of the border that would take delivery for you and wait for you to come pick them up. The narrow front tire in the Avon Venom is an MT90, and they also have white walls. I'd say mount 'em here and ride 'em back. If you want to come all the way to Texass I'll do it for ya. Good luck, Goose
-
Lucky and Stupid. When you think about it, that is about the best you can hope for when stupid is part of the equation. So here's my story. I use my tires too long. Not intentionally, and I'm not proud of it, and for sure I'm not recommending it, but facts is facts. I can explain how it happened, but that doesn't make it right. Closer attention would have prevented it. The problem is that without a center stand, it is just such a pain to carefully rotate the tires and inspect them all the way around. When my tires get close to the wear bars, I THOUGHT I kept a pretty close eye on them. As some of you might know from my past posts, I ride a lot. I'm on the bike virtually every day, and I can often put a thousand or two miles on the bike between washing (when I really get down and inspect everything). So keeping a pretty close eye on the tires usually means I regularly take a look a the open part of the tread below the rear fender or on the front of the bike. I just figured that by looking at that section of the tire every few times I walk up to the bike, random chance would mean that I was seeing all of the tire within a reasonable time frame. Facts prove me wrong. Here's the condition I thought my Avon Venom rear tire was in at 14,000 miles: [ATTACH]802[/ATTACH] [ATTACH]803[/ATTACH] In these pictures you can clearly see the edge of the wear bar in the middle of the long tread groove that stretches all the way across the tire. The Venoms only have about three of these long grooves, so there are not a lot of places to check for the wear bars. Yes, I know that you are supposed to dump the tires when the wear bars first hit the surface, not when they are gone. My weakness is that I have always wanted to push them to the bottom of the wear bar. Gonna have to change that. When I had my bike in about a month ago for the shock to be replaced, the shop told me that the belts were showing on my rear tire! This was a shock to me, but sure enough, this is what I found when I put the bike on a stand and rotated the tire all the way around: [ATTACH]804[/ATTACH] [ATTACH]805[/ATTACH] [ATTACH]806[/ATTACH] [ATTACH]807[/ATTACH] So it seems that the majority of times I looked at the rear tire I either wasn't really paying attention, or I was seeing the section that still showed the wear bar! How did this happen? The answer is probably interesting, but incidental to my failure to properly inspect my tire often enough. That tire was mounted for me by my dealer as a favor to me after they had to re-do some work. It now seems to me that they mounted the tire and just left the old weights on the wheel from the previous tire. The section that was mostly worn through to the belts was about where the weights were, so the grossly out-of-balance section was being thrown harder against the road on each revolution, and the part that still showed the wear bar was the lightest part of the tire. So, lesson learned, right? Not hardly. I didn't want to let my bike sit while I waited for a new tire, so I mounted an old one that I had around for emergency use. This tire was just to the bottom of the wear bars and very flat, but I figured it was OK for a couple of weeks. And I watched it about the same as I had been watching the last tire! (Told you I was stupid - lesson not learned at all.) Well, at about the second weekend, when I was planing to change the tire, a short notice PGR mission came up, so I thought a while longer would be OK. This mission was over 100 miles away, and the return run was at high speed. All total, I guess I put close to 2,000 miles on this old tire. I'll cut to the chase here. When I pulled into my garage two days ago, I saw this showing on the back tire: [ATTACH]808[/ATTACH] [ATTACH]809[/ATTACH] Yikes! About half the tire has the center section worn through the tread layer with belts showing in a big section, and the other half just looks worn out. Bottom line is that I was very lucky that my negligence and assumptions about the tire condition could have turned very ugly but did not. I'd certainly like to think that I'll be doing closer full-tire inspections in the future, but only time will tell. I'm a bit chagrined that I wasn't watching that second tire closer after what I had just seen on the one before. I thought I'd subject myself to embarrassment and ridicule here because I survived this bit of stupidity only through sheer luck. Next time, if there is a next time for either me or someone else, that luck may not hold. If even one person looks at their tires a little closer, then this has been worth while. One last thought for you. As these pictures make completely evident, these modern tires do NOT have any rubber to spare under the last part of the tread. I have sectioned worn tires in years past, and they always had a thick layer of rubber left over the belts, but neither of these tires have that margin of safety. Don't push them too far! Ride safe, Goose
-
.thumb.jpg.4e1b3809c4633f365ba67afc212f21df.jpg)
To Swivel or Not to Swivel, That is the Question
V7Goose replied to Mean Dog's topic in Trailer Talk
Ventuedad is back; try the link again. No idea what happened, but it worked this morning. Goose -
I can't stress enough how great this thing is to use for such a low cost. Last night I mounted the tire on backward (even after checking the arrow first!). If I was still using tire irons, I think I would have probably shot myself when I noticed it. Using the changer, I was able to just pop the tire back off, flip it, and pop it back on the rim in about 3 minutes flat! It took longer to carry it back out to the changer and clamp it in than it did to reverse the tire. Goose
-
Not really. Actually, that big flat rear tire should have BETTER traction when braking on dry pavement. Think about it - the flat surface puts more of the tire in contact with the road if the bike is straight up - bigger contact patch, more traction. The only reason it might have started sliding more on you is if the rubber was starting to harden with age? My rear tire was shot in 6 months, so age didn't come into play! On a related note, my last Avon rear flattened out a lot by the end too, but never to the extent that the Brickstone did. Based on my recent experience, I think that is why I noticed the tendency to track grooves increase again as the tires wore down, but also why it never got really bad like it was as soon as I put the old Brickstone back on. Goose
-
Has anyone towed a First Gen with this type of hitch?
V7Goose replied to GG54172's topic in General Tech Talk
Damn, you smarter than me! Goose -
Has anyone towed a First Gen with this type of hitch?
V7Goose replied to GG54172's topic in General Tech Talk
This is actually a very good way to tow a bike, as long as there are not any lubrication problems. I've done it with other bikes just using the step bumper on a pickup. If the front end is fully compressed with straps on the forks, it ain't goin NOWHERE (unfortunately, straps are a bit difficult to put on an RSV). The rear suspension and ability for the bike to pivot around the front axle provide good compliance with the road. Frankly, 600 miles shouldn't be that bad unless some gears are running totally dry. Goose -
Safer and better long-term outcome to get a new gurlfriend!
-
Has anyone towed a First Gen with this type of hitch?
V7Goose replied to GG54172's topic in General Tech Talk
The angle is going to affect the pooling of the oil - not sure if it will be enough to cause a problem. I don't have any idea how the shaft splines and CV joint in our drive shafts are lubed, but some BMWs and Guzzis used to rely on oil spinning up the shaft and then draining back through the housing. The angle would probably cause a big problem for that also (if applicable). Besides, who you gonna find to help muscle a 500lb front end that high in the air? There ain't enough room for four guys to grab hold of that thing! I know you said you couldn't use opinions, but I just can't help myself! Goose -
I appreciate the kind words - I'm just glad the information helped someone! I know I have gotten a lot form other folks here, and it is just dumb to make everyone re-learn something themselves if we already have the knowledge. Best of luck to y'all, Goose
-
I simple stick the axle back in and set the tire between two jack stands. The grease seals do have a little friction that affects the free rolling of the wheel, but I haven't found that to be a problem. I have thought about using a slightly smaller bar instead of the axle, just never got around to doing it. When necessary, I use self stick weights from JC Whitney. I checked the wheel without tire, and it is balanced perfectly. The Avon's do not have a heavy-point mark like most brands (Avon claims they don't have a heavy spot). I generally check the balance before I seat the tire and rotate it a little if necessary. No weight needed at all on the one I did last night. Frankly, I think my ballance job is better than the shop's! Good luck, Goose
-
How much affect does a rear tire have on the tracking and unstable feel of a bike? A LOT! Much more than I ever suspected. In another thread several weeks ago I reported that I had to take off my rear tire before I had a new one available. Because I ride every day, I decided to re-mount an old Brickstone rear tire that I had sitting around for emergency use. This tire was flat as the proverbial fritter and mostly bald, but I figured I could run it for a couple of weeks. I was absolutely shocked with how bad the bike handled! This thing started trying to weld itself into every groove and ridge on the road, and if there was a spot near a light where the asphalt was bubbled or rolled up from the heat and weight of the cars, the bike would pitch hard back and forth as it contacted the uneven surface. Going over a ridge of uneven pavement between lanes was actually scary. All of this attributed to just the BACK tire alone. Last night after work I finally decided I had to mount the new Avon rear tire. Today, the bike handles absolutely perfectly again! No more tracking, the rolled up asphalt is undetectable, and the bike makes the transition between uneven lanes with hardly a blip. My front tire is an Avon Venom MT90 with 16,000 miles on it - same tire I had on it yesterday when it handled so badly with that old Brickstone rear. Today with a new Avon Venom on the rear, that 16,000 mile Venom on the front is handling every bit as well as I remembered when I first mounted the Venoms. I suspect that the quick handling that we get from the MT90 size up front actually made the impact of that flat rear tire worse than it was when it was still in use with the original front tire. On another note, anyone who has run the stock Brickstones is undoubtedly familiar with the infamous howl they make as they wear. I can conclusively tell you that the flat rear tire is where that howl is coming from! As soon as I put that old tire back on, the howl was back with a vengeance any time the bike as not being held in a perfectly straight line. The slightest hint of a lean left or right would just make that tire wail! Stay tuned for the next phase of this impromptu experiment. In about a month, while that new Avon rear tire is still new, I am going to re-mount the old fat Brickstone front tire to see just what effect that tire alone has on the handling of the RSV. I'll let y'all know! Final bit of information for anyone who has hung in here this far - I use a Harbor Freight tire changer that makes mounting skins a breeze. The learning curve is minor - after about the third tire change, the operation is so smooth and easy that dismounting and mounting a tire is truly a 5 minute operation. If you want to do this work yourself, that tool pays for itself with the very first set of tires you change. For anyone in North Texas who is interested, I'm more than happy to let you come over and use mine s'long as you bring a six-pack with you! I can't supervise without a beer, ya know? Good luck, Goose
-
Thanx LASER917, that is the info I was looking for. So I guess you don't have any problem just holding the bar high enough to clear the disk; I'll try that. Goose
-
I haven't done it, but it is pretty simple if I remember it correctly. I think they will fit right to the existing pipes, but there will be a gap in the chrome cover that you will need some sort of adapter or clamp to cover up. I'm sure others will provide that info. The mounting location for the rear of the muffler is much further back than the existing bolt on the stock muffler (almost to the very end of the muffler), so you will need to mock up a custom mounting bracket that will bolt in place of the existing muffler and extend rearward to bolt onto the RK muffler. This doesn't look too difficult, and I have seen someone selling this adapter bracket. Again, I'm sure others that have actually done this will respond with all the details - I just wanted to tide you over with what I think I remember! Good luck, Goose
-
Here are the links for the base changer and the motorcycle attachment: http://www.harborfreight.com/cpi/ctaf/displayitem.taf?Itemnumber=34542 http://www.harborfreight.com/cpi/ctaf/displayitem.taf?Itemnumber=42927 Be sure to check out the link to the review of this tool at either one of those pages; some good pictures there. They show the tool arm used to put the tire on/off being drug over the edge of the chain sprocket of a tire (similar to having a brake disk in the same place). I'm just not sure I would trust this putting pressure on the edge of a disk without having to hold the handle of the tool so high it would be very difficult to operate. I guess I'll just have to give it a try. I'll be posting a lot more information on using this with our tires in the near future, along with pictures and a link to another guy's excellent illustration of changing a rear tire for a Honda Refrigerator. Goose
-
Such a minor change in weight should not make any difference in how the bike sits. I am about 250 lbs. I'm not going to try to reveal the weight of my passenger, but she is about 5'5 and not fat. Anyway, I usually run my rear shock about 45 lbs, and I do not usually change it when she goes with me. Since most of my miles are put on solo, and I ride every day, I should immediately notice a significant shift in the level of the bike when she gets on, but I do not. If yours is changing so much with less than a 50 lb increase in weight, you probably have something wrong with the shock. Good luck Goose BTW - I have NEVER drug pipes on my RSV, even before adding the shorter dog bones. I drug floor boards, but never pipes.
-
I have usually changed my own tires using standard tire irons since the 70s. With this method, disk brakes don't really get in the way. However, I have recently started using a manual tire changing machine (from Harbor Freight). This works great, and the effort is much less than with tire irons, but so far I have only used it on my rear tire. Since the rear only has one disk and the wheel can be put in the changer with the disk down, it is not an issue. However, I am not sure how to deal with the dual-disk front wheel. Does any one here have experience using a manual tire changer with a dual-disk wheel? Do you have to remove one of the disks? Thanx! Goose
-
I always put my helmet int he trunk, so anything that makes that harder won't work for me. Goose
-
I do not grok. If you already had this stuff in the tire, why did it go flat? Since it did go flat, why does it make sense to trust the tire after filling it back up again? Goose
-
Replacing horn???
V7Goose replied to Bigfoot's topic in Royal Star and Royal Star Tour Deluxe Tech Talk
Just wanted to share on option for where I put the air horns on my RSV. These are chromed steel from JC Whitney. http://i21.photobucket.com/albums/b289/V7Goose/AirHorns1.jpg -
Roadhand, I think you are mistaken in understanding how the bike will react to the crown of the road. When a bike is traversing across a slope and kept vertical, the bike will want to move UP the slope, not down. This is a function of the coning effect of the rounded motorcycle tires. Think about it this way - if you are riding on a perfectly flat surface and lean the bike to the left, which way does the bike move? Left, of course. Now, think of the relationship of the bike to the road surface when leaning to the left: the left side of the bike is closer to the ground than the right. OK, now think about riding the bike straight across a sloped surface, rising from right to left (just like a crowned road surface). When the bike is held vertical but the road surface is sloped, lower on the right side of the bike than the left, the actual physical relationship of the bike to the road is identical to the example above, where the surface is flat but the bike is leaning left. This means that the bike turning "left" is actually moving up the slope The reason the bike behaves this way is that the contact patch of a motorcycle tire leaning to one side is like the surface of a cone. If you lay a traffic cone on the side and roll it, it will roll around in a circle, turning in the direction of the small end. Well, the side of a motorcycle tire near the rim is smaller in diameter than a point on the tread, exactly like the side of a cone. So anyway, riding in the right lane of a crowned road will cause the bike to want to move to the left toward the top of the crown. That is why the test to see if the crown is causing the problem is to ride on the opposite side of the road. I hope that explanation helps, Goose
-
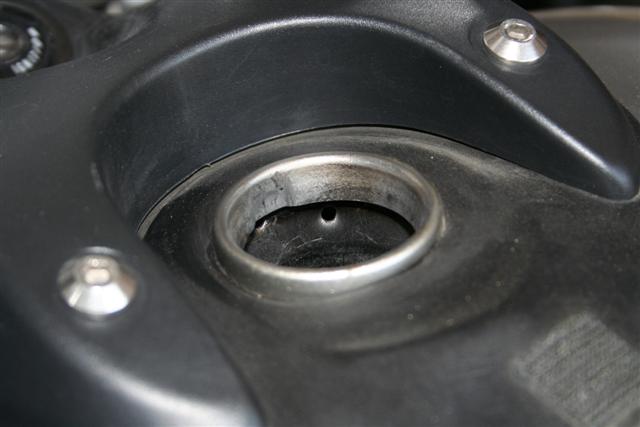
If you are tired of not being able to completely fill the gas tank and having the bubbling air escaping from the tank blow gas all over the tank top, you can solve this by adding a few air vent holes to the tank filler neck. I had to put 4 fairly good sized holes in the front and right side. The process is simple - just use a punch awl and ball-peen hammer to make the holes, as shown in the picture. Here are a few more tips: NEVER NEVER NEVER drill! Not only will that dump metal shavings into the tank, but all electric drill motors create sparks! When you use a punch awl, just put the tip in contact with the filler neck and hit it enough times to make the hole as large as the awl shank (not just a little hole from the tip). You will need a MINIMUM for four large holes to make a big difference. I have seen a suggestion to use wax paper between the awl and the tank neck to reduce the chance of sparks - no idea if that provides any value at all, but it can't hurt. I personally think there is no real risk of sparks from using this method. I also suggest putting a thick towel or something over the tank near the awl head so you do not accidentally slip and mar the tank with the hammer. A dead blow hammer would be an excellent choice for this job - less chance of slippage, and they are all covered in plastic. Several folks have said to do this with a full tank - I disagree. If it is too full, the vibrations from the hammer blows will splash gas all over you. If you have to do it with a full tank, place a rag over the opening. I think that any level below the filler neck is probably OK. And some important information about filling your tank AFTER you do this mod: You now have a CHOICE how full to make it, and that choice is important. If you fill it all the way to the top and then park it in the sun while you go have lunch, the heat will cause the fuel to expand and run out the overflow hose into a big puddle under the bike! Even just the engine heat can cause this, so my recommendation is simple - if you are going to ride at least 10 miles right after filling it up, put as much in as you want. But if you are just around the corner from home, or planning to take a break before getting back on the road, either wait to gas up until after the break, or keep the fuel level down near the bottom of the filler neck.