V7Goose
-
Posts
3,588 -
Joined
-
Last visited
Content Type
Profiles
Forums
Gallery
Events
Store
Everything posted by V7Goose
-
.thumb.jpg.4e1b3809c4633f365ba67afc212f21df.jpg)
Engine vibration
V7Goose replied to texasrices's topic in Royal Star and Royal Star Tour Deluxe Tech Talk
Are you sure it is engine vibration? If it is, you should have that problem at the same RPM in any gear. If it ONLY happens at the speed you stated in top gear, then it almost certainly is not the engine. My bet would be tire balance. Goose -
You are smart to look or something lower than the typical 55 watt bulbs. I have posted several times about the limited charging capacity of the RSV, and I have recently added a new set of lights that illustrates this problem even more. I have the standard Yamaha driving lights that used to be on all the time. I now have a set of mini bullet driving lights that are wired to come on with my high beams, and the Yamaha driving lights are only on with low beams. My ammeter and electronic volt meter make it very clear that the 55 watt lights are a problem, even when the carb heaters are off. The bike barely keeps up with that load at 3,500 RPM. I switched to a nice little set from JC Whitney with 50 watt bulbs, and these do OK at 3,000 RPM. I'm satisfied with this load for high beams, but I absolutely would never run two 55 watt driving lights all the time. Goose
-
You sure about that LA? Is it 39,000 or 3,900? 39,000 miles on ANY motorcycle tire would be a WOW in my book. 3,900, however, would definitely equate to a "sorry" tire, and exactly what I think about most Brickstones.
-
My 05 QuickSilver does not have any "chrome ring attachment screws." The chrome ring is held on by three small tabs bent over the back of the light rim. This makes it quite difficult to re-attach the ring with the extra thickness of a visor. I had to take my fairing apart a second time about a week later when one side of the ring came loose. Good luck, Goose
-
Rear Shock Air Pressure
V7Goose replied to a topic in Royal Star and Royal Star Tour Deluxe Tech Talk
I'm a pretty big guy at 230 lbs, so I keep my rear shock pumped up pretty good. Always at least 45 pounds. Generally don't change it when two up. Good luck, Goose -
Replacing Headlight Bulb ??
V7Goose replied to stardbog's topic in Royal Star Venture Tech Talk ('99 - '13)
2005 is the first year Yamaha started using the bastard turn signal bulbs with three pins. Like another said, you can use an 1157 and just knock/cut off one of the pins. The one remaining pin will be in the correct place for the Yamahaha socket, and the bulb will work fine. I have had one in for over 20,000 miles. Good luck, Goose -
You have an 06 with a five year warranty - why are you buying parts? Goose
-
The liner comes out of the N100E just like it does on the N102. That is a nice feature, as washing it is a whole lot better than just spraying it. Mine is showing a lot of wear, but from what I could find, Nolan does not sell replacement liners for the N100E (but they do for the N102). That, and the wear in the detent pins on the shield hinges is why I decided to go for a new helmet. Glad I did. Goose
-
The pads on the rear of my 05 QuickSilver were gone by 10,000 miles, and I use the rear brakes very little. My dealer replaced them for free since they did not warn me of the wear at the 8,000 mile service. I do not know what pads they used, but I assumed stock Yamahaha parts. I now have over 30,000 miles and these second rear pads have plenty of life left. My front pads have twice as much life left as the rear, and they have never been changed. I use the front brakes MUCH more than the rear. I have new EBC HH pads sitting on the shelf waiting for the need. Paid about $90 for all three sets from Ron Ayers. Good luck, Goose
-
Just got my new Nolan N102 n-com helmet - man, do I love it! Some great improvements over the N100E that I have been using for three years. I loved the N100E too, but she's yesterday's news now that I have had my head in the N102!! (The N102 n-com is $250 at Motorcycle Accessories Warehouse, and the Platinum color is very close to the 2005 RSV) Both the N102 and N100 are modular flip-front helmets. The N102 is proportioned a bit differently, giving slightly more forehead and chin room (both front and sides of the chin). The new latch release mechanism is really sweet - much easier to use than the old one, once you figure it out. Just pull forward with your thumb on a little lever in the center of the chin bar, causing a bigger lever to push out from the front of the chin bar - squeezing these two together causes the helmet to open. The shield ratchets and covers are significantly improved. Both helmets have Nolan's proprietary anti-fog shield that works really well, and the N102 has a new dark 1/2 shield outside the main shield that works like sunglasses. Nolan calls this the VPS (vision protection system). I am a little disappointed that the VPS is not extra dark, as it will not make a significant difference when riding directly into a setting sun, but it let me make one simple mod that solves that problem too. I just put a strip of blue painter's tape inside the top of the VPS shield. This is above the normal line of vision, but allows a slight tip of the head to completely block the direct rays of the fire ball. Here are a couple of pictures: [ATTACH]7589[/ATTACH] [ATTACH]7591[/ATTACH] [ATTACH]7590[/ATTACH] That last one is with the VPS shield flipped up and the main shield down, but it looks a little strange because the whole front is flipped up too, so you are looking at the top of the helmet through the shield. For someone who already has the N100E with extra shields, the shields are ALMOST interchangeable. Actually, without the VPS on the N102, they ARE interchangeable. But to use the VPS shield too, you need a little notch cut in both sides, like this: [ATTACH]7593[/ATTACH] [ATTACH]7592[/ATTACH] A rotary tool with a small steel cutter works fine to modify the older shields. I modified my old extra dark shield so I have both it and the VPS for summer riding. On to the Headsets. I have the cheapest J&M clip-on headset on my old N100E, and I have been very pleased with the quality of the sound. I ordered the mid-level 277 series for the N102 n-com. Love the way the helmet is designed to take an integrated headset and the way J&M used that for theirs. The sound of the 277 series is better, but not by a huge amount. Although the mid-range is more crisp, the bass is not as pronounced as it was with the cheapies. I verified this was the speakers instead of the helmet by unplugging the speakers from the old one and putting them in the N102 after I had completely mounted the new headsets. This weekend I am meeting my brother who has a new set of J&M 584 series (their best, and lot more expensive). I'll compare them and report back next week. Ride safe, Goose
-
Leveling Links Question
V7Goose replied to Double D's topic in Royal Star Venture Tech Talk ('99 - '13)
On my 05 QuickSilver, I did not need to remove ANYTHING except the two bolts to which the links attach. I simply raised the bike on a fixed maintenance stand that put the rear tire 1" off the ground and pushed a 1" thick piece of wood under the tire. This took the weight off the suspension and allowed me to remove the bolts without effort. I then attached the new links to the top bolt, pulled out the wood and slipped in the bottom bolt. Done. Good luck, Goose -
I don't think "ownership" makes much difference. I do think that the specific plant and who operates it makes a difference. In other words, the same brand of tires made in two different locations can be very different. In general, the same brand, model and size will only be made at one plant, so if you have one you like, you don't have to wory about where it was made. Good luck, Goose
-
I am not aware of any hard rule - like another said, it depends a lot on the facility. My general rule is to prefer a tire less than a year old, and I will absolutely refuse to pay new prices for any tire over 3 years old. Good luck, Goose
-
I had to remove one of the disks from the front wheel to do that tire. Good luck, Goose
-
My stock links were a dark greenish color and stamped "4XY". Goose
-
In actuality, a proper crimp connection is BETTER than solder. The key here is "proper," and in good condition. As previously noted, any corrosion or looseness is a problem. Crimp connections can become loose over time, where soldered connections do not. The reason a good crimp connection is better is that direct metal to metal contact has less resistance than the solder between the two pieces of metal. This difference in resistance is minuscule, and it makes little difference in real life, but it is there nonetheless. When putting together a proper solder joint, the best method is to ensure a good crimp or physical connection between the two metal pieces first, then use the solder to ensure the original crimp never moves My main point here is that this recommended "fix" to the factory setup is meaningless unless the specific bike has developed a problem and actually needs to be fixed. It never hurts to reinforce a crimp joint with solder, but I wouldn't rush out to do it unless this particular connection has been shown over time to be a week point in these models. Good luck, Goose
-
I do run a pressure gauge, and I think it is important (for me). But it is also important to know what it tells you and why you want one. Do you realize that the oil idiot light on these engines is NOT a low pressure light? Although the oil light on just about every auto and bike is for low pressure, ours is not. Our oil light is for low oil LEVEL. That is why our bikes do not have a dip stick to easily check the oil. The chance of complete and sudden failure of the oil pump is extremely small, so adding a pressure gauge to see that doesn't make much sense. The only other problem that would cause the oil pressure to totally fail is loss of oil, and the low oil light WOULD detect that, so again there is no need for the gauge. So why do I want the gauge anyway? Because this is the only way to monitor slowly developing problems, such as worn rod and main bearings, that gradually reduce the oil pressure over time and can lead to eventual major engine damage. If you don't put a lot of miles on your bike and expect to still have it at 100K+, then even this would not be of any real significance to you. Here's what I know about our engines and how I use my gauge: Specifications state that on a hot engine, you should have 50 lbs pressure at 5,000 RPM (going from memory here). Since I also have a tach on my bike, I check this at every service interval and periodically while riding if I push the engine to 5K while shifting. Frankly, I don't notice this very often while riding, so it mainly comes into play during the four service intervals every year. Normal riding between 2,000 and 3,200 RPM does keep the pressure around 25 - 30 lbs. I don't pay that close attention to the exact reading, but I know where on the dial I should normally see the needle and expect to react if it is materially different. Idle on a hot engine barely moves the needle off the stop. This is normal on ALL engines, as most oil idiot lights trigger at about 7 lbs pressure. If you can find a gauge you like that tops out around 60 lbs, then you might be able to see meaningful readings at idle, but most gauges just don't show it well at such low pressure. Nevertheless, this is actually the most valuable information I get from my gauge, as I do notice this a lot (not much to do while waiting for a light to change), and I know that just barely cracking my throttle will cause noticeable rise in the needle by 1,200 RPM. I probably test this 3 or 4 times a week, just by mental reflex without even thinking. So this is where I will first notice any significant engine wear or loss of normal oil viscosity from overheating or gas dilution. Gauges are very easy to add to these bikes. I had a detailed write-up on here BC, but it got lost during the meltdown, and I have not put it back. I'll try to remember to do that this week. Good luck, Goose
-
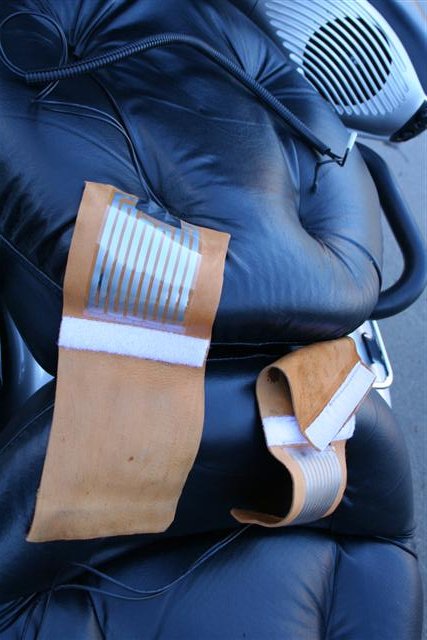
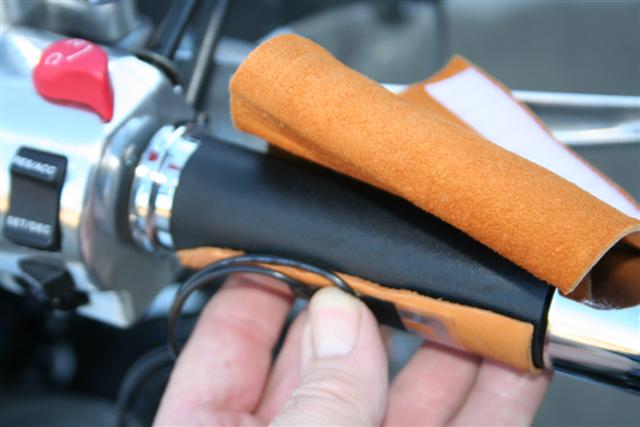
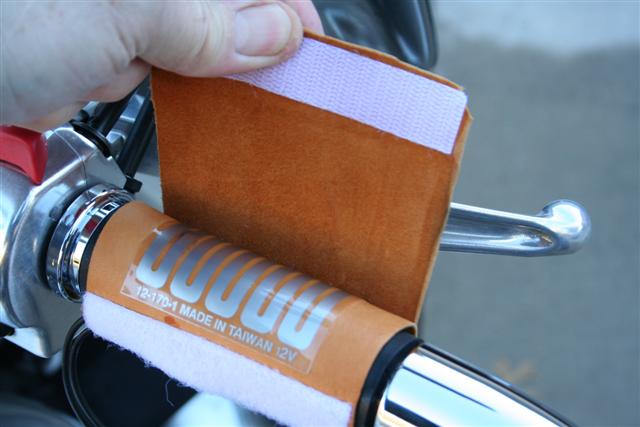
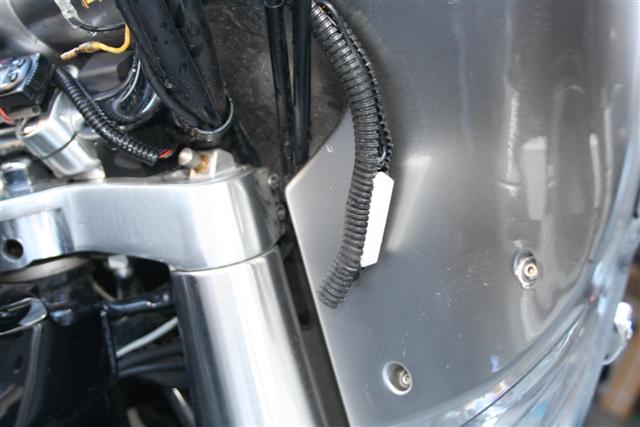
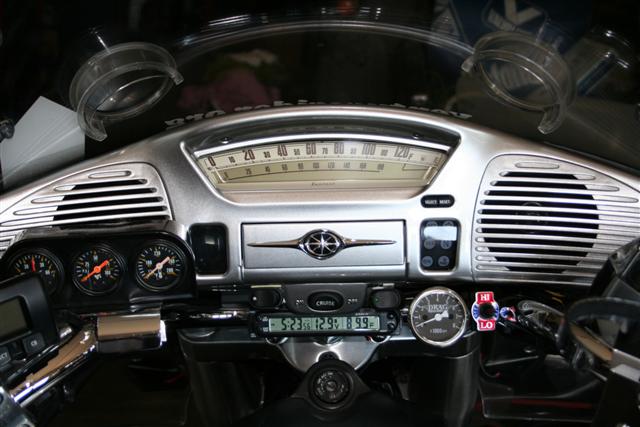
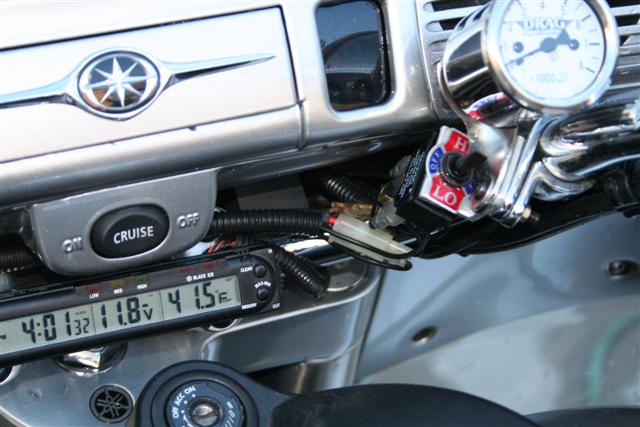
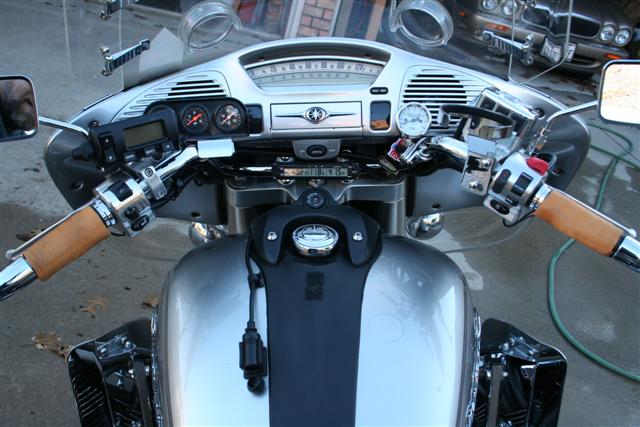
I have been riding year-'round since the late 60s, and I have never had grip heaters or used electric clothing. As I get older, however, I am finding that the painful fingers when the temperatures drop below 30 are less acceptable, so this year, I started experimenting with grip heaters on the RSV. I really like the stock grips on QuickSilver, so I didn't want to just replace them with heated grips; that left either wrap-around heater covers or the under-grip heat strips. I first ordered a set of Oxford HotHands wrap-arounds. These are specifically labeled for use ONLY on 1 7/8" bars, as they will make the grips too large when put over grips on 1" bars. I decided to ignore this and try them anyway since I have very large hands. Turns out, we are both right. The HotHands are quite thick, and when put over the RSV grips, they feel overly large. I was easily able to get used to them, but most people probably wouldn't. In addition, the HotHands only have one temperature - High! To modulate the heat, the only choice is to turn them off and on periodically. My next try was to order a heated grip kit designed to install underneath existing grips. These consist of self-stick mylar sheets with heating elements bonded to the surface. The ones I ordered use a dropping resistor and two position switch to provide low and high heat options. More on the resistor later. Before I tried installing the heater kit as it was designed, I wanted to try and make my own set of grip wraps that could be removed easily when not needed. First, I chose to use buckskin, since I had it available and I thought the deer skin grips would be comfortable and functional. Although the buckskin worked very nice, I think rubberized nylon or canvas would have been a better choice. With the leather, I am concerned about the long-term effects of water, and when washing the bike I have been either wrapping the grips in plastic or removing them. Here's a picture of the heat strips and Velcro on the buckskin: Important: If you are going to make a set of wrap-around heaters like this, you need to be careful to get the kind of elements with the SAME amount of heat on BOTH. Many sets made for motorcycles have one that heats a lot more to compensate for the damping effect of the cold metal bar directly against it on the left side. The dropping resistor is a bit of a problem - these get HOT when the grips are on low, hot enough to burn your fingers. There is at least one other brand of grip heater kit available that uses two separate heating circuits instead of the resistor, and I would use those in the future instead of the more common type with the resistor. I used some plastic wire wrap to hold the excess wire and the resistor (it came all soldered together), and then just stuck the wire assembly down behind the throttle cables and the fairing. (note - after using these for a year, just having the resistor and wires stuffed between the throttle cables and the fairing as shown in the picture has worked perfectly - the heat from the resistor has not damaged anything.) Finally, I just wrapped the wires from the grips once around the existing bar wire bundle and routed the wires from the left grip and the power plug through more of the plastic wire wrap across the front of the handlebars. The tach mount made a convenient place to mount the switch. I am currently powering these from the power plug in the fairing, but will permanently wire the switch next time I split the fairing. I am quite happy with this solution and think this is what I will stay with! Goose UPDATE - one year later: I have used these grip heaters for two winters now, and I love them. In November we took a weeks ride up to Pigeon Forge, Tennessee, and the weather for three days all the way there was low 30s and solid rain. Of course, the buckskin grip heaters got soaked, but that just made them work even better, as the water absorbed the heat and kept my hands "steamy" warm. Even when my winter gloves got so wet that just making a fist would cause water to stream out of them, these grip heaters were too warm to leave on Hi very long. After the grip heaters dried out, they are still in perfect shape. One of the things I like most about them is that I only have to have them on the grips when really needed. Here is an updated picture of the dash and location of the switch between the tach and the right handle bar.

-
I have been riding year-'round since the late 60s, and I have never had grip heaters or used electric clothing. As I get older, however, I am finding that the painful fingers when the temperatures drop below 30 are less acceptable, so this year, I started experimenting with grip heaters on the RSV. I really like the stock grips on QuickSilver, so I didn't want to just replace them with heated grips; that left either wrap-around heater covers or the under-grip heat strips. I first ordered a set of Oxford HotHands wrap-arounds. These are specifically labeled for use ONLY on 1 7/8" bars, as they will make the grips too large when put over grips on 1" bars. I decided to ignore this and try them anyway since I have very large hands. Turns out, we are both right. The HotHands are quite thick, and when put over the RSV grips, they feel overly large. I was easily able to get used to them, but most people probably wouldn't. In addition, the HotHands only have one temperature - High! To modulate the heat, the only choice is to turn them off and on periodically. My next try was to order a heated grip kit designed to install underneath existing grips. These consist of self-stick mylar sheets with heating elements bonded to the surface. The ones I ordered use a dropping resistor and two position switch to provide low and high heat options. More on the resistor later. Before I tried installing the heater kit as it was designed, I wanted to try and make my own set of grip wraps that could be removed easily when not needed. First, I chose to use buckskin, since I had it available and I thought the deer skin grips would be comfortable and functional. Although the buckskin worked very nice, I think rubberized nylon or canvas would have been a better choice. With the leather, I am concerned about the long-term effects of water, and when washing the bike I have been either wrapping the grips in plastic or removing them. Here's a picture of the heat strips and Velcro on the buckskin: [ATTACH]5015[/ATTACH] [ATTACH]5016[/ATTACH] [ATTACH]5017[/ATTACH] Important: If you are going to make a set of wrap-around heaters like this, you need to be careful to get the kind of elements with the SAME amount of heat on BOTH. Many sets made for motorcycles have one that heats a lot more to compensate for the damping effect of the cold metal bar directly against it on the left side. The dropping resistor is a bit of a problem - these get HOT when the grips are on low, hot enough to burn your fingers. There is at least one other brand of grip heater kit available that uses two separate heating circuits instead of the resistor, and I would use those in the future instead of the more common type with the resistor. I used some plastic wire wrap to hold the excess wire and the resistor (it came all soldered together), and then just stuck the wire assembly down behind the throttle cables and the fairing. (note - after using these for a year, just having the resistor and wires stuffed between the throttle cables and the fairing as shown in the picture has worked perfectly - the heat from the resistor has not damaged anything.) [ATTACH]5018[/ATTACH] [ATTACH]5019[/ATTACH] Finally, I just wrapped the wires from the grips once around the existing bar wire bundle and routed the wires from the left grip and the power plug through more of the plastic wire wrap across the front of the handlebars. The tach mount made a convenient place to mount the switch. I am currently powering these from the power plug in the fairing, but will permanently wire the switch next time I split the fairing. [ATTACH]5020[/ATTACH] [ATTACH]5021[/ATTACH] [ATTACH]5022[/ATTACH] I am quite happy with this solution and think this is what I will stay with! Goose UPDATE - one year later: I have used these grip heaters for two winters now, and I love them. In November we took a weeks ride up to Pigeon Forge, Tennessee, and the weather for three days all the way there was low 30s and solid rain. Of course, the buckskin grip heaters got soaked, but that just made them work even better, as the water absorbed the heat and kept my hands "steamy" warm. Even when my winter gloves got so wet that just making a fist would cause water to stream out of them, these grip heaters were too warm to leave on Hi very long. After the grip heaters dried out, they are still in perfect shape. One of the things I like most about them is that I only have to have them on the grips when really needed. Here is an updated picture of the dash and location of the switch between the tach and the right handle bar. [ATTACH]14364[/ATTACH]
-
RSV Electrical Capacity Info
V7Goose replied to V7Goose's topic in Royal Star Venture Tech Talk ('99 - '13)
Lots of good discussion here. I have planned on putting a carb heater cut-out switch on QuickSilver to experiment with, but just have not gotten to it yet. I don't have enough factual knowledge about the RSV stator and charging systems to really comment authoritatively on options to solve our problem. I understand that one of the problems is that the RSV stator uses permanent magnets instead of electromagnets, so this severely limits any option to build a high-output replacement. I contacted a company out in CA a couple of years ago about a replacement for the Royal Star (might be the same one Rich mentioned?), and they said they planned to release one "next year." I never heard anything else from them, so I assume "next year" ain't here yet! Good luck, Goose -
RSV Electrical Capacity Info
V7Goose replied to V7Goose's topic in Royal Star Venture Tech Talk ('99 - '13)
BuddyRich, Your comment about the vest and the lights seems consistent with both my experiences and calculations. This bike is running close to the full charging capacity without adding many extras. As for running down the battery, that would take quite some time, since the actual current draw out of the battery while the bike is running is only the delta above the total charging capacity at a specific RPM. I don't consider actually running out of juice as a realistic risk from a day with all the stuff running, but if the battery is not being fully charged for any specific length of time, or repeatedly throughout the season, the life expectancy of the battery is materially reduced. This is especially true if it is also experiencing below freezing temperatures. My only point to the membership here is to be aware of the limitations on these bikes and not blindly assume that it has "lots of charging capacity" just because someone said so. The charging system has reasonable capacity, but not the extra headroom of some other bikes. I'm not even asking anyone to believe me, but at least I have given y'all some additional information that should cause you to look into the situation further. If you know the limitations and have the tools to monitor the system (at least a volt meter), then you can easily manage the current drain so that it does not have a negative effect on your machine. Ride Safe, Goose BTW - based on nothing more than watching my gauges during all sorts of riding conditions over 30,000 miles, the carb heaters on QuickSilver do not appear to stay on for very long if the temperatures are over 50 degrees. As I stated earlier, I attribute that to engine heat and the protected location of the temp sensor. I usually run with my driving lights on at all times, and I can tell immediately at idle if the lights and the carb heaters are both running. It is not a big difference without any additional load, but it is still obvious. -
RSV Electrical Capacity Info
V7Goose replied to V7Goose's topic in Royal Star Venture Tech Talk ('99 - '13)
I deliberately did not start listing system specifications and calculations, but if you care to do that, you will find out that what I reported is pretty much as expected. These bikes do NOT have significant excess charging capacity when the carb heaters and after-market Yamaha driving lights are on. I did the research and the math on this two years ago when I bought the bike, but not everyone wants to look at it that way. That kind of detail was on this sight before the crash, and you may still be able to find it over on the Venturers site. Anecdotally, this also might help to explain whey Yamaha only puts 35 watt lights in their driving lights when the majority of those lights are 50 watts. Goose -
Note: This post is kinda long, but not too technical(except for the very end). There has been a lot of discussion in the past about the amount of reserve electrical capacity on an RSV for accessories, although most of the detailed facts were BC and no longer available for review. Some folks have glibly stated that the RSV has "lots" of extra electrical power available (with which I completely DISagree). So I thought I would publish some real world observations without a lot of stats to interpret. My 2005 QuickSilver has quite a few added lights, but with the exception of 4 small 3 watt instrument bulbs, all of them are LEDs, so they do not significantly increase the total load. My Driving lights are stock Yamaha accessories with original bulbs. I have both an ammeter (which allows me to see absolute proof if current is going in-to or out-of the battery at any moment, and a digital volt meter that reads to the tenth of a volt. I also have a tach. Most of you know that these bikes have four individual carb heaters, 15 watts each, for a total of 60 watts, which is a significant load. I don't know the trigger temp for the heaters, but it seems to be around the low 60s. The thermal switch is under the rear battery covers, so engine heat causes them to be shut off after warm-up unless the temp is quite a bit lower. When trying to figure out how much extra load you can add to an RSV, you need to factor in this 60 watt load if you are going to be riding in any cool or cold weather. Obviously important if you are going to use heated clothing! To recap, the electrical load on my bike is almost stock. I am experimenting with a set of grip heaters that pull about 2 amps/25 watts. I know they are not malfunctioning because they are wired through a 3 amp fuse which has not blown. Today, the temp was right around 30 degrees as I headed to work - cold enough to guarantee the carb heaters never shut off from engine heat. I ride about 25 miles, so this is far enough to ensure the current drain from starting the bike is completely replaced by the time I get to work, giving me the opportunity to observe the charging system both with a battery taking light charge, then a fully charged battery. Bottom line: with the driving lights on and the grip heaters on but headlight on low beam, the RSV can just barely handle the charging requirements of a normal battery in good condition at engine speeds above 1,800 RPM. Turning off the driving lights (total load reduction of 70 watts) makes a BIG difference. Below 1,800 RPM with driving lights and grip heaters on, the ammeter shows the charging system cannot handle the load and the battery is discharging. Hitting the brakes dramatically increases that discharge, and brakes with turn signals even more. This means the RSV has very little practical reserve charging capacity during cold weather unless you turn off the driving lights! Here are the technical details to go with those observations: At high idle after starting (about 1200 RPM, while the battery is trying to take a charge, with lights and grip heaters but no brakes or signals), the system voltage reads only about 10.9 volts, and the ammeter shows the battery is discharging. Raising the RPM close to 2,000 pushes the voltage up to 11.7, and the ammeter shows 0, meaning that the charging system is handling all the lights and heaters, but nothing (or only minor amount) is left to recharge the battery. Over 2,000 RPM shortly after starting (all conditions the same as above), the system voltage raises to about 12.3 and the ammeter begins showing a slight current flowing into the battery. After the battery is fully recharged, the system voltage at idle with lights and grip heaters but without brakes or signals is about 11.9, and the ammeter still shows a slight discharge. Hitting the brakes at idle drops the voltage to 10.9. Fully recharged battery with lights and grip heaters on, normal cruising RPM, the system voltage registers about 13.2. With a fully recharged battery, turning off only the grip heaters at idle pushes the voltage back up to about 12.8, and turning off the driving lights gets it all the way back up to about 13.5.This test is admittedly unscientific, and all the voltages were based only on memory from this morning's ride (not carefully written down under precise conditions), but I hope that information at leasts gives you something to base your decisions on when deciding on additional accessories. Good luck, Goose
-
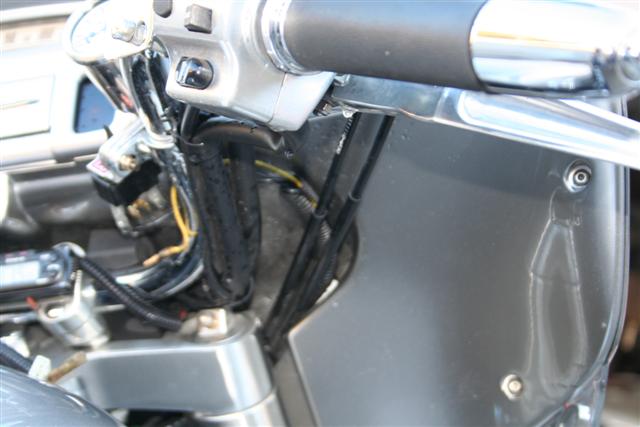
Don't know if this applies to you, but several folks who have added driving lights have had the wires pinched in the steering stops. I also had a wire that I ran down my front brake line rub through on one of the guides and short out. That last one was very frustrating since I could not find the problem. I replaced fuse and all was well for a while, then 'pop'. Turned out the short only hit the brace when the forks compressed a fair bit, so it was tough to find the problem since you cannot see when the lights go out during the day. Goose
-
Without quibbling about the specific wording, this is basically correct. RPG's response more accurate than Stoutman's (but much of wha Stoutman says is absolutely correct). The ping or knock that you hear in an engine is also called pre-ignition, and that is an accurate name. The ping is heard when two flame fronts (one from the spark, the other from the pre-ignition) meet. If I go into any more detail, this thread might put my tire discussions to shame for length! Suffice it to say that pre-ignition can be caused by numerous things, and low octane fuel in a high compression engine is one of them. Goose