V7Goose
-
Posts
3,588 -
Joined
-
Last visited
Content Type
Profiles
Forums
Gallery
Events
Store
Everything posted by V7Goose
-
.thumb.jpg.4e1b3809c4633f365ba67afc212f21df.jpg)
R6 & R1 Front Calipers
V7Goose replied to Rick Butler's topic in Royal Star Venture Tech Talk ('99 - '13)
I don't have anything technical to add about making the switch - I have never even looked at it. I find the front brakes on both my RSVs to be just fine (and I use the front brake as my primary brake - the rear gets very little use). Even after 1000+ mile days, of which I have done several on both bikes, I have never even had a twinge of discomfort from using the front brake. Maybe it is just the size of my hands? Goose -
Well, I haven't been back to Sturgis since the early 80s (first trip was '74). Just didn't want to fight the crowds and commercialization that it has become. But I'll mull it over some this year and check with She Who Must Be Obeyed. Might decide to go back.... Ride safe, Goose (but I'll be wearing a helmet - probably ruin the whole rally for all them 'professional riders'- they may even chase me out of town!)
-
I don't really know from back by the battery. The main fuse panel is just under the left cover, so I'd start by pulling the fuses and checking power feed to the contacts first. Unfortunately, I suspect all of those fuses are hot all the time and tie into the switched circuit later down the line. If I wasn't on this little laptop I'd look at the schematic for ya. I know you can tap switched power under the tank - that is not too far away. But you still need to be careful in identifying and selecting the specific circuit you want based on the power load you will ad to it and the risk of what happens when you pop the primary fuse to that circuit. Here is a better choice - use a standard after-market light relay and trigger it from that white plug - have full battery power supplied to your power panel through the relay. That way you risk nothing on the existing bike.
-
That white plug by the battery is powered by a little 5 amp fuse just like the front power jack (located in the right lower cowling). Probably not suitable for a "power panel". Goose
-
Not one helmet in the whole state if you don't count the horns. tsk tsk tsk (at least that is what the video would lead you to believe)
-
Sorry, but I just gotta ask since no one else has... What's wrong with the stock switch that comes with the light bar? If it is mounted correctly it works fine, lasts long time. The only thing I could see against it is that it is a bit inconvienient to use if I wanted to turn the lights off and on a lot with my winter gloves. But I don't. Goose
-
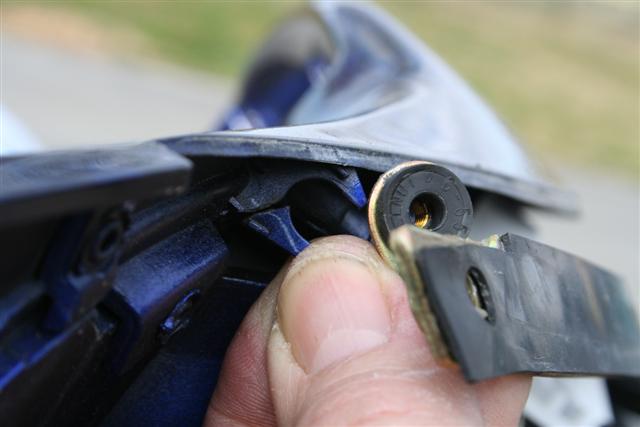
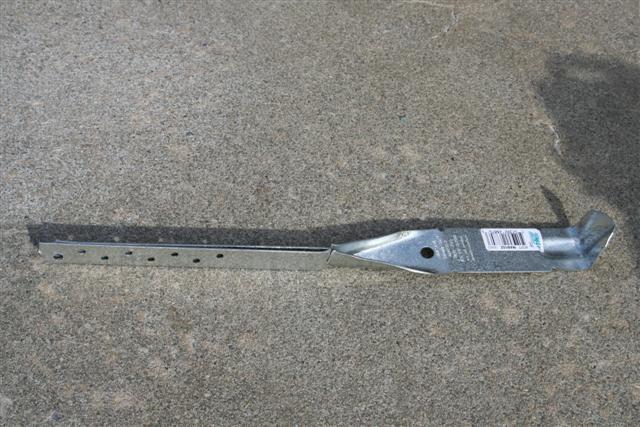
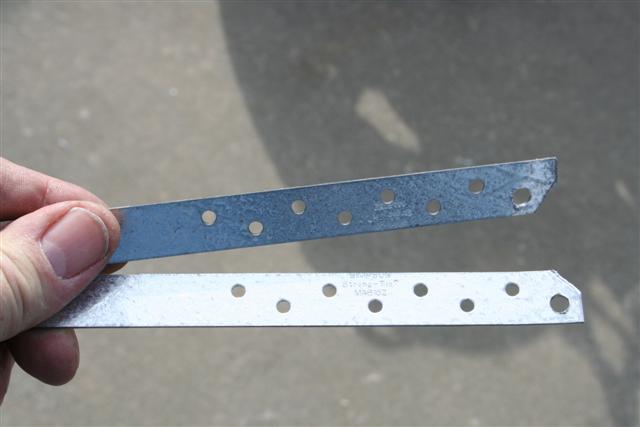
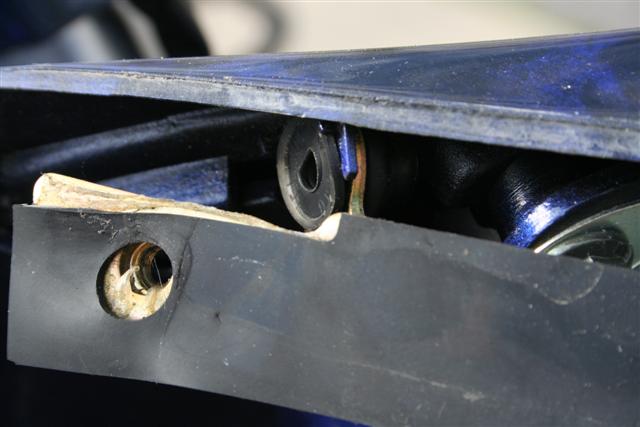
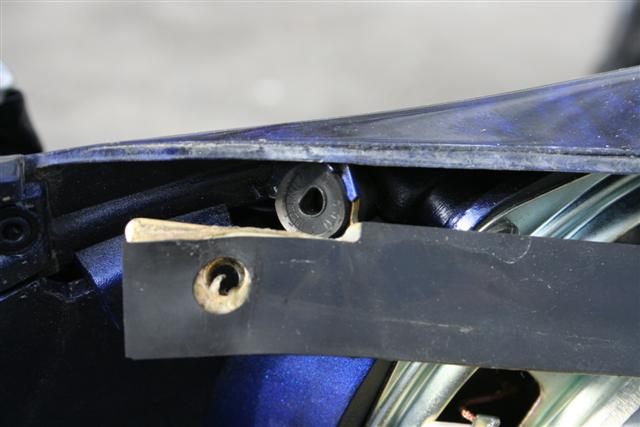
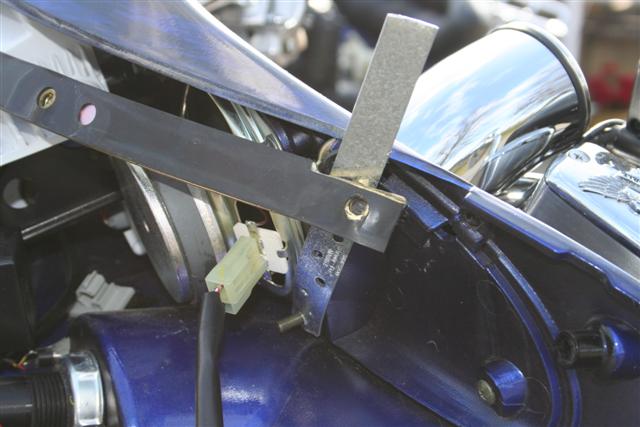
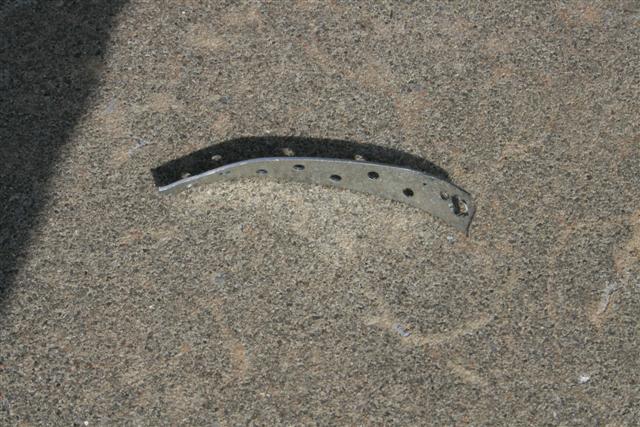
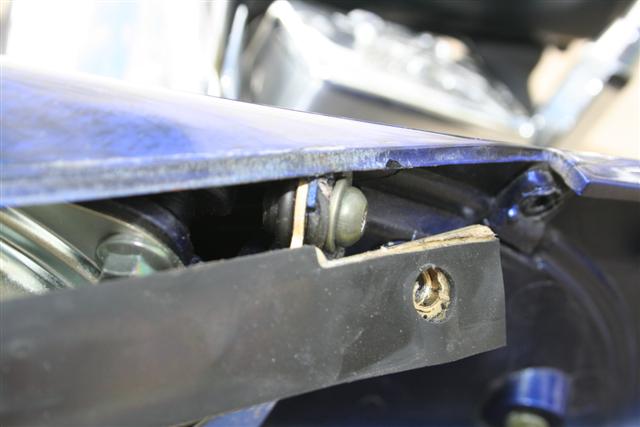
Trust me, if you have a 2nd Gen, you DO have broken tabs on the inner fairing where the ends of the windshield bracket SHOULD be attached! Even if your bike is quite new, they are broken. Here is a picture of what the tabs should look like - I'm holding the broken back piece to show how it would look if it was actually there: [ATTACH]15890[/ATTACH] I'm sure Yamahaha would replace the inner fairing under warranty for this, but frankly, I don't want them to rip my bike apart to do it when the new ones will just break in the first week anyway. The relatively easy solution is to make a brace that will run from the bottom screw on the speaker to the screw in the windshield bracket. When positioned correctly, this will clamp the windshield bracket against the tiny bit of the tab that remains and stop all motion. To start with, you will need a couple of metal straps - they cannot be too thick, but must be more sturdy than hardware tape. I found this bracket in the framing section of the hardware store and just cut the two pieces off: [ATTACH]15891[/ATTACH] [ATTACH]15892[/ATTACH] Put one end on the speaker screw and then cut the bracket to the exact length that will just fit under the top lip of the inner fairing. You will have to use a pair of pliers to twist and curve the strap to fit flush against the rubber grommet that holds the nut. The correct position for the windshield bracket is to have the metal piece behind the fairing tabs, and the front lip of the rubber grommet on the outside of the tab. Here are a couple of pictures of how it should be positioned: [ATTACH]15899[/ATTACH] [ATTACH]15898[/ATTACH] In other words, if the tab was still in one piece, it would slide over the groove in the rubber grommet on the outside of the metal windshield bracket. You will need to make sure the windshield bracket is properly positioned on the remaining piece of the tab before you can mark the correct position for the screw hole in the new brace. Here are pictures of the brace before I cut it to length, the finished brace before mounting, and then a couple of different shots of the brace all fastened in place. [ATTACH]15895[/ATTACH] [ATTACH]15893[/ATTACH] [ATTACH]15894[/ATTACH] [ATTACH]15897[/ATTACH] [ATTACH]15896[/ATTACH] Once you have those new braces in place they work like clamps and everything is rock solid.
-
Trust me, if you have a 2nd Gen, you DO have broken tabs on the inner fairing where the ends of the windshield bracket SHOULD be attached! Even if your bike is quite new, they are broken. Here is a picture of what the tabs should look like - I'm holding the broken back piece to show how it would look if it was actually there: I'm sure Yamahaha would replace the inner fairing under warranty for this, but frankly, I don't want them to rip my bike apart to do it when the new ones will just break in the first week anyway. The relatively easy solution is to make a brace that will run from the bottom screw on the speaker to the screw in the windshield bracket. When positioned correctly, this will clamp the windshield bracket against the tiny bit of the tab that remains and stop all motion. To start with, you will need a couple of metal straps - they cannot be too thick, but must be more sturdy than hardware tape. I found this bracket in the framing section of the hardware store and just cut the two pieces off: Put one end on the speaker screw and then cut the bracket to the exact length that will just fit under the top lip of the inner fairing. You will have to use a pair of pliers to twist and curve the strap to fit flush against the rubber grommet that holds the nut. The correct position for the windshield bracket is to have the metal piece behind the fairing tabs, and the front lip of the rubber grommet on the outside of the tab. Here are a couple of pictures of how it should be positioned: In other words, if the tab was still in one piece, it would slide over the groove in the rubber grommet on the outside of the metal windshield bracket. You will need to make sure the windshield bracket is properly positioned on the remaining piece of the tab before you can mark the correct position for the screw hole in the new brace. Here are pictures of the brace before I cut it to length, the finished brace before mounting, and then a couple of different shots of the brace all fastened in place. Once you have those new braces in place they work like clamps and everything is rock solid.

-
There are lots of wire size reference charts you can dig up on the internet, but this is one of the absolute easiest ones to use for the average guy. Even though it is made for boats, it applies equally well to any vehicle. The thing that makes it really great to use is that it incorporates both the load rating AND length of the wire run in the calculation. I wish it included wire sizes smaller than 16 AWG (American Wire Gauge, or simply "gauge"). http://resources.myeporia.com/company_57/9113.pdf Anyway, here is an example of how to use it: The formula for Power (watts) is P=volts*amps, so you can easily find the amps a circuit must hold by dividing watts/volts=amps. If you were going to put two 50W driving lights on the bike (NOT recommended for the RSV), you will need to provide enough juice for a total of 100 watts or 9 amps (100/12=8.3 - I use 12v instead of 14 to be more conservative in my calculation). This is the MINIMUM circuit size, and needs to be calculated at the size of the fuse you would use, or 10 amps. Personally, I would bump that to 15 amps to allow for maybe adding additional load to the circuit in the future. ALWAYS size the circuit for the Fuse size, not the load! The fuse must be equal too or SMALLER than the maximum load capacity of the wire or you are NOT safe from a fire. So now that you have the amps (15), you multiply that by the length of wire you will use - let's say maybe 6 feet from battery to front of bike. 6*15=90. Now you just go to the chart and look down the 12V column to find the first line that is equal to or bigger than 90. You can choose to use either the conservative 3% voltage drop or the common 10%, but like the chart says, best to stay with 3% for critical or life-safety circuits (and to get the most light from your driving lights). This shows that a 16 AWG circuit would be just fine for the driving lights. Using the same chart shows why I choose 10 AWG wire for adding an ammeter to the RSV: Total bike load - 30 amps (size of main power fuse), maximum wire length from battery to ammeter and back=10 feet; therefore, 10*30=300 feetamps. At 3% voltage drop, the chart shows that 10 AWG can handle 348 Famps. Hope that helps, Goose
-
Date, Time and Location set for Daytona Bikeweek Meet
V7Goose replied to Animal's topic in Watering Hole
My brother and I should be around for a while. Both of us ride 07 RSVs. Hope to see ya around. Ride safe, Goose -
Rear end gear oil question
V7Goose replied to Midrsv's topic in Royal Star Venture Tech Talk ('99 - '13)
It's in the manual somewhere, but not easy to find - I think maybe in the specs in the back? Anyway, I found it after I went all over the place to find GL4 (which I did find eventually). Had a lot of GL5 on the shelf, but didn't want to use it while I thought Yamahaha only said GL4. IF I remember correctly, GL5 is not compatible with certain gear boxes that have bronze bushings in them, or something like that. Not a problem for us. Goose -
Like everyone else, it is great to have on group rides or even when just riding with one other person. I do my best to avoid interstates in most situations, but my CB is always on when I have to ride the super-slab. I stay on 19 and monitor/talk with the truckers. Sometimes I do get very good info on where the bears are or road debris and traffic problems. Goose
-
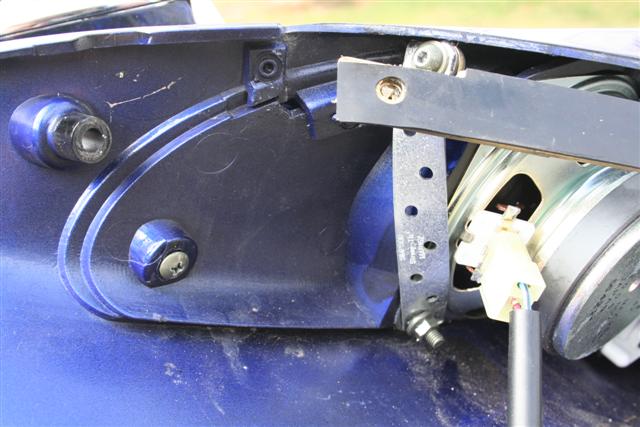
Be careful turning the antenna. Those two black spots that look like a plug on top of a set screw are actually the ends of a plastic pin that will shear off if you try to turn that part. Loosen the bottom nut and it should go well. Goose
-
Yeah, we got that during the day yesterday, but it was all past the DFW area by dark. Beautiful here today, so you got nice stuff coming your way. Ride safe, Goose
-
My local Harbor Freight tells me they don't have the stands because "there were a lot of problems with them." No idea if the guy knew what he was talking about or was just making excuses. Goose
-
I'm working on doing the same thing with my W580i Walkman phone (ATT). I've had the phone for just over a month and am very happy with it, but I haven't fully set up all the music and connections to the bike yet. I'll report more when I have it done. Goose
-
Broken cowling bracket
V7Goose replied to Moakster's topic in Royal Star Venture Tech Talk ('99 - '13)
Before you do anything more to it, why don't you just have it replace under warranty? Goose -
I bought the Condor front chock a few months back at the bike show after having lusted after it for a couple of years. It is all aluminum and very nice, but I have mixed feelings about it for the RSV. http://www.condor-lift.com/product.asp?ItemID=1001 The front tire is just too big for ease of use or stability (even that one you linked to above says max tire size is 130). I also found that even with rubber covers on the feet, it will not stay still on a smooth garage floor to roll the RSV onto it unless you can brace it with something between the wall and the stand. The problem is again that fat front tire of ours - it has to go up too high to get over the center of gravity on the pivot point. Finally, the RSV is NOT steady by itself when in this chock! It initially seems so, but if the front tire is even the slightest bit turned, then after about 5 minutes you can begin to see a slight list in the bike one way or the other. If you don't do something about it, the bike will eventually slowly fall over! Buyer beware. Goose
-
Here is the best price I have found on either Nautilus air horn (black or chrome). I have ordered from California Sport Touring numerous times and always been happy with their prices, products and service. http://www.casporttouring.com/store/merchant.mvc? And here is what the chrome one looks like when mounted in place of the right side stock horn. Goose
-
For anyone that comes across this thread, here is a link to the tech article I wrote on mounting gauges: http://www.venturerider.org/forum/showthread.php?t=19119 Ride safe! Goose
-
I advise against your plan - not flying the flags, but do not put them on your antennas. Quite a few owners have experienced busted antennas from doing this. Get some bike antenna mounts for for your trunk rack or your chrome bag rails. Goose
-
Normal water temp sits around 200 - that is with the sender bulb mounted directly in the head of Cyl 1. On hot summer days in city traffic, it will climb rapidly as soon as you stop at a light until the fan comes on around 225. I have never had the temp go over 230, even when idling for over an hour in stalled traffic at 108 degrees! That was a miserable time for me and my wife, but the bike had no trouble with it at all. I don't know yet about this weekend, but I'll make it if I can. Ride safe, Goose
-
Well, I finally took the time to mount gauges on my 07 RSV. Same mix of gauges I put on the 05, but different look and very different mounting. Here are a couple of pix. I'll have a full writeup for the tech section in a day or two. Goose
-
Yes, I agree that it is a subjective thing. But I absolutely cannot agree with "It's a matter of how much you want to improve the handling." In my personal opinion, doing both makes the handling WORSE than either one alone. This is not particularly apparent when the tires are new, but becomes hugely evident (to ME) as the rear tire wears and begins to flatten out across the center. In fact, if you have a rear tire that has developed a very square profile near the end of its life (as the stock Brickstone will), having the leveling links and the MT90 front tire will make the bike handle VERY DANGEROUSLY. I stress this because, in my opinion, the violent way the bike will track pavement ridges and deep cracks is extremely dangerous. Goose
-
Just picked up the new (to me) bike
V7Goose replied to htlal's topic in Royal Star Venture Tech Talk ('99 - '13)
I understand the difference between a choke and an enriching circuit (The Del Orto carbs on my Moto Guzzis had enriching circuits clear back in the early 70s). I have never had the need to look into the details of the carbs on the RSV, so I did not know until now that they did not use a true choke, but that is immaterial. All I was trying to do was imagine some possibility for the original poster's statement that his bike popped when leaving the choke on too long so I didn't sound like I was just saying he didn't know what he was talking about. As for the cracks in the intake manifolds - those are extremely common on an RSV over three years old, and many here have stated they generally do not cause vacuum leaks (something about internal metal lining?). I cannot personally vouch for that, but it is worth looking at all possibilities. Anyway, you are absolutely right that the carb cleaner test proves a vacuum leak. My point here is that the leak could just as easily be a torn vacuum hose or cracked rubber cap on the nipples of the other two intake manifolds. Either of these points would also suck any carb cleaner sprayed around the area. I know from experience that the vacuum hoses are easy to tear when pulling off the nipples, and the rubber caps on the other two were badly cracked on my 05 in just two and a half years. Both of these things are much easier to isolate than the entire intake manifolds (and a LOT cheaper). Goose