frankd
-
Posts
1,140 -
Joined
-
Last visited
Content Type
Profiles
Forums
Gallery
Events
Store
Everything posted by frankd
-
Jean and Earl, May our Lord help you both get through this.
-
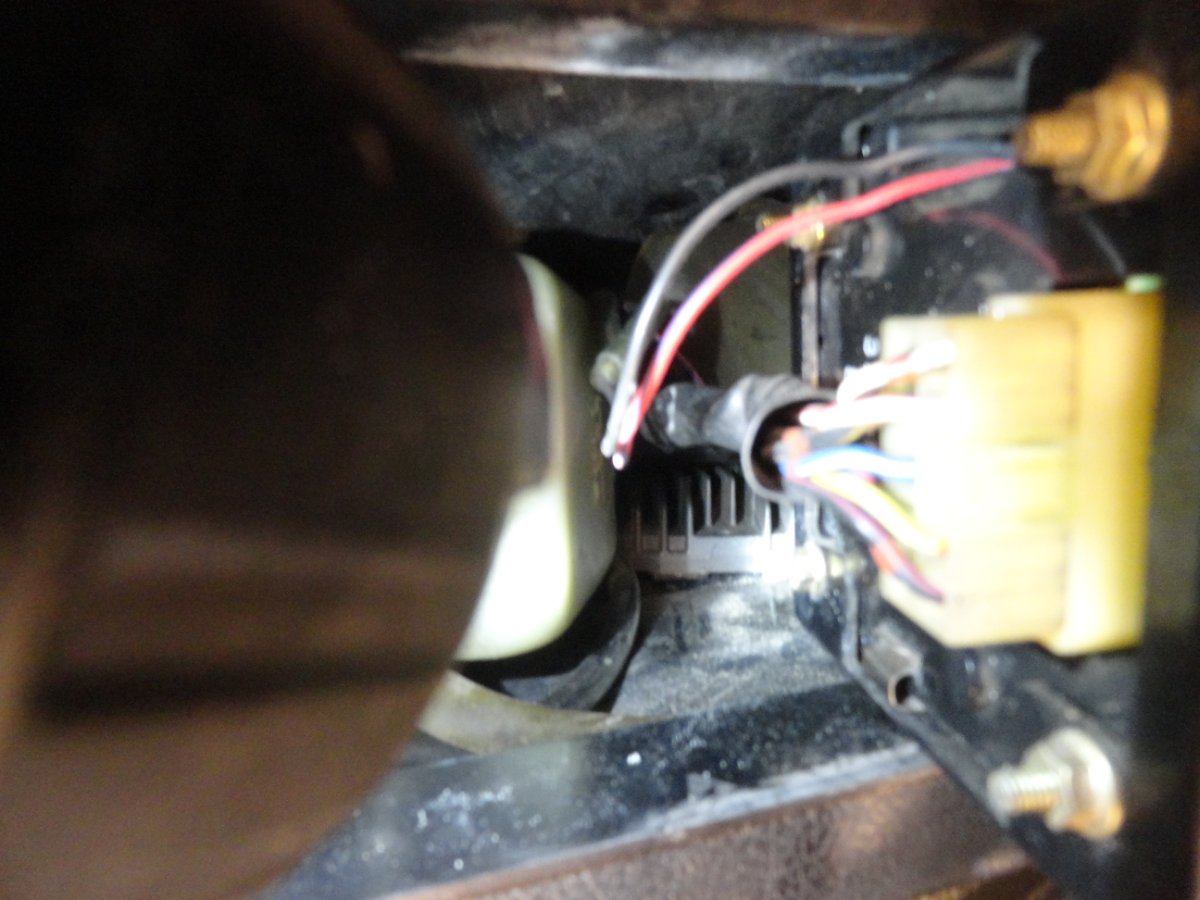
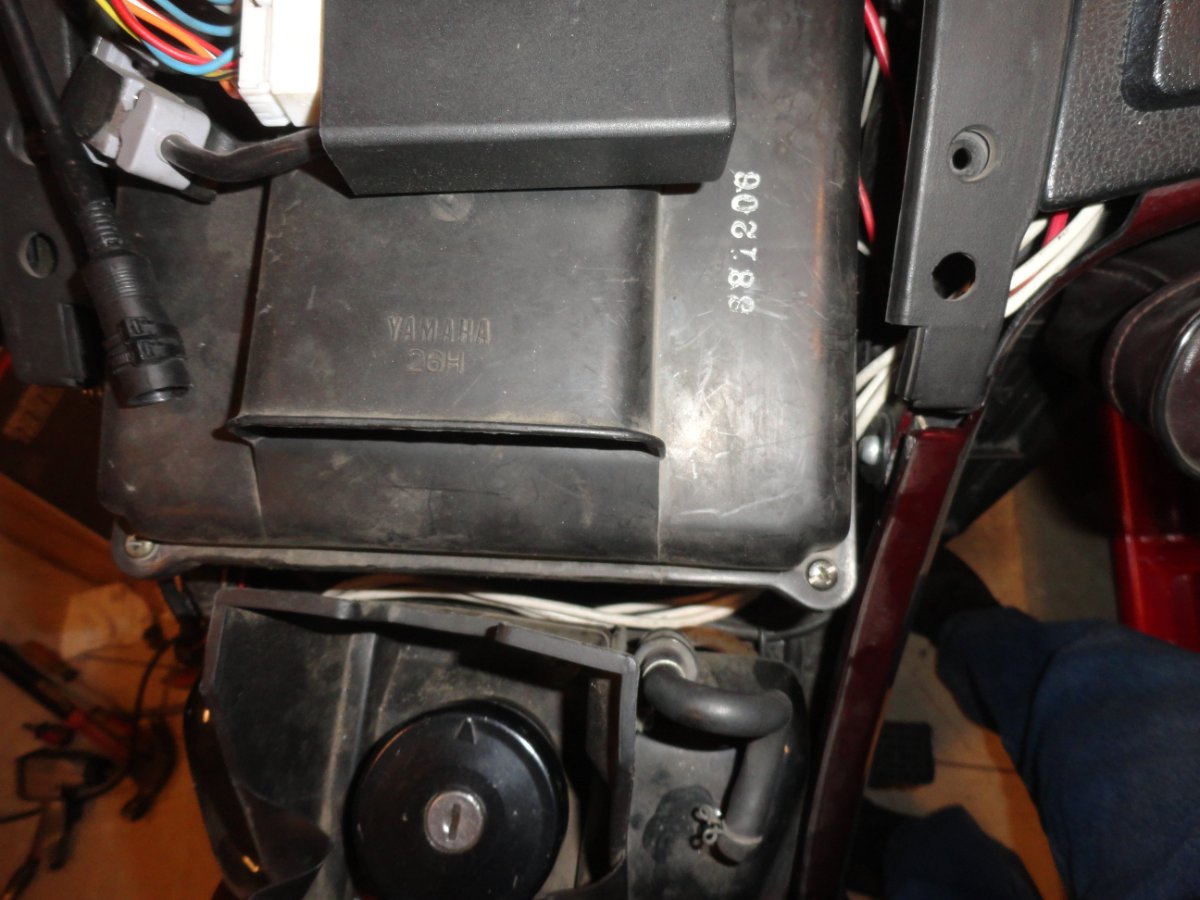
 The MOSFET regulator will NOT fit in the original regulators position. What I did was: 1) I mounted the MOSFET regulator on the inside of the right fairing upper. It's been a couple of years, but I think I probably removed the right fairing half to do this. After I did it, I thought about putting a piece of metal behind it to act as a heat sink, but I never did that and things are holding up fine. The first picture (7213) shows where my regulator is mounted. The bottom of the picture is the inner side of the fairing, and you can just barely see the fins of the regulator. There isn't a lot of extra room, but it does fit here. 2) I extended the 3 stator leads with #10 Gauge stranded wire so that they would reach the regulator. I ran the new leads up the left frame, across the top of the frame, and into the fairing. Picture 7215 shows the white wire is used going between the back of the air filter and the gas filler neck, and then into the top of the fairing. The top of my fairing is cracked, so you see pretty good here. 3) You have to connect the black lead from the regulator to a good ground, and I seem to remember there are several bolts that hold the inner panel of the fairing onto the frame that are good for this. Then I connected the Red regulator lead (using #10 gauge stranded wire) to the main 40 A. fuse. You do NOT want the battery side, but the other side of this fuse. Picture 7214 shows how mine is connected, but I've replace my OEM main fuse. If yours is still original, it will be to the left of the battery. Skydoc did his 86-93 also, but he put it underneath the trunk. Even though mine was a 89, I decided to go with the fairing mount. On a 83-84 you don't have that choice, and probably not on a 85 either.
-
Thanks for your suggestions. I'll think about them for a bit and then choose. You asked......If you think you can get away with out the gasket use either a small bead 1/32 to 1/16 inches in dia of anaerobic gasket eliminator along the center of the gasket surface. Do not smooth out and reassemble o A few years ago, somebody on this site assembled theirs without a gasket using a RTV-Silicone product and when he started the engine, the rotor was rubbing on the cover. Clearances must be pretty tight here. When you mentioned that using the Silicone sealants often cause the gasket to push out, that was an eye opener. I might have used that method without this.
-
These 6 lt's are made to haul, running them just above idle is just going to stuff them up. Are you using a phone app to monitor Sometimes I use my smart phone with the TORQUE app, but usually just the display on my Edge controller. Usually the Edge displays Engine Oil Temp., Coolant Temp., Trans. Temp., and Exhaust gas temp. There is an added thermocouple in the near the discharge of the left exhaust manifold. You're right about the different settings on the controller. They call that tune the 65HP tune, but it doesn't give you exactly 65 HP. The place that did my engine (Power Stroke Secialists) also installed the Edge and modified the software. It not only increases the engine output, but also modifies the transmission parameters. I run it in the 65HP when I'm not towing because the transmission shifts later and firmer with the other settings because they are intended for towing. When I got my trans. rebuilt, they beefed it up by adding a mutliple clutch torque converter and also increased the number of plates for the various gears. They modified the programming in the Ford transmission module and it shifted WAY too hard. I was able to go into my Edge and soften the shifts up a bit. They're still real firm, but not as abusive.
-
I've had problems with engine oil leaks from the left side of my 89 Venture for quite a while. I modified an intermediate gear cover by cutting off the excess so I could see where the leak was. Afterwards, I've replaced the o-ring in the gear indicator switch, and that took care of the leak from that area. Also, I could plainly see that my stator leads and my ignition leads from in the stator cover were NOT leaking. A couple of years ago, my alternator stator bit the dust and I changed it. Since then I've had another oil leak which got worse and worse. Before I put it in my workshop and pulled the cover, I put it on the center stand and ran it at about 2,000 rpm. I could see exactly where the fresh oil was dripping from.....on the bottom of the stator cover at about the 5:00 o'clock position. Every couple of minutes another drop of fresh oil would fall. I pulled the stator cover and now I can see where there are quite few deep scratches in the cover and the mating engine flange. No way will a uncoated gasket seal 100%. Does anybody have a suggestion of what compound or coating I could use to help the gasket seal?
-
Patch, I also have an 07 F-250 with a 6.0. Mine is Studed, the cylinders o-ringed, EGR blocked. It came with an Edge and I run it in the 65 hp mode when not towing. Please explain why you say that you'll have less boost with a larger exhaust system. Mine has a 5" with a muffler. My Turbo is stock and when starting up a grade pulling my 10,000# 5th wheel I will see as much as 28# boost before it downshifts. BTW, I tow my camper with the 25hpsetting on the Edge. The way I look at it, the exhaust flow through the turbo is what turns it. When you have a larger free flowing exhaust system, there will be less restriction from the downpipe back, and therefore the flow through the turbo will be increased.
-
Also, 83's are a lot easier to get onto the center stand than the MkII's. First off, the MkI's weigh about 50# less and most of that is at the rear of the bike. The center stands are a little different also. The MkII frames are different than MkI's. I'm 71 years old and 6' 1" tall and not skinny. I can put the 89 on the center stand by myself, but I'm happy when my wife grabs the right crash bar and gives me a hand.
-
Puc, I agree 100% with FlyinFool. I don't see any way a critter getting fried could affect the compressor internals. Did you disconnect the connections at the compressor and check for continuity on the compressor windings (should read a couple of tenths of an ohm)? Check from the connections to compressor case (should read infinity)? Any chance the capacitor went bad and you have 2 problems? Frank D.
-
Do you have a 12volt test light or a voltmeter? If so, pull all of the fuses in the main fuse panel, turn the ignition switch to ACC and let me know which fuse clips have voltage on them. Then repeat the same procedure with the ignition switch in the run position. It's been a lot of years since I pulled the fuse panel off of a Venture, but I seem to remember that it's part of the main wiring harness. You probably didn't replace the entire harness because you'd have to take a lot of the bike apart to get to it. That means that you probably cut the wires to your old panel and then reconnected the replacement panel. Please describe exactly what you did. The Class fuse should have voltage on it when the switch is in the ACC position. The power for this doesn't go anywhere near the fuse panel, but comes straight from the ignition switch.
-
I know you won't want to hear this but you've got the new fuse panel miss wired. I assume that the panel you installed wasn't a OEM panel, but one with the push in fuses. It sounds like you're going to need somebody with electrical experience to look at how you wired the panel and compare it to how the OEM panel was wired by looking at the print. Did you take some pictures before you removed the old panel? A picture of what you have now would also help and I could use my 89 for a comparisson.
-
It's NOT an oil pressure light, it's an oil LEVEL light. Usually when the light comes on as you describe, the oil level is low and there isn't enough oil reserve in the sump. Put the bike on the center stand on level ground and look into the oil sight glasss and see where it indicates your oil level is. Do this with the engine OFF. I suspect you'll find your oil level is down to the point where almost no oil is seen. Usually I keep mine near the center of the gauge. How much oil did you add when you changed the oil? My 89 needs little over 3.25 quarts to get the oil level to the center of the sight glass.
-
I put the carb back on the motor and pumped the float bowl full of fuel. I activated the accelerator pump linkage and it did pump fuel. The next day I pulled it out on the driveway and hooked up the cooling water (aka garden hose). This motor has one main lever for throttle and gear shift and a 2nd lever that seems to be a fast idle in neutral lever. I first tried pumping the fast idle lever, but there wasn't enough accelerator pump linkage movement to pump enough gas to start the motor. I switched to the main lever, and pumped it twice. The motor started right up. I had to adjust the idle speed screw, but it runs great and has good throttle response. Now I've got to put the boat in the water and try motors and the live well pump out (I had to change the pump). We have 3 good sized lakes close by but the TVA boat ramps are closed. The county ramps are still open, but very crowded and most don't have docks. One of the lakes about 20 miles away has a nice dock, but I'll have to take a ride and make sure it's open. Maybe next week or the one after the weather looks better. Thanks again everyone for your help. There aren't many things that the members of this site don't know something about. Frank
-
I customized a screwdriver to fit the bottom of the tube's slot, soaked the carb body in a solution of cleaner and water, and then heated the water up to simmer on the grill burner. I pulled it out of the solution, and attempted to unscrew the tube. Nope, it wouldn't budge and then when I tried harder one of the slots cracked and fell away. Thanks Patch, a good idea but.... I PMed with MarCarl and he told me his method. It's a good method, but I decided that the potential of doing damage to the carb was too high and decided to look at other methods before I tried it. I decided to order the BerryMann cleaner that Puc suggested, and it arrived Friday. I also made up a Rube Goldberg attachment to blow air into the tube from the carb throat side. I took the shaft from an arrow, cut a piece about 2" long, drilled a hole almost all the way along it's length, and another small hole to intersect it from the side. Then I took a slightly larger drill and made a tapered hole that would seal better to the tube. I connected an air hose to it and soaked the carb for about 2.5 hours. I held the 'adapter' in place and had my wife open the air valve. The first time, nothing happened, but the second time I saw bubbles and carb cleaner come out of the inlet. When I refilled the tube with carb cleaner spray and blew air from the bottom up through the tube, my wife saw something interesting. The tube outlet wasn't on the top end of the tube where I 'ASSUMED' it was, but on the inside side of the tube spraying in the direction of normal air flow. With the discharge hole in this location it occurred to me that the tube had to be in it's present roation after it was installed in the carb body. I wonder if the tube was screwed into the carb body because that would mean that the thread starting position would have to be repeated on every carb. I wonder if it's possible if the tube was pressed into the carb body with an interference fit. That would make it easier to duplicate the rotation of the tube in each carb. That would also mean that you can't remove the tube from the body to make it easier to clean. If so, this is a throw away piece, like a lot of things. One more thing. Yammie must have had problem with this tube clogging because the accelerator pump inlet in the float bowl has a fine mesh screen on it. When I took it apart the first time the screen was laying in the bottom of the float bowl. The screen has a rubber grommet that holds it into the carb body and over the years the rubber had dried up and shrunk. The new screen fits tightly......now. I plan on putting the carb back together this morning. There is a small plastic plug with an Oring that pushes into the carb body. If I have a replacement Oring in one of my kits I may even get to try out the carb in the driveway. If I don't have a suitable replacement I'll have to order it. The original Oring has dried up and isn't tight in the hole it goes into. Thanks everyone!!!
-
Patch, The tube that is clogged is not available from Yamaha. I will customize a larger screwdriver and make it fit better, then I'll warm it in the cleaning solution/water mix and try to remove the tube. I 'assume' that you mean something like Mr. Clean or do you use dish wash soap? Frank
-
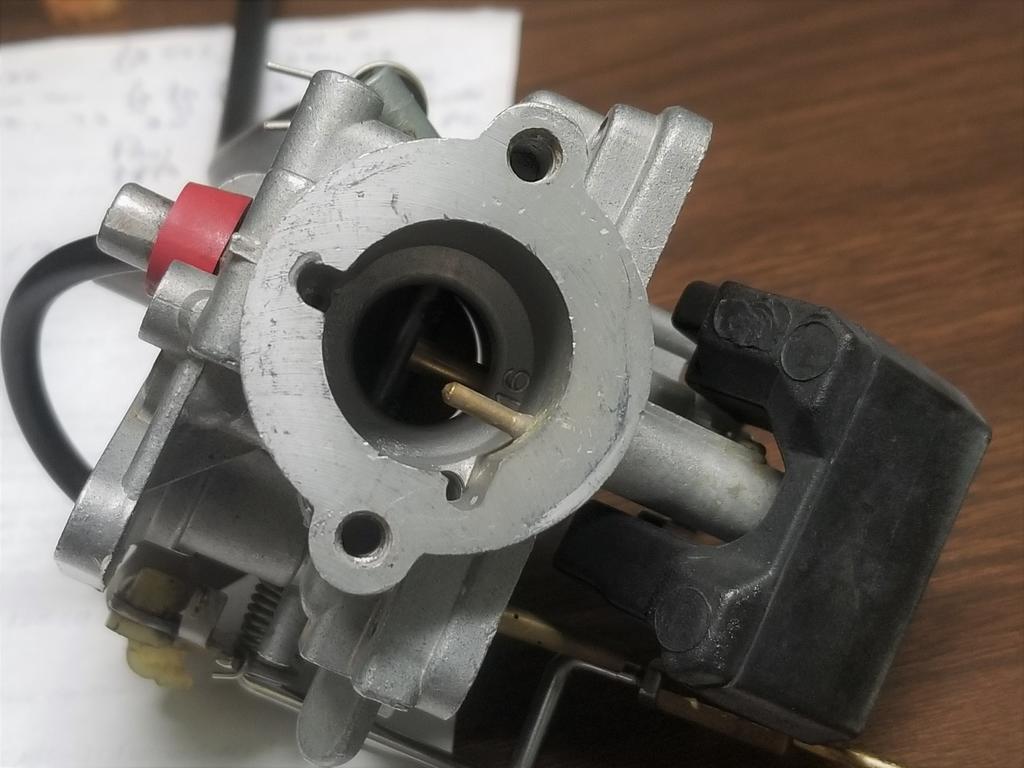
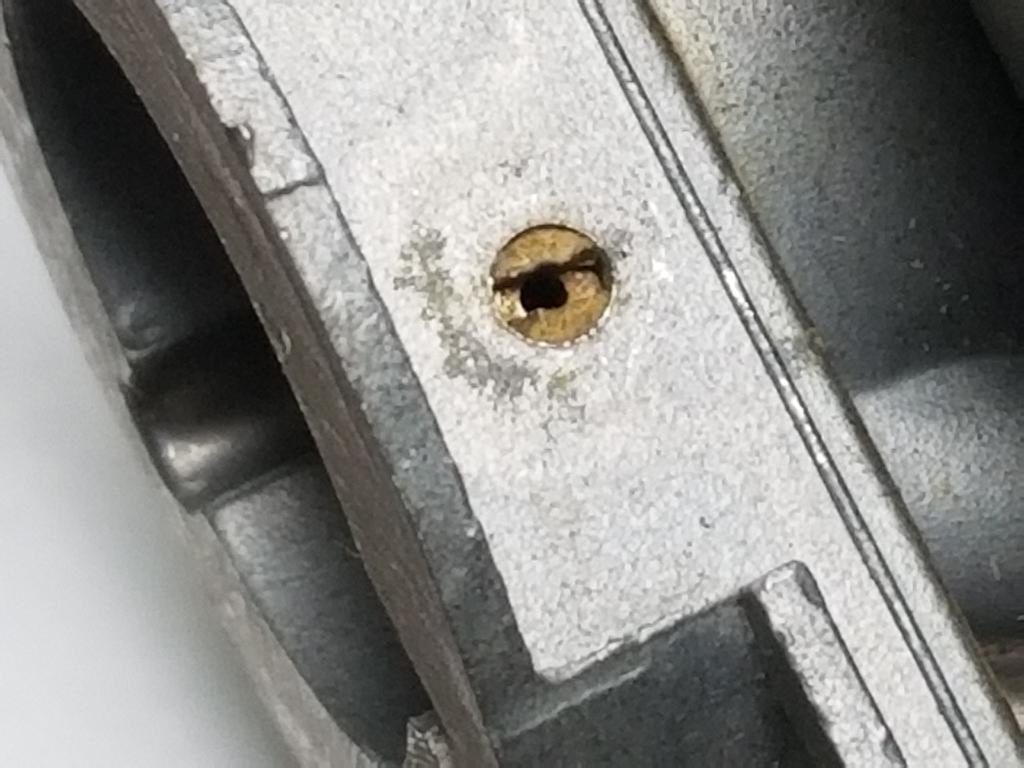
I've been working on a 9.9HP Yamaha 4 stroke outboard motor that was left with gasoline in the carb. First I pulled the carb and cleaned all the jets and then put it back together and attempted to test run it. There was gasoline running out the bottom of the carb. I opened up the accelerator pump and found the diaphragm was dried out and cracked. I replaced it and tried to test run it again. When I first started cranking it over, it would hit a couple of times, but not start. I helped it start by restricting the air intake and it was lean unitl it warmed up, and then ran pretty good. I pulled the carb again and found that there was no discharge from the accelerator pump. I pulled it apart 'again' and found that everything was working except the final discharge tube was plugged. I've been trying to clean out the restriction, but no luck. The discharge hole is very small. I soaked it in Berrymans B-12 for 2 days, and a friend had a stainless steel cable that had very small strands (.009") but I couldn't get that to go into the opening from either end. Any ideas on what else I could try? Maybe some magic potion that'll eat the crud out? A new carb is $400 or more. I've added a couple pictures. The first one shows the discharge tube in the carb. throat....it's the first brass tube. The 2nd one is from the bottom of the tube. The opening here is pretty big by comparison, but the opening the fuel flows from is much smaller. I've tried to unscrew the tube so I could get better angle, but it doesn't budge. HELP!!!
-
Now we live in a helmet state (Tennessee) but when I lived in Illinois both my wife and I always wore our helmets. Now when I was young, I hated it when the helmet law passed in Illinois. A couple of years later it was repealed. Then I had a bad accident, and the top of my helmet (I WAS wearing it at the time) hit a fence post. I was unconscious for almost 3 weeks (swollen brain) and I sure I would have died if I hadn't been wearing a helmet. Now I've switched from a 3/4 face helmet to one of those full helmets that open up when you pull the latch. Barb still wears her 3/4 helmet.
-
I use Valvoline 10W-40 conventional motorcycle oil, but I see that Walmart has full synthetic for just a little more. I don't remember exactly what I paid for my last batch, but I think it was way less than Walmarts '$6.72/qt. I usually buy it at Blain's Farm and Fleet, but the last batch I picked up when we were up in St. Cloud MN visiting our grandson at Mill's Fleet Farm.
-
On the 83, 84 and 85 bikes the temperature gauge is calibrated so that the needle is just shy of the red when the fan comes on. This caused some complaints so when the 86s came out the gauge was calibrated to indicate a little lower. What I'm saying is that your bike is normal. If the bottom (oil pan) and front side of your engine is gunked up with crud you could clean that off and it will run just a bit cooler.
-
Spencer, Thank you.....everything is fine now.
-
Don, I just tried that again and it doesn't give me the option of changing my password. Is there an option for that on this board? I see where Skid told somebody to select 'user cp' but I can't find that either.
-
I blame the latest Win10 update for this mess, but.... The computer I usually use for VentureRider is a Win10 laptop. After the update, I went to open Venturerider.org and got the message that I wasn't using the correct name or password. Heck, I haven't changed my password since joining. I messed around with it and couldn't gain any ground with the laptop. I grabbed my Chromebook and venturerider.org came up just fine. I went out to my Ham Shack and tried the Win10 tower there and because I'd never signed on from there before I had to enter my name and password. It worked. I decided to sign off from venturerider.org on my Chromebook and went I went to sign back in I got the bad name/password message again. I decided I needed to reset my password and start off from scratch on all 3 computers. I got my password reset and now the laptop works fine, but I can't find where to change my password from the temp. password. Which button do I push.....
-
When my 83 was new, I used to run leaded gas in it. When it got up in mileage, long after leaded fuel wasn't available any longer, after it sat for a while sometimes it'd be a bear to get started. You could tell by the way it cranked so fast that the compression was way low in some cylinders. After I got it started, it ran terribly for a while, spitting out of the carbs and also exhaust. Then after a couple of minutes, it'd get better and then it ran and started normal. One year after a long winter (I lived in northern Illinois then) it almost started the first time, and then it started the same ritual except it was worse then normal. I couldn't get it to start at all. Because it was spitting out of both the carbs and exhaust, I pulled the valve covers to check the clearance and found that the valves had excessive clearance, so I assumed that there was some garbage between the valve and the seats caused by crud breaking off the combustion chambers. I made a fitting that would adapt an air hose to the spark plug hole and applied air pressure to the cylinders and spun the engine over. After I did this, the bike started but barely ran for about 5 minutes and finally got better. I treated the bike with Yamaha Ring-Free and although one of the spark plugs had it's insulator ruined and I had to change the plugs, the bike ran great. I could tell by how it cranked on hot starts that the combustion chambers had been cleaned out. I never had that problem again. Now I see that Yamaha makes a combustion chamber cleaner and it'd probably be what I'd use if I needed to. https://www.shopyamaha.com/product/details/yamaha-internal-engine-cleaner If you trust your compression gauge's accuracy, it sounds like your on the same path.
-
Mounting Dunlop Elite 4
frankd replied to frankd's topic in Venture and Venture Royale Tech Talk ('83 - '93)
Earlier I'd decided that it probably would be best to take it to where they had more than tire irons to persuade it to join the rim... I remember Cowpuc commenting that it was a bit tough to mount so I hope he joins in.....Puc---how did you do it? Frank -
It was past time for a new rear tire on my 89' and I was tired of the short life from the Avon Cobras, so I bought a Dunlop Elite 4. I pulled the Avon off and started to put the Elite 4 on the rim, but I couldn't get it started. This tire is way stiffer than other tires I've used, and I couldn't get the first side started on the rim so that over 1/2 of the tire was on the rim. I used tire lubricant and tried every combination I could think of, but I couldn't get it to a point where it would stay by itself so I could use the tire irons to finish if off. Those of you who have mounted a rear Elite 4 on their 1st Gen. please tell me how you did it. Frank
-
I originally swapped the bulb for the benefit of visibility. Both to see and to be seen. Now I am thinking that less stress on the stator is a good thing. Thomas MIDICAT If you have a stock GEN1 charging setup, your stator current is the same no matter how much load is on the system. The voltage regulator controls the voltage by switching on a load when ever the voltage gets to a threshold (14.4V) and dissipates this extra power as heat. It's known as a "SHUNT REGULATOR". The GEN2 bikes (at least some of them) have a 'SERIES REGULATOR" and with it the stator current will go down at lighter loads. I converted my 89 to the series regulator, but I had to mount it in the fairing because it's bigger than the OEM rectifier/regulator.