-
Posts
5,200 -
Joined
-
Last visited
-
Days Won
7
Content Type
Profiles
Forums
Gallery
Events
Store
Everything posted by XV1100SE
-
Keep in mind that the Venture comes with a 5 year warranty (starts from original date of purchase) and is transferable. If you find one that was originally purchased in 2008 or newer you'd have some coverage if there is anything wrong with a used bike.
-
I just put a Deka AGM battery in my bike. I had a charger for lead/acid batteries and gave it away because it doesn't work on AGM's and I've heard you need a "smart" charger/maintainer for these. Any recommendations on what to get ? "Battery Tender" ? I've seen this one at Canadian Tire (1.1 A) - http://www.canadiantire.ca/AST/browse/4/Auto/3/Batteries/BatteryChargers/PRD~0111926P/Noco+Genius+G1100+Smart+Battery+Charger/CROSSSELL~0111941%20Battery%2BTender%2BPlus%2B%2B1.25A%2BCharger%252FMaintainer.jsp?locale=en Or this one (3.5A) - http://www.canadiantire.ca/AST/browse/4/Auto/3/Batteries/BatteryChargers/PRD~0111927P/Noco+Genius+G3500+Smart+Battery+Charger/CROSSSELL~0111941%20Battery%2BTender%2BPlus%2B%2B1.25A%2BCharger%252FMaintainer.jsp?locale=en
-
You would want a narrow beam. More of a spot. Aimed properly, you won't blind oncoming drivers.
-

World's first rearview, flip-front motorcycle helmet introduced
XV1100SE replied to Cougar's topic in Watering Hole
Hmmmm.... easy to get a pinhole video camera or small security camera. How about one mounted on your license holder ? Only $19 - [ame=http://www.amazon.com/Koolertron-License-Plate-Backup-Camera/dp/B0049LBJ56/ref=lp_1253823011_1_2?ie=UTF8&qid=1363039772&sr=1-2]Amazon.com: Koolertron Rear View License Plate Backup CMOS Camera: Electronics@@AMEPARAM@@http://ecx.images-amazon.com/images/I/41p837fV7EL.@@AMEPARAM@@41p837fV7EL[/ame] (didn't get a very good review - water leaks in) Aluminum at Walmart - $99 - http://www.walmart.com/ip/Bravo-View-License-Plate-Back-Up-Camera-PC-3/10105212 So a range in pricing for a back up camera... but next issue is how to display the image. -
SkyDoc sells SS brake lines in choice of 4 colors - $300 http://www.venturerider.org/classifieds/showproduct.php?product=4052&title=second-gens-sbrake-2fclutch-5-line-set-21&cat=22 "YOU GET 4 S.S. BRAKE LINES, YOU GET A S.S. CLUTCH LINE, YOU GET THE SPECIALLY MACHINED VMAX SPLITTER, YOU GET THE S.S. SPLITTER ADAPTER BRACKET WITH ALL S.S. HARDWARE, AND YOU CAN CHOOSE YOUR BRAKE LINES IN 4 DIFFERENT COLORS, CLEAR, (SILVER) RED, BLACK, AND BLUE"
-
In case you don't know.... the passing light spacer puts the light bar a little further forward. By doing this, you don't have to remove the lights when you want to split the fairing. This thread has an email address for someone that makes them - http://www.venturerider.org/forum/showthread.php?t=56389
-
Sweep under and around your bike just in case there is a screw/nail that found there way there over the winter.
-
http://www.venturerider.org/forum/showthread.php?t=512
-
I'm 4 1/2 hours away and would consider attending if it were during warmer weather. Would be a nice ride !
-
Wait until you start buying safety chrome ! You've just begun to spend money !
-
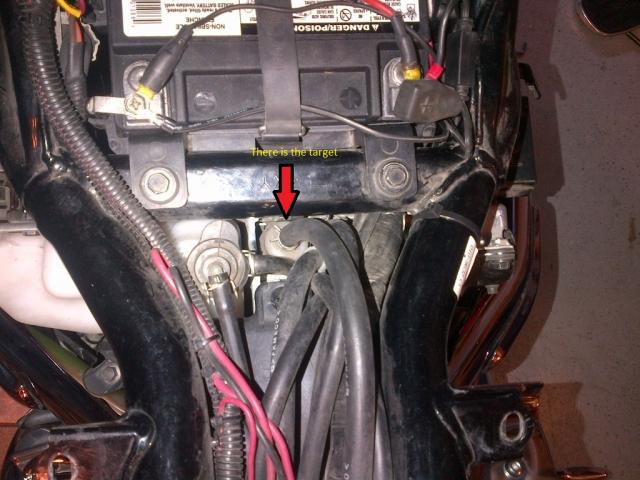
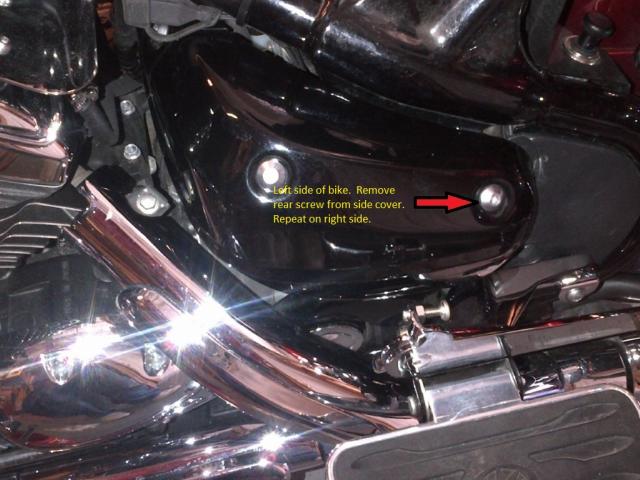
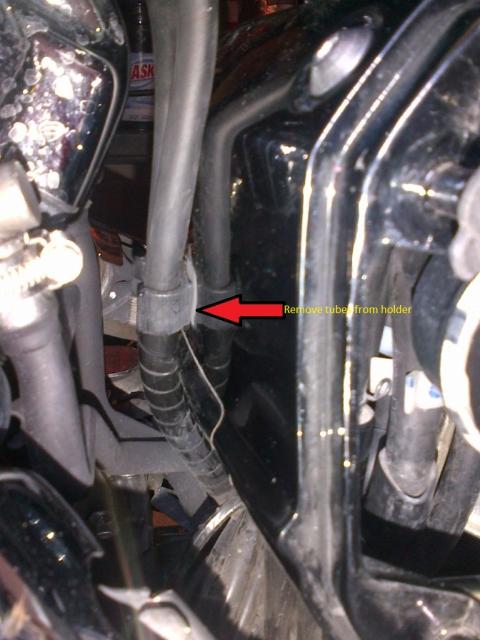
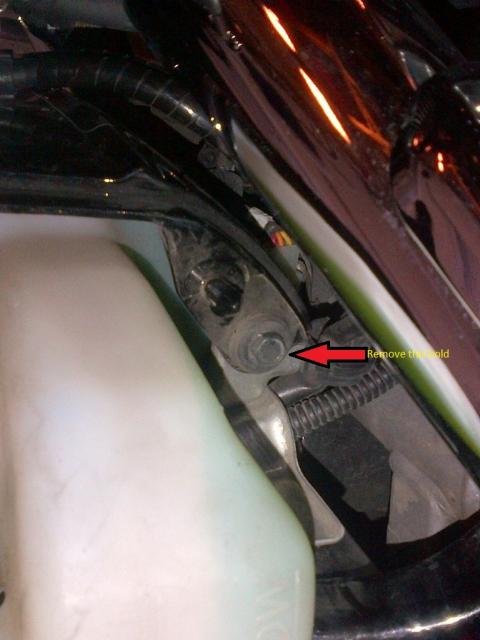
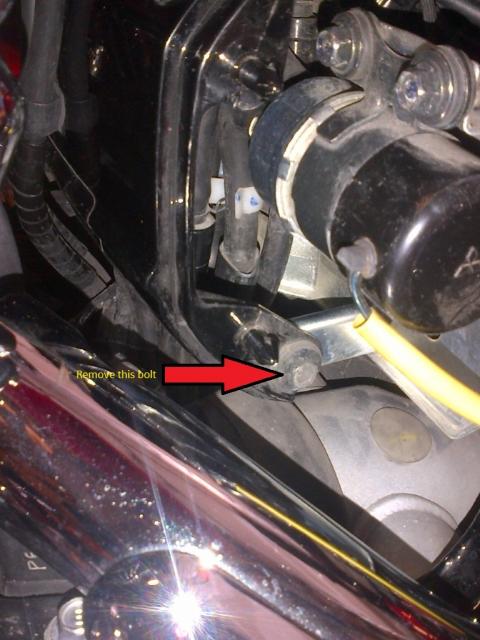
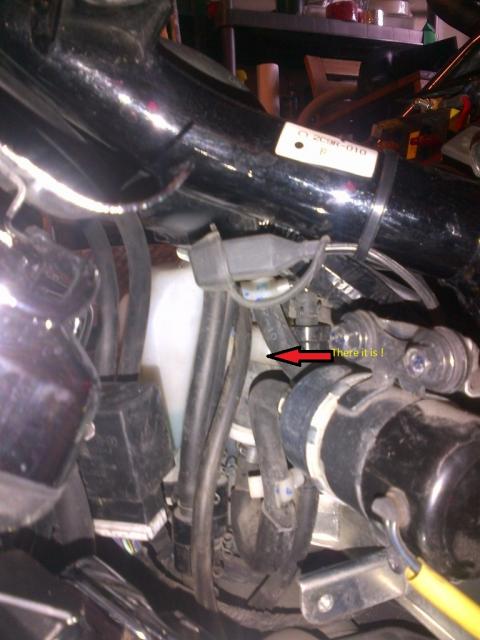
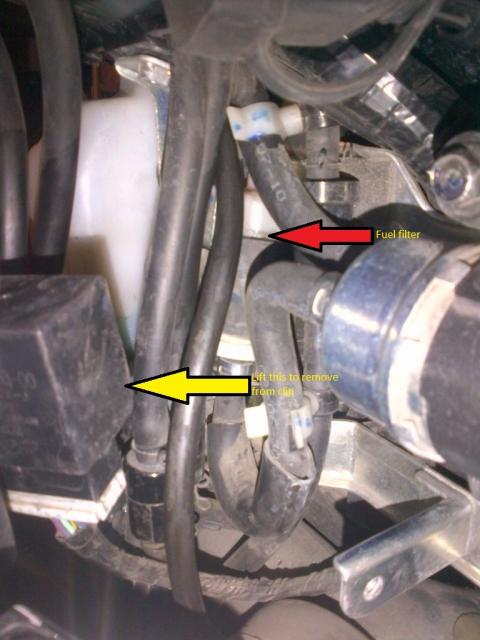
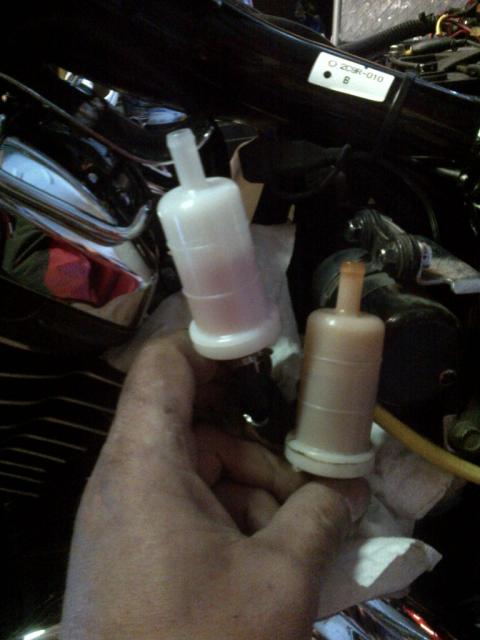
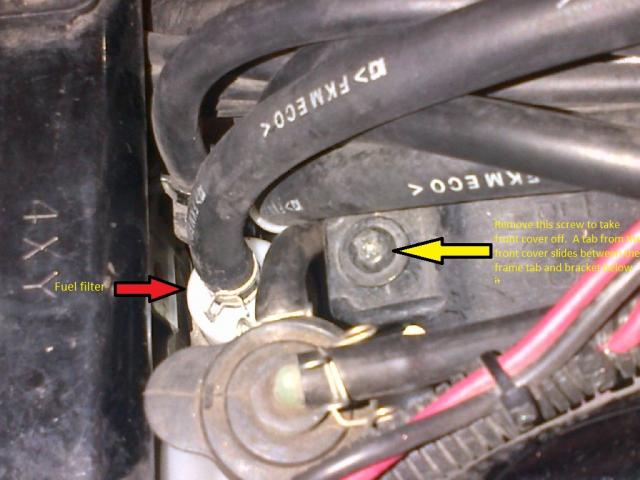
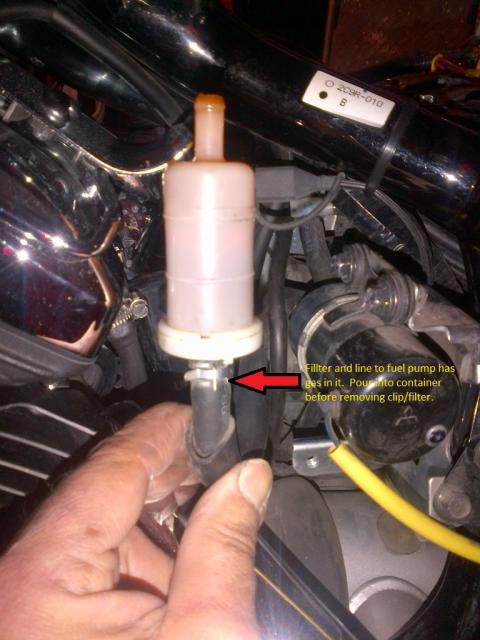
Changed my fuel filter today after reading posts about how to do it. Didn't see any pictures in previous discussions so for those that like pictures to follow when you do yours, here you go. 1) turn off fuel petcock - IMPORTANT !! 2) remove drivers seat 3) drivers seat off, view of fuel filter from above (picture 1) 4) remove screw to loosen front cover (picture 2) 5) remove side covers from both sides (picture 3) 6) pull tubes out from holders on front cover (picture 4) 7) remove bolts front left and right side of front cover (picture 5 and 6) 8) remove front cover. There is a tab on the top of the side cover so move top of front cover towards front of bike then push from right side of bike and remove from left side 9) fuel filter is visible (picture 7) 10) lift up on item pointed to in yellow in picture 8. It slides over the tab shown in picture 9 11) from above, using needle nose pliers squeeze clip holding fuel line to filter and lift up on fuel line to disconnect 12) from above, push down on fuel filter to slide it out of holder 13) from left side of bike, pull fuel filter down and clear of tubes. Note fuel filter orientation (picture 10) 14) the filter on the right has 37,000 km. The new filter is on the left (picture 11). NOTE : there will be gas in the fuel line and filter. Pour the gas out by tipping the fuel filter into a container BEFORE disconnecting the fuel line Use pliers to squeeze the clip holding the fuel line and remove the old filter. Put the new filter (Yamaha filter shown) in the same orientation 15) reverse steps to reassemble NOTE : when putting front cover back on remember that there is a tab on the top/center that goes between screw hole and bracket
-
Changed my fuel filter today after reading posts about how to do it. Didn't see any pictures in previous discussions so for those that like pictures to follow when you do yours, here you go. 1) turn off fuel petcock - IMPORTANT !! 2) remove drivers seat 3) drivers seat off, view of fuel filter from above (picture 1) 4) remove screw to loosen front cover (picture 2) 5) remove side covers from both sides (picture 3) 6) pull tubes out from holders on front cover (picture 4) 7) remove bolts front left and right side of front cover (picture 5 and 6) 8) remove front cover. There is a tab on the top of the side cover so move top of front cover towards front of bike then push from right side of bike and remove from left side 9) fuel filter is visible (picture 7) 10) lift up on item pointed to in yellow in picture 8. It slides over the tab shown in picture 9 11) from above, using needle nose pliers squeeze clip holding fuel line to filter and lift up on fuel line to disconnect 12) from above, push down on fuel filter to slide it out of holder 13) from left side of bike, pull fuel filter down and clear of tube. 14) the filter on the right has 37,000 km. The new filter is on the left (picture 11). NOTE : there will be gas in the fuel line and filter. Pour the gas out by tipping the fuel filter into a container BEFORE disconnecting the fuel line Use pliers to squeeze the clip holding the fuel line and remove the old filter. Put the new filter (Yamaha filter shown) in the same orientation 15) reverse steps to reassemble NOTE : when putting front cover back on remember that there is a tab on the top/center that goes between screw hole and bracket
-
Riding season is about to start so things to check : - trunk hinge screws - saddle bag hinges - tires - age, wear and pressures - shocks - set your pressures - assorted bolts and screws (such as shifter bolt) - rear shock (oil on bottom of shock?) - steering head - do the steering test while on the lift and tighten head if necessary) - brake pads - helmets - supposed to be replaced if more than 7 years old - riding gear - boots and gloves in good shape, jacket (still fit? LOL) Hope I've reminded you of a few items. Add more if I missed anything.
-

Where can I buy a DEKA battery in Ontario (Kitchener) ?
XV1100SE replied to XV1100SE's topic in Watering Hole
Put the new battery in today... fired right up ! Finished off my winter plans for the bike.. - carb covers - passenger highway pegs - remove gps tracker - rewire under drivers seat to replace previous splicing with wiring harness from a member - changed fuel filter - changed oil and filter - put air in shocks (took them down to 0 psi for storage on the lift) - since the bike is on the lift, good time to put air in the tires - reset my radio stations (what a pita) Ready to ride ! Not bad temps today, heard a few bikes out. I can wait until we get a couple good rains to get rid of the grit. -
Whatever you used to screw into them to take them out is a good idea to use to put them back in. Some use an old spark plug but I found that a screw from a wall plug fit perfectly. Gives you something to get your fingers on to push back in. They don't go as far as you might think and the fake fins hold them in.
-

Where can I buy a DEKA battery in Ontario (Kitchener) ?
XV1100SE replied to XV1100SE's topic in Watering Hole
Round trip to Hamilton and back would have cost me $20 in gas. Thanks for the info though ! -
Thanks for posting about this. Will definitely keep it in mind when pulling up behind someone. Leaving yourself in a position in the lane so the driver can see you also gives you room to escape if someone coming up behind you doesn't realized traffic is stopped.
-

Where can I buy a DEKA battery in Ontario (Kitchener) ?
XV1100SE replied to XV1100SE's topic in Watering Hole
Battery Wholesale 320 Lawrence, Kitchener Seemed like good people to deal with. I called them at the end of the day and said I wouldn't make it there before they closed.... they said they'd wait for me. Had the battery on the counter before I got there. $115.... same as the cheapest web site I could find in Canada. If you are looking for a dealer closer to you, call East Penn (in London) and ask them for a retail store in your area. -

Where can I buy a DEKA battery in Ontario (Kitchener) ?
XV1100SE replied to XV1100SE's topic in Watering Hole
Thanks for the input ! Bought my new Deka battery yesterday locally for $115 + taxes. Just another one of the things I get from VR.org.... recommendations on what to buy can save a lot of time and effort. Only thing I had to do was find a place with the best price, knowing what make/model to buy. -
As posted in the other thread... if you find a bike, test ride it. You know what to listen for and in what power range. Only the minority have the basket whine. Quiet ride... buy it !
-
If you are buying a used bike you know what to look for. The whine isn't on every bike... probably only a minority. Test ride whatever bike you come across and if you don't hear it... buy it. You won't be disappointed in a Venture !
-
http://www.wheels.ca/news/stroke-survivor-embarks-on-long-ride/
-
Funny.... a lot of younger guys I work with can't believe I'm driving a rear wheel drive car. I tell them that people drove rear wheel cars for decades before they were even born ! Its all in how you handle the throttle and brake. I actually like driving in the snow.
-
Miles.... when are you not riding a bike? Must be a rare sight to see you in a car ! My Mustang GT came with Pirelli as OEM. I hated them. During summer with even a little moisture on the road made it like driving on ice. If you want good tires, I highly recommend Michelin Pilot Sport A/S Plus. Great at moving water. The Mustang is my "winter beater" (even though it is an '07 with around 110k km) and even driving in snow isn't a problem. Rear wheel drive and I have better traction than 4 wheel drive SUV's.


