camos
-
Posts
2,232 -
Joined
-
Last visited
Content Type
Profiles
Forums
Gallery
Events
Store
Everything posted by camos
-
Looks like it is just starting to turn 11.1.
-
Hah! That's one of my favourite peeves.
-

1983 Venture Royale Bobber Project
camos replied to a topic in Venture and Venture Royale Tech Talk ('83 - '93)
You might find this page inspirational: Tim's Chopper Blog -
Oops, forgot to include the link. http://www.venturerider.org/forum/showthread.php?t=44037
-
Stator Replacement Procedure
camos replied to camos's topic in Venture and Venture Royale Tech Talk ('83 - '93)
Thanks, I'm going to look for one on sale. -
Since I just did this, here are a couple of most useful posts I found made by dingy on how to make attachments work for you. Thanks Gary...
-
Stator Replacement Procedure
camos replied to camos's topic in Venture and Venture Royale Tech Talk ('83 - '93)
I found a pic of the shift linkage and inserted that in the procedure. I'm not an expert mechanic and other then having done this job twice make no claim to fame. If anyone has an opinion on anything that I missed or perhaps could have done differently please chime in here. It isn't necessary to repeat the advice already given regarding the use of an impact driver or doing this job on the center stand or even on a lift. This procedure may as well be as complete as possible so I will be including those tidbits in the procedure text. -
Stator Replacement Procedure
camos replied to camos's topic in Venture and Venture Royale Tech Talk ('83 - '93)
I think that is a very good idea. Does the DeWalt driver have adjustable torque settings? -
Stator Replacement Procedure
camos replied to camos's topic in Venture and Venture Royale Tech Talk ('83 - '93)
The first time I did this job the new stator did not come with the plug so I too used quite a lot of RTV around the plug and wires when re-using the old one. The second time I did it the new stator came with a plug and the wires were very tight where they went through the plug so I left them alone. The wires were also very stiff which caused the plug to come out several times before I got them oriented so the plug would not pop out. The first time I put the plug in I used quite a lot of RTV but found after it popped out a couple of times that there was not much RTV actually in the slot. So it seems a little is all that is necessary since the rest of it gets squeezed out. -
Stator Replacement Procedure
camos replied to camos's topic in Venture and Venture Royale Tech Talk ('83 - '93)
Now you tell me. -
Stator Replacement Procedure
camos replied to camos's topic in Venture and Venture Royale Tech Talk ('83 - '93)
The first time I replaced the stator I managed to snap off one of the 3 Phillips screws holding the stator. It broke with hardly any pressure, like a piece of string cheese being twisted. Rocket came to my rescue with a spare case cover. He took my case in to his shop and had the offending remains of the screw removed. Paul is one of the great assets of this club. I'm not sure I made ALL the possible mistakes but certainly made a dent in the list of likely ones. You will likely be far better off to ask Paul to help you with it since there is a good chance I only made half the mistakes that are possible. If the bike was standing there would probably be much less chance of anything falling into the engine. -
Stator R-n-R, how much trouble am I in?
camos replied to camos's topic in Venture and Venture Royale Tech Talk ('83 - '93)
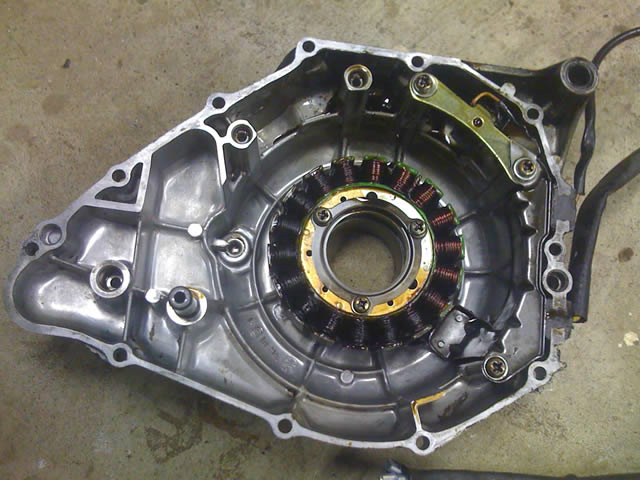
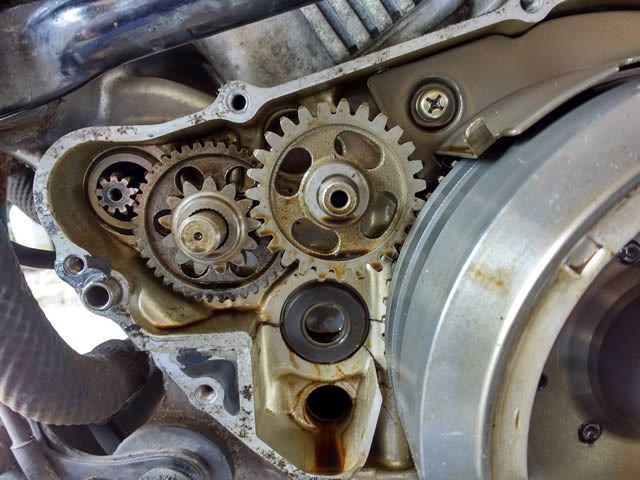
There is a splined shaft in one of the gears and a pin shaft in the other gear, the one closest to the flywheel. The pin shaft is smooth and fits into the cover. When I pulled the cover the pin stayed in the cover which allowed the gear to drop out of position. I noticed the gear was slightly out of position but thought the pin in the case would align the gear when it was reassembled. It didn't realign and I could not get the case to go all the way on. When I removed the case to see what was causing the problem the pin shaft came out and fell down to the hole just below it. There is a "flange" or what I refer to as a chute at the hole which caught the pin and directed it into the engine. This is why I recommend the pin shaft be in the gear prior to reassembling the case. The gear it fits into is just sitting there with nothing holding it other than the pin shaft. To align the gear with the hole it is necessary to turn the gear one tooth at a time to get it in the correct position. Since the bike was laying on its side, this would likely prevent the gears from falling out. The pic I took was originally intended to display the holes things could fall through into the engine. It would have been better to have included more of the gears. They are visible in the top left of the pic. The hole the pin fell through is right below the gear and the chute can be seen well enough. -
That's a very nice looking wheel which, unfortunately, would be pretty much wasted being hidden behind those huge front rotors.
-
Stator R-n-R, how much trouble am I in?
camos replied to camos's topic in Venture and Venture Royale Tech Talk ('83 - '93)
I just uploaded the Stator Replacement Procedure here: http://www.venturerider.org/forum/showthread.php?p=745524#post745524 -
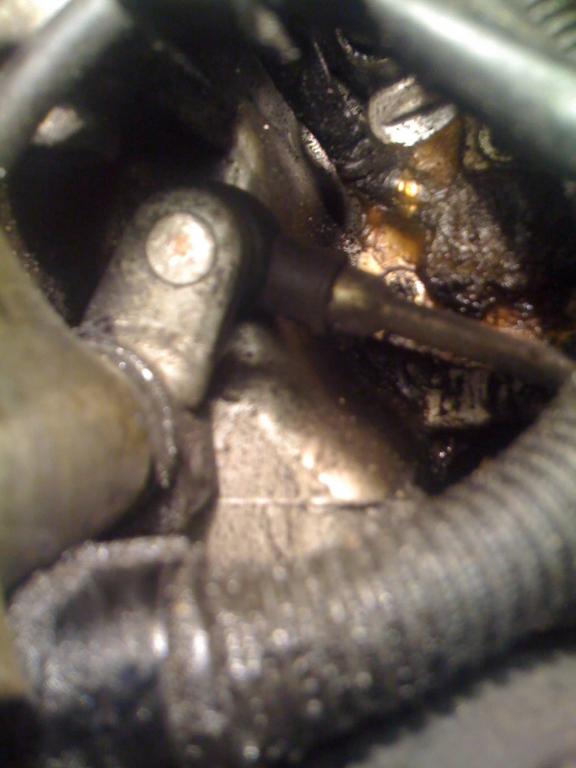
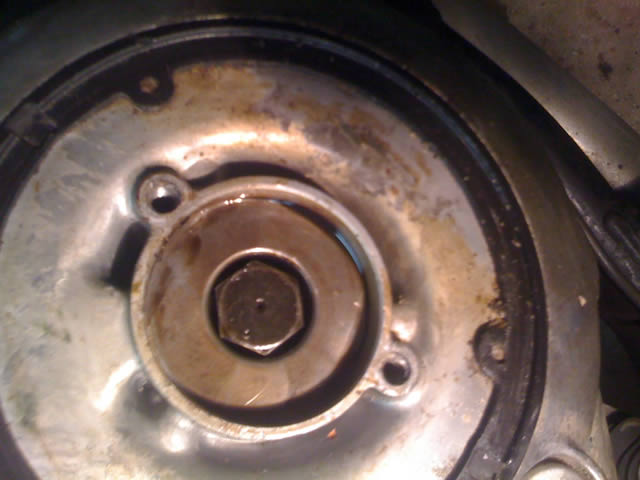
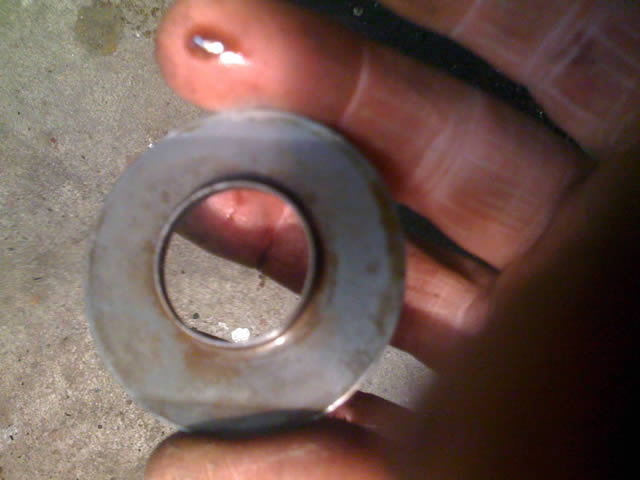
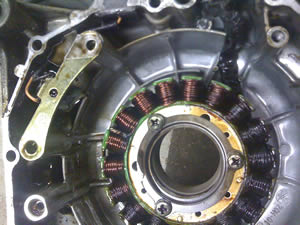
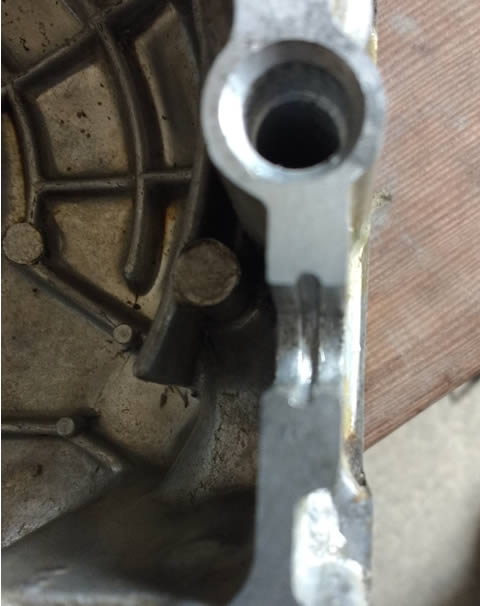
First Gen MkII Stator Replacement Before you begin make sure you have all the materials and tools you will need: the new stator, gaskets for the flywheel/stator cover and the middle gear cover, large Phillips screw driver (#3), 10mm socket, 12mm socket, 5mm allen wrench, flathead screwdriver, gasket remover, scraper, brake cleaner, thread locker (Blue Locktite) oil resistant RTV (Permatex PX #82180) Possibly an extension magnet will be needed if any of the case pins fall into the engine. A new copper crush washer might be needed. You will find it on the bottom bolt of the middle gear cover. The old one should work OK but if it does leak afterwards it can be replaced any time so it's not that important to have at the beginning unless you plan on losing it. Removing the covers: First remove the chin fairing, left side lower fairing, the engine crash guard, the shift lever from the shaft that comes through the stator cover and remove the "C" clip and washer from that shaft. Remove one bolt from the the foot peg/shifter assembly so it can be pushed out of the way. Next remove the six 5mm cap screws from the middle gear cover (the small cover at your left foot while riding) taking note that the cap screw at the bottom has a copper washer that is used as an oil seal, carefully remove the cover. Have a small container ready to catch the oil behind the cover. Perhaps a 1/4 cup, just enough to make a mess. Make note of the orientation of the inside shift linkage because unless the lever is in the proper position (lever should be up) the stator case cover will not fit back on properly. You can now see two wire leads coming out of the lower rear part of the stator cover, follow these under the middle gear until you get to a connector on each of the cables. Unplug the two connectors (the smaller two wire one is the pickup and the large one is a three wire for the stator) then remove both cables from the retaining clips. Remove the two Phillips head screws from the flywheel cover and remove the round plate and note the orientation of the spring washer so you can replace it the right way.(flat side out). Remove the eleven 5mm cap screws from the flywheel cover and remove it from the engine. As you pull the cover away from the engine it will start to come but then give some resistance. This is due to the magnet in the flywheel pulling on the steel in the stator. A steady straight pull will remove it by gentle prying with a flathead screwdriver. Be careful when prying as you don't want to mark the case edges. A tap or two with a mallet will help to break the seal. Inside of the cover there are two guide pins in the case perimeter that are used for positioning. There are also two shafts and three gears used by the starter, if they fall out or come with the case put them back into position in the engine. A note of caution here, when removing the cover one of the gear pins may stay with the case and the gears may fall out. The gear on the splined shaft will only go in one way, rotate to fit. Be advised the pin that goes into the gear can fall into the engine. Remove the three Phillips head screws in the center of the stator coil. Make note of the position of the retaining cover for the wires from the stator before removing the 2 screws holding them. These screws may have Loctite on them and be tough to break loose, so use a screw driver that fits tightly in the screws and proceed using gentle steady force. Remove the wire cover and the old stator. Prepping and Reassembling the New Stator: Clean all the old gasket from the cover mating surfaces. If you are lucky the old gasket will all be on the cover. Likely the old gasket will be baked on so now is the time to use the gasket remover. This stuff will also remove paint. The luck involved in having the gasket remain only on the case makes it much easier to spray the remover without getting it all over the bike. Scraping may be necessary to get all the old gasket off. Use multiple applications of gasket remover, scraping between coats. It's important to remove it all but be careful of scratching the mating surfaces. The stator wires go through a rubber plug. Some stators come with a new plug and some require reusing the old plug. To prevent future oil leaks at this point use brake cleaner to clean the plug, wires and the area in the case where the plug fits. Pay attention to cleaning out the groove in the slot. A small amount of RTV on the plug and the wires will aid in preventing oil leakage. Use a tap and a die to clean the threads on the 3 stator screws and the 2 wire cover screws. This will get rid of any remaining locking compound. This step is highly recommended and will prevent the possibility of breaking any screws while tightening. Guess how I found that out. When installing the new stator pay attention to the position of the wires coming off the stator, they must go between the two pins that position the clip holder. The first time I did this job the wires fit in place perfectly but the second time when using a different brand of stator it was necessary to loosen the clamp holding the wires on the stator to adjust the position to fit between the pins. Re-install the wire cover. Adjust the shift shaft to the up position. The flywheel/stator case can now be installed. Run the wires up to the connectors and put them into the clamp near the stator cover. After replacing the flat spring washer, the round flywheel cover and 2 screws can be installed. Clean the mating surfaces then replace the middle gear gasket and install the cover. Don't forget the copper washer on the bottom bolt. Place the washer on the shift shaft and pull the shaft outwards until the slot for the "C" clip becomes visible then press into place. Re-install the foot peg, engine guard and chin fairing and you are done.

-
Stator R-n-R, how much trouble am I in?
camos replied to camos's topic in Venture and Venture Royale Tech Talk ('83 - '93)
If the pin could have fallen into that area then it would appear that I may have used up several years of my good luck quota. Perhaps I should stay in bed for at least the near future and dream of sugar plums. -
Stator R-n-R, how much trouble am I in?
camos replied to camos's topic in Venture and Venture Royale Tech Talk ('83 - '93)
I did wonder how lucky I was to have found the pin so easily. I could not see in there but could feel some bumps and stuff so knew it was not just an empty pan. Are there gears in there? It is not much of a stretch for the falling pin to find the hole. The pin normally would be in the right hand gear at the top left of the pic. The hole is directly under the gears and has a metal chute that would catch anything that fell and direct it into the hole. Another great Yamaha design feature. -
Stator R-n-R, how much trouble am I in?
camos replied to camos's topic in Venture and Venture Royale Tech Talk ('83 - '93)
After getting an extension magnet and an extension mirror today it only took two tries to capture the pin. The mirror was no help since it would not fit through any of the holes into the case. It was the smallest mirror Canadian Tire had although a specialty tool store may have a slimmer model. The snake camera would have been the bee's knees for that purpose. If it ever comes up, I'll be voting to become the 51'st state. Fed up with the cross border Hoo-Haw. Thanks to all for the ideas and moral support. -
Stator R-n-R, how much trouble am I in?
camos replied to camos's topic in Venture and Venture Royale Tech Talk ('83 - '93)
You are such a ray of sunshine Kevin. I took a bunch of pix and have written a procedure that will not include snapping a bolt off or dropping stuff inside the engine. Perhaps I'll get it posted before you need to start your install. -
Stator R-n-R, how much trouble am I in?
camos replied to camos's topic in Venture and Venture Royale Tech Talk ('83 - '93)
A flash of hope! Went out again to have a look just in case but no such luck. The pic below shows a hole on the left with a very (in)convenient chute into it. Probably landed there and shot right in. I'll try the mirror and magnet method tomorrow. Thanks for the input though, much appreciated. -
Stator R-n-R, how much trouble am I in?
camos replied to camos's topic in Venture and Venture Royale Tech Talk ('83 - '93)
That's me, that's me. As I recall there were at least 2 holes under the stator that could have been an entry point. Well, the collector is broken so it will need to come off sooner of later anyway. Possibilities, thanks. -
Stator R-n-R, how much trouble am I in?
camos replied to camos's topic in Venture and Venture Royale Tech Talk ('83 - '93)
The case would not go on because the shifter lever was not quite oriented correctly so I pulled the case back off and heard a metallic clink, clink but no thud so it's unlikely to have hit the concrete. Didn't appear to be on the floor but will go and have another look since I don't have a magnet pickup tool so tomorrow is as soon as I can get one. Since I can't see it I'm not 100% sure of anything. Also don't have a small mirror. There are a couple of 1" or so holes that the pin could have easily fallen through but no direct view of the bottom of the case. If that doesn't work what is the easiest way into the case? -
Today I pulled out the old burnt out stator and while re-installing the case the pin that goes into the starter gear fell out. Most likely it managed to get itself into the case since it was nowhere else to be seen. I can't see it in the case but it is definitely not on the floor or otherwise visible so....
-
Been there a few times myself in a 48' boat, the light blue one is probably about 42'. It's definitely not a nice situation. Looks like sand in the water so it's probably fairly shallow. Somewhat like the entrance to the Columbia River where the outbound flow turns the sea into total confusion. During bad weather the swells can be so deep boats such as those two can hit the bottom. Chose to stay out to sea a few times rather than mess with that ****.
-
I have had an HJC IS-Max for about a year and a half which I am very happy with. I wear this helmet 7 hours per day 5 days per week 52 weeks per year plus a few hours on the weekends and find it very comfortable. It has a flip down sunshade and is Bluetooth ready, according to the manual, for a Chatterbox headset but I installed a Sena SMH 10 which fits just fine. The helmet costs between $180 and $225, approximately depending on the retailer, which puts it in the lower to mid price range and seems to be a very good value. This helmet is meant for a round head which for me was not so good since I have an oval head. It only took a few minutes to shave a little of the foam on the forehead area to get a perfect fit. The other down side is the chin strap uses D-rings which are difficult to navigate with cold fingers so I added a clip converter. HJC has an excellent method of changing the face shield which can be done in minutes with no fuss. There has been no opportunity yet to test how well it will slide on asphalt.