-
Posts
2,232 -
Joined
-
Last visited
Content Type
Profiles
Forums
Gallery
Events
Store
Everything posted by camos
-

Brake light adjustment issue
camos replied to camos's topic in Venture and Venture Royale Tech Talk ('83 - '93)
I bled the brakes a week or two earlier and did not experience any problems. It wasn't until the morning after messing with the rear pedal adjustment that this problem appeared. Can't say I noticed any issue with the front brake at the time but to be perfectly honest, I couldn't budge the bike after it happened so there may have been some affect on the front brakes. I always carry the complete Yamaha tool kit with a few extras in the saddlebag so I have all the tools needed to adjust or repair almost everything. That said, your advice is well stated. Bleeding the brakes would have been the second thing I tried. The tool kit does include a hose for bleeding the brakes and getting under the bike to do the rear caliper is not necessary as the hose can be attached to the bleeder valve by reaching in through the gap in front of the right saddlebag. Thanks for chiming in Randy. -

Brake light adjustment issue
camos replied to camos's topic in Venture and Venture Royale Tech Talk ('83 - '93)
Good point, I'll check it all out on Sunday. Don't want to go through that Hoo-Haw thing again. Being lucky once is more than I usually get. -
Thanks David, First I'll see if I do have a keyboard cable that will fit the VR HS cable. If so then the link you gave will probably be a good start otherwise $25 is not such a terrible price. It's easy enough to spend almost that much driving around shopping for parts.
-
That will be about US$20 landed in Canada which is about CA$25. Still, a good option if I fail at making one from the junk in my box. Thanks for the suggestion.
-
Yeah, ICBC is pure evil. Govmints just want to suck the people dry. To add insult to injury, that $grand is only for basic insurance. As previously mentioned in other threads, I work all day in my modular helmet which entails a lot of opening and closing of the chin piece. That creates a lot of wear and tear on the mic boom not to mention the windsock. When I first got it I wore the SMH-10 for about a week and the windsock was trashed and plastic transition support piece at the inside end of the boom broke. Figured if I continued to use it every day the boom would probably break internally. Then there is the PITA factor with the boom always getting in the way and having to be moved this way or that. Figured it might be a better option to just replace the SMH-10 with a set of bluetooth headphones so I can listed to some tunes.
-
I remember reading that on here quite a while ago. Thanks for the reminder. I have several keyboard cables in my junk box. With a little luck one of them might fit. Might even have a 3.5 mm stereo plug in the junk box too. So 4 wires? Does that mean 2 wires for each side of the male stereo plug? Have never pulled one apart before.
-

Brake light adjustment issue
camos replied to camos's topic in Venture and Venture Royale Tech Talk ('83 - '93)
That is pretty much what mine looks like too. I think the spring hook is the most likely cause for my issue. Too bad it can't be seen without taking the passenger board off. Hopefully the board will come off easier than the one on my 90 VR which had one bolt that to be drilled off. So.... rather exciting ride to work this morning. Got 2/3 of the way in, was in the passing lane travelling at about 60 mph when it felt like the bike started to run out of gas.... but had half a tank. Gave it a bit more throttle and headed for the right shoulder. Fortunately no traffic in the immediate vicinity at least. Rear brake finally seized up leaving the front half of the bike in an on-ramp and the rear half in the travel lane. Very fortunate I think, a tractor trailer was the first on the scene and he stopped with his four-ways on which made the rest of the pack either stop or go around. Kudos to professional drivers!! Took a few minutes to back off the free play locknut and I was able to roll the bike off the highway. Only got a couple of "friendly" fingers for that one. :duck:Very lucky, could have been much, much worse. The specs say .5 - .6 inches of free play. Pretty sure there was .5 but now there is 1 inch. Much safer with too much than not enough. -

Brake light adjustment issue
camos replied to camos's topic in Venture and Venture Royale Tech Talk ('83 - '93)
I do have the manual and I did the height adjustment and free play adjustment as per the manual but all it says for adjusting the brake light timing is to hold the switch and turn the adjuster nut until the timing is correct. Not much help there. The only thing I can think of is there is an issue with either the hook or the spring. Unfortunately they can't be seen without removing the passenger board. Another thing to do this coming Sunday. It just never ends. -
Holy smokes!!! $65!!! I'm already suffering from MC insurance pain, $1029 and that is after a 40% safe driving discount. July 2 I'll be coming down with a serious case of municipal tax pain for my over valued house, $3500 and that is after my senior discount. I need to make twice as much as I do just to break even. Might have to reconsider how much bother the mic boom is worth. Sorry for the whining. Thanks Utah. Looks like just what I was asking for. Sigh....
-
There is something funny happening with the rear brake light. The brake is being applied before the light comes on. The switch adjuster is backed out until the switch is tight against the fuel tank. The pedal height is about right and there is about 1/2 play before the brake grabs. Do I totally not understand how this thing is supposed to work? Have not pulled the passenger board off yet but it's getting dark so that will have to wait for another day. Any suggestions?
-
Is there such a thing as an adapter cable that goes from 5 pin to 3.5 mm stereo plug? I've read a bunch of threads that might have been related but since hardly anyone listed what year/model of bike they have I am more confused than before I started. The purpose of the adapter is to connect the bike's audio to a set of relatively cheap headphones. I have the Sena SMH 10 which is very nice but when I am working the microphone is an unnecessary PITA so I would like to get rid of it. So... is there such a cable adapter and if so where can it be purchased?
-
You are right, they are.
-
That reminds me of a 10 hole "outhouse" I used once when in Calcutta, India. It was built overhanging one of the canals in the the Ganges river delta. Can't recall if this outhouse was co-ed or not. Probably not but then it was not unusual to see men peeing against a wall and women squatting in the the road. No need for fancy toilets there.
-
I was in Europe in 1970 and there were no pay toilets. A bit earlier in Nepal after asking for a toilet, in sign language, was pointed towards an outhouse which was quite clean but the "facility" was two bricks with no shovel in sight???? Across the Middle East public toilets were also free but extremely filthy. The left hand wall decorated with excrement rather than graffiti. Really gross. Learned that TP was worth gold and to never be with out a couple of rolls. The only place to get any was at expensive hotels where you needed to be well dressed to get into their public toilet. Well worth the effort. hahahahaha!! Good Times
-
I bought one and used it for a couple of years then bought another one to use for a passenger or as a spare. Won't say they are the best helmet available but they are excellent for a relatively low price. The one I have used all day, everyday for 5 years is still in good shape. Nothing broke on it but after 4 years the side cams/attachment for the chin piece wore out so the face plate would fall down in a wind and the chin piece would also drop when hitting a small bump. Replaced the cams and it's all good. The sun shield is not dark enough but that is a common complaint but that might be a DOT thing. Bought a spare liner so there would always be a clean one to swap out. The inside foam of the helmet is shaped for a round head and I have an oval head so there was a pressure point on my forehead until I removed a tiny amount of foam in that area. Had a full face Arai before the HJC and it was was quite a bit lighter but that would be expected. It was also much quieter than the HJC but again, probably more to do with modular design than anything else. The cooling holes in the top are useful at highway speeds but not so much below 40 mph. Can't talk about fogging up the face shield because I never put it down below my nose. The HJC comes with D-rings which suck but I got a bayonet closure so problem solved. Considering I have worn the helmet for 5 years, 7 hours a day, 5 days a week at work plus whatever for commuting, grocery shopping and fun trips, it has stood up very well. I will most likely get another one when this one has had the biscuit.
-

Need to lift the rear a bit
camos replied to GaryZ's topic in Venture and Venture Royale Tech Talk ('83 - '93)
That's what I was thinking. Not to put you on the spot but you probably could easily make one and send it to Gary. You know, paying it forward. -

Battery Bypass, Right Wire?
camos replied to clint_1985's topic in Venture and Venture Royale Tech Talk ('83 - '93)
Good question. Probably meant the CMS which is an acronym for Computer Monitor System which is the display unit in the middle of the dash that shows you all the warnings, the fuel level and gear positions. -
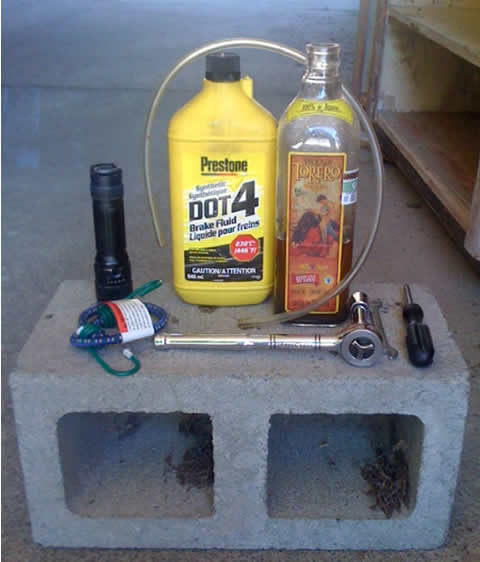
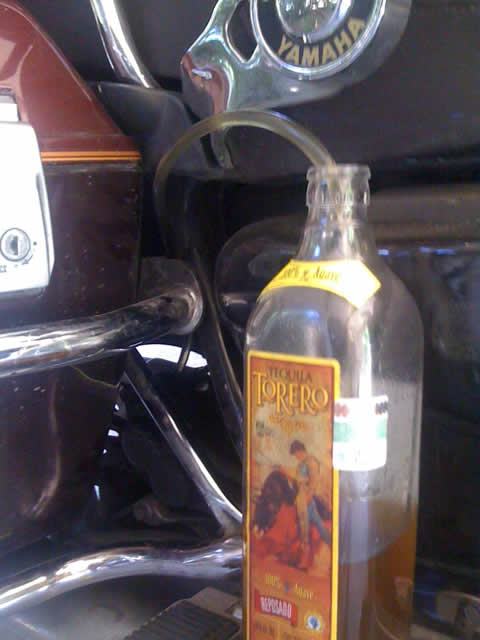
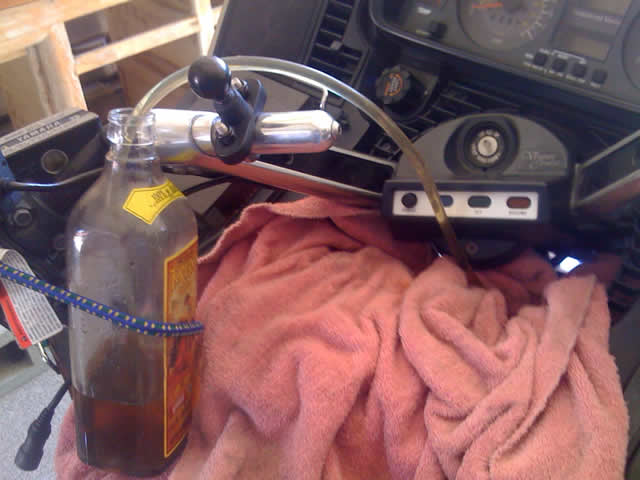
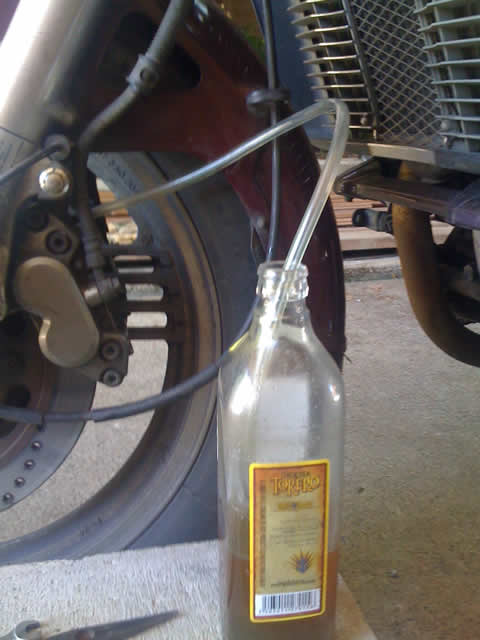
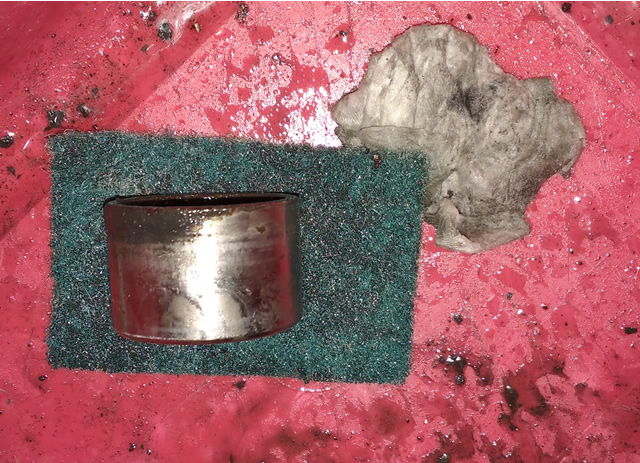
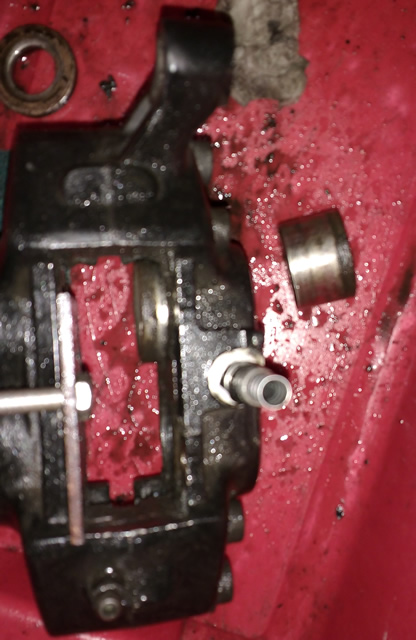
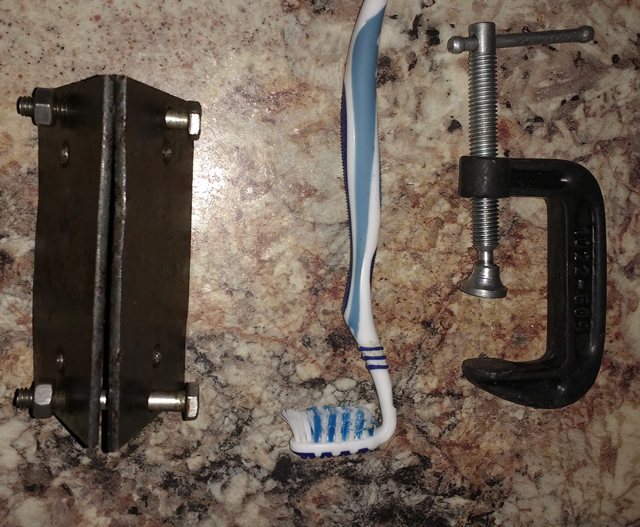
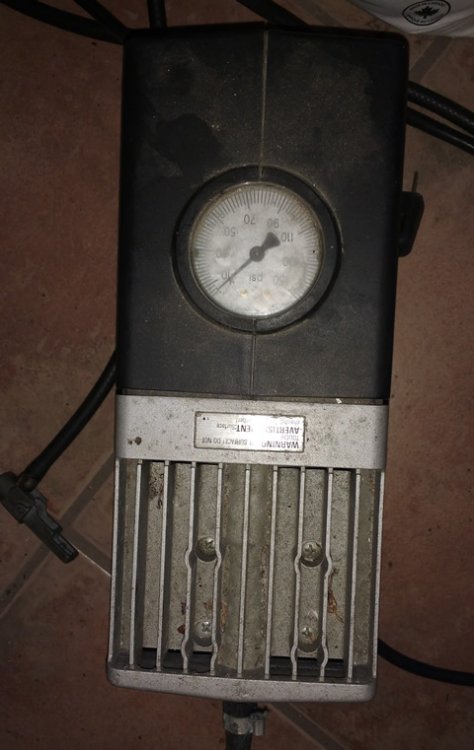
A little while ago I experienced a low MPG rate and it was suggested to me that my brakes might be dragging. So, today I cleaned the pistons and then bled the brakes. While doing this job I recalled that some, if not many guys on here have had difficulty in accomplishing this simple task. Since it should take only five or ten minutes per bleeder, it has always baffled me how bleeding the brakes on these bikes can be so difficult. Anyway, for what it is worth, I took some pix of how I go about doing it. No Speed Bleeders or Vac Pumps required. Here are the tools required: DOT 3 or 4 brake fluid A waste container - I use a tequila bottle but there may be better choices available. Funnel that fits into rear MC opening. Toweling to protect against drippage. Bungee to secure waste container when bleeding the valve at the steering head. Needle nose pliers - to clamp hose when removing. Phillips screwdriver - to remove the top cover and the right MC reservoir lid. 14 mm wrench or socket - to remove rear reservoir filler cap. 8 mm wrench - to loosen bleed valve. 24 - 36 inches 3/16 ID plastic hose - thick wall fits over the bleeder tightly while thin wall fits but is too easy to pull off. The thin wall hose that comes with a battery acid pack will work OK but is only 20 inches so it is perhaps a bit more difficult to support the waste container at the correct height. My hose is 25 inches so it is also necessary to use a brick to lift the waste container. There is only one thing that makes this method work so well and that is the hose must go up from the bleed valve before looping down into the container. This creates a fluid lock head which prevents air from getting back into the bleed valve as the brake is pumped. For this head lock to be effective the hose must not leak at the valve and the head must be long enough so when the brake is released and fluid is drawn back into the system no air can reach the valve. With a few quick pumps to begin the head will fill up and waste fluid will begin to make its way into the container. If the hose end in the container is below the fluid level there will also be a fluid lock that prevents the fluid in the hose from draining and allowing air back into the hose. This part, however, is not very important as it is the fluid head up from the valve that must not be broken. Now all that is required is to pump the brake to force out old fluid and with it any trapped air. Be sure the reservoir is never depleted enough to let air in at the MC. There is no need to tighten the bleeder valve between pumps because no air can get to the valve. Since the system is not under pressure there will be no air locks that can keep air in the system and the air will flow easily into the container along with the waste fluid. Once all air is removed from the system, close the bleed valve and using needle nose pliers clamp the hose near the valve and remove the hose. Finally got around to properly addressing the cleaning part of this thread. Initially my method for cleaning the pistons involved constraining three pistons and pushing the one free piston most of the way out using the brake lever/pedal then polishing it with a Scotch green scrubby and then pushing the piston back in. This kinda worked but did not allow cleaning around the seals so really, it was only half clean. I was a bit apprehensive of popping the piston all the way out because I didn't know what would happen or whether there were any parts that would fly off to hide somewhere in my shop. Turned out that there was absolutely nothing to worry about on that point. The tools used: Made two clamps a while ago to hold down two pistons on one side. Old toothbrush with head re-positioned for cleaning the piston hole. Used 2 - 2" C-clamps in total. My little old Craftsman compressor For the first of 3 calipers I removed the left front caliper from the bike and put a can under the hose end to catch the drips. After removing the caliper I used one of the clamps I had built to hold the two pistons on one side and a small C-clamp to hold one of the pistons on the other side. That left one piston free to be blown out using a small compressor stuffed into the brake line port. This worked well enough even though several of the pistons were quite stuck and required 170 lbs pressure to get them out and my compressor only had 175 lbs available. This is a pic of the caliper with one piston removed, not showing the C-clamp. This is a close-up pic of the piston showing it half cleaned. The external part of all the pistons were really cruddy looking but cleaned up nicely. It took about 2 1/2 hours to clean the caliper pistons and reassemble them. Brake Clean and the bent toothbrush was used to clean around the o-rings. There was quite a bit of crud in the cracks on either side of the o-rings. The hardest part was reinserting the pistons because with the clearance being so tight the piston had to be almost perfectly square to the bore or it would jam. It helps to lubricate the bores and pistons with brake fluid when reassembling. Once put back together and mounted on the bike it took 13 minutes to bleed the caliper. The rear caliper was next and the whole job took a little longer because of the difficulty of getting at it behind the saddlebag. It was necessary to remove the hold down bolts so the saddlebag could be moved a little to allow room to get a ratchet onto the caliper bolts. Otherwise, the procedure was the same as for doing the front caliper. I didn't actually time how long it took to bleed the rear caliper but it was about the same as the front one.
-

Need to lift the rear a bit
camos replied to GaryZ's topic in Venture and Venture Royale Tech Talk ('83 - '93)
So what's wrong with making a "U" shaped extension adapter that fits the bottom eye and essentially moves the attachment point down an inch? The adapter might have to be more like a socket if lateral movement becomes an issue. -

Rear Lower Fairing
camos replied to Patmac6075's topic in Venture and Venture Royale Tech Talk ('83 - '93)
Meh... talk about denial... and that's not the river. The Brits are a polyglot Heinz 57 group that over the centuries have been invaded by almost everyone. Starting with Heinz then Sven, Louie, Ahmed and Cordoba... before inviting half of Asia and Africa in. Canadians are almost the same starting with the Brits and French before inviting the rest of the world in. The Victoria area where I live is full of displaced Brits and the East Coasters still talk funny just like the Brits or Scots, if you prefer. Multiculturalism has its ups and downs but for the most part is a good thing. I know, -

Rear Lower Fairing
camos replied to Patmac6075's topic in Venture and Venture Royale Tech Talk ('83 - '93)
I wish I had lovers with adjustable openings. Well.... actually what you meant would be louvers which is the American version. The Brits, ergo Canadians, would make it louvres You can thank the French for the spelling of that word. Couldn't help putting on my vocabulary police hat. Shortly after getting my very nice condition 89 VR I found one of the side vents had a broken attachment point so rather than fixing it I removed both vent covers. In any case, I think it looks better that way because it shows off more of the engine. During the winter there was not enough heat to feel but it probably helped to keep my legs a bit warmer. Now that the temps have gotten into the 70's F I can feel the heat when at a stop but not in a way that is uncomfortable. If it gets into the 80's here and people are dropping like flies it might be necessary to re-think the situation. Have to wait and see. -
There is no "but", go with your first thought. So I think Cowpuc and GW are both referring to the same condition. Other tires probably have similar construction to E3's which is a harder compound in the centre and a softer compound on the shoulders in an effort to maximize both wear and traction where it is needed on a touring tire. Not that I actually know what I am talking about but it makes sense to me that the carcass is made first with a fairly soft rubber compound then the shoulders and centre sections would be added later in either one or two pours. Once the riding surface wears close to the carcass it would likely not take much to go through the carcass to the cords. Something like a few normal applications of the brakes would likely do in the tire as midnight's pic shows. This thread is a good heads up for all of us to pay more attention to the state of our tires. Thanks to all for sharing.
-
There is no sight line to the crankcase on these bikes so it is impossible to see the oil level through the filler. The oil level in the window is not that critical,. Anywhere from 1/4 to 3/4 is good. Above 3/4 and there is a chance for the oil to be drawn into the air cleaner or a cylinder. If the window is fully covered then there is no indication that there is way too much oil. Allowing the level to get too low is not a good idea for fairly obvious reasons. Assuming the oil warning light works, it will come on after the oil disappears from the window, at least that is what it does on my 90 VR. Have you looked at the window after the oil has been drained? While the window might be yellowed as you have stated, on my bikes a yellow window shows clean oil. You also stated there is a darker line across the window. Right after an oil change the oil should be all yellow not dark. The important point here is that you are aware of how the window looks with no oil and then with oil there should be a line across that indicates the current level. With the sidecar and a generally vertical ride there is probably less likelihood of an overfill getting drawn out of the crankcase but it is still not a very good idea. If I were you I would drain the oil into a clean container, check the window then put about half the oil back in before checking the window again for a level.


