

Freebird
-
Posts
18,135 -
Joined
-
Last visited
-
Days Won
260
Content Type
Profiles
Forums
Gallery
Events
Store
Everything posted by Freebird
-
I've seen the ads on TV and have often done the research online. Every one of them....EVERY SINGLE ONE that I've ever researched have proven to be useless.
-
Great post. I have copied it to the tech library. Thanks.
-

Rear Shock Air Pressure
Freebird replied to a topic in Royal Star and Royal Star Tour Deluxe Tech Talk
I too have the leveling links. With them I run about 35 lbs. regardless of solo or two up. -
Yes...works great. We gave away a bunch of it that Seafoam donated at one of our VentureIns a couple of years ago. Good stuff.
-
I've never used those but they look pretty good. It's been a LONG time ago that I used a helicoil either so I really don't know which would be the better choice.
-
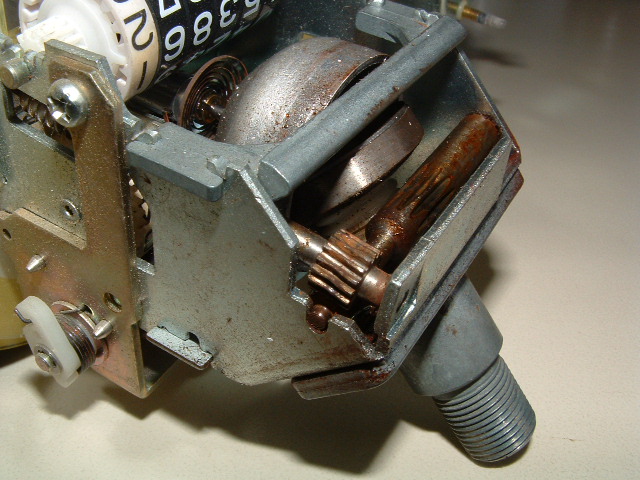
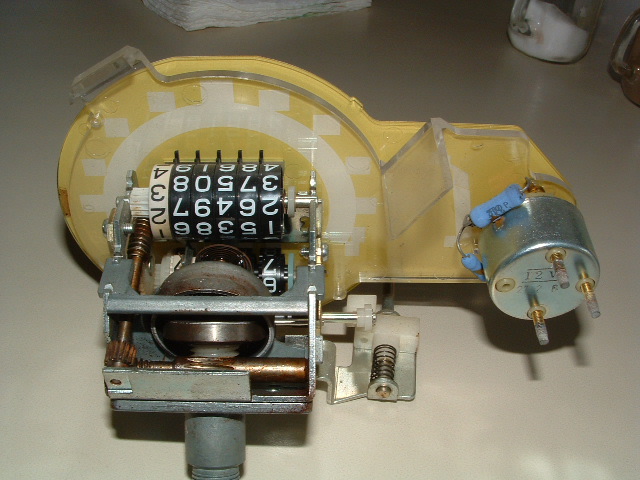
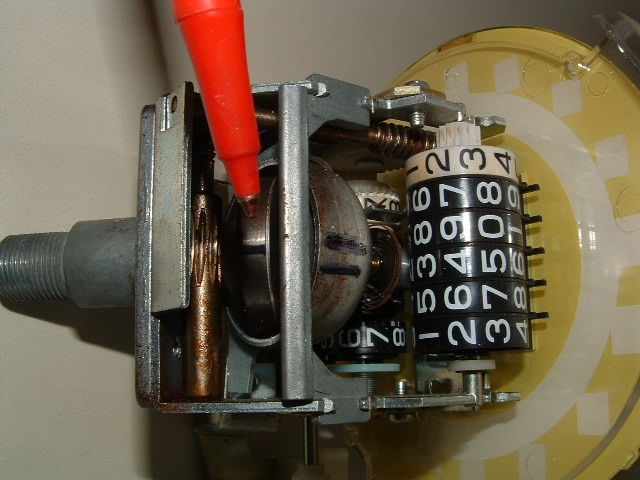
Thanks to GeorgeS for this excellent article. NOTE: These pictures give you a good overview of the workings of the speedometer. You do not necessarily have to tear yours down to this extent to lubricate it. 1ST Gen Speedometer Photos I just read thru this thread, and just happen to have a , spare 1St Gen, Speedo in the cabinet , Right Here, at my the computer station: ( And a Camera !!! ) So, I took some photo's, that might be helpful to those who have the noise, and have not had the speedo removed. The Idea of blowing light lubricant up the cable housing caught my attention!! So I took these photo's this will show where the Lubricant is needed, Left to right: ---1st photo, shows frontal view of unit: ---2nd photo, shows rear view of unit: ---3rd photo, shows left side view, you can see the shafts driving Odometer: ---4th photo, shows the Point Where Lubrication is needed !!!! So, if you blow a light oil up through the cable Sheathing with the cable remove, useing compressed air, the Lubricant would get to where the Red Pen Is pointing, and where its needed. ---5th photo, With Red Pen, Indicating the Rotating Magnet ( I put one black line for identification ) ( at least I think its a magnet ) This rotates at the speed of the Input mechanical cable. ---- 6th Photo: Pointing to the Outer Pickup, this Only Moves as many Degrees Of Rotation, as the Indicator Needle moves. ( So this could not be the source of the loud noise ) ( This is marked with Two Black marker lines, in the 5th photo for identification ) Also, for those with 1st Gens that have never lubed their Speedo, Simply Remove the headlight assembly, you can reach up and Remove the Outer Speedo Cable Sheeth, from the threads shown in my photo's and with a long tipped Oil can, or WD-40 can its very Easy to apply some lubrication to this point. Anyway, after examining my spare unit, I can't see anything else that could cause the Loud Screech, would Almost have to be coming from this point. Unless its the cable itself. As to the speedo cable itself, I use heavy grease on mine, and Also shoot WD-40 with the grease, and lube it often, usually every year, whether it needs it or not.

-
Yes...that will do away with the noise. Heck...who really needs to actually STOP anyway.
-
WOW....now THAT is some good information. I'm pretty sure that it's not the same on the RSV though. I think they are the same any way that you turn them. Great catch on your part.
-
Yes...it's pretty normal. Some folks have actually chamfered the front edge of the pads and said that it got rid of it. Mine eventually went away on its own for the most part. I still here is every now and then.
-
The short answer is no. It will prevent any back feed from other circuits but will not protect your bike if there is a short circuit on the trailer.
-
That is their better lift and will work great. You DO need some adapters though. Either some on your own or get Carbon One's adapter. I highly recommend his.
-
Where to place bike jack?
Freebird replied to Jethroish's topic in Royal Star and Royal Star Tour Deluxe Tech Talk
No...it is a one person job. Just roll the lift under the bike with the bike on the side stand. You insert it from the right side of the bike so the bike is leaning away from you. I hold the handlebar and the passenger grab rail when I start lifting the bike just to steady it. As you jack it up, the bike will straighten up and sit on the jack. Very easy. -
Bub Sleepers and Samsons
Freebird replied to a topic in Royal Star and Royal Star Tour Deluxe Tech Talk
I would think that they would work. I have RSTD mufflers on my RSV and they bolted right on. -
Where to place bike jack?
Freebird replied to Jethroish's topic in Royal Star and Royal Star Tour Deluxe Tech Talk
Here is the ultimate solution. Larry makes a great product and anybody who owns and RSV should have one of these. http://www.venturerider.org/classifieds/showproduct.php?product=69&cat=7 In the meantime, you would need to makes some spacers to sit between the stand and your frame. Some folks have used wood, some have used hockey pucks. -
seat suggestions,please...
Freebird replied to f6ryder's topic in Royal Star and Royal Star Tour Deluxe Tech Talk
I've never tried them. I did try putting gel inserts in a stock seat one time and just wasn't impressed with it. -
Leveling link install
Freebird replied to Jethroish's topic in Royal Star and Royal Star Tour Deluxe Tech Talk
I bought a new lift at Sears a couple of weeks ago. They were on sale for $69.95. May still be. -
Another thing you could do. Just run the rear tire up on a 2 x 5 board. That will give you about the lift you are talking about and then check the stand.
-
On my RSV....it has not had any major effect. You have to realize that the 1" lift is measured at the back...probably only half that or less at the mid point where the stand is located. It has made no difference at all on my bike.
-
exhaust popping
Freebird replied to foundryratjim's topic in Royal Star and Royal Star Tour Deluxe Tech Talk
Both....they are bike specific but programmable for the rev limiter and timing advance. -
I've read this several times here and have just let it go but I just have to finally speak up. This is simply NOT true. Mobil 1 is indeed a true synthetic. True synthetics use a Polyalphaolefin base and NOT a highly refined crude base. Castrol does us a highly refined crude base. There was actually a law suit where Mobil 1 sued Castrol for calling their oil a full synthetic but Castrol convinced the courts that their oil was highly refined to the point of being able to call it a full synthetic. Amsoil is ALSO built on a base of Polyalphaolefin. Mobil 1 did NOT change from this after the lawsuit...that is a rumor started but is completely false. Amsoil is a good oil and I'm not knocking it but many of their reps over the years have spread this false rumor that they are the only true synthetic and actually there are several. Mobil 1 is just one of them. The following information comes not only from Mobil's own site but from several other sources as well. It is what the American Petroleum Institute calls a "class 4" oil. Also....if you look at Amsoils site and the studies that they publish...the are just barely ahead of Mobil 1 in every category...and that is their OWN biased studies and reports. Mobil 1 is a fully synthetic motor oil for automotive engines. It is made from a unique combination of high-performance fluids, including polyalphaolefin (PAO), plus the SuperSyn™ anti-wear system for protection under the most extreme use. Mobil 1 with SuperSyn™ is available in five viscosity grades: I don't care what anybody uses...it's a personal decision. I'll stick with Mobil 1 because it has proven itself to me in quiet performance, smooth shifting, etc. The added benefit is that I can find it most anywhere.
-
I just received a PM from one of our members telling me that Gerry Calhoun passed away yesterday from an apparent heart attack. Though he didn't post much, Gerry was one of our Canadian members from New Brunswick. Our prayers got out to his family and friends.
-
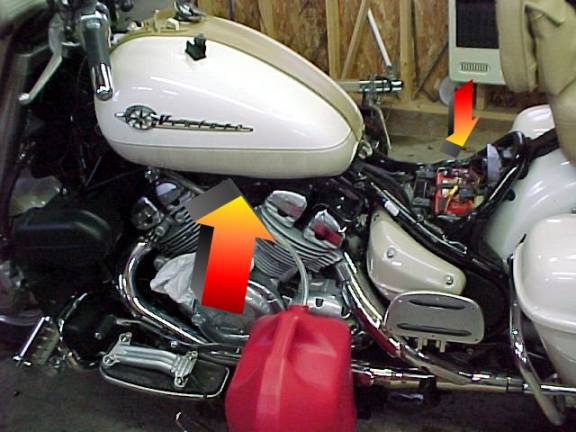
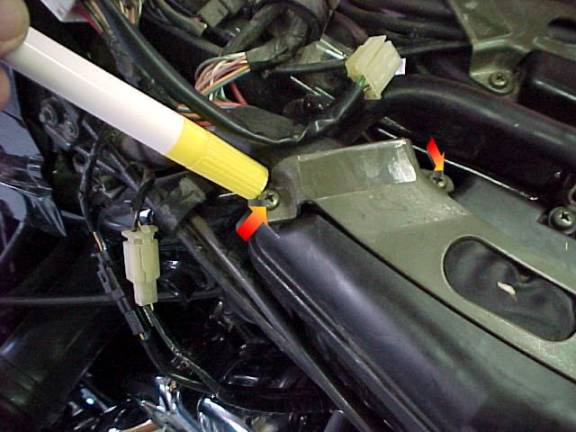
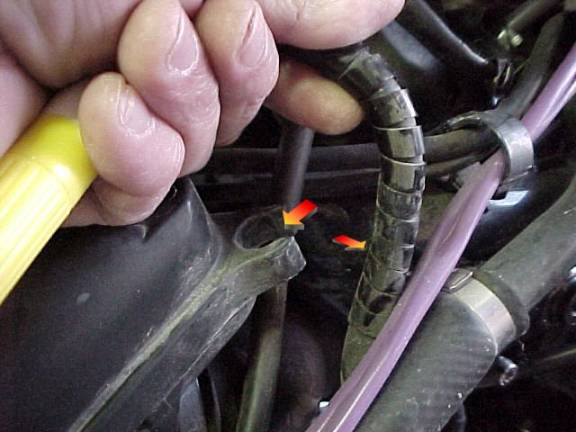
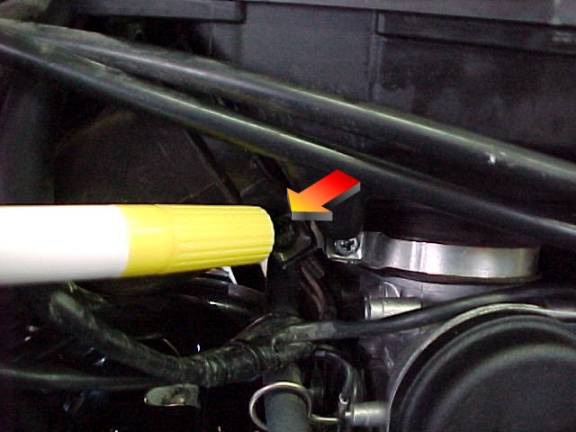
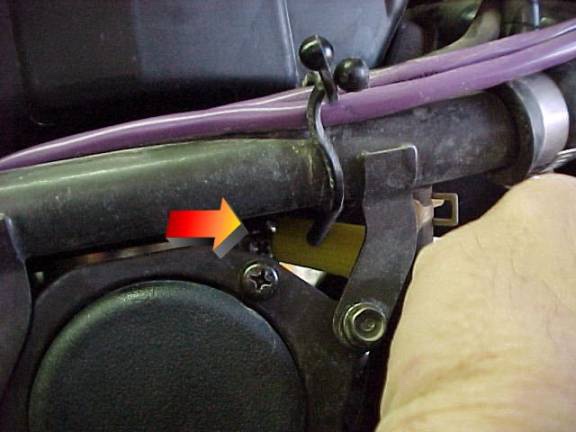
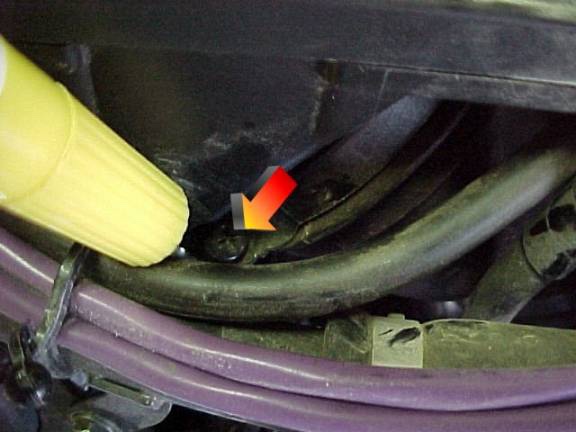
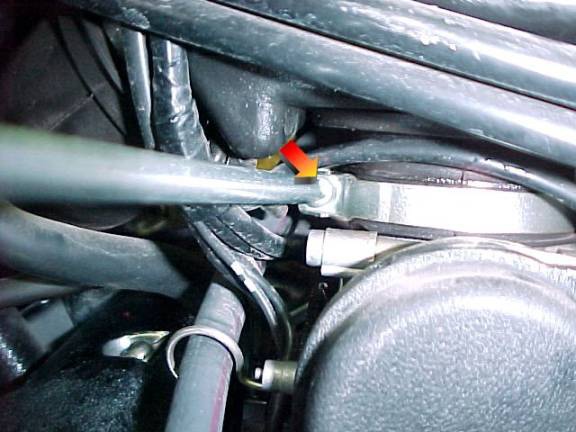
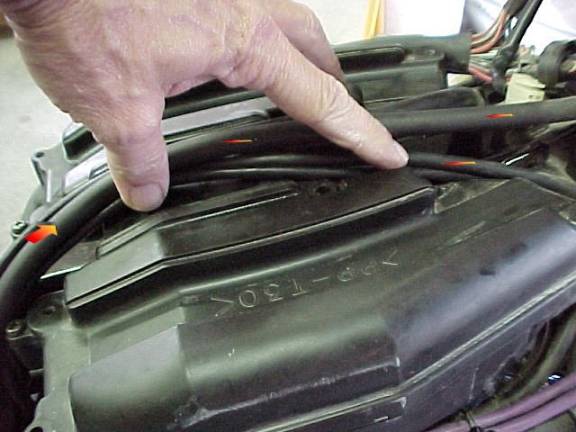
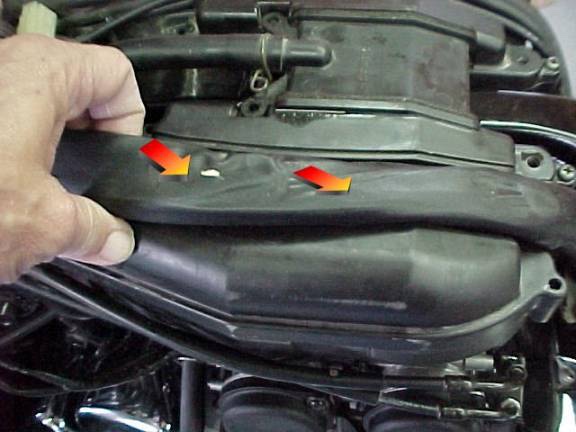
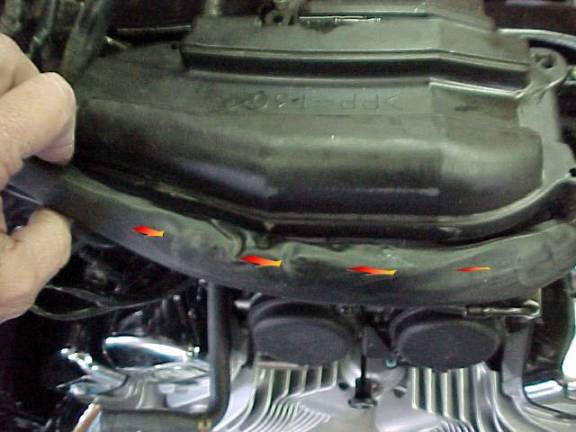
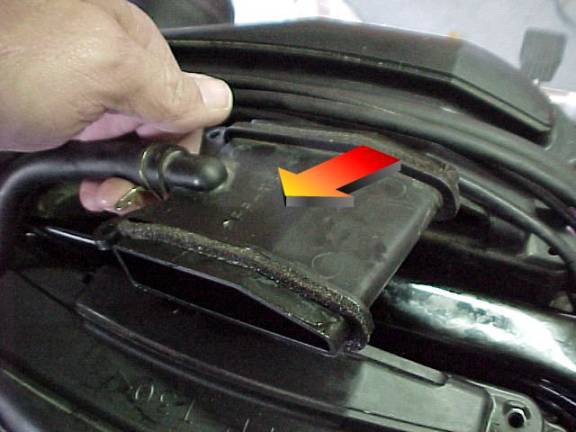
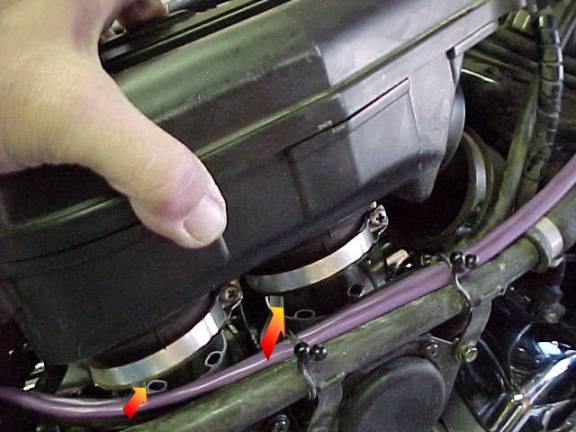
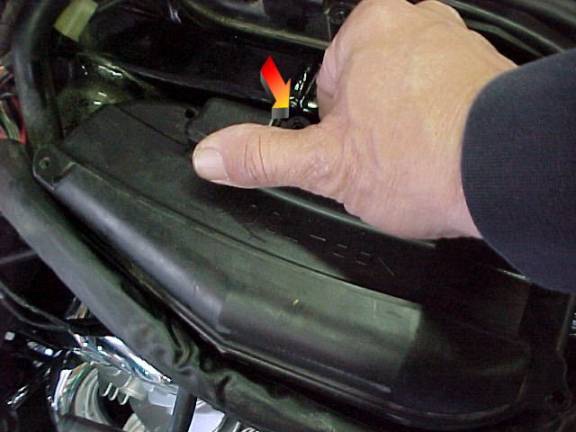
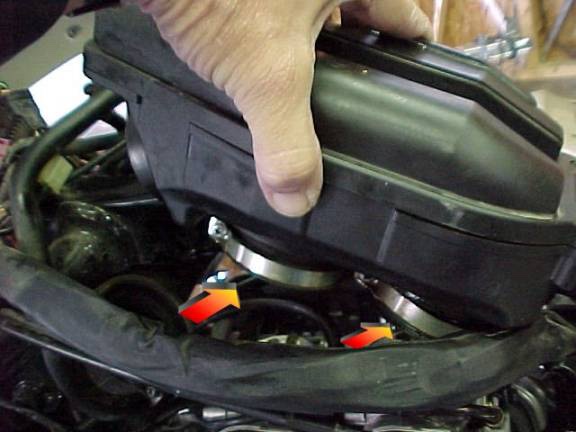
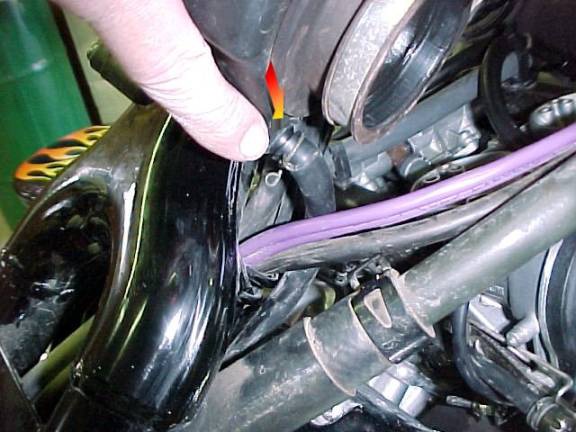
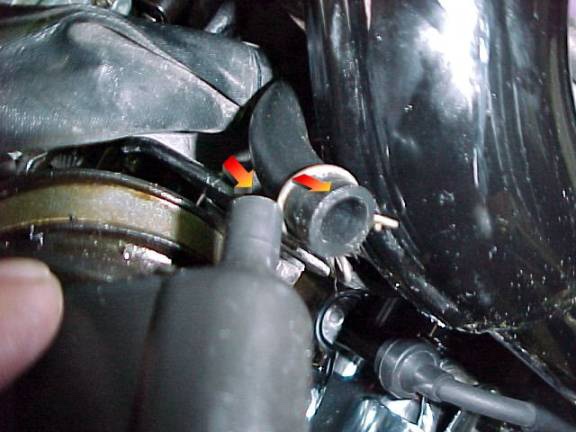
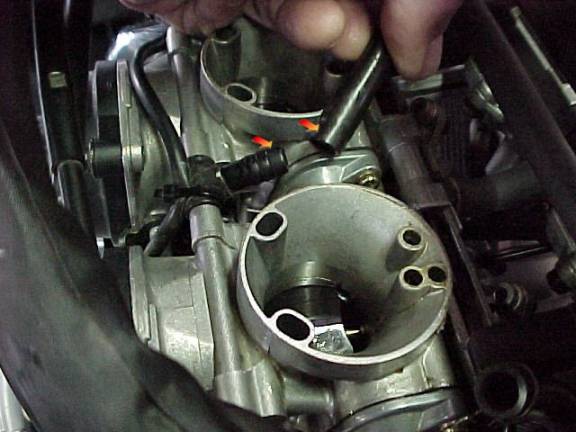
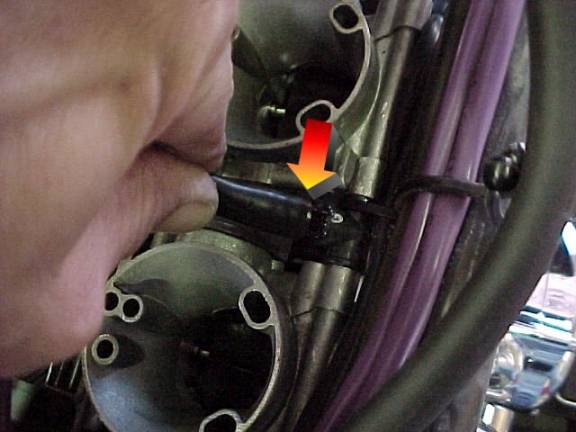
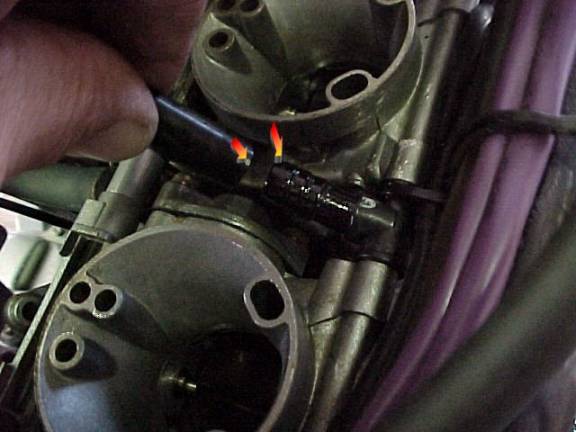
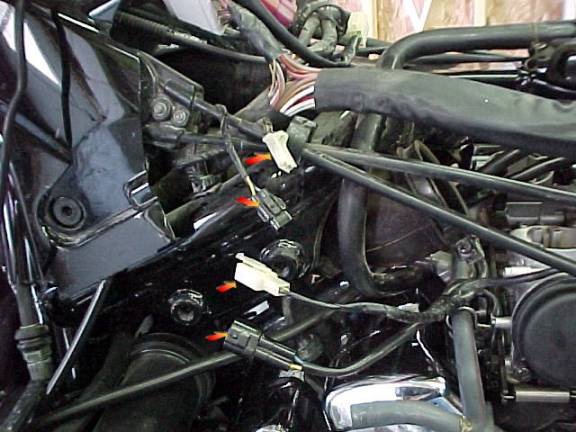
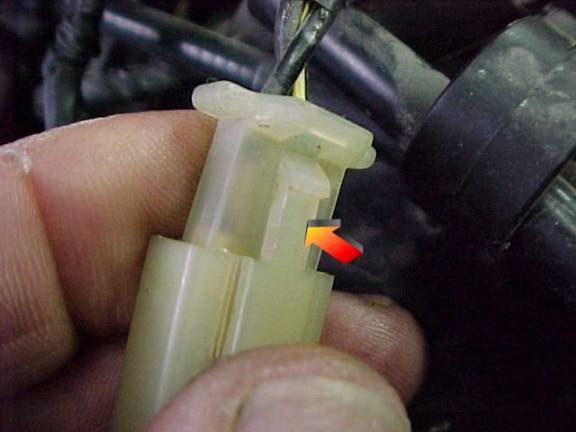
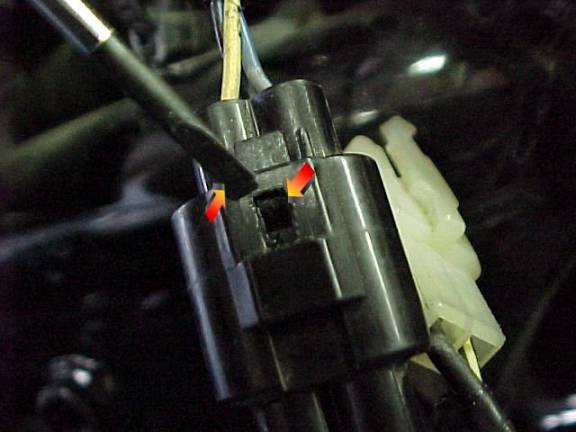
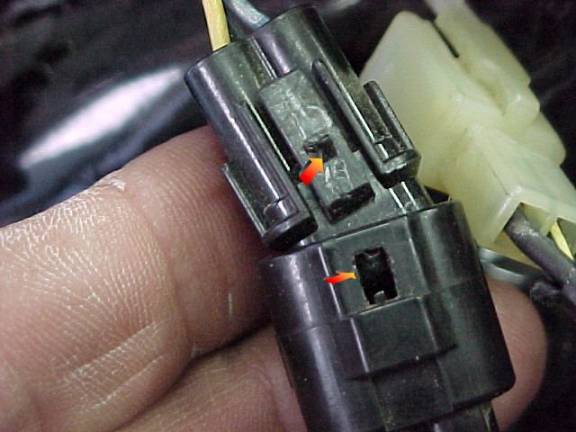
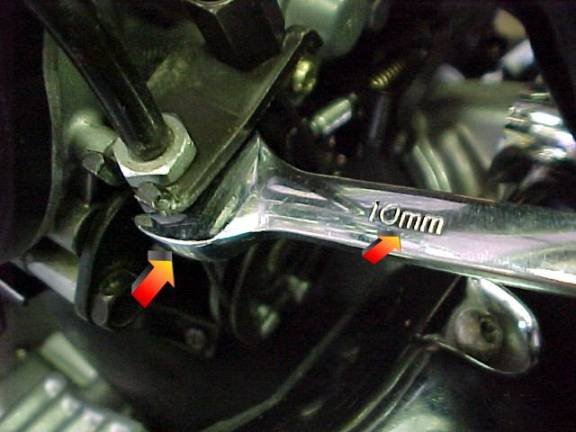
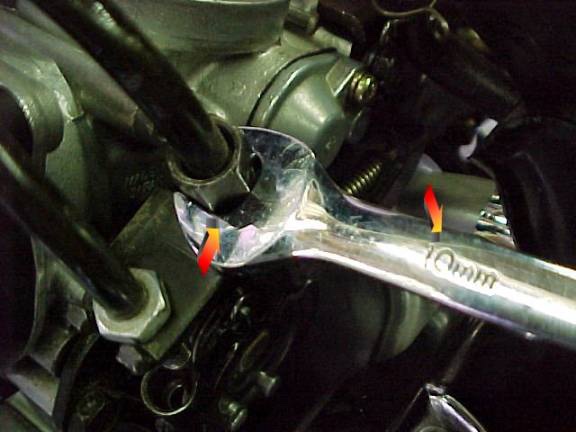
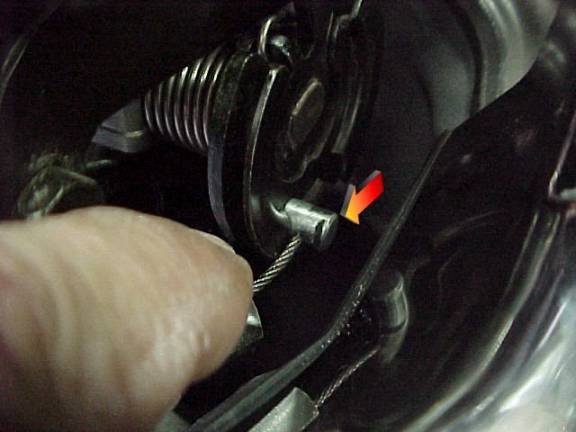
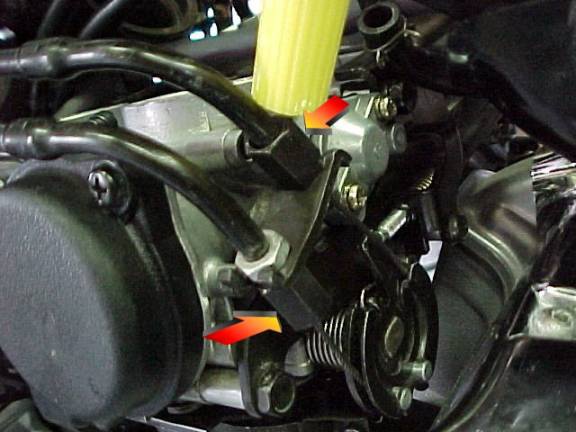
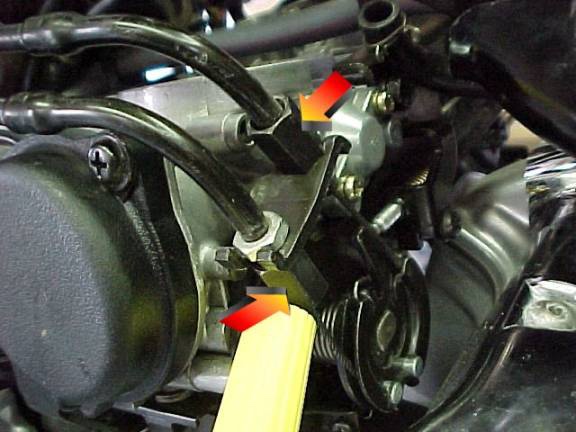
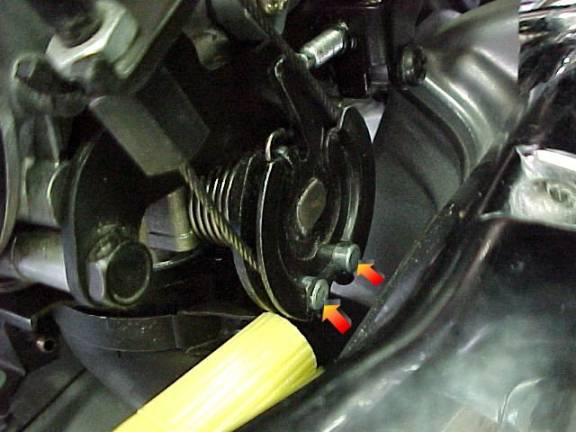
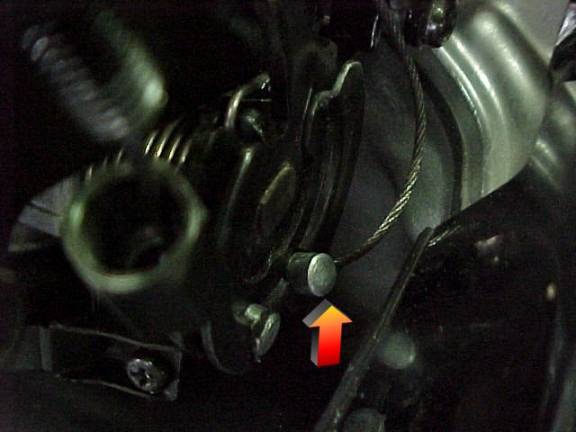
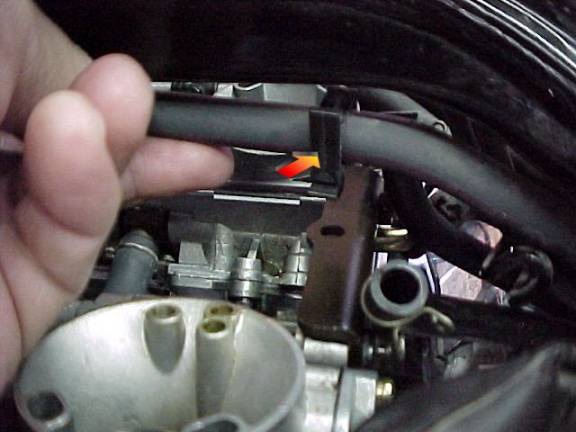
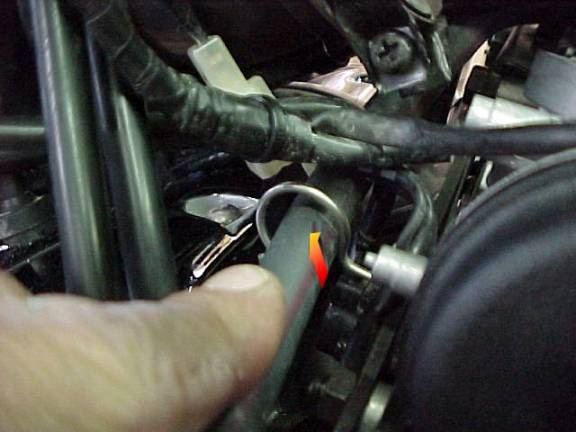
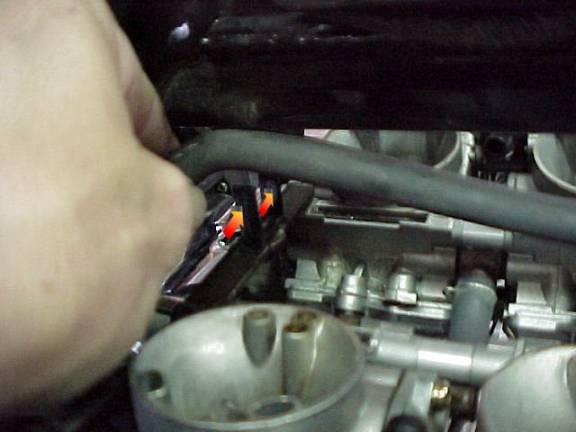
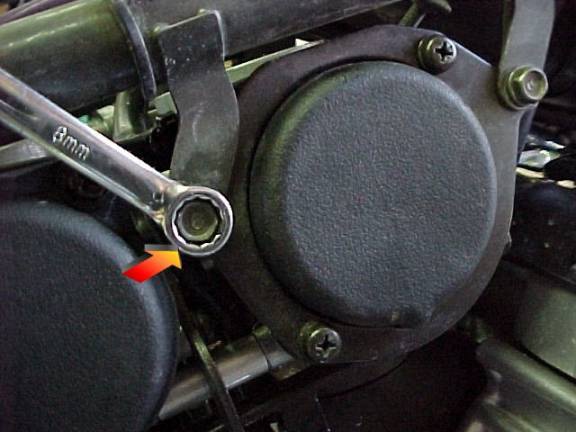
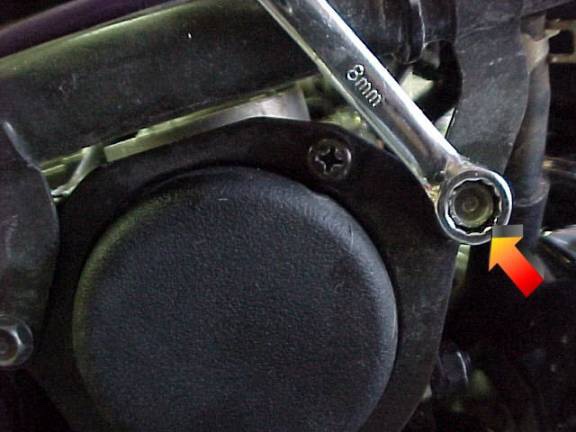
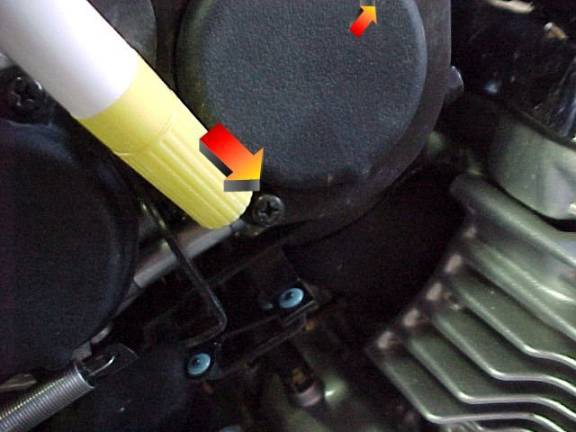
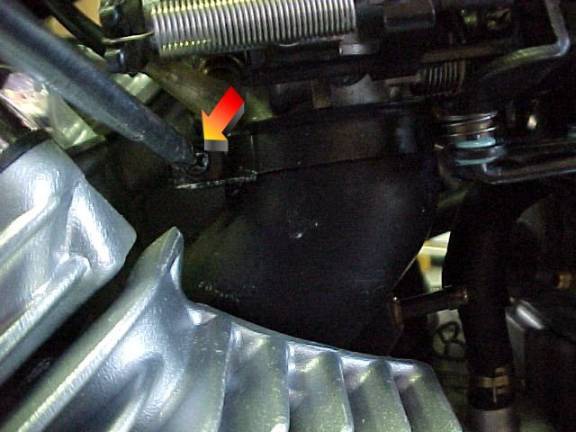
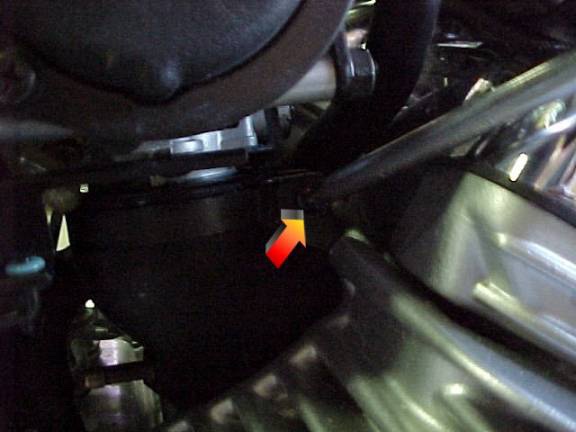
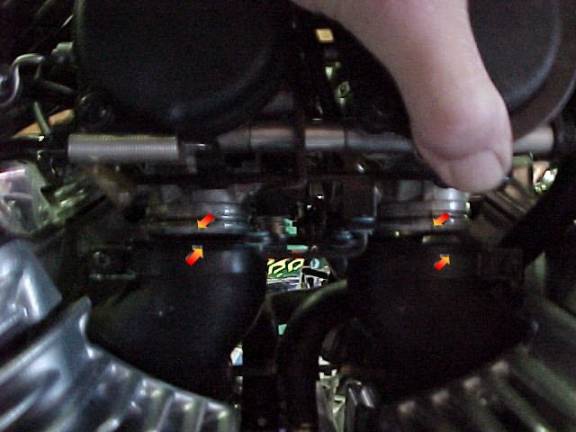
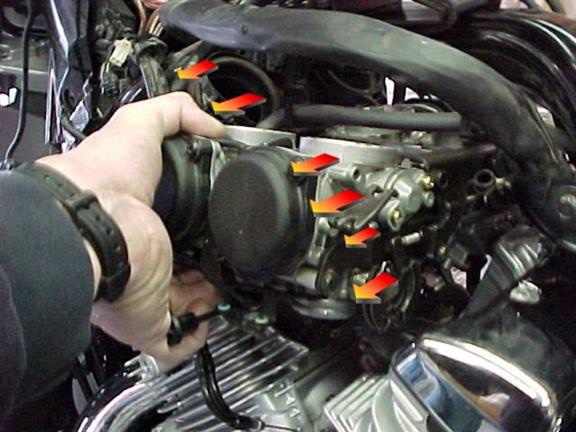
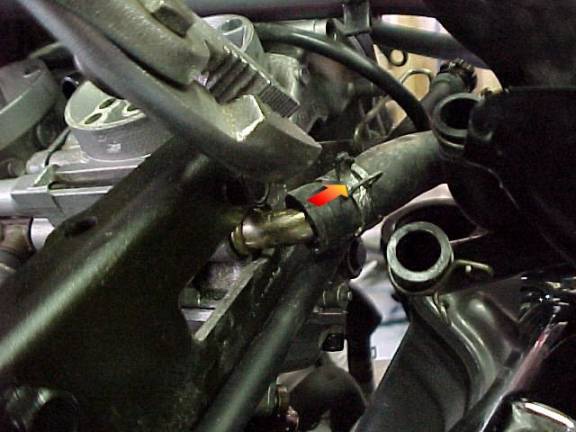
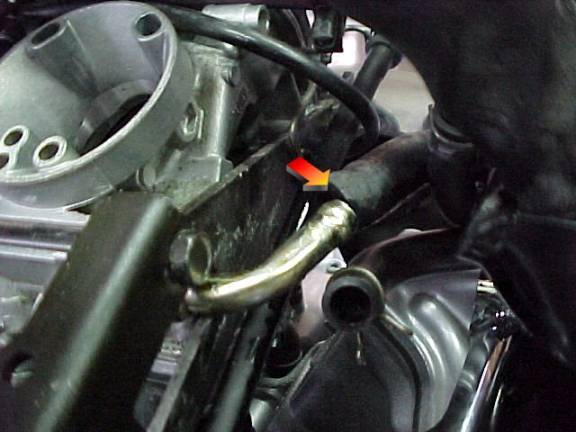
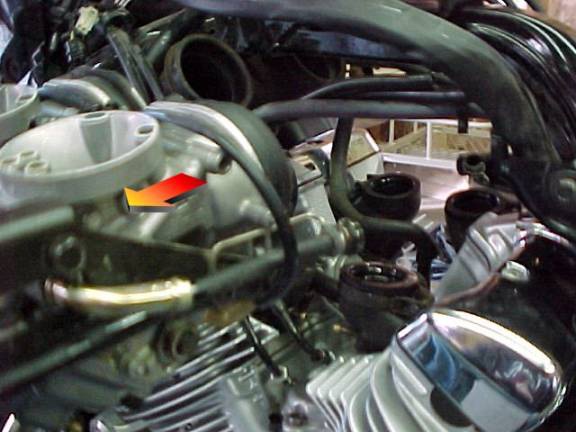
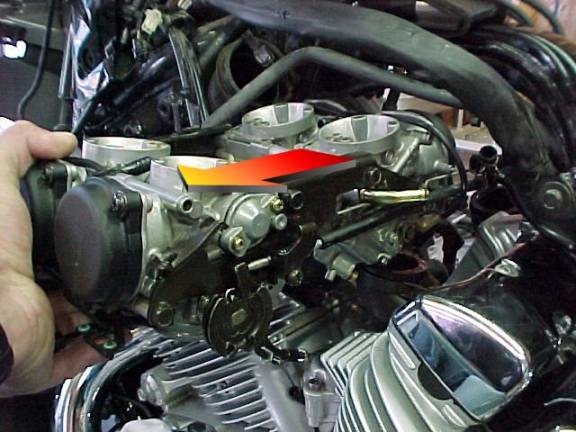
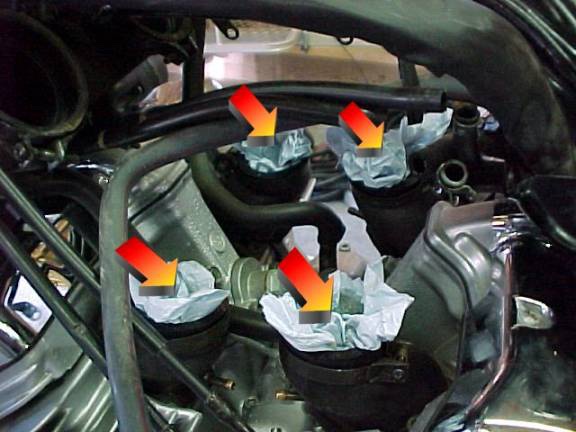
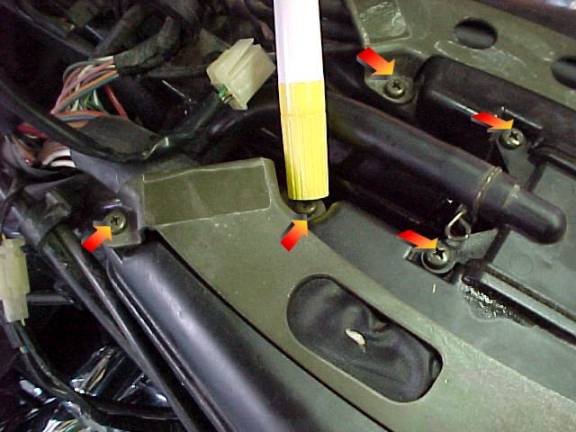
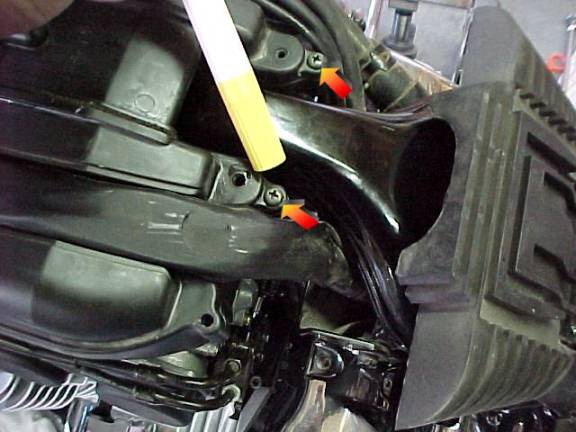
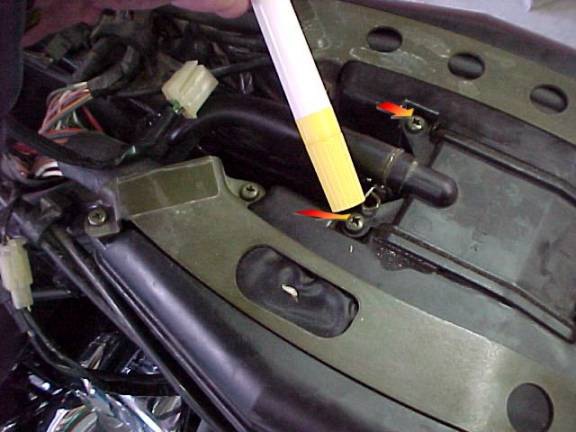
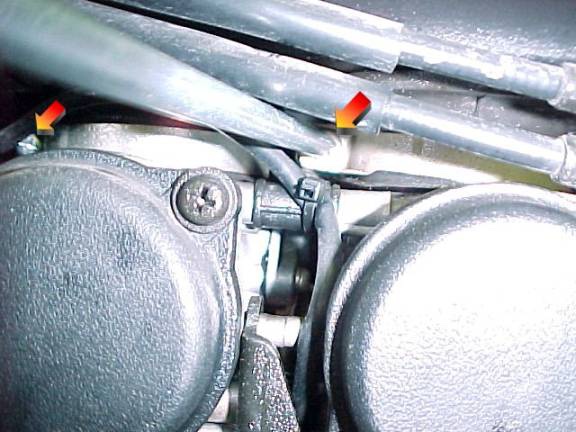
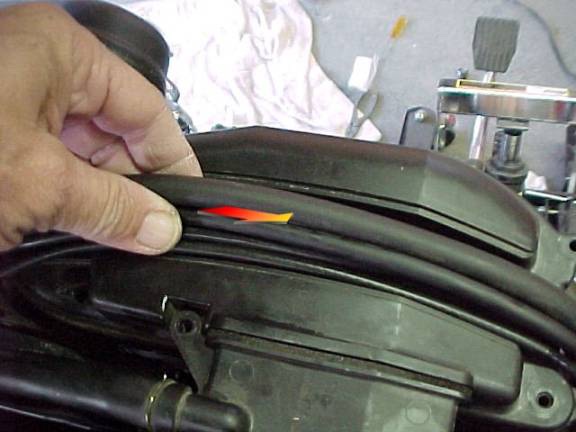
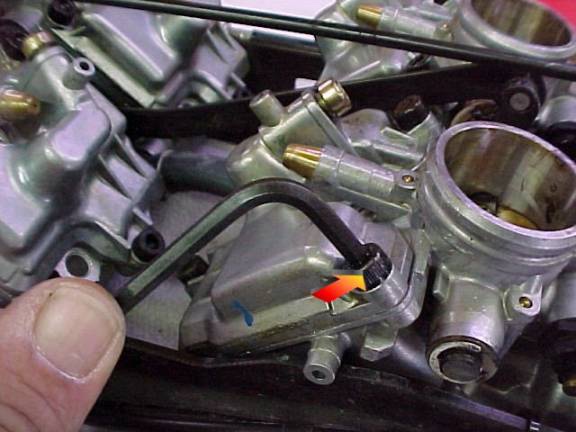
How to remove the carburetors from the '99 to present Royal Star Venture Thanks to Cougar for this excellent article. This was my first time removing the carb cluster from my 2000 RSV. This project took me about 30 to 40 minutes to do including the seat and tank removal. I think it is a pretty easy job to tackle. I tried to take as many pictures as I could. In the write up I used only 2 instead of 5. You will get the idea. 1. Remove the seat and fuel tank. 2. Now you will see the cable and cord clamps. Remove all the screws shown below. 3. No need to remove these screws. 4. Remove this hose from the right surge tank. 5. Now loosen the clamps on the front of the surge tanks (2) as shown below. 6. Now loosen all four clamps on the bottom of the surge tanks that are attached to the top of the carbs in four places, one on each carb. 7. These wires and hose will go towards the middle. 8. Pull the left and right wires and hoses to one side of the surge tanks. Do not worry, they will stretch far enough. 9. Now remove the tank surge union. 10. Now start wiggling and pulling up on each surge tank. 11. Remove one vent hose on each surge tank and then they will be free and out of the way. 12. Remove both left and right overflow hoses from each carb. 13. Next, split apart the two wire connectors on the left side front of the carbs. I think that they are heater and sensor wires. I always have hated the black connectors. 14. Now the fun part. Loosen both nuts on the throttle cable housing. (NOTE: REMEMBER AND MARK THE TOP AND BOTTOM) in the pictures I just remembered that the top nut and lower nut are different. 15. Remove the fuel line from the three holders. 16. Remove these two bolts off the right front carb. NOTE: DO NOT REMOVE THESE TWO SCREWS! (these are to hold the cover on for the carb diaphragm) 17. Loosen all 4 lower clamp screws on the bottom of each carb. 18. Now lift slightly on each side, left and right. 19. Start to pull from the left side about half way and then remove the fuel line that is on the rear middle of the carb cluster. 20. Now the carbs are free from everything. Pull them the rest of the way out from the left side. 21. Find a bucket and turn the carbs over to drain them. 22. Find your favorite work bench and place your carbs on it. 23. Do not forget to fill your intake manifolds with something that will not fall apart to keep the junk out of them. Just a side note for the float bowls. You will need a 4mm hex to remove the 3 screws. The cone shaped brass caps above the hex wrench come off for adjusting the mixing screws. Also, I want say PLEASE make any other comments or suggestions so that Don can add them to this write-up. I hope I explained this for you well.
-
I could spend a lot of time here typing various opinions and etc. about antennas, coax, connections, etc. The fact is though, there are smarter people with me who have already done it. One of those is Firestik Antennas. Great information regardless of whether or not you have that particular brand. Good articles on setting the SWR, Antenna selection, ground planes or lack of the same. http://www.firestik.com/Tech_Docs.htm Here is a great site regarding coax that was forwarded to me by George S. http://www.qsl.net/g3yrc/coax.htm
-
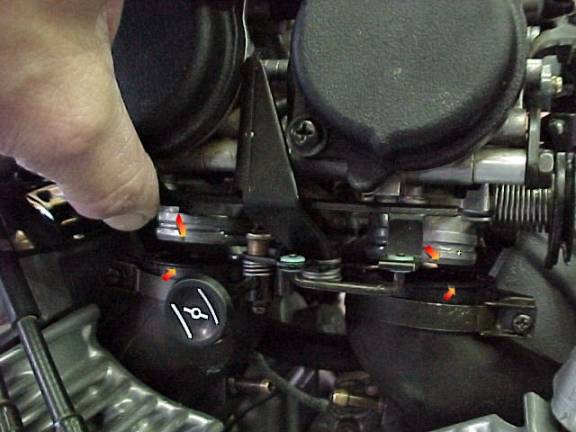
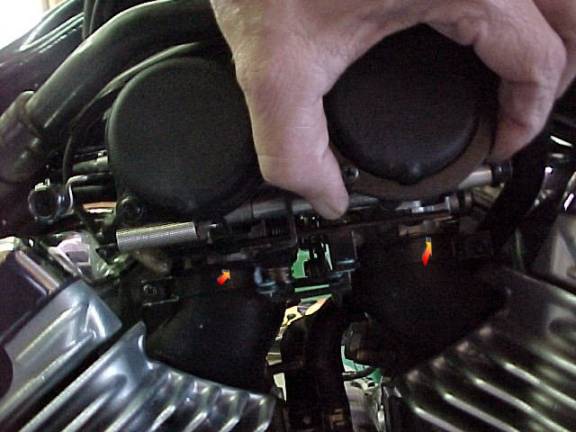
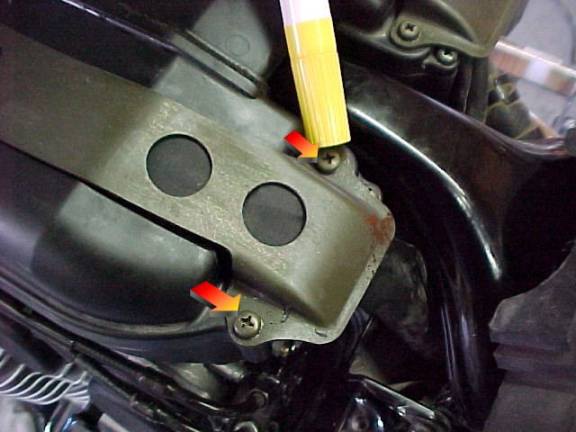
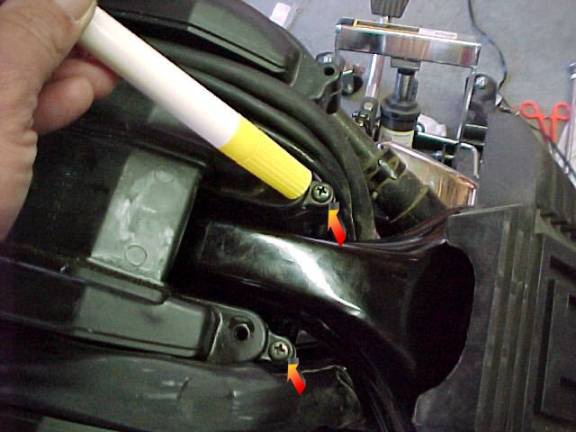
Carburetor Syncing Thanks to Kenneth Branton (Kbran) for this excellent article. Thanks to George (kj5ix) for creating a .pdf file of this article that you may download and print. It is attached at the bottom of this article. First thing you'll want to do is get the bike warmed up and set your idle speed at 1000 RPM's. The next step is to access the four brass ports on the intake runners. They are located in the middle of the V ov the engine. If your bike is stock you will have two hoses and two caps to remove, one of each on each side of the engine. This is where you hook up the hoses from your carbtune II. I hang the carbtune from the right handlebar with the bars turned to the left so it is less likely to fall off. The next step is to hook up the Carbtune. I take the two hoses from the left side and route them under the carbs to the left side of the engine as you are seated on the bike. Left is seated on the bike and right is also seated on the bike. It doesn't matter which hose goes to what port. Take the two hoses from the right side of the Carbtune and hook them to the right side ports. Again it doesn't matter which port the idea is to have the left pair to the left cylinders and the right pair to the right cylinders. Another thing is don't worry about synching the carbs to get a specific vacuum reading. Just get them all even. Start up the bike and see what you have for a reading on your gauge. This is what mine looked like. If you need to do some adjusting here's what needs to be done. You'll want to adjust 1 and 2 on the left side and 3 and 4 on the right side of the bike (again, direction when sitting on the seat), These adjustments are made with a #2 Phillips screwdriver from the right side of the bike. Once both sets are done you will then synch the bank of 1 and 2 to the bank of 3 and 4. This adjustment is made with a regular screwdriver from the left side of the bike. Here is the adjustment screw for doing 1 and 2. It is accessed from the right side of the bike, looking through the V of the engine to the left side bank of carburetors. You will need a long #2 Phillips screwdriver to reach this one. It is located just above and left of the choke lever. Here is another picture. Go ahead and turn the screw a little bit in one direction. If the the carbs get more in synch, keep turning until it they are even. If they get farther out, you'll have to turn the screw the other way. Once you think they are good, rev the throttle or blip it a few times and see if they are sitll even. Once these two carbs are set it's time for the next two. Here is the adjustment screw for doing 3 and 4 (also accessed from the right side). Do the same here as the previous side. Once these two are set, it's time to synch the left side to the right side. \ Here is the screw for synching both sides together. It is accessed from the left side, just above the choke knob. This is a hex head screw with a slot for a screwdriver. When turning this screw you will see the left pair (1 and 2) move together as well as the right side (3 and 4) move together. Turn the screw which ever was is needed to get both sides even. Again blip the throttle and see if it stays. This is what I ended up with. Can't complain about that. Once everything is set shut off the engine and remove the synch gauge, reinstall your hoses and caps, and go for a ride.
-
The answer you will most often get here are the Avon Venoms. People here are really high on them. I feel pretty much the same way about my Michelin Commanders on my '99 but don't know if anybody here has tried them on the first gen Venture.


.JPG.28e93a0819b8e82a5ebcbe856bc2c9d9.JPG)
.JPG.a41bb8147f0d3c6cedd7d25f2aa5e284.JPG)
.jpg.00304ac66343c078953e3f5930e4677e.jpg)
.JPG.dc1387e2f0682a98095b2608783e99ac.JPG)
.jpg.96ac8214ce937a2f1dbda766b8e59afe.jpg)
.jpg.9949c0c87ca835ed81c1036ebd5ac4ba.jpg)
.JPG.f68c34d34416dfa4d432604730412134.JPG)