MiCarl
-
Posts
3,442 -
Joined
-
Last visited
Content Type
Profiles
Forums
Gallery
Events
Store
Everything posted by MiCarl
-
Start by undoing whatever you did installing the horn and see if the CB works properly.
-
Or if that's not an option she could pick up a part time job. If she's planning to do any distance riding don't go for a 250. If there isn't some length and weight to the bike it'll beat her up on a long ride.
-

2nd Gen Venture Fork Oil Change
MiCarl replied to Jimbob66's topic in Royal Star Venture Tech Talk ('99 - '13)
The oil controls the damping, not the spring. You'd go to a heavier oil if it's bouncy. Heavier oil won't do much for the dive and will make the ride more harsh. You might consider dropping in a set of progressive springs rather than a heavier fork oil. -
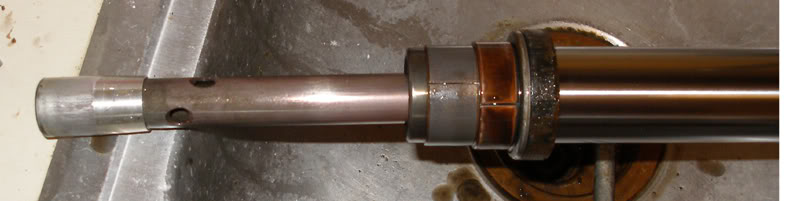
I looked at some tutorials for you and didn't find any I much like....... So, here is how I'd tackle an RSV: 1) Remove whatever you need to of the fairing to get to the pinch bolts that hold the forks into the upper and lower tree. 2) Unbolt brake calipers and tie them off to the motorcycle so they aren't hanging from the brake lines or banging around. Undo the pinch bolt on the axle and break the axle loose. 3) Jack up the front of the motorcycle to where the tire is still touching the ground but you can turn the wheel with your hand. 4) Pull the axle. Jack the bike higher to where you can roll the wheel and tire out. 5) Remove the fender. 6) Let the air out of the forks and pull the cores from the Schrader valves. 7) Put something under the forks to catch the oil that runs out. Use an impact wrench to remove the socket head cap screws that anchor the damping rods. When you do this the lower tube will drop about 6" and oil will begin to drain. 8) Loosen the pinch bolts on the upper tree and crack the fork caps loose - do not remove yet. 9) I do not recall how to remove the covers that the RSV has over the upper fork tube. You're on your own here or perhaps someone can chime in. *** From here do ONE fork at a time. *** 9a) you might be able to loosen the pinch bolts on the lower tree and slide the fork down to where you can work on the top of the lower tube. If so, you can do this instead of removing the covers in step 9. Re-clamp the lower pinch bolts to hold the fork. 10) Pry off the dust seal and slide it up the upper tube out of your way. 11) Remove the circlip that holds the oil seal, washer and bushing in the lower tube. Leave it around the upper tube, don't force it off. At this point things will be much less messy if you let the forks drain over night. I strongly recommend a 10-12 hour break. Prepare a clean work area about 4 feet long and cover it with clean rags or heavy duty paper towels. 12) Lift the lower tube a couple inches and stroke downward smartly. Make sure you don't end up splashing or spilling your drain pan when it comes off. It may take several strikes to get the lower tube off. Lay it down on your clean work area. Do not use a lot of force (you don't want to pull the motorcycle over), just sharp raps. Don't bang the lower tube up or you can damage the oil lock. 13) At this point the upper tube is still clamped to the lower tree. On it (from bottom to top) are the lower bushing, upper bushing, washer, oil seal, circlip and dust seal. Pay attention to how everything is - it needs to go back the same way. It'll look similar to this picture: In the picture the dust seal and circlip are not shown. The aluminum piece at the far left is probably still in your lower tube, don't forget to get it out. Yamaha typically calls it the oil lock. This is the piece you will damage if you slam the lowers up when knocking the lower tube off. 14) Loosen the lower tree pinch bolts and take your upper tube to your work area. 15) Remove the fork cap (there is some spring pressure, keep some down force on it so it doesn't fly away.). Pull out the spring, slide the dust seal, circlip, oil seal, washer and upper bushing off the upper tube. Lay all this stuff out the way it came off. Dump out the damping rod, spread the lower bushing and pull it off. Pay attention to which end of the fork spring goes up. 16) Clean everything thoroughly. 17) Drop the damping rod back into the upper tube, install the spring and the cap (oil the cap o-ring) but no need to make the cap tight. Slip the new lower bushing into the groove. Slather the lower bushing with some fork oil. 18) Hold the upper tube with the damping rod pointing up. Set the oil lock on. Slide the lower tube down over the upper and install the socket head cap screw (don't forget the loc-tite). Torque the cap screw per the service manual. 19) Remove the fork cap and spring. 20) Slather the new upper bushing with fork oil and drop it down the upper tube, following it with the washer. Drive bushing and washer home with a seal driver or a piece of PVC pipe. 21) Get the oil off the very top of the upper fork tube (I use brake clean). Wrap the top of the tube with 1 1/2 turns of electrical tape so the tape hangs over the edge. This is to protect your new seal from the sharp edge. 22) Slather your new seal with fork oil. Push it down the upper tube so the side with two inner lips points down and the single lip points up. Drive it home with your seal driver/PVC pipe (Make sure your PVC pipe has a big enough ID it's not damaging the upper lip. 23) Install the circlip. 24) Oil up the dust seal and slide it into place. You might have to tap it home with a soft mallet or your seal driver/PVC pipe. 25) Add and set oil level per the service manual. 26) Slide the inner tube UP all the way and keep it there. Slowly drop in the fork spring (right side up) and install the cap. Make sure the o-ring on the cap is lubed. It might be easier to torque the cap after the fork is back on the motorcycle. 27) Re-install the fork per the service manual. If the cap isn't torqued torque the lower pinch bolts, then the cap, then the upper pinch bolt. Go back to 9a and do the other side. Put the rest of the motorcycle back together. An extra set of hands is helpful for many of the steps.

-
I looked at some tutorials for you and didn't find any I much like....... So, here is how I'd tackle an RSV: 1) Remove whatever you need to of the fairing to get to the pinch bolts that hold the forks into the upper and lower tree. 2) Unbolt brake calipers and tie them off to the motorcycle so they aren't hanging from the brake lines or banging around. Undo the pinch bolt on the axle and break the axle loose. 3) Jack up the front of the motorcycle to where the tire is still touching the ground but you can turn the wheel with your hand. 4) Pull the axle. Jack the bike higher to where you can roll the wheel and tire out. 5) Remove the fender. 6) Let the air out of the forks and pull the cores from the Schrader valves. 7) Put something under the forks to catch the oil that runs out. Use an impact wrench to remove the socket head cap screws that anchor the damping rods. When you do this the lower tube will drop about 6" and oil will begin to drain. 8) Loosen the pinch bolts on the upper tree and crack the fork caps loose - do not remove yet. 9) I do not recall how to remove the covers that the RSV has over the upper fork tube. You're on your own here or perhaps someone can chime in. *** From here do ONE fork at a time. *** 9a) you might be able to loosen the pinch bolts on the lower tree and slide the fork down to where you can work on the top of the lower tube. If so, you can do this instead of removing the covers in step 9. Re-clamp the lower pinch bolts to hold the fork. 10) Pry off the dust seal and slide it up the upper tube out of your way. 11) Remove the circlip that holds the oil seal, washer and bushing in the lower tube. Leave it around the upper tube, don't force it off. At this point things will be much less messy if you let the forks drain over night. I strongly recommend a 10-12 hour break. Prepare a clean work area about 4 feet long and cover it with clean rags or heavy duty paper towels. 12) Lift the lower tube a couple inches and stroke downward smartly. Make sure you don't end up splashing or spilling your drain pan when it comes off. It may take several strikes to get the lower tube off. Lay it down on your clean work area. Do not use a lot of force (you don't want to pull the motorcycle over), just sharp raps. Don't bang the lower tube up or you can damage the oil lock. 13) At this point the upper tube is still clamped to the lower tree. On it (from bottom to top) are the lower bushing, upper bushing, washer, oil seal, circlip and dust seal. Pay attention to how everything is - it needs to go back the same way. It'll look similar to this picture: [ATTACH=CONFIG]98450[/ATTACH] In the picture the dust seal and circlip are not shown. The aluminum piece at the far left is probably still in your lower tube, don't forget to get it out. Yamaha typically calls it the oil lock. This is the piece you will damage if you slam the lowers up when knocking the lower tube off. 14) Loosen the lower tree pinch bolts and take your upper tube to your work area. 15) Remove the fork cap (there is some spring pressure, keep some down force on it so it doesn't fly away.). Pull out the spring, slide the dust seal, circlip, oil seal, washer and upper bushing off the upper tube. Lay all this stuff out the way it came off. Dump out the damping rod, spread the lower bushing and pull it off. Pay attention to which end of the fork spring goes up. 16) Clean everything thoroughly. 17) Drop the damping rod back into the upper tube, install the spring and the cap (oil the cap o-ring) but no need to make the cap tight. Slip the new lower bushing into the groove. Slather the lower bushing with some fork oil. 18) Hold the upper tube with the damping rod pointing up. Set the oil lock on. Slide the lower tube down over the upper and install the socket head cap screw (don't forget the loc-tite). Torque the cap screw per the service manual. 19) Remove the fork cap and spring. 20) Slather the new upper bushing with fork oil and drop it down the upper tube, following it with the washer. Drive bushing and washer home with a seal driver or a piece of PVC pipe. 21) Get the oil off the very top of the upper fork tube (I use brake clean). Wrap the top of the tube with 1 1/2 turns of electrical tape so the tape hangs over the edge. This is to protect your new seal from the sharp edge. 22) Slather your new seal with fork oil. Push it down the upper tube so the side with two inner lips points down and the single lip points up. Drive it home with your seal driver/PVC pipe (Make sure your PVC pipe has a big enough ID it's not damaging the upper lip. 23) Install the circlip. 24) Oil up the dust seal and slide it into place. You might have to tap it home with a soft mallet or your seal driver/PVC pipe. 25) Add and set oil level per the service manual. 26) Slide the inner tube UP all the way and keep it there. Slowly drop in the fork spring (right side up) and install the cap. Make sure the o-ring on the cap is lubed. It might be easier to torque the cap after the fork is back on the motorcycle. 27) Re-install the fork per the service manual. If the cap isn't torqued torque the lower pinch bolts, then the cap, then the upper pinch bolt. Go back to 9a and do the other side. Put the rest of the motorcycle back together. An extra set of hands is helpful for many of the steps.
-
The bushing on the inner tube you spread with your thumbnails and push it up into it's groove. They don't have that in the service manual that I can see...... The rest of the steps are in the service manual starting at the bottom of page 7-52 (page 342 of the online manual in the tech section). Forks are pretty routine, and all damping rod forks are pretty much the same so the service manuals tend not to go into fine detail.
-
I was at my mother's house this weekend. Accessed the site from my tablet Saturday evening and it seemed very fast. I thought "Crap! I've got a problem with my home and work computers". Then I saw your update. At home and work it seems as fast as it used to be. I think you found the problem.
-
Jay, I'm not sure how much detail you need. I prefer to leave the fork in the tree until the upper and lower are separated. After the damping rod bolt and circlip above the oil seal are removed you use the raise the lower tube a bit then strike downward with it. A few strokes should knock the bushing and oil seal out of the top. DO NOT BANG IT UPWARD ON YOUR RETURN STROKE! YOU CAN DAMAGE THE ANTI-DIVE. Once the lower tube is off you can spread the lower bushing with your thumb nails and slide it off.
-
I think it has a lot to do with The Gulf of Mexico and the fact that Canadians often leave the southern door open. The gulf pumps a lot of warm moist air into the atmosphere which causes strong storms when it meets cold air from Canada.
-
I'd think that after 18-20 hours it'd start to get repetitive.....
-
'puc, I did a similar repair on one of my furnaces 8 or 10 years ago (not the same one I had trouble with a month ago). Been working fine ever since.
-
seal questions
MiCarl replied to Chaharly's topic in Venture and Venture Royale Tech Talk ('83 - '93)
......at any rate, you need something to go around the fork tube but with an OD small enough to get inside the lip of the lower tube. There are specialty tools for this but they're expensive for a one time use and probably harder to find in Randolph than PVC pipe. -
seal questions
MiCarl replied to Chaharly's topic in Venture and Venture Royale Tech Talk ('83 - '93)
I'm wondering where randolph is that there isn't PVC pipe? -
seal questions
MiCarl replied to Chaharly's topic in Venture and Venture Royale Tech Talk ('83 - '93)
You won't be able to do that. The bushing on the upper tube won't fit through the bushing on the lower tube. You have to put the bushing and seal in the lower tube after the upper tube is inserted. There are some forks where what you describe might be possible (some of the XJs come to mind) but not on a Venture fork. -
Oh, I need to add that on my '89 Venture I have an LED license plate frame that is modulated. I don't know that the CMS won't report a bad bulb if you modulate the stock brake light.
-
I'm a big fan of modulated brake lights. I run a brake light modulator on all our bikes. I've noticed that bikes with headlight modulators tend to stand out. I haven't put on on any of our bikes though. On your '85 I believe you'll have to disable the Reserve Lighting Unit or it'll tie itself in knots.
-
I have a full set of color tune plugs and used to use them regularly. I've found that using a digital tachometer is a much quicker method for me. In engines with the spark plugs deeply recessed I find the color tune plug almost impossible to use. They're difficult to see and the electrical lead tends to leak so it fires against the cylinder head rather than the plug. Where the spark plug has a 14mm thread and isn't recessed the color tune plug works well. You still have to move it cylinder to cylinder so a tach is much quicker. The window in the 12mm plug is small enough it can be difficult to see. I've never been able to see anything through my 10mm plug. I've never tried a color tune on the Venture because it's a 12mm plug so difficult to see in good circumstances, spark plug is buried deep in the head so the lead is likely to leak, and you can't look straight down on it so I'd have to use that goofy mirror contraption. Not worth the effort to me.
-
1987 venture progressive springs
MiCarl replied to Money Venture's topic in Venture and Venture Royale Tech Talk ('83 - '93)
That original spring is what's called "dual rate", tight windings on one end then a sudden transition to loose. It'll be soft until the tight coils bind then it'll suddenly become stiffer. In a progressive spring the windings vary continuously along the spring. As individual coils bind the spring rate increases gradually rather than the sudden jump in the dual rate spring. -
Ignition woes Part Duex
MiCarl replied to flyday58's topic in Venture and Venture Royale Tech Talk ('83 - '93)
Replace that plug. When a plug is fouled you can get it to work by giving an additional gap to jump - that's what you're doing when you lift the cap up. -
Posting "Want to buy" and opening the wallet are two different things. Lots of people have big eyes but not the cash to back them up. You've been more than generous. Get your item.
-
CLASS system operation and pressure
MiCarl replied to Brenner's topic in Venture and Venture Royale Tech Talk ('83 - '93)
Once the CLASS reaches the pressure it's looking for it basically shuts down. You can leave the key on, but if there is a leak the CLASS won't kick back in until you press buttons. Theoretically it should never leak down. Like Peder I have different springs in front and never pressurize them. The rear holds well enough I don't notice any change until I change the pressure setting (passenger or not), except for maybe a few PSI over winter. Remember though that temperature, weight on the bike and whether it's on the center stand or not will affect the reading. Also like Peder mine discharges a little spurt from the valve any time I select the Front or Rear button. I'd suggest you put it on the center stand, set a pressure and remember it. After a few days put it back on the center stand and re-check it. If you're down more than a couple PSI you should look into it. -
AND - they charged Honda for the repair. I hope you kept that paper. The folks at the Honda warranty department might be very interested in it.
-
price for 89 Venture
MiCarl replied to chocking's topic in Venture and Venture Royale Tech Talk ('83 - '93)
If it's in decent shape I'd stay his price is quite reasonable. I paid $2500 for mine 5 years ago and the plastic was pretty rough. At that price I'd say he needs the floor space. You might offer him $2,300........ -
There used to be mom and pop outfits where you could drop an item off, they'd handle the auction and shipping. I wonder if your seller used something like that.
-
Excellent point! Let me see if I can remember the conversion: 1 imperial hour = 254 metric hours *9/5 + 32. In German time that's 27,007 hours! For the math challenged - that's about 37 months, or just over 3 years.