greg_in_london
-
Posts
714 -
Joined
-
Last visited
Content Type
Profiles
Forums
Gallery
Events
Store
Everything posted by greg_in_london
-
 Hi Cimmer, This is the closest I've found to what you said, though EBay says it will not fit the Rav4. There is a whole bunch of equivalents, but the makers don't seem to tally across the pond. For a tenner I might just get one and see. If it doesn't fit I can just try running it without a thermostat and see what effect it has. https://www.ebay.co.uk/itm/233914467352?fits=Car+Make%3AToyota|Model%3ACorolla&hash=item3676638418:g:CRoAAOSwqo1gPC1A these are the cross references - I don't know if you will have heard of any of the companies over here: Cross references BGA CT5491K CALORSTAT by Vernet 141682, TH141682, TH141682J FAI AutoParts K20182 MAHLE TX 7 83D MOTAQUIP VTK6 QUINTON HAZELL QTH115K UNIPART GTS515K, GTS870K, UGCGTS515K
 -
Patch - What is it that you think could be the problem ? You think that an oil problem could cause overheating like this without parts failing ? The carbs were a problem, but seem fairly good now and were balanced with decent gauges. The exhaust could be a problem and does need work, but I don't see why it would cause overheating if all pipes are a similar temperature and it runs okay on the road. Did you mean use the infra red gauge on the casing by the plugs ? Actually taking them all out takes longer than a couple of minutes, so I'm not sure what you're saying. The cams could do with shimming - it has been a while since I got into them as access is not easy, but before I faffed with a half dozen other issues it wasn't overheating and I've done much less than a thousand miles since then, so it's hard to see that could have been such a big issue come on quickly since then. I'm glad of every contribution and thank you for your time, but I'm trying to follow the logic and not really following your train of thought.
-
Thanks for that - I can see that is available for pennies in the USA ($5.99) but couldn't track it down here. Most of our parts shops have been taken over by big chains who can find nothing not on their computer system (which means if I can't spot it on their website they won't be able to either). When I get the chance to ask I will though, even though I have one on order already because I don't really want to wait. All four exhausts warm nicely as it warms up. Tiny differences in where I point the the tester give widely different temperatures (80-120 degrees, though I didn't run it for long), so I can't really say if there is any difference in how quickly they are warming, but it is definitely firing on all four.
-
Good thought. Each cylinder is hot to the touch, but with water cooling it would do. I do think it is running on all four though - I've had a misfire before and think I remember what it's like (easy not to though - it does still run with three). The obvious way to be 100% sure is to use an infra red thermometer on each exhaust pipe, which I can do easily. It would have sounded lumpy because of a questionable seal from the front left downpipe to the collector box, loose ones to the silencers and, most crucially, a poor seal on the rear right nasty/silly olive joint thingy. The collector box is the result of my welding - replacement bits are hard to come by and my welding never better than middling, especially when having to build sections up. The silencers, well, when they are tight, getting them off damages the collector box too much, so a loose fit until I make up some silicon rubber seals is damage limitation. That rear pipe seal though I despair of. It is just an awful design and new seals are loose almost straight away. I keep meaning to experiment with placing a feeler gauge inside the olive to take up additional space and make it tighter, but haven't done that yet. I ordered a thermostat - £46 - about $60, but (and I didn't realise this when I placed the order) it will be on back-order from the EU and so the expected delivery date is 15-16th June 😞 My normal preferred supplier had said they couldn't get it though. I'll let you know the results of the test on the downpipes, but it looks like the Venture will be going back into the lock-up again.
-
Hopefully I haven't tried to be too clever. I took pictures and video and combined them. I had to use a rubber bung upside down to block the rad cap hole and then run a bit of hose to get round the fairing. It took some fluid out first so it wouldn't go up the tube. Later I put it back in case the surge tank was allowing a by-pass, which didn't help and I wouldn't recommend. Basically I didn't see significant bubbling and I'm pretty sure there were no leaks around the bung - I squirted fluid and it didn't obviously bubble. Look at the pictures and video here (it isn't too long):
-
I've changed the rad cap for a new after market one. It certainly holds some pressure, though I have no way of measuring exactly how much. Once it starts bubbling though, it really bubbles, more like there is a hot spot that is vaporising the coolant. I'm using a pre-mixed G12+ coolant that I think is fairly high spec. The vapour tester kit arrived just as we were going out to get my second jab and then going shopping, so now I just need to summon up the courage to do the test.
-
Lol - I do a lot of home brewing and this is kit looks like the easiest work around ever. All it is is the bubble trap that pushes into the bung in the top of a demijohn. I have several, though they may supply a different sized bung. It was a brilliant idea all the same and the amount of liquid looked like it would do enough tests to persuade me if I want more. You can't use a vacuum pump on it of course, but I'm still quite looking forwards to giving it a whirl. I may need to use an extension pipe because of the space limitations between the fairing and radiator, but that will be no problem. I'll try and remember to take video as well as pictures. Because it boils up so quickly when hot, I suspect the issue is a hot spot or failed circulation rather than combustion chamber pressurisation, but it will be good to eliminate this (and confirm it maybe on the missus's Reliant Rialto.
-
That tool to test for engine/combustion chamber leaks is a good test - something I'd been wishing for for another vehicle, but had never heard of. To begin with I bought the one most easily available, which will hopefully be here Wednesday: https://www.ebay.co.uk/itm/284004648824?epid=15031188540&_trkparms=ispr%3D1&hash=item421fff0778:g:XPEAAOSwoUBfw8Wh&amdata=enc%3AAQAFAAACkBaobrjLl8XobRIiIML1V4Imu%2Fn%2BzU5L90Z278x5ickk7PdDazAlGltMLJlUhrWsD1SxGjmhb6XUcLGvpOvmVEiglH2cBj%2Fv5Uo4zcLTcNjA%2BrOhlgItsFUC%2BSqAvtbk6il7zNLrI8sgKSo0Jl98oXJ2718xp%2F9yt8YV2CDjXgOuaNozkJmawBA5B8Su78UqJ0BDN8NlXzyLdZgTc71S%2BWtJUxkqLetXxpVkYdzWGx8HnYXoFSws7rTR8qb6Giq4M9aFXcdwYQZubBHGjKHQ7UvKKC8WC1eSMttVMbah5RIFNgnYPYnT5Y2i%2FZV72sF1k7kEZjR6a0NsxIDPKp4nC%2B9e%2BRBgLtd1Feh61iZAR4XMQH%2FartT5JQ6hs%2BKck66e6fZQZL62Z54GkaG171bP4qGxq5N0tzrn%2BP5soXtYn%2FTafjgzEmO1ZkDsju4rts9%2BGnxIyep6d3gF2lKK0nQ%2FYlT9OpLBwTxYRcCDPMIxYj%2F0kFnPaf%2Bg19wdocsyculH99FrObUME0NhCDLEeCKVNEZWDS7JE5aBOLfVc%2Bq8YK0rbuXgiyBA%2FAXFEM7r0bdXx8YqOknc9lGUpHK8x5KvEaT7COA6HywD4d5GbQczqFaCx5AUpGs6pRgfqMK1NdaJGHXh8xDvs%2BuXyi57WWj%2BHlJRsS8P0v7OOUzhHdl5%2BiYKfeQNPy07kH%2FRnNmWPu1Emv7IgZqlW1PVCLlQi2IFt9jBFC5Lari0KjCRrjggxI71Dx98lOy6KwgYjrM9mvwQOiBuf3r7x%2BGGp5aWdmapXJB65IQodM8BmXwr4HlTubYdvz9BNDPd3H9e4mmmZQIc49xD7gjnxdi%2Baisy5%2F1VEuir4963pgWhY2mx8YNo0UfR|cksum%3A2840046488245c76fd4ec6de4c2a8f15a8c48f823510|ampid%3APL_CLK|clp%3A2334524 Yes - a thermostat would not break the bank, though I wonder if just taking it out would give an indication of whether it is the problem ?? I've been wondering about the pump too, but the parts I replaced were after the problem began emerging. Admittedly I'm not sure what wear would look like, but the 'new' one was metal and nothing was visible. My recollection is that the shaft was fitted to the impeller and so could not be fitted the wrong way round. I know that was a couple of years ago, but could I really be so wrong about that ? (As I type it, that sounds a very daft question - of course I could be that wrong !) Looking at the parts list it is sold as one item - and in fact needs a separate seal to be added for it two work. The V-Max did have a different vane design I think, though with all other bits looking the same I'd expect it to work. Checking the vanes on the radiator will be an easy one to check tomorrow. When I started it yesterday with the rad cap off there were a few bubbles, but I thought that was just the system scouring out bubbles - they were quite little. I'll be able to check when that kit comes, but it isn't slowly blowing water out, it is becoming hot and then boiling, turning the surge tank into a kettle !. I took the bike out this evening for a steady run at about 50mph down the A2 (a dual carriageway approximately following the line of Watling Street - the road the Romans built from Dover to London and then on up to North Wales). Initially it seemed to be warming more slowly and I hoped it would stabilise, but after 6-7 miles I could see the level in the surge tank rise and start bubbling (I had the cover off so I could keep an eye on it). I pulled off and waited for it to stop bubbling and for the level to drop and topped it up again - and again. Then I came back a different way, stopping every mile to let it cool and add water if needed. I used 4-5 pints of fluid doing about 7 miles back. So - tomorrow check the fins, Wednesday check for combustion leaks. Is there any sort of flow test for the pump - disconnect the return feed to the radiator and see if I can squirt the cat (if we had one) ? I feel there should be something simple to make such a dramatic effect. I'll look at access before deciding whether to try taking out the thermostat and trying without it - or else see what availability of the part is here and how long it might take to come (not forgetting the price...) I'll keep everyone updated as things turn out, though it may not be for a few days now the weekend is over.
-
I'm putting this down here to help think it through and get all sorts of useful suggestions. After taking it out last night, I got caught in traffic and watched the expansion bottle bubbling like mad - I ran it without the plastic cover on so I actually see it ! It does seem to hold pressure, though it bubbles just before it reaches the red on the gauge. I definitely had to top up the fluid before taking it out to give the rad flush a chance to clean it out (it was too late when I got back last night). It was boiling up again by the time I got back. I thought I was a bit hasty waiting for it to cool, but thankfully didn't get scalded when I pulled the drain plug. I filled it with water to flush it all out, drained it and filled with fresh coolant. Taking a short spin round, avoiding traffic, it was again boiling within minutes, despite only bimbling along at about 2,500rpm and a light throttle. It's heating up quickly at tickover too. I've discounted the idea that it's only a duff temperature because boiling like a kettle tends to be a sign something is wrong. And anyway, any tea made from it is not that pleasant. I don't think the issue is a leak or a crack anywhere because it builds up pressure and does not leak anywhere obvious, plus it draws more in from the surge tank. I'm forced to think that the issue is either with how the water circulates or that the radiator is thoroughly corroded. I didn't think the rad flush would do much, but it is one of those steps you have to go through. I've just checked the position the radiator drain valve should be in, but I don't think that would have this effect - it either by-passes the thermostat or doesn't. I'm wondering if the thermostat has just stopped opening. I would just take it out, but I'm sure I've been warned that bypassing it (using the valve) can sometimes cause a lack of fluid to the back cylinder - which might be what's happening - and taking the whole thermostat out might just make that worse. The radiator could be more furry than my throat the morning after a heavy night, but I find it hard to believe it could be THIS bad. As the only feasible alternative would be to refurbish or replace the radiator, I'm obviously keen to be sure before splashing out - I seem to be forever replacing bits without getting to drive it 😞 I also wonder if there is any way that I have mismatched parts using a metal V-Max pump vane - I thought that would bean upgrade over the plastic one that was cracking. I certainly see a little movement peeking in through the radiator cap hole when I rev it, but you can't see much. Usually I can take a step-by-step approach o finding a problem, but there seems no way at present. Shorting of connecting a second radiator in-line I'm a bit stuck. The fan comes on fine. Has anyone had similar experiences ?
-
November 2018 - That's a long time without an update, going back way before lockdown. I said a few posts up that it seemed that if I didn't get things finished at once, there would be a long delay before I had time again and then other faults would start to emerge. Well I did get the carbs sorted and working nicely. I had to replace a rotted out downpipe and had a lot of problems with the collector box joints. The exhaust is mostly sealing now, though those olive joint seals on the back two downpipes are never 100% right. I thought I had fixed a slow leak on the rear wheel by polishing the inside rim and using seam sealant, but it has started to go down again, albeit slowly. That has not been my main problem with the Venture for the past year or two though. For twenty years I did not have the slightest concern about the cooling system and didn't really give it a moment's thought. When it stated failing I wasn't prepared and didn't know what I was looking for. I don't really know what went first or what caused what else to go. I was basically chuffed that I had her running again, but found I had to top up the expansion bottle a couple of times. I thought I had probably left an air gap after re-installing the radiator. Whatever the original issue was, the system boiled dry on the way back from the seaside one evening (the first proper run for it) enough to overheat the clutch mechanism. I didn't know the cause because some of the electrical warning systems were getting a bit iffy through sitting so long. I hoped they would re-establish electrical connections, but they didn't get the chance. With a thermostat sensor not working properly I just hadn't realised how hot it was getting. This seemed to be due to the failure of an o-ring on one of the pipes to the thermostat housing, but it wouldn't come off because of one of the screws holding it in was seized. That took forever because of access and that screw just being so stubborn. Having the cooling system run out of fluid is not a good thing though and so next this fubarred the water seal in the water pump, so that had to come off. I had to chop and change a bit with the spares I could get (Ventures are not common in the UK), but after a false start missing off quite an important circlip I replaced the old plastic pump with a metal one from a V-Max. In the process the plastic angle pipe broke, but a spare had come with the pump cover, so that was okay. Now finally you'd hope all would be hunky dory, but there was still a litany of little leaks that slowly got closed up until... it was still overheating. I'm not sure if it has been leaking until it doesn't have enough water and then boils, if the drain valve was in the wrong position, if it was escaping through the cap or what. My latest effort has been to jiggle with the drain valve, change the radiator cap and flush the radiator. Right now it is full of Holts radflush and has been out for a good ride. The needle went off the scale, but other than that things seem okay. The radiator did not lose water and the surge tank did not get sucked in after it cooled down. The best interpretation is that the new temperature sensor is no good and everything else is fine. It was probably a second hand V-Max one that I got - or maybe it reacts with the rad flush - who knows ? When I've flushed it, put decent coolant in and run it over this weekend I'll know if she's properly on the road again or due to go back into the garage. Oh yeah - it's good to be back. Sorry it's been a wile since I posted.
-
Improving My Brakes
greg_in_london replied to Idrys's topic in Venture and Venture Royale Tech Talk ('83 - '93)
All I'd say is that if you are getting new stainless steel hoses, it's a good time to consider de-linking the brakes on the basis you could be paying for the hoses again if you decide to de-link later. It's no biggy if you make your own, but obviously a few dollars more if you don't. If you might be removing the proportioning valve, leave another couple of inches loose on the rear pipe so you can be sure it still reaches (I didn't and so the hose on my is pretty tight). -
I don't think there was a way that India could have had a different result with the number of people, the healthcare and the range of levels of poverty. I contributed something through the British Red Cross the other day, but really they need access to vaccines and international help - as will other countries in similar conditions. I'll be getting my second jab next week and it's good for me to feel "I'm all right", but India needs help producing enough of its own as well.
-
Rebuilding and Modding my 83
greg_in_london replied to icebrrg3rd's topic in Venture and Venture Royale Tech Talk ('83 - '93)
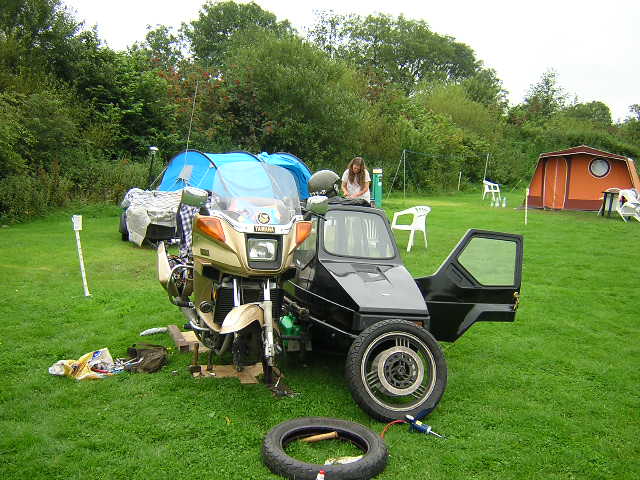
I'm glad to see that you've extended the sidecar chassis as to my mind these sidecars are WAY to light for a Venture. I know they are popular in the states, but here they came on the side of 350 Jawas - half the weight and a quarter of the power. With the standard wheel I've bent a stub axle on a Velorex 562 chassis with the extra power of putting one on a GS550. If you are always gentle with it, you may be okay, but if there is anything tougher on offer - or you can weld your own chassis - I'd recommend that option instead. -
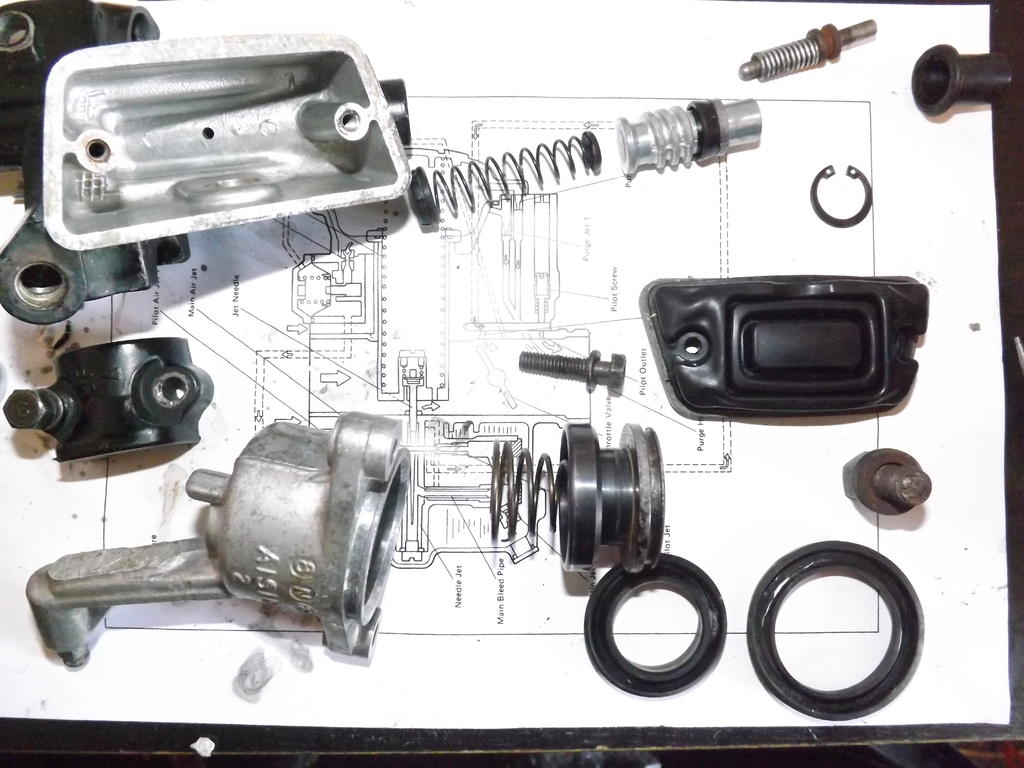
It doesn't cover the sizes for the pilot jet, but it does reinforce the idea that the #37 .5 pilot jet has a hole 0.375mm. I had thought it was a measurement of flow, but it is obviously around that size as .25 goes through and 0.38/40 doesn't.
-
The E-string from my fiddle was 0.22mm and much stiffer than the fuse wire and was perfect, except for the jet that wouldn't come out and was stuck in the housing. For that I took the plastic inner from a biro (rinsed the ink out and) cut a length 30-40mm long. Then I could thread the fiddle string through the middle and it was much easier to push it through the jet - or easier to know when I had it in place. I kept alternating between pushing the wire through, soaking teh jet in degreasant and an ultrasound cleaner. If done all four and rebuilt the carbs and done a bench synch. Now I need to wait for a chance to go back over to my garage to reinstall them. Fingers crossed I've done it right this time.
-
Thanks - the clutch seemed to be working fine now, though I didn't do many miles before deciding I had to play with the carbs again. Never mind a guitar - I play the fiddle and have old strings lying around. I suppose I might have thought of it eventually, but I'm glad you suggested it first. And the brass brushes - I have some somewhere and was planning to root them out, but thanks for saying it - it's a spur to get me moving. The short strands are much stiffer than the fuse wire. I'm hoping they are nearly as thin. I'll measure them anyway so they are a reference for others.
-
I'm seeing a familiar pattern emerging again - if I can't get things done when I get the chance, it all starts to drag out for another year. I'm trying not to let that happen and have gone and collected the carbs again. (That's worrying - I'm talking about collecting them rather than taking them off the bike - kind of suggesting it's something I'm happy to keep on doing.) I've checked the diameters of the smallest nozzle cleaner (now listed as for carb cleaning on EBay !) and according to my old micrometer the smallest is 0.40 mm (0.38 on the advert). 3A fuse wire is smaller at 0.17mm, but not stiff enough to poke through. I really have no idea what the size of the hole should be for a 37.5 jet (wouldn't it be nice if it was 0.375mm, but I think the numbers are based on flow rather than diameter - am I wrong ?), but the nozzle cleaner doesn't fit. Right now I have a jet sitting and soaking in degreasant. I'm thinking of just buying new ones - there's just part of me convinced I just need to clean these and they'll be fine.
-
I would not argue with anybody that says getting the wheel out while on the road is a PITA with these bikes. I once had completely unexpected levels of tyre wear, even though I began with a brand new back tyre. I actually changed the front tyre on a camp site in Scotland and the back tyre outside the in-laws house in Ireland. I'm sure most people know this, but in case anyone is looking at this on the phone while stuck at the side of the road, the key is to put planks down and put the centre on top of those (or over the edge of a kerb). The bike is much too heavy to do that unless you FIRST roll the back wheel onto something - with the tyre pumped up (even if it goes down again in two minutes - that should be long enough to get it up on the stand. Better to spend a half hour looking for planks, branches, bricks etc than weeks off work after hurting your back.

-
Just do a search on Ebay for one you like the look of. I bought mine a few years - mainly for emergencies because the place I go to for tyres has reasonable prices and tools for you to remove them yourself. They charge for balancing, but not fitting. Anyway, the one I bought looks a bit like this and was just as cheap: https://pulsar.ebay.co.uk/plsr/clk/0/SADS/9?pld=%7B%22mecs%22%3A%222024166249796d2a181e3e894f63be56b8409604dfd0%22%2C%22enc%22%3A%22AQADAAACsBkojIFHYtWT%2BANpG6F7t2F09Z9Cbsu1X59rcQ4wVNT6A2C4dotaid1BlSqpY2v6yePzhOYc7cgk4BD5PFWI2SIa4CTkRla8x7l4lNmgi9HQgwzYslxWcGPRbQ2wQaEgSLYHzFwTCXM8sFctn9DhcQOug5w7DX8QWkAtkT%2FRbE%2Fpu4bLyDg27eMQSLwlO2PtSKDjbyhWYO4TE6gi4XGAWenRYkULG5LqwjQckEUf6rTN9t%2FT5FuA5tGW57klb6eZj0icNV0XCeim3bmt4goPx%2Bq8a46wBhNXkyRJvJeeM9pRFrSgHGpnq4qDo6wqDjB7P3gHNHMtpiN8Q%2BDiZvlex8KbJ3xQz1On46lIuOF2z%2F3ULmxa%2BSnBxEu5mceSXa1zpe%2B9sW8IRw8PlXRHUYI%2BBe2J2wqZN3TeHVwT23Bmor0ATww1ZHevLpJIGp25EcSuJ%2FZTcn7Et4%2BDXqN3w9DWOhlU6T%2B0OBhQdMwc5bf4BNKkpZtXnItH44ReN8DV6hspajsxDn0SL2vy5Eat5yegKE6g6poIuLKiR8CTNvNIcAgQqTw2WsQhg%2FEMUlHM5UiLesZysfvkHziU2%2F%2F9u2N0Zw40azDruEEgU8WOWVlAyVfd%2ByiB3NgNQnlPtA23QlGpzoBZIukKviDXNQ2AlZfA8IBsv6vwftd33zC3gGmr4LKhq0V%2F%2BfN6C3kwl%2BHQDhOcunye6WQaykaorzxjevDnh95EpcL7a1ZDGgksRrPk3bFXY1IyjVRqOb3DZXVsxRfnY14QB1vNjFbx4cuEAeymLgpb70hF2abO3Op6TuroeRlUm9Fttdkcuwo73eeek8Akat05Bk1Gu5E2y0hbg0YY6q9Bg4ZWb6ugzKN%2BNlp9uS%2FU8bsHzHMbstyRHpUJCNXc4c0%2Fn0SUThuadtjzKvuSZkE%3D%22%7D
-
The kits arrived yesterday and so I've rebuilt both slave and master cylinder. Work is starting again today, but hopefully I'll make time to get to the garage and put them back on. Then I'll be able to see if the carbs are continuing to improve or if I need to do a better job on them (the nozzle cleaners were also due yesterday or today, though I'll have to see if they go small enough).
-
Unfortunately the 'proper' way of checking the fuel level is to check it on the bike with the engine running and with the mid-cover off and the clutch bits off I don't want to start her up. I don't really want to take the carbs off before putting the clutch system back together - one thing at a time I'll know I'll get on with, but too many things at once and it becomes a project that gets left forever. I ordered a set of those welder cleaners though. I have found somewhere in the UK that does the pilot jets for £5 each, so I may invest in those once I check the engine numbers to be sure which model I have - my manual covers different markets with different jetting and I should have written down exactly what I have a long time ago. Or rather I should have kept it - years ago I had a long running thread collating as much information on carb setups and what mpg people were getting. Oops - just looking for that mpg post I found a thread ten years ago when I was talking about a rebuild. It sorted itself out then, but it does look like the kit is justified now... https://www.venturerider.org/forum/showthread.php?27144-Clutch-lever-actuating-pin-(between-lever-and-master-cylinder) I found the mpg one - the table that we kept updating doesn't show properly anymore: https://www.venturerider.org/forum/showthread.php?20950-What-gas-mileage-do-you-get/page11 At least I can see that I wrote down what model I have (XVZ12DL - 41V-000125) Right now I keep looking at the clutch bits trying to work out what is/was wrong. I'm going to order the kits though and keep polishing the (already smooth) slave cylinder bore:
-
Thanks for a detailed answer. Float height - I measured the fuel level some time ago and recall it had been right (though the manual says 14mm in one place and 16mm in another..), but I'd brought them back from the garage and couldn't easily do a check with the fuel pump running. I had a recollection that the float height should be 19mm and that I'd followed a thread suggestion on reducing fuel consumption and set it at 20mm, which is what they were at. Looking back through threads the only concrete reference I could find to float heights was that the float by the cutaway should be level with the bulge in the jet block, which was the case. The jet - I expected to see light, but couldn't. I've had it drummed into me over the years to keep wires and drill bits away from jets and not to scratch them, but in this case I couldn't find anything small enough. I convinced myself there was space for air to pass through and was worried that if I didn't get them back on I wouldn't have another chance until Christmas (it's been off the road for a long time). I thought about ordering new jets, but suspected I couldn't afford them. I just checked and in the USA they're just over $5 each, but here they're £27 !!! (over $30) - that's ridiculous. The battery is fairly new (AGM) and fully charged. The starter has the four brushes and the better earth conversion so it spins nicely. I've a compression tester somewhere if I can find it (I had to move both flat and garage recently and can't find anything) and will check the results if I can. Either way, there was an improvement over how the carbs were before and that's something for me to work on. What is soul destroying is the clutch problem. On Friday I managed to get the slave cylinder off as well as the master cylinder and I've dismantled and cleaned both. Apart from a tear in the slave dust cover everything seemed to be in good condition. There may be been something blocking the small jet in the master cylinder, but now I've cleaned it I can't tell. The next thing would be to buy kits to refurbish both slave and master cylinders, but am reluctant to spend money without having found the problem as I hate the thought that I'll get the bits, rebuild it and then still have no clutch. Having said that - I can't think of anything that might not be working !
-
Okay, so this guy goes to his doctor and explains that he is worried about his health and not feeling well and all his symptoms as well as his history. The doctor is a bit distracted while listening to him, consulting the files on his PC, checking a few pamphlets and interrupting every now and then to ask a question. After a couple of minutes the doctor stops his patient and, hardly looking up, says, "I'm really sorry, this can't go on, you only have ten to live." The man hardly stops his flow, but obviously changes his tack, "Ten, ten. ten ? What do you mean ? Ten years ? ten months ?" The doctor continues, "Seven, six, five...."
-
I must admit that I tried a few things to poke the blooming holes, including the finest needles I could find. I deliberately put the drill bit box with the 1mm bits down out of sight to stop me from being tempted. I haven't seen those bag ties for years, but yes, they would have done. I sat trying to decide if I was blowing through the jet or just imagining it until the taint of petrol made my lips tingle ! I really hope they weren't blocked and there does seem to be improvement, so fingers crossed... Cleaning the slave cylinder may well help, but what puzzled me was that the lever pushed in part way and then resistance gave way. I thought maybe that funny extender piece between the level and piston was slipping somehow, but I couldn't see anything amiss. I found another job to do today, but I'll look again with a clear mind in the morning.
-
Well I had a really busy early Summer with no free time followed by no work at all which allowed me to go on holiday for a month - touring through Germany, Poland and Czech, hitting music festivals and chilling in campsites by lakes and rivers in between. A beautiful way to spend August and not much different cost-wise to staying in London (except for a few days in Germany and France on the way back). That's another story though. I had a bit of work I was expecting cancelled (so a diet of bread, cheese, beans and the beer wine and vodka we brought back for a while...) and have had time to pull and clean the carbs and play with the old Venture. A while back I bought one of those small jewellery ultrasound cleaners from Lidl or Aldi. I didn't expect much from it, but it seemed to do a good job of the carb parts I put in it. The emulsion tubes that I thought might be blocked were pretty clean and overall I didn't find much crud at all. The float heights looked about right as well. The pilot jet disappointed me in that I seemed to be cleaning them, but could not see even a glimmer of light through them which I thought I'd been able to do in the past. I'm now having to wear glasses though, so it's harder to be sure. They do have tiny holes through them. Using a lens the ends looked clean and I was sure I could just blow a little air through them. Having used an ultrasound cleaner, squirted them with releasing fluid and blasted them with an airline I wasn't sure what else I could do though and the three I could get out (one was too tight and I was worried I'd strip the head) all looked the same - if I'd been able to see through one I'd have persevered until all were the same. All of the carb slides moved easily, but one seemed to 'stack', so if I wiggled it it felt as if pressure was building up, though it soon released. When I took the top off there was nothing amiss and it seemed the same as the others once I put it back. Either way - it starts more easily, though it still needed Easy Start. Even when not starting it felt like it 'wanted to'. I took it out for a run and that seemed to help a bit, as did refuelling with fresh petrol - I seemed to have full power above 2,000 rpm, but below that it was not happy and did not tick over. Hopefully getting the throttle stop set right and balancing the carbs will help, though they were pretty close on a bench set-up (all beginning to open at the same point). The worst part was that the bite point of the clutch was getting closer to the bars again by the time I got back. Thinking it was an air problem again I did a quick bleed before putting it back in the garage and then it all went pear shaped. Pulling on the lever it would get part way back and would then feel as if it had gone 'over-centre' and pull to the bar with no resistance. I can't see anything odd with the lever, but when trying to bleed the slave cylinder the fluid tended to run back into the cylinder, rather than syphon down from the top, though the process was hard as the hot engine kept softening the pipe. I decided to leave it alone and go back this morning when it is cooler again (the lock-up garage is a few miles from where I live now) but I'm wondering whether I need to rebuild the master cylinder or maybe the slave cylinder as well. It's never been brilliant and I wonder if a non-Venture master cylinder would be an upgrade. Although air in the system has occasionally been a problem, it doesn't drain out fluid through the slave cylinder like some people have reported. Any suggestions for what to check ? The return valve has been mentioned in other threads. If just cleaning it would help that would be good, but I suspect I only have a window of a few days before work starts properly again and don't have much of a budget knowing that income will be limited until November...