-
Posts
58 -
Joined
-
Last visited
-
Days Won
7
Content Type
Profiles
Forums
Gallery
Events
Store
Everything posted by InfinitySurf
-
2nd gen - front & rear camera DVR system
InfinitySurf replied to InfinitySurf's topic in GPS, Audio, Electronics
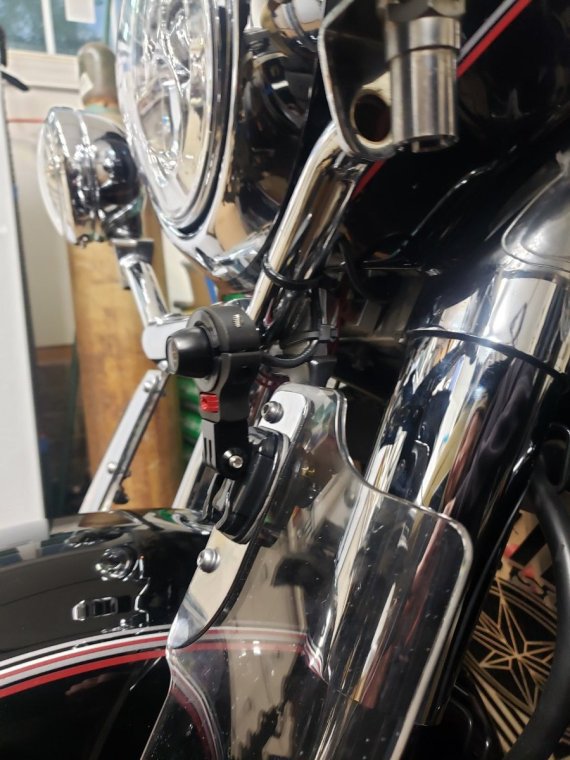
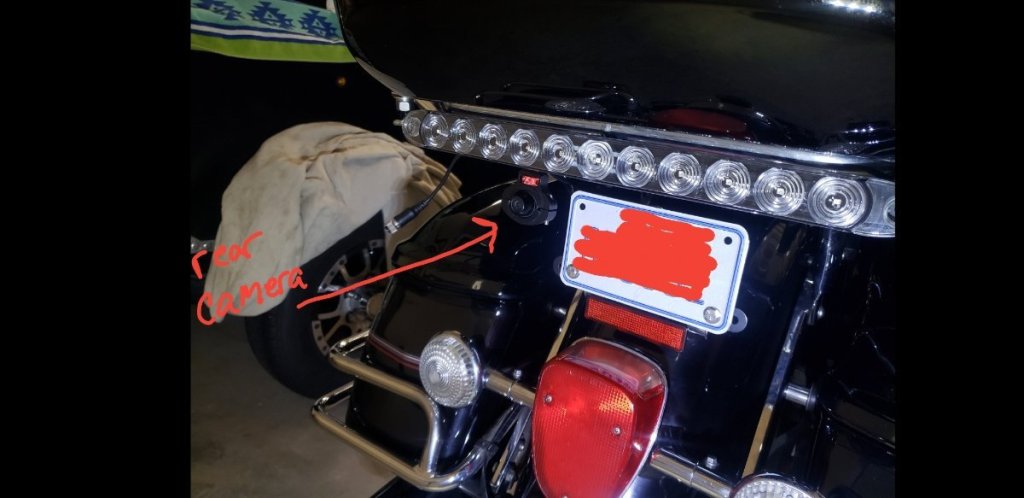
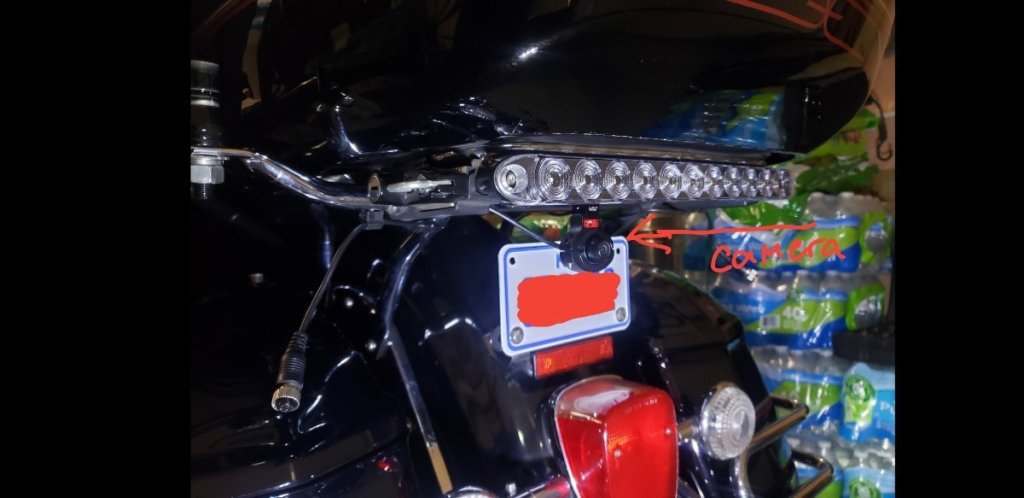
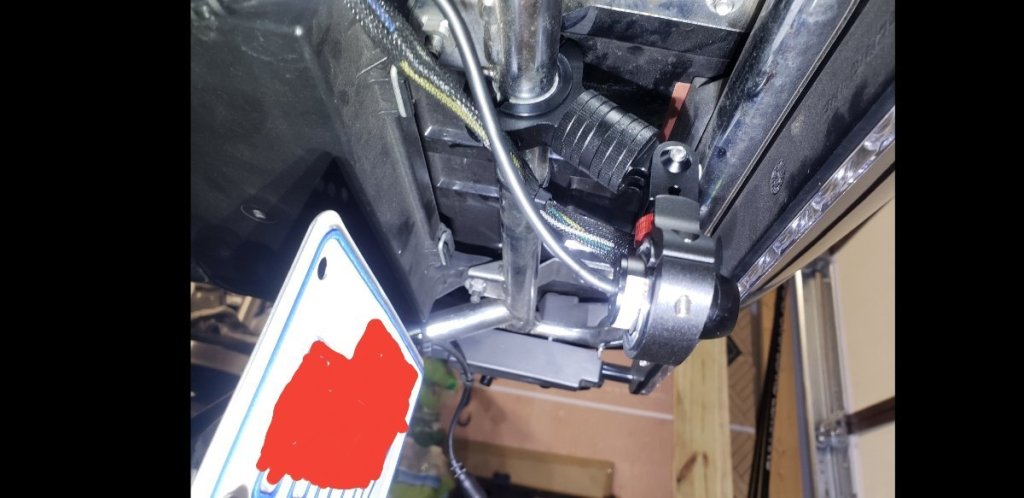
Sure thing. I will paste the links below: Keep in mind that I did some dremel mods to some of this and where the "toothed" pieces join together because I was mating 2 of the same kind (with three teeth and built in nut....on the aluminum ones I drill out one of the nuts so I could use a screw and on the plastic base one I cut off the tooth with the nut. Also because of that they dont mate up perfectly flush so I added a couple thin washers between the mounts so when I screwed it tight they didnt break. If that doesnt make sense I can post a couple more close up pics of those areas if you end up getting similar set up. Another thing, the part that clamps onto the tube or the camera was a slick plastic that was not real grippy so I also added either a real thin piece of rubber or a piece of this 1 sided adhesive grip tape like you put one the floor to help hold a rug in place. This made them clamp on real secure so I should not have to adjust them often since the bike vibration may want to move them over time....figured one I know for sure I like the placement then I also plan to go back and use blue locktight on all the screws that go into the aluminum clamps since I am guessing over time those may also want to back out a little bit. 1x) This is the one I used at the back to connect to the tubing under the luggage pack... https://www.amazon.com/dp/B0D149HB3J?ref=ppx_yo2ov_dt_b_fed_asin_title&th=1 2x) I used 2 of these to hold the cameras... 1 at front and 1 at rear. https://www.amazon.com/dp/B0D142YW5J?ref=ppx_yo2ov_dt_b_fed_asin_title 2 pack) Connected one of these to the above mounts that hold the cameras https://www.amazon.com/dp/B0CPJ5MDTR?ref=ppx_yo2ov_dt_b_fed_asin_title On the below link... I already had these but the helmet mounts like this come in slightly curved mount for helmets or the flat mount (the mount is rounded on the sides), the flat is the one I used to stick to the chrome part of the trim: https://www.amazon.com/Sametop-Adhesive-Accessory-Compatible-Insta360/dp/B0CR1FZLDY/ref=sxin_16_sbv_search_btf?content-id=amzn1.sym.7032aefd-3c59-4a1e-aaf4-8d3a944207a4%3Aamzn1.sym.7032aefd-3c59-4a1e-aaf4-8d3a944207a4&crid=22GU68HQJMMLV&cv_ct_cx=go+pro+adhesive+mount+flat&keywords=go+pro+adhesive+mount+flat&pd_rd_i=B0CR1FZLDY&pd_rd_r=ba5cde73-68cd-4501-bb9c-fd74f8fcd50f&pd_rd_w=HksOC&pd_rd_wg=ljJvb&pf_rd_p=7032aefd-3c59-4a1e-aaf4-8d3a944207a4&pf_rd_r=KD2JJ5KMVTRBH4GKMWBG&qid=1736352891&sbo=RZvfv%2F%2FHxDF%2BO5021pAnSA%3D%3D&sprefix=go+pro+adhesive+mount+flat%2Caps%2C111&sr=1-1-5190daf0-67e3-427c-bea6-c72c1df98776 -
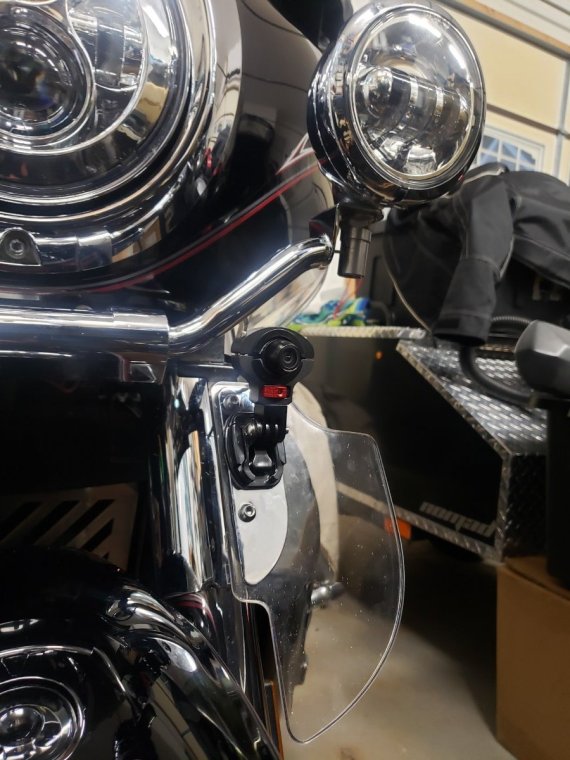
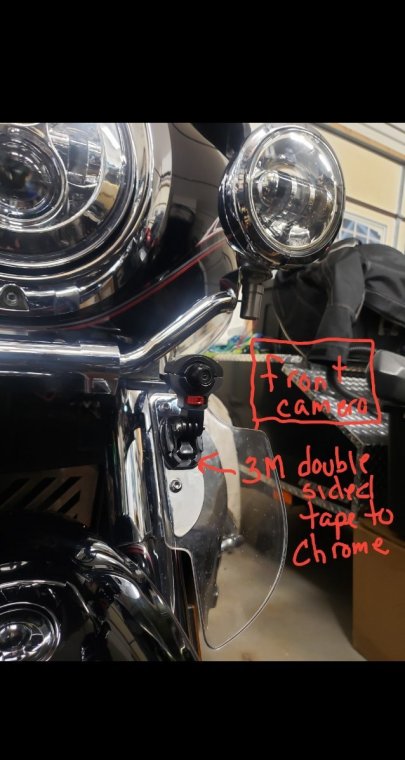
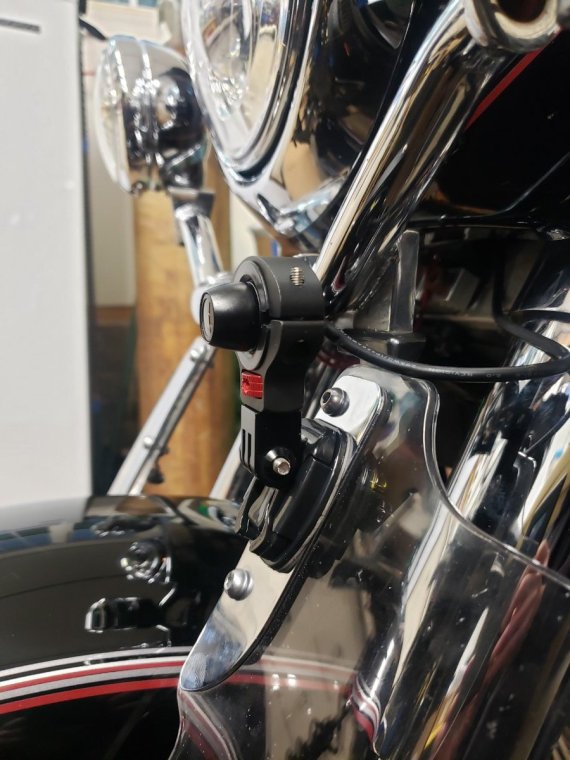
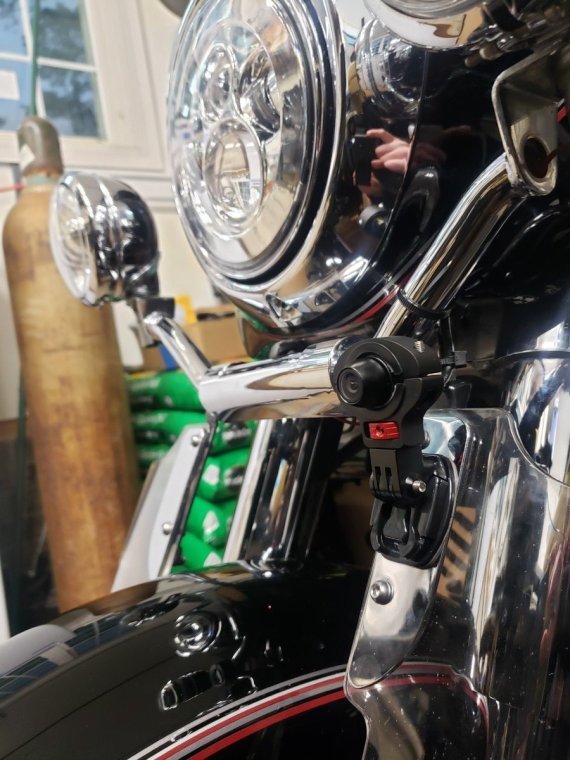
I actually installed this camera system on my bike in 2022 but the camera's came with crappy plastic mounts and it didnt take long for the cheap plastic mounting tabs to break off... then I used some go-pro mounts to secure them but because they were also plastic it didnt take long for them to break as well due to vibration and other normal riding conditions. So I ended up literally electrical taping both camera's to the bike, ugly but in fairly hidden areas so wasnt seen much, been on my to-do list to figure out a better way and just havent done anything till about 2 weeks ago I remembered it still needed to be done and ordered a variety of go pro style mounts made from aluminum that would hold a round object that was 7/8" since both the bullet camera and many of the bikes round tubing is 7/8". Got the stuff a few days ago and nothing wanted to go together like I had planned in my head since by the time I attached 2 pieces that would hold onto both the tube and the camera it was so stinking long that there was no way to mount it on the front that IMO didnt look like crap. So got a little creative and used a mount on the front that uses adhesive and stuck that to my front fork wind guard and then did some dremel work on the piece that snaps into that base since both it and the one that holds my camera are designed to have an adapter between them (which was too long for my liking). I think it turned out pretty sweet. On the rear I used the double 7/8" clamps, attached it too one of the support bars under the luggage box and angled it up as far as I could so the camera just peaks out below the extra light bar that I added under my rear luggage box. The camera DVR system I have automatically starts recording 24/7 and re-writes over old video once its full. Think I have a 256mg micro SD card in there so it will hold something like 24hrs of footage before it starts re-writing. I figure these days its kindof important to have camera's since so many crazy fools on the road. Have them in my vehicles as well including my kids. No long ago I was in line in my truck waiting to turn left...the green arrow turned on and cars started moving, I was maybe 15 cars back from the front...we are all moving when suddenly a lady in the right lane (straight only) stomped on her gas and swerved left in front of the car in front of my clipping her front bumper while doing it. Lady in front of me locked up her brakes... I did the same but could not stop as fast as her small cadillac and just tapped her rear door. No damage to my bumper but put a dent in hers. The Lady that caused the accident was stopped by red light luckily so I ran up there and asked her if she realized she had just caused an accident and also hit the lady in front of me. She got very angry, said she definately hit no one and also didnt cause the accident and that I could shove it. Soon as the light turned green she floored it and took off...but not before I got pics of her, her vehicle and license plate. Anyway the moral of the story, my dash cam in my truck caught everything and the lady was charged with hit and run, etc. Had I not had that footage, because I was the last person in the accident and rear ended the lady in front of me, insurance would have automatically ruled me 100% in the fault. Anyway, got off track there but lot of decent camera systems out there that are not that expensive and can easily be hooked up to power and only gotta do the extra work to hide the wires, etc if you are OCD like me :-). Attached a few pics of how I connected the front/rear cameras to the bike
-

Started on valve cover gasket replacement process
InfinitySurf replied to InfinitySurf's topic in Watering Hole
It was a great opportunity to get the bike nice & cleaned up again. Carb sync is done and after that I ran all the fuel out of the carbs so I don't have to worry about issues there in the Spring. I have her put too bed for a few weeks till I have time to get all the remaining AIS equipment removed & still planning to replace the front wheel bearings & seals before Spring just so its done since that should be quick n easy to do. Have already cleaned/re-packed the new bearings with Lucas synthetic marine grease, have always had good experiences using this grease in my trailers and other stuff. -
That is a great idea, I will most definitely try that! Did you literally just pressure fit them on or are they secured on there with anything? I got the carbs synced and since its so damn cold right now I just put 4 nipple caps on to the intake boots and then also just temporarily capped both of the small hoses for now. Have my heated garage tied up with a quad engine re-build right now so will get back to this bike sometime soon and if I can cap them at the cylinders with the 1/2" copper cap like you showed I will delete every bit of the AIS crap on & under the bike. Thank you for sharing!!
-

Started on valve cover gasket replacement process
InfinitySurf replied to InfinitySurf's topic in Watering Hole
Speakers all replaced. Back together and all good to go, just need to get carb sync done at some point when there is a nice day! -
I read that thread here and saw linking them mentioned in a couple other places, the comments about the idle being wonky after doing that kept me from going that route. I just finished my list of maintenance items on the RSV for this winter and have my bike back together with everything running perfectly again, so planning to sync the carbs on the next day where I have decent weather. Figured after doing that I would go ahead and cap the other 2 nipples. Guess I also need to remove those 2 hoses and cap them where they terminate into the AIS system. The rear hose will be pretty easy to access but that front hose looks like its gonna be a PITA to get too since it terminates between the radiation and the bottom front of the engine. I may end up just plugging that front hose for now so I can get all 4 nipples capped.
-
Happy New Year!
-
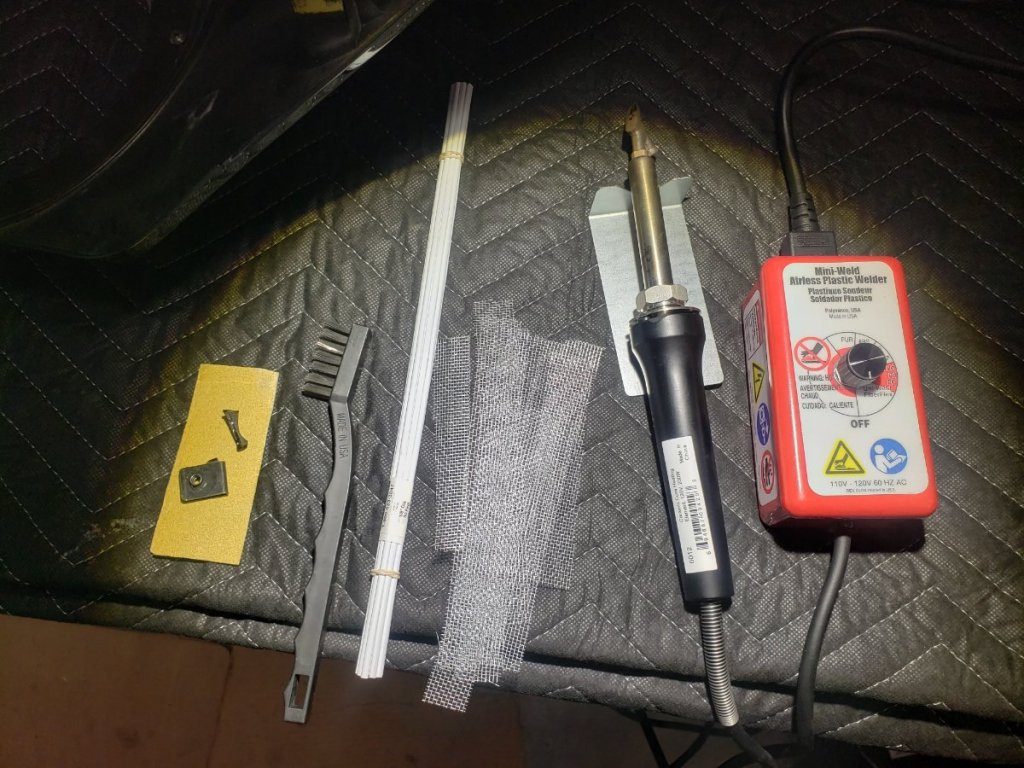
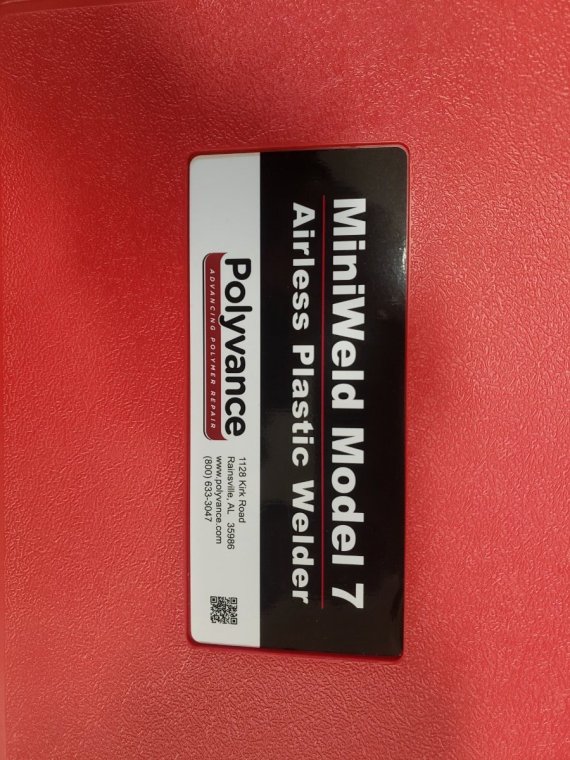
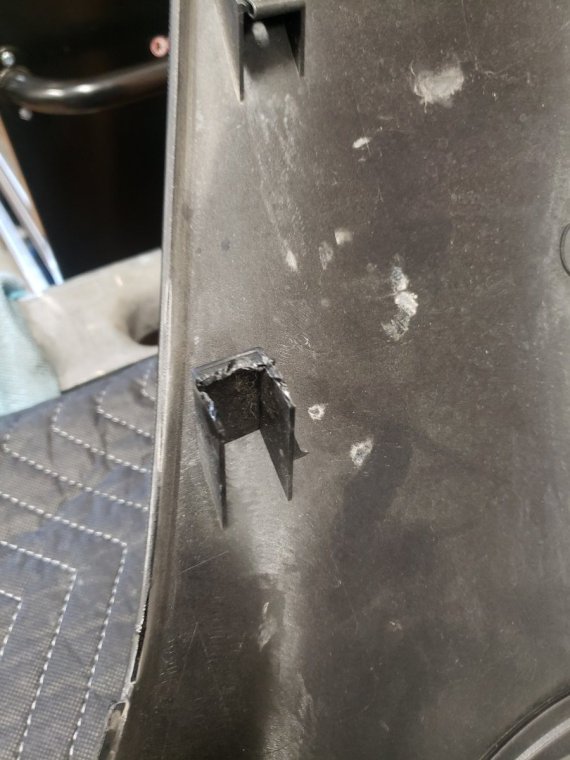
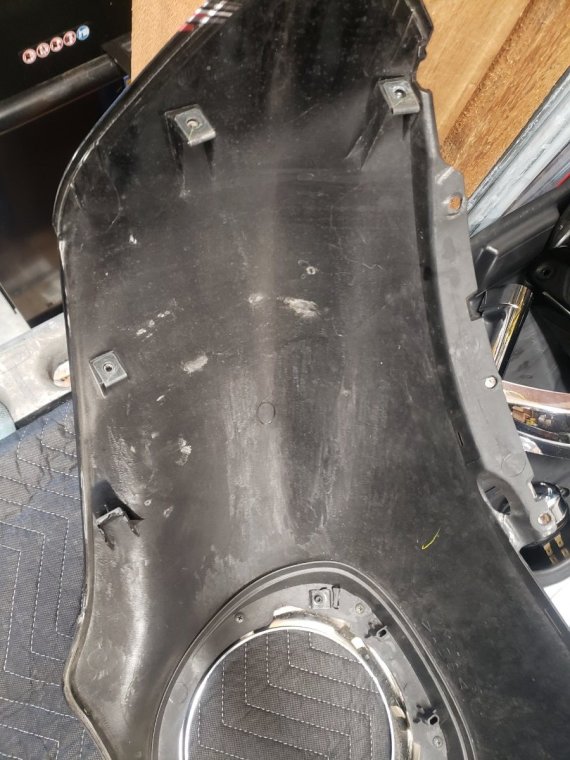
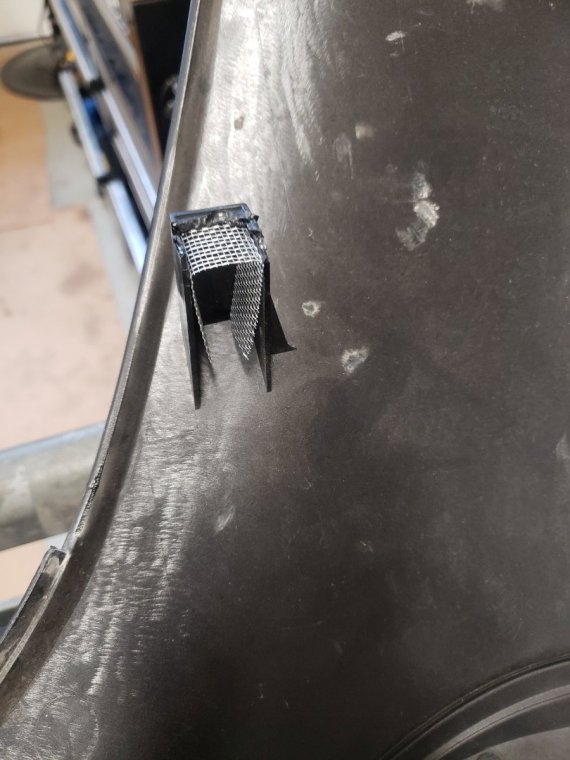
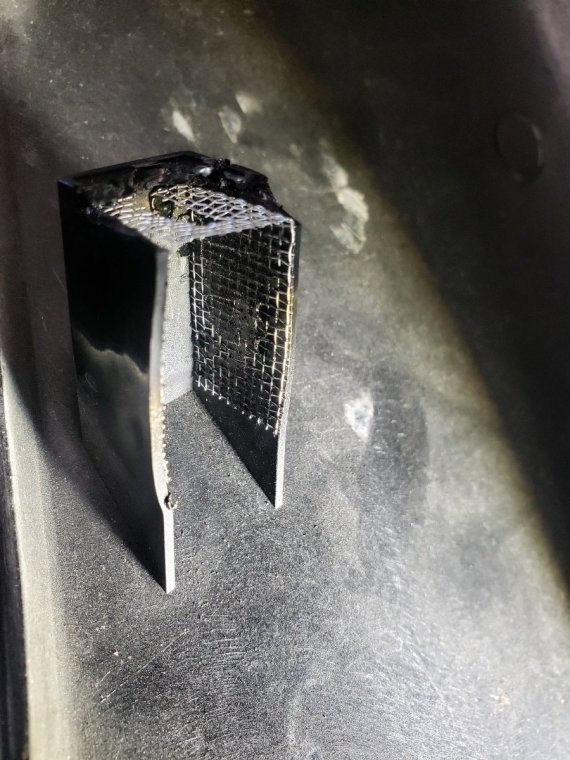
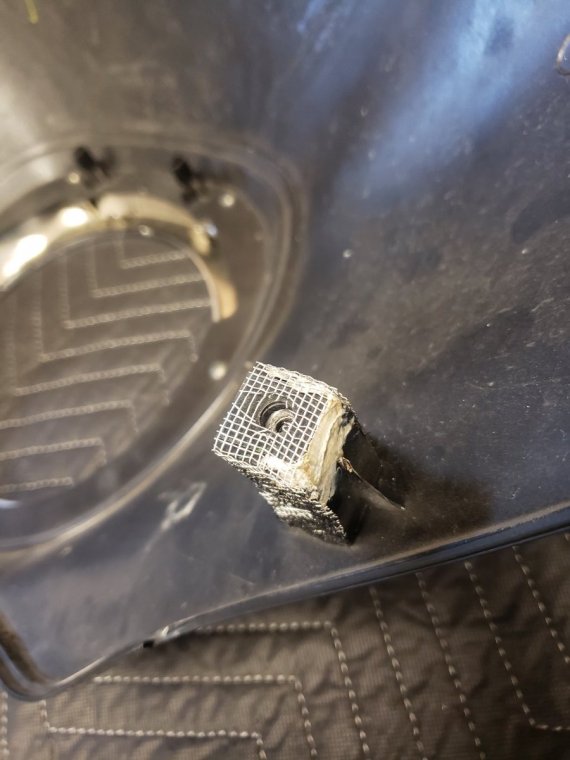
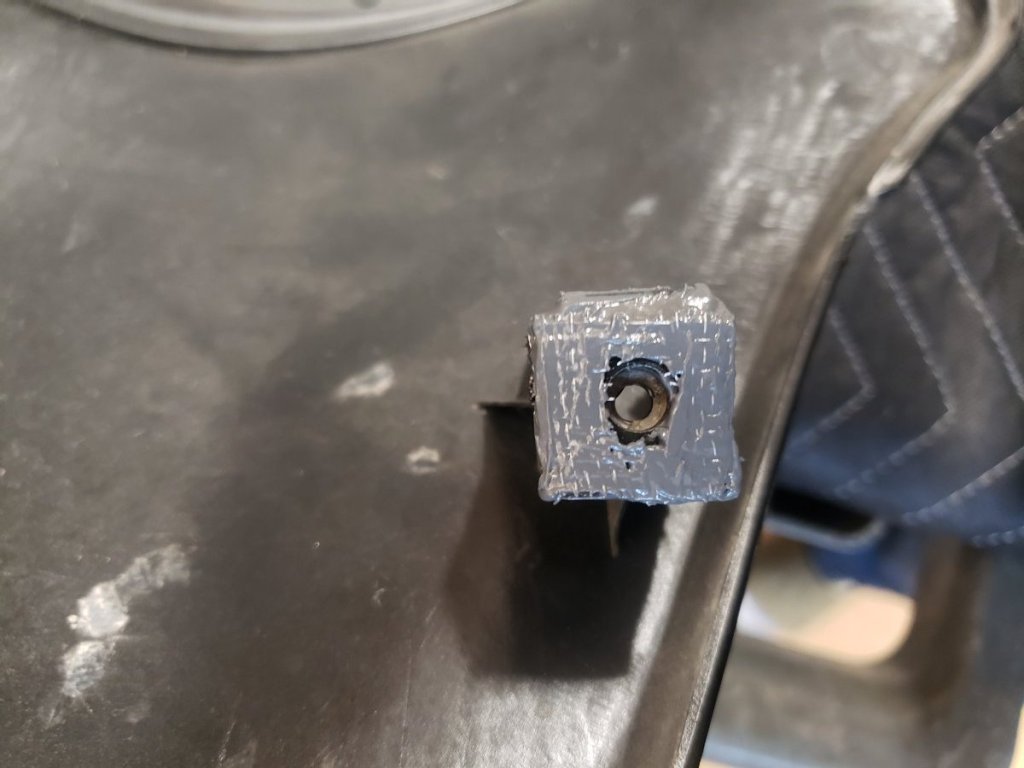
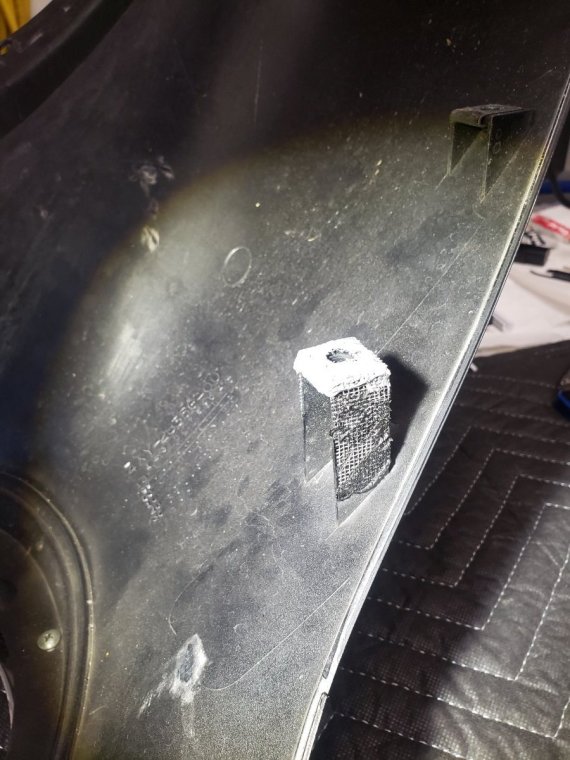
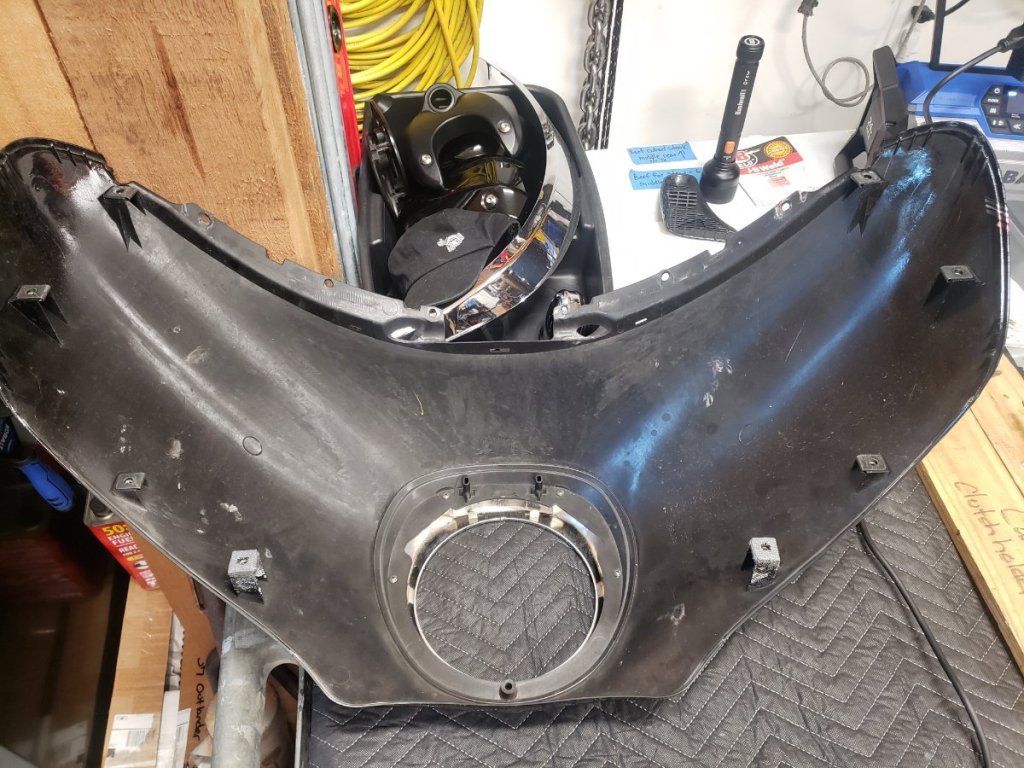
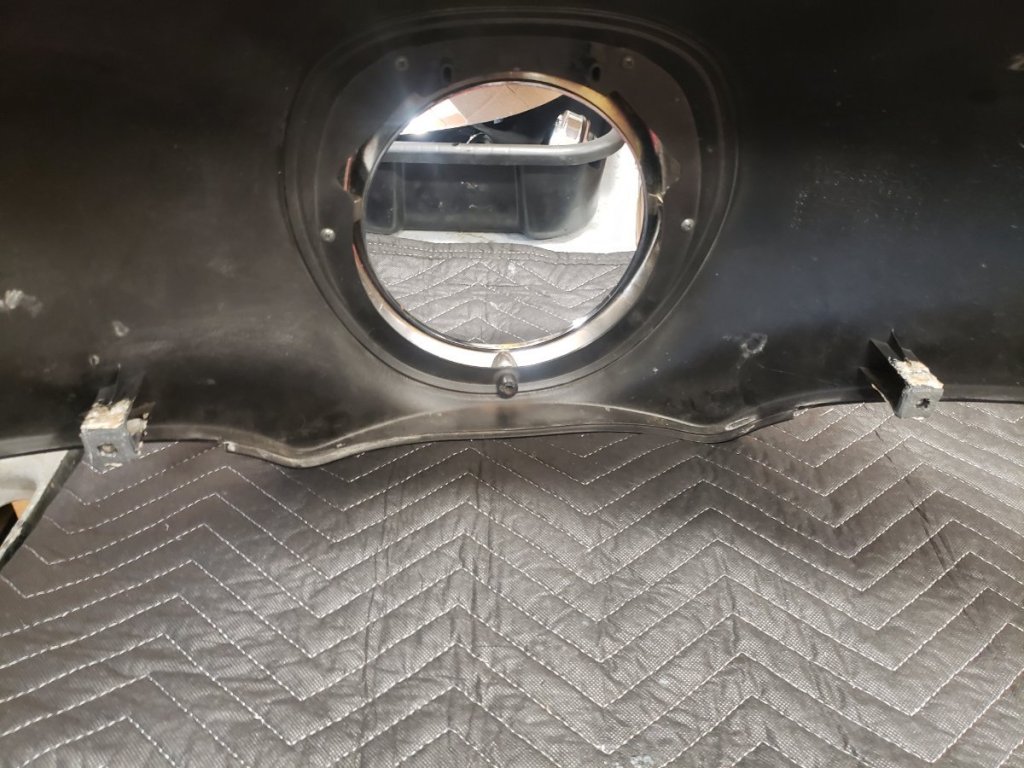
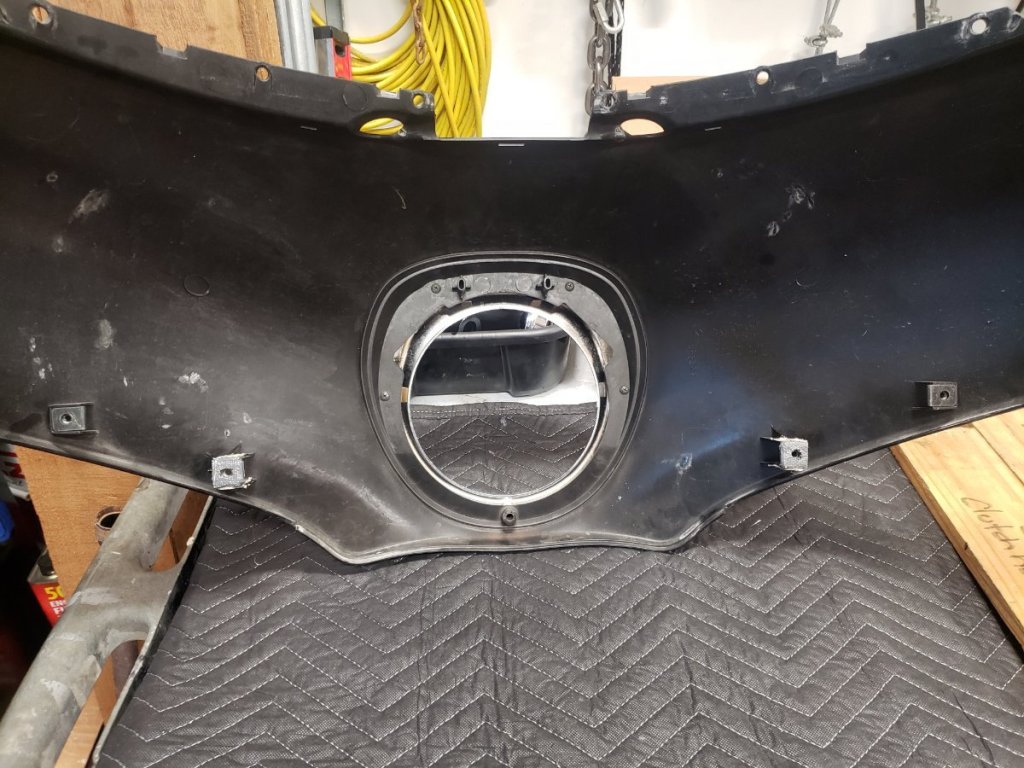
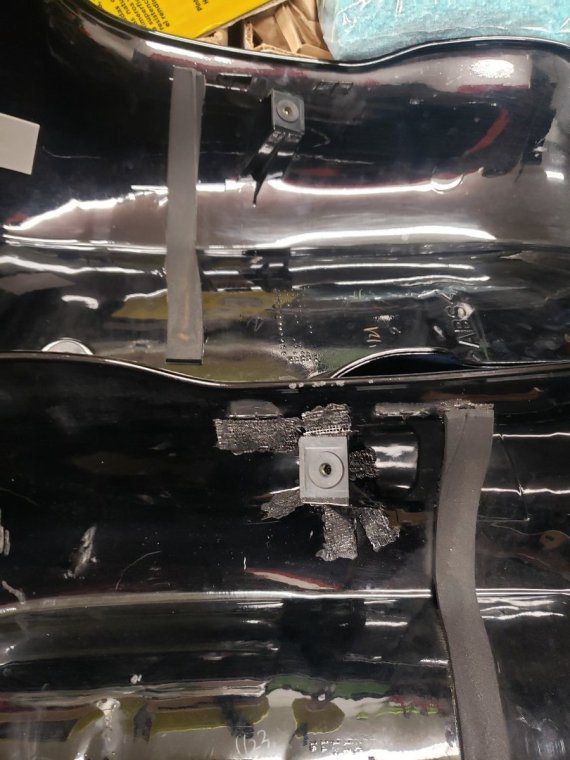
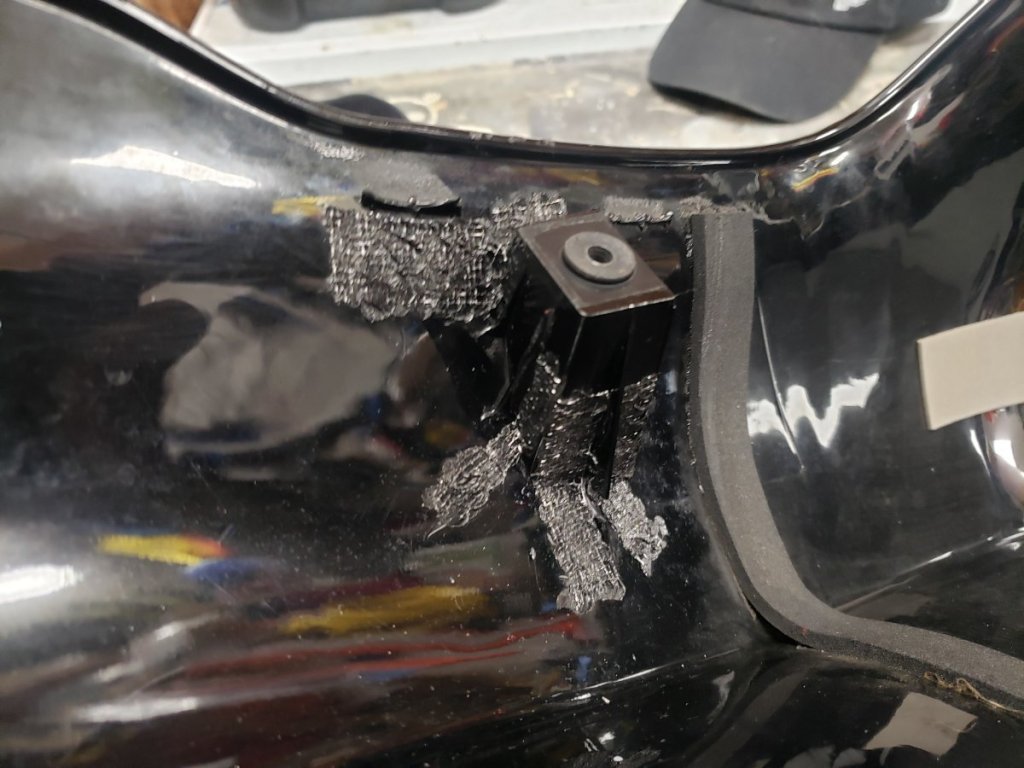
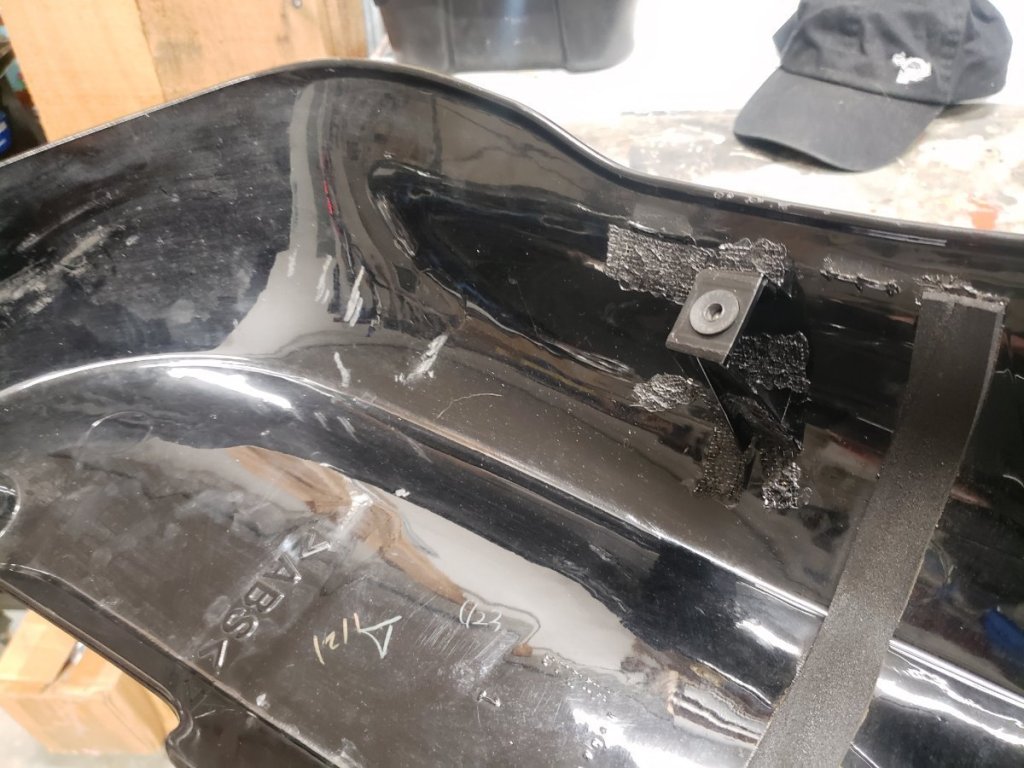
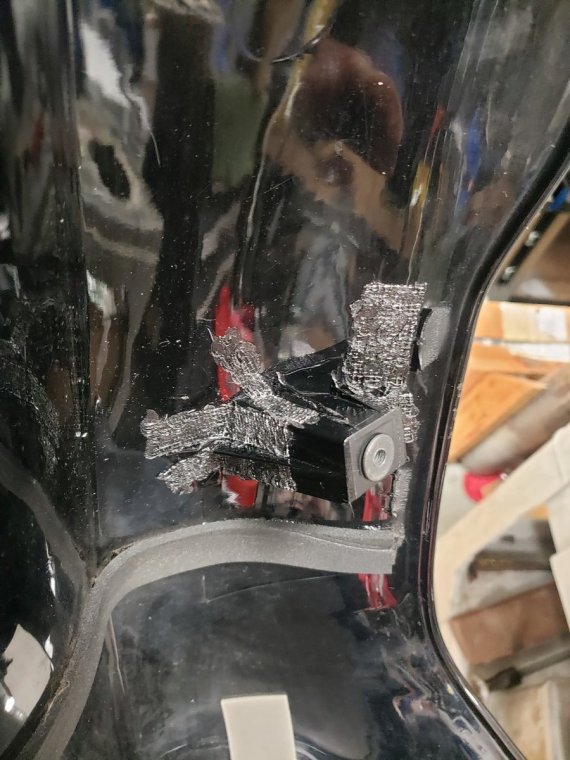
Cold weather so been in maintenance mode on my RSV, so got another write-up for some plastic welding repairs I just did to 3 broken tabs...previous owner had put locktight on the 8 bolts that detach the front fairing/batwing for some reason and when I removed the bolts for 1st time back in 2021, 2 of plastic tabs cracked since they have the metal tabs that clip onto the ABS plastic which is fairly thin. Recently 1 of the center tabs to the front "batwing" broke off completely and the other one had cracks in the plastic tab where it attached to the metal clip so it would have broken off soon too (have before & after pics of this repair). Then on the lower left front cowling that protects your knees, the top tab had cracked when the bike fell over on its side one day while I was having a dumb moment, I didn't notice how bad it was then I guess but when I removed all the body panels to do all my recent maintenance, the entire tab column had snapped off flush with the body panel when I removed that bolt...just thankful all the pieces where still there so I could repair it! I didn't get a before picture of that one but have 4 after pics. That one was actually the most involved repair cause I had to re-attach the entire tab to the cowling. Several different ways you can repair/weld plastic but I have a Polyvance MiniWeld Model 7 airless plastic welder that I have used for a bunch of other repairs in the past since myself and almost all my family members all ride quads and duel sport bikes, so plenty of crashes and broken plastics happen when having off-road fun! This plastic welder has saved thousands over the years by being able to repair vs buying new plastics, been a great investment. On the front fairing/batwing, I decided to do a combination of plastic welding & JB cold welding since the plastic was broken and the metal clip had no plastic between it to hold it in place. Since plastic wont secure well to metal I ended up cutting up strips of metal screen, formed it into a U shape and melted it into the plastic both on the inside and the outside of the plastic tab column so the screen supported the metal tab both under and over it...then I used JB cold weld to weld the metal screen to the bottom and the top of the metal tab with extra underneath it on the sides to add additional support. I used some ABS plastic to weld over the areas where I melted the screen into the tab to help strengthen those areas. Its cured and re-installed on the bike now, feels totally solid so we will see if it holds up long term. On the lower front cowling, I cut a bunch of strips of metal screen, held the broken tab in correct orientation and then started melting the screen into the plastic. I did a crapload of metal screen strips on that one since there are ridges/supports around that entire tab and I wanted it to be super solid. After the screen was all melted into place I used plastic strips called fiberflex (works on many different types of plastic) & welded that over all the screen strips. Looks pretty ugly looking at the repair on the inside of the cowling but you would never know it was repaired from the outside and I bet its stronger now than it ever was. The last 4 pics are of this repair.
- 1 reply
-
- 1
-

-
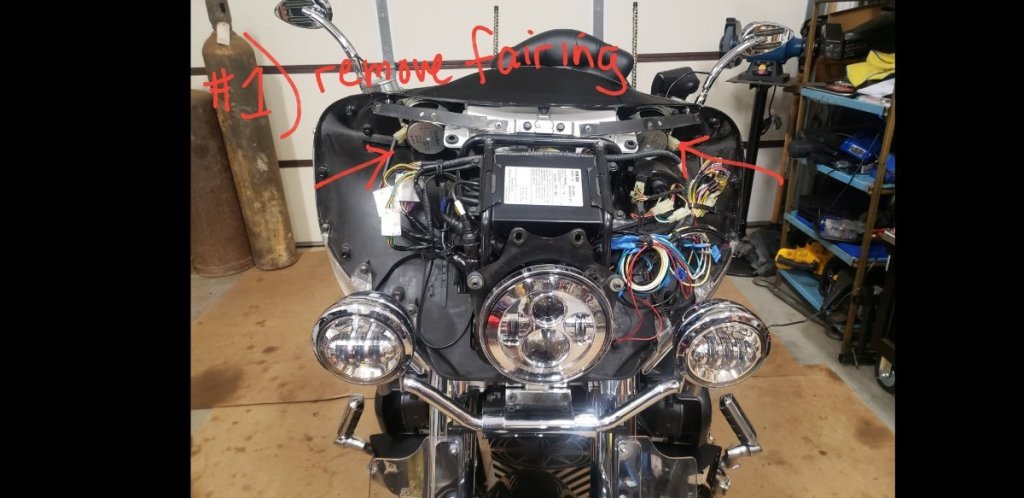
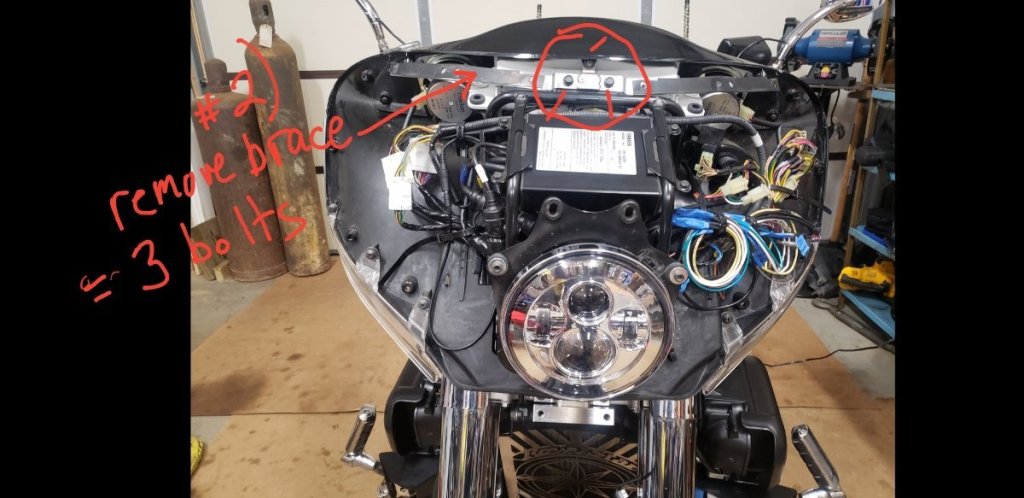
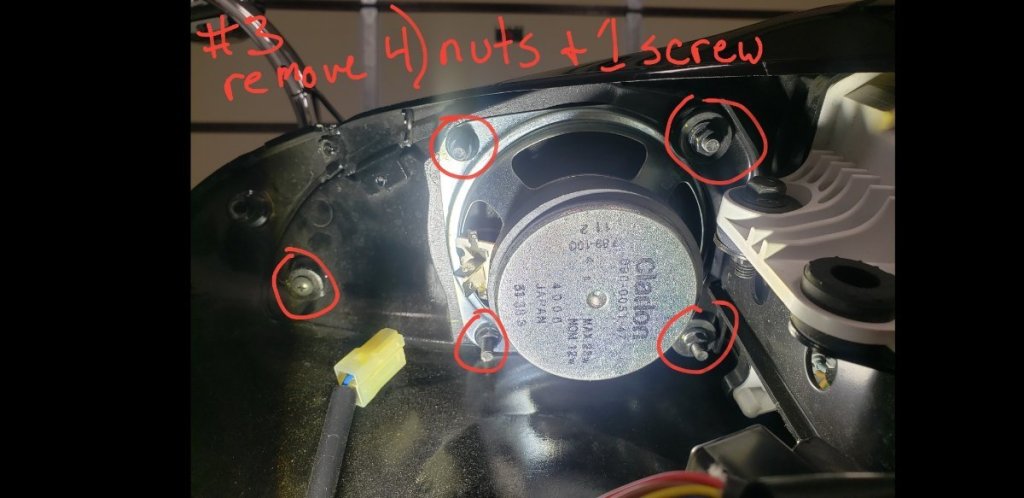
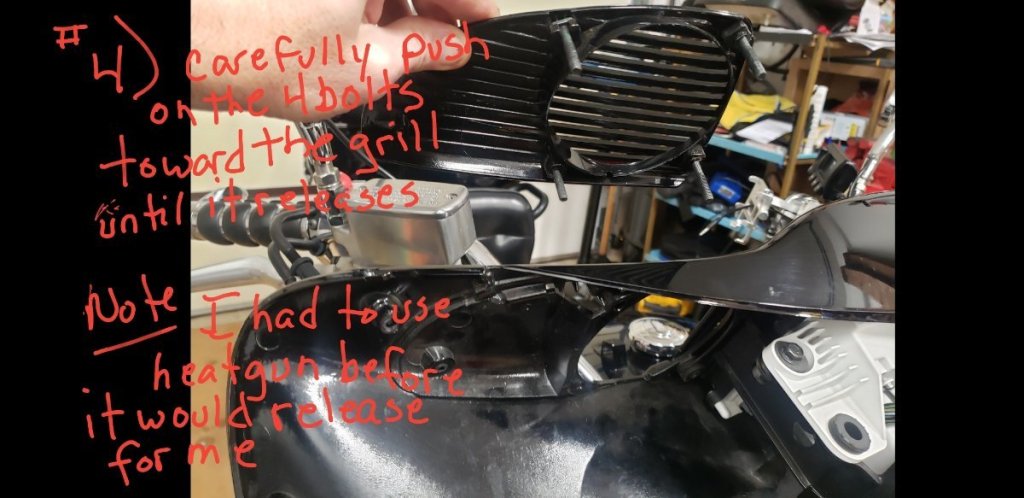
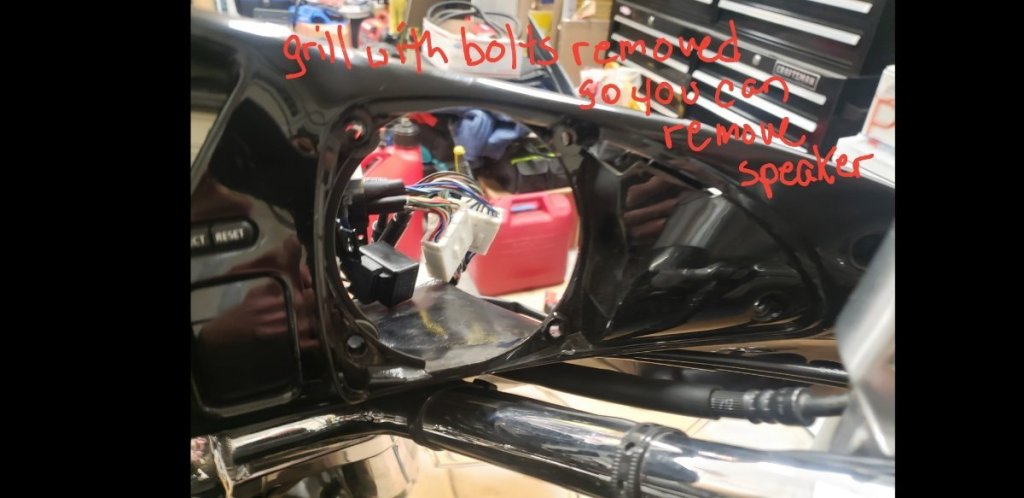
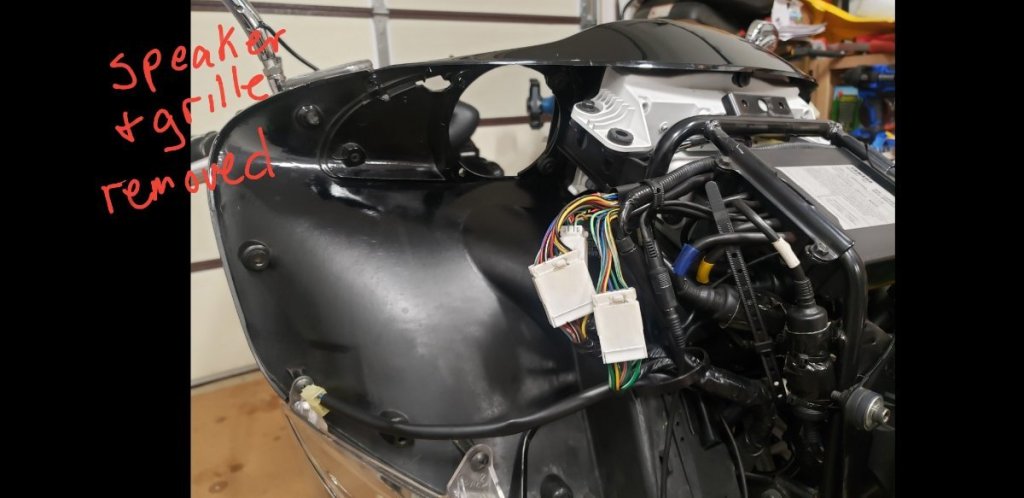
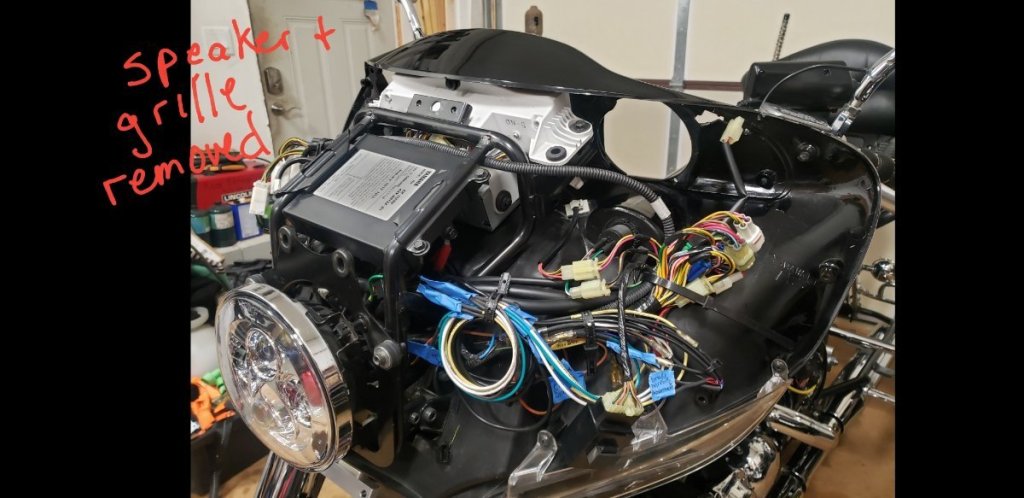
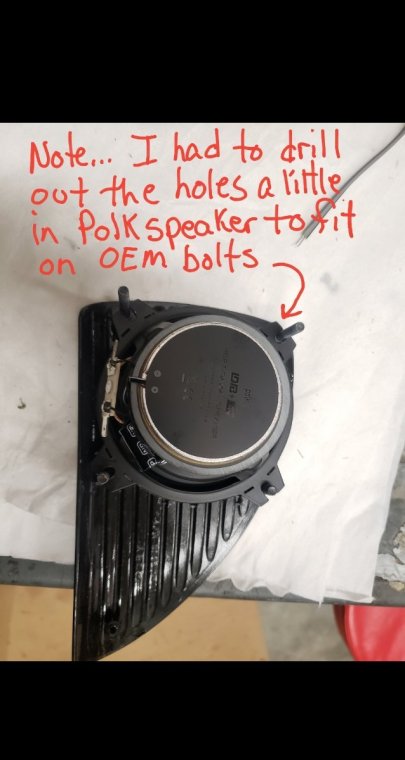
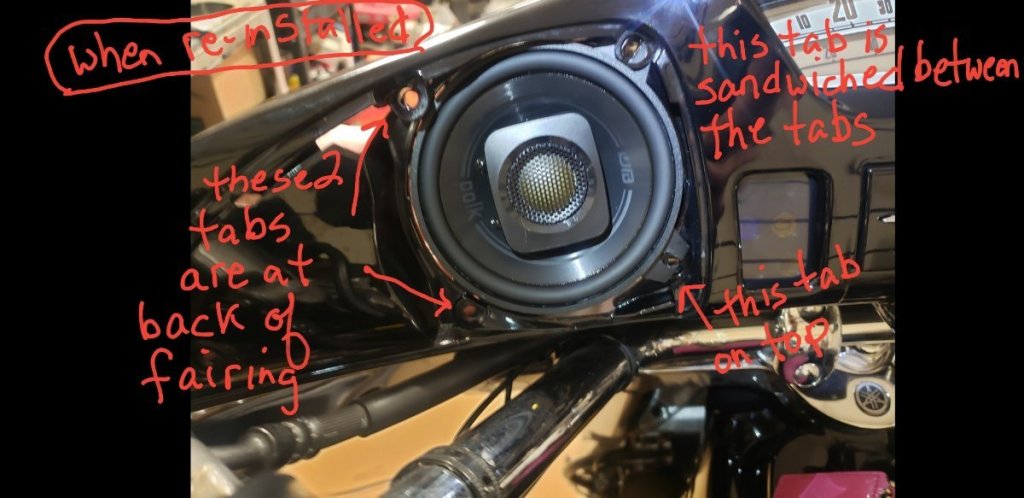
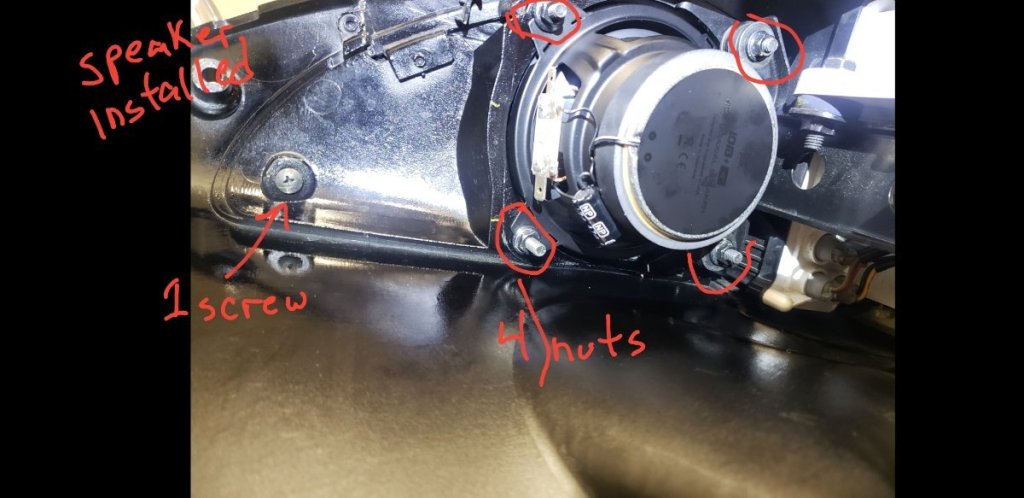
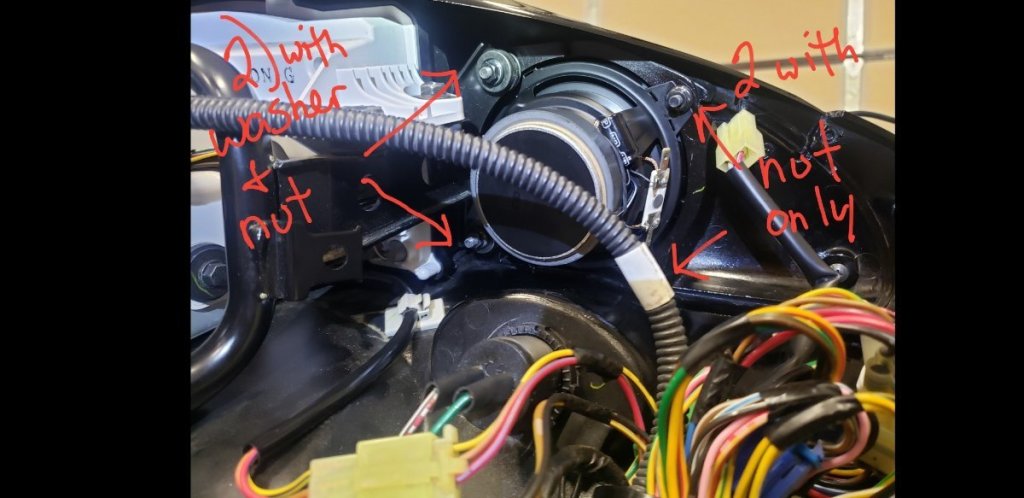
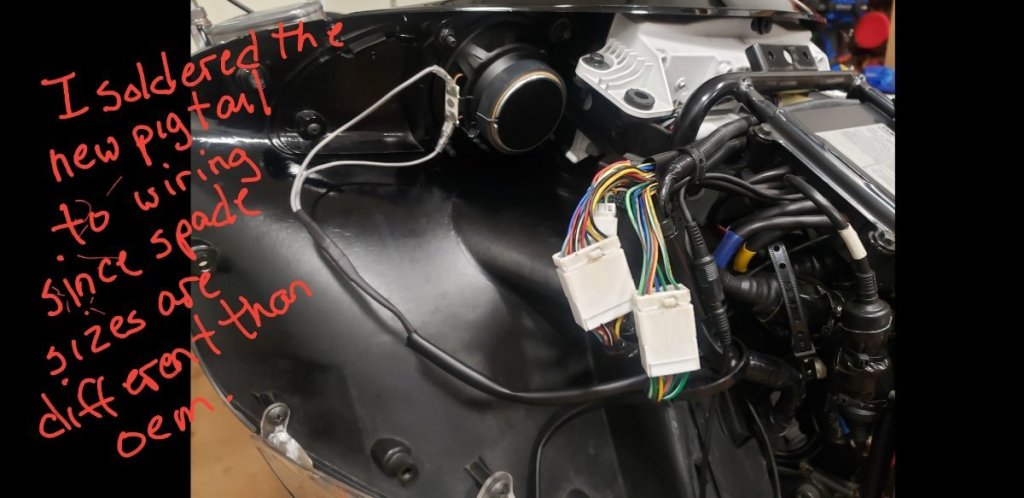
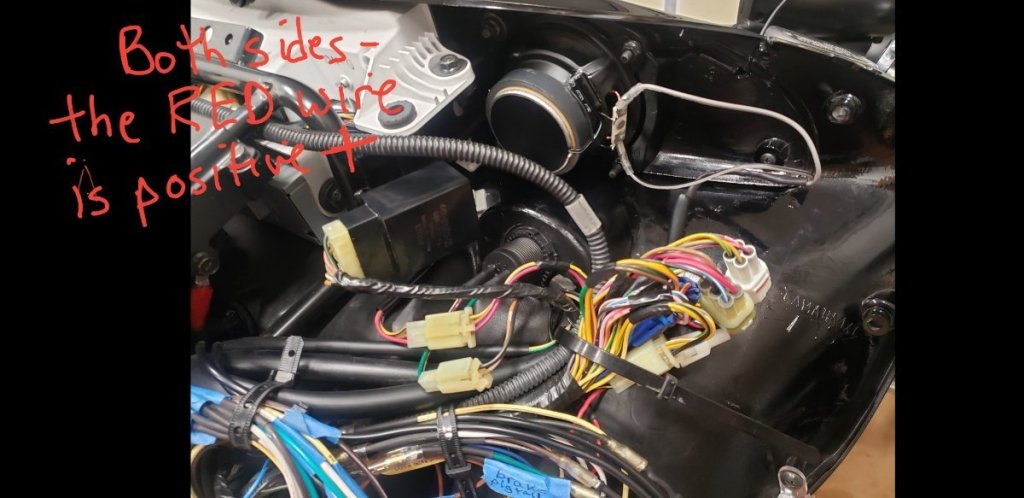
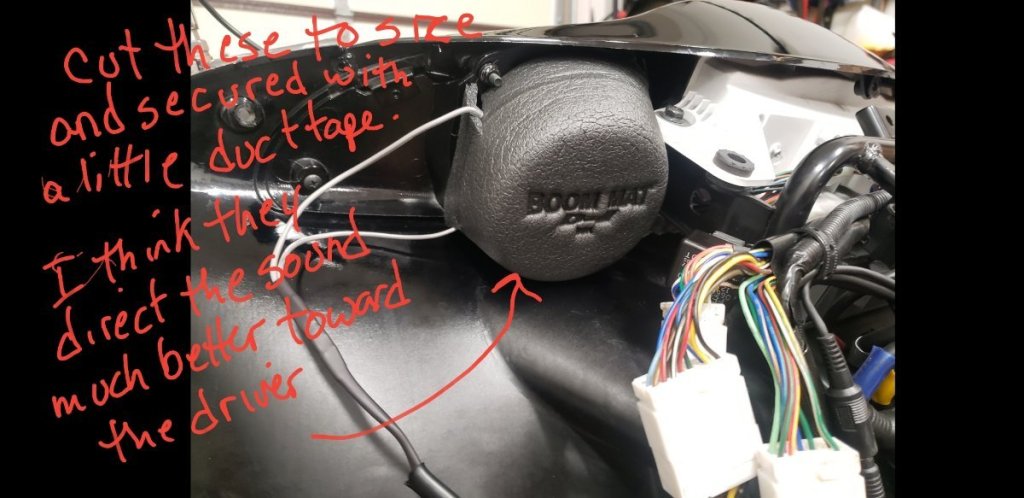
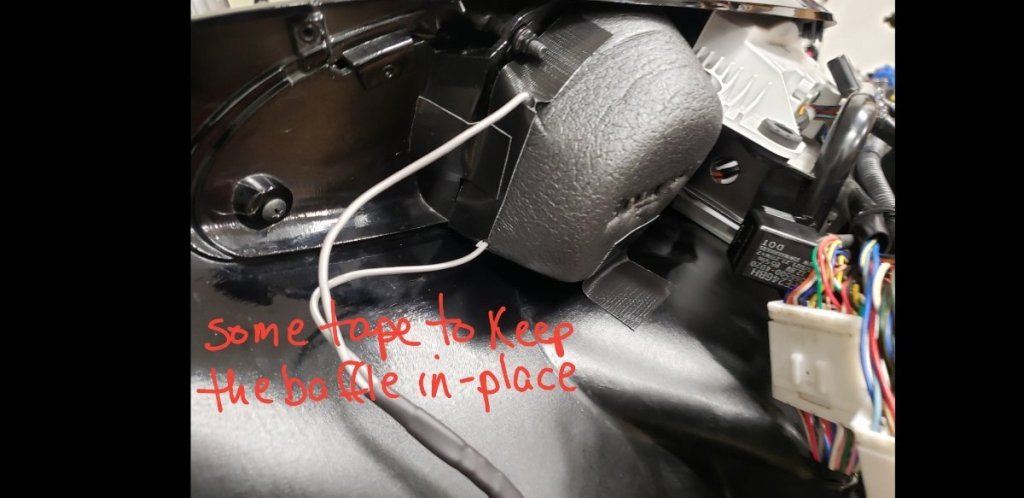
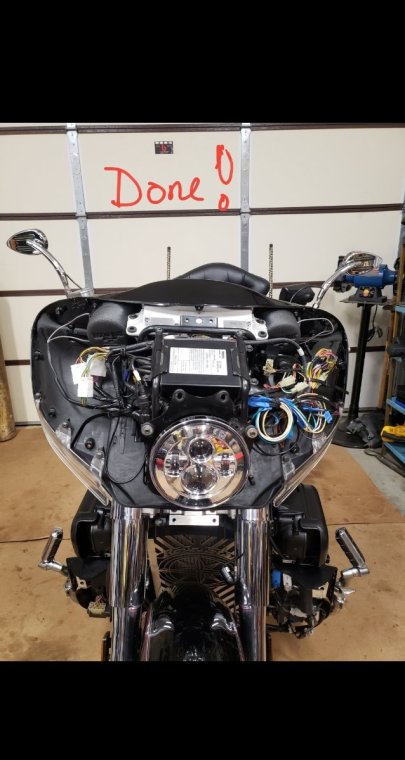
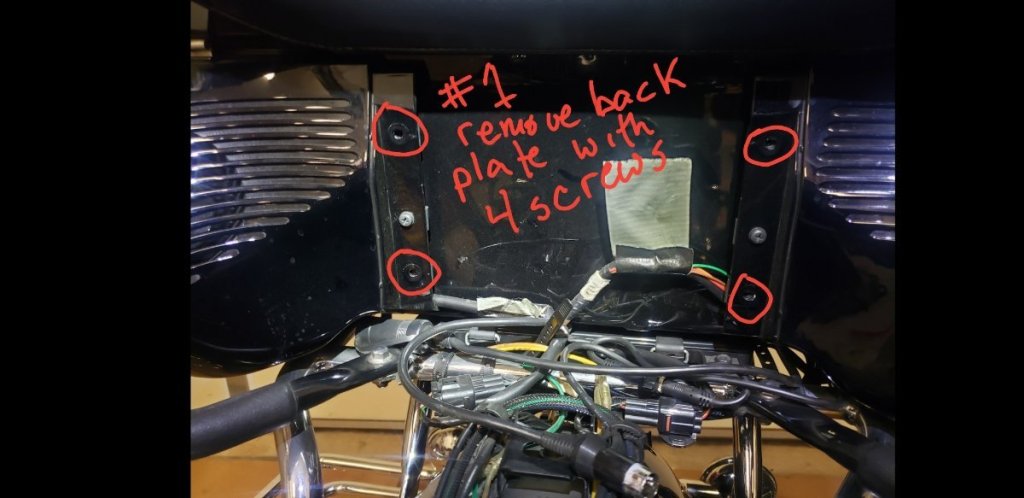
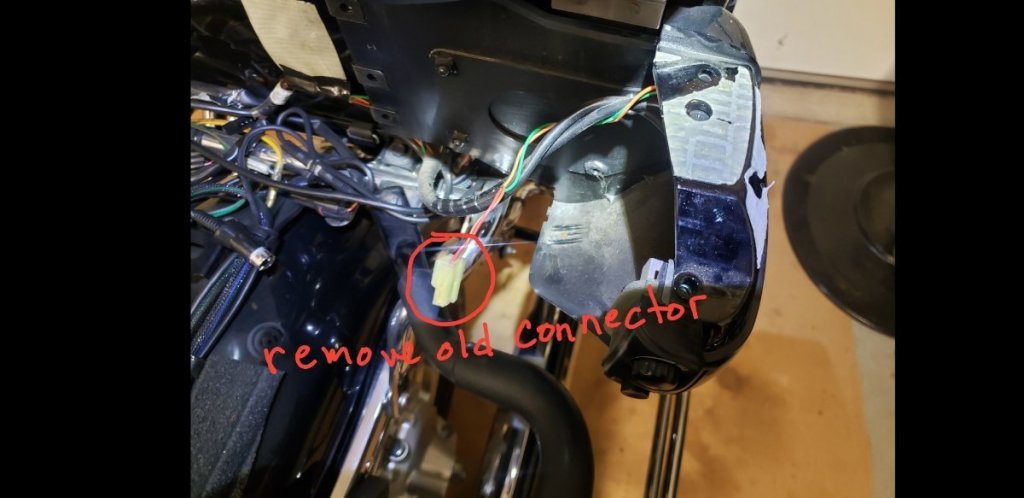
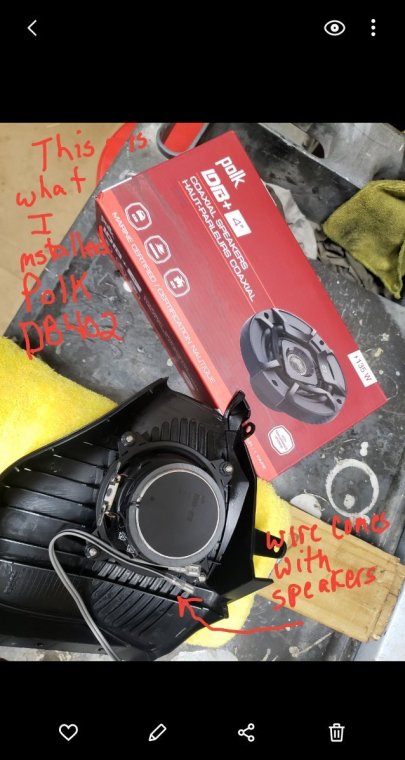
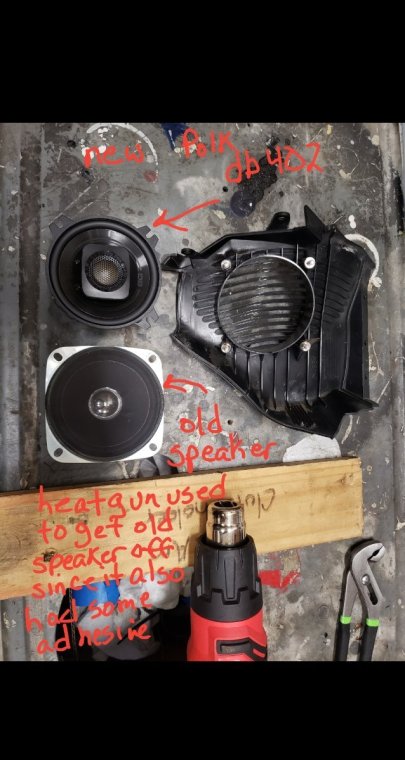
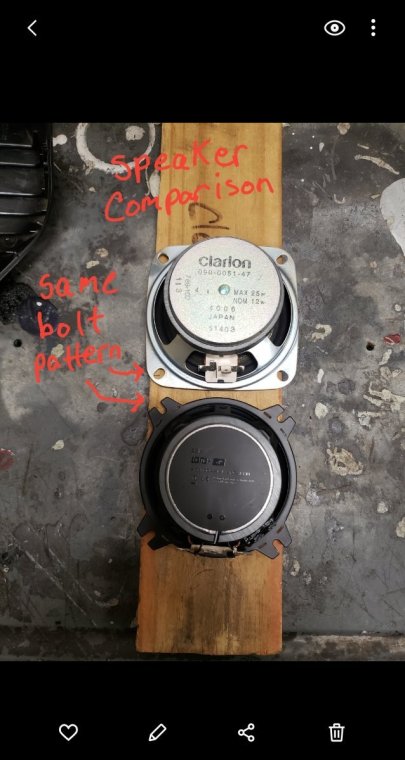
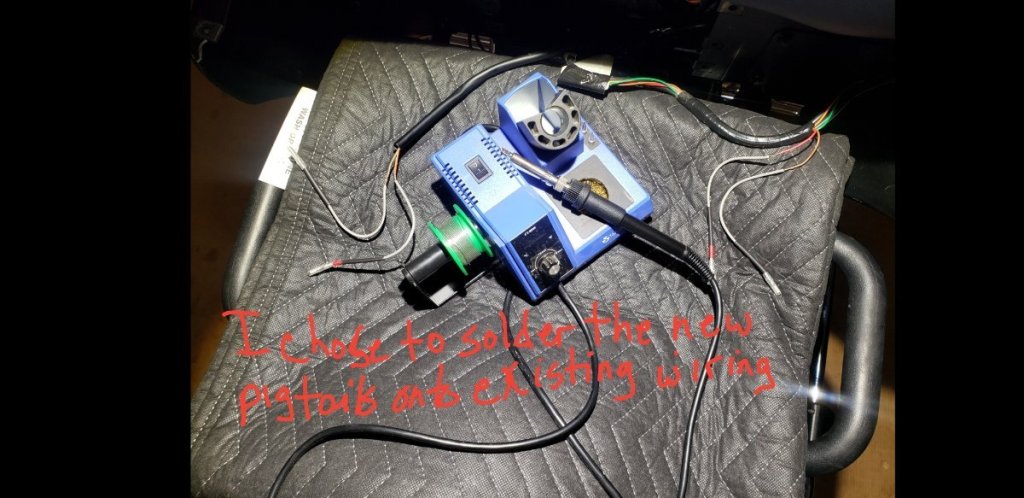
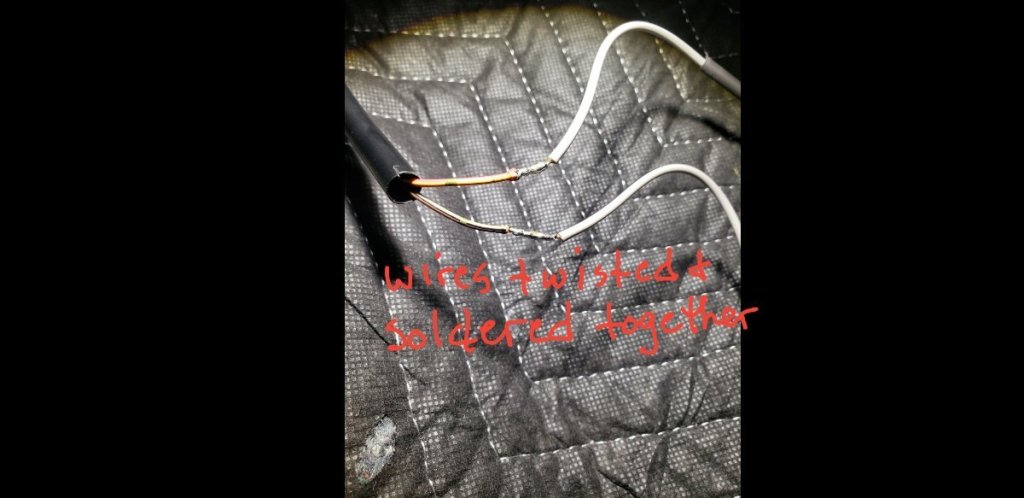
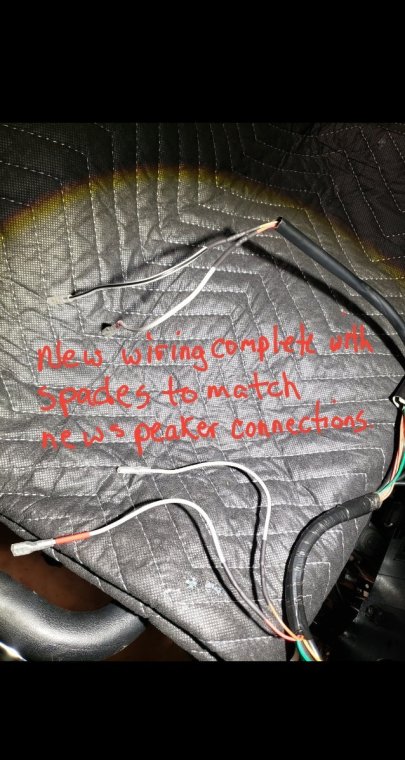
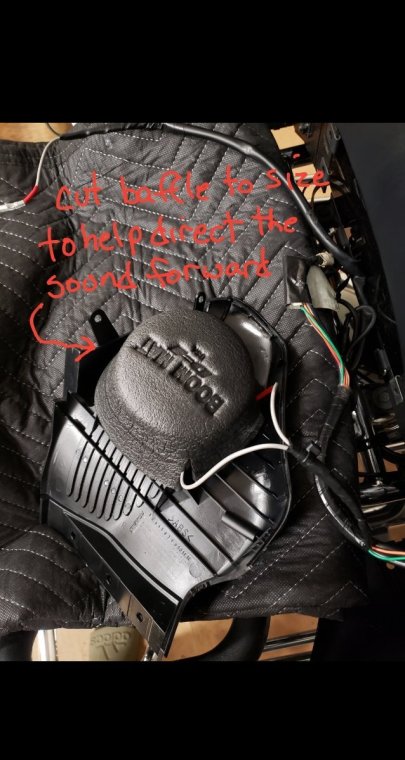
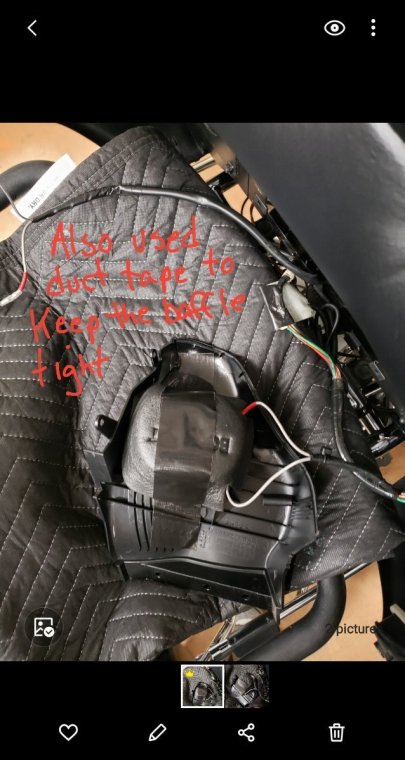
I decided to just go ahead and get the front speakers replaced today and just finished a little while ago. I did realize earlier when searching that someone else did do a front speaker replacement write up back in 2007, there may be others but that is the only write-up I stumbled upon. Figured I would go ahead and post this info anyway since I said I would do it. I used the Polk DB402 and also installed foam baffles (boom mats). After the install was done I tested it for a while without the baffles and then with the baffles. With the front fairing off it makes a HUGE difference having the foam baffles installed, before it projected the sound everywhere and with the baffles installed, when sitting in the saddle the tunes were deeper and projected right at me so IMO, well worth also installing them. I did have to trim the flanges off the baffles since its so tight behind the fairing but a little gorilla duct tape to keep them in place and I doubt they will move. Basically similar to how I installed the baffles for the rear speakers yesterday. The pictures all have notes written on them so pretty self-explanatory but 1 thing to note is after I removed the 4 nuts and the philips head screw that attach the speaker and the grille, nothing wanted to budge with some gentle prodding, being afraid I may break something (since that fairing has proved to be a little brittle at times... actually I have to plastic weld 1 of the 8) tabs back onto the front fairing that broke off when I was removing the screw earlier this evening).... anyway I used my heat gun to slowly heat up around the speaker area and blew some heat thru the grille from the saddle side of the bike, obviously being careful not to get anything to hot....and then all it took was pushing gently on the 4 bolts a little at a time and the grille with the bolts popped right out pretty easily. Like the rear speakers, the OEM connector obviously wont work and the existing spades are much too large for these Polk speakers, I wanted a nice tight connection that I wont have to worry about so since the Polk speakers come with about a 12" pigtail with the correct size spades on one end, I cut the factory connector off and took about 6" of the Polk pigtail wires, twisted the wiring together and then soldered them and put heat shrink tubing over the soldered splices. Hopefully the pics with notes are clear, hopefully this helps someone else down the road. Cheers
-
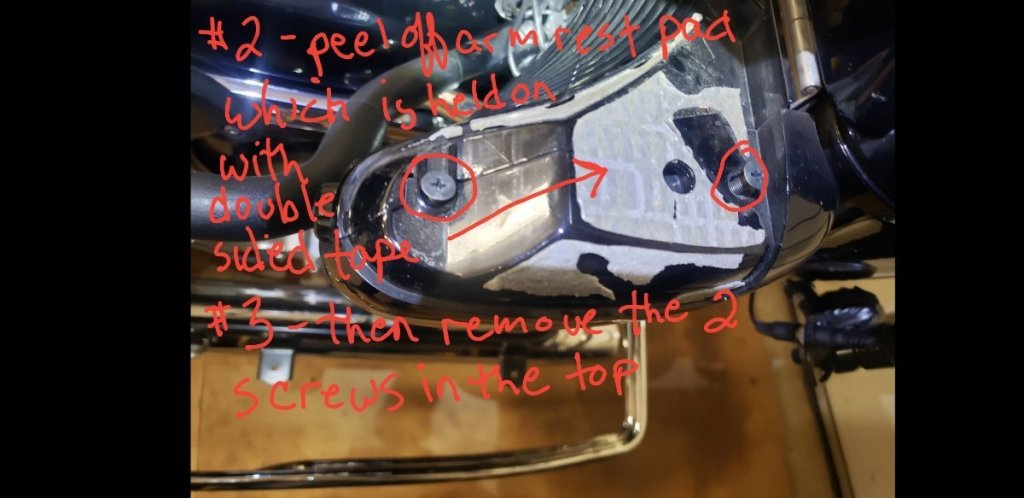
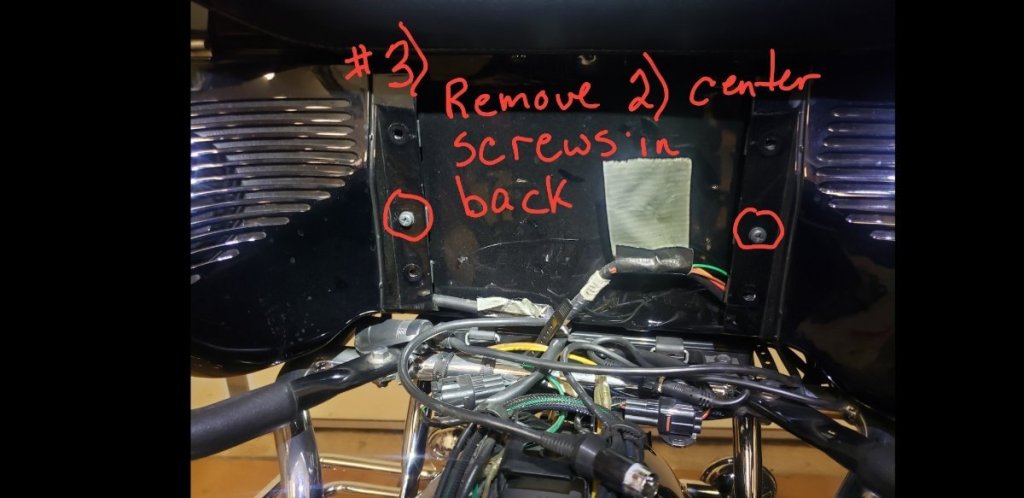
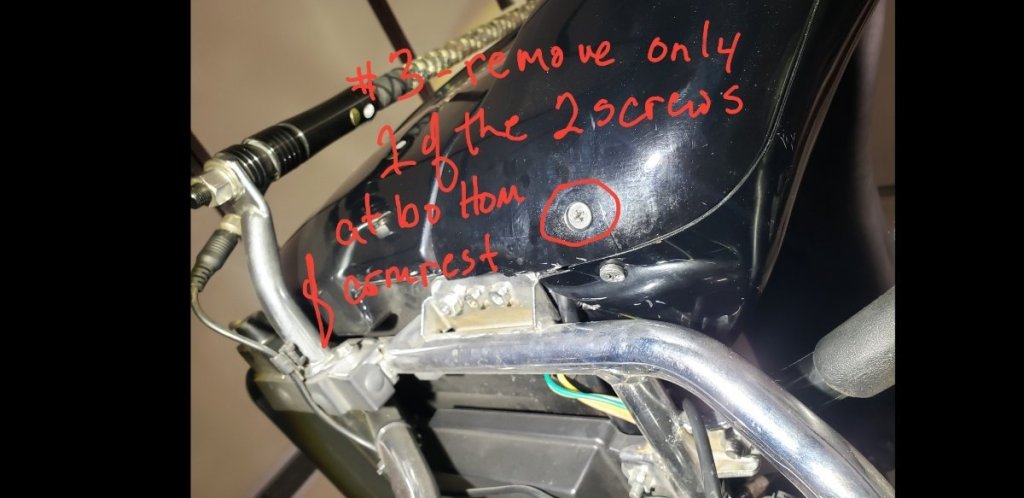
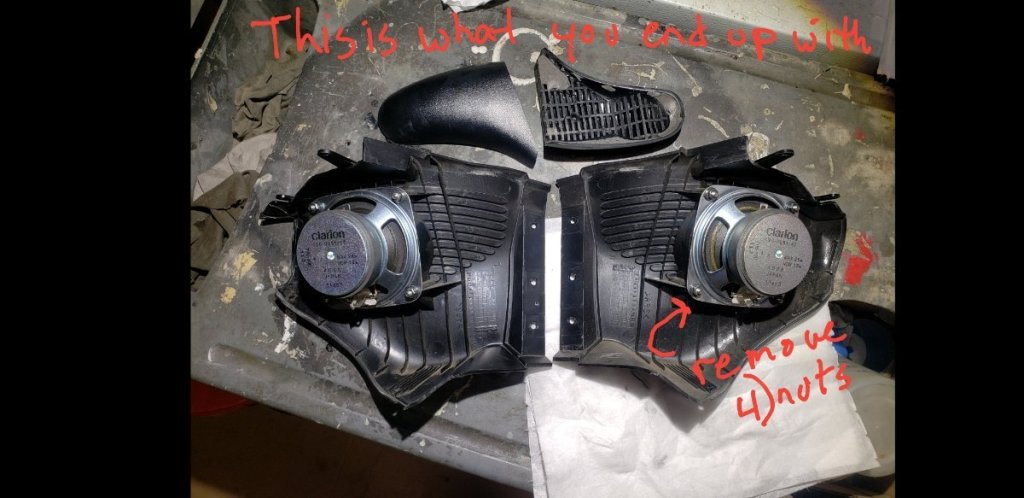
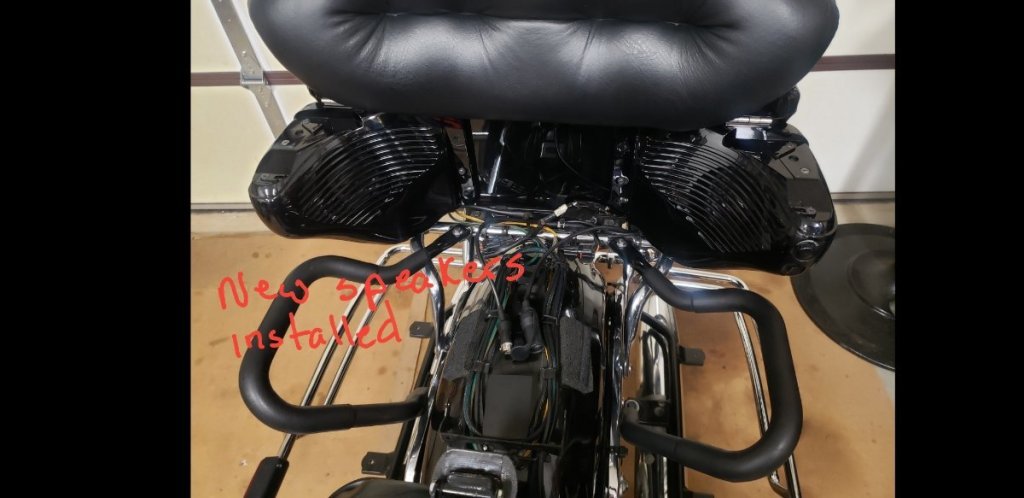
Figured I would post this since I didnt find anything that showed exactly what to do in order to replace the speakers at the rear of the 2nd gen Royal Star Venture - mine is a 2012. I got the Polk DB402 speakers since many have said good things about them and I found a great deal on 4 of them as I also intend to replace the front speakers sometime soon. I am not planning to install an amp at this time, I typically play music thru the AUX cable using my phone. Attaching a bunch of pictures with notes written on them of the process of removing, re-wiring for the different connectors needed and then re-install. Hopefully this is helpful to others in the future. You 1st have to peel off the armrest pad which is held down with a thin double sided adhesive... I heated it up slightly and then carefully pulled them off. Then remove the 4 screws in the rear center cover that passenger leans against. Then to remove the plastic housing on each side which the speaker is connected too there are 4 screws to remove, note that all 4 screws are different so you may wanna label where each one goes. There are 2 screws at the top which are under the armrest pad. There is 1 screw at center rear where passenger leans against...and at the bottom there are 2 screws but you only remove 1 of the 2. Initially I removed 1 and then started to remove the 2nd not realizing that there is a small metal bracket that is held in place with those 2 screws so once you remove 1 of the 2... the other is just gonna spin the bracket which runs risk of breaking something so only remove 1 of the 2. The OEM Clarion speaker has different connectors than the new Polk DB402 so I removed the spades from the connector... and since the Polk speakers come with wiring pigtail that has the properly sized spades I cut the old spades off the OEM wiring and then soldered the pigtail to the OEM wiring. The OEM speaker is disconnected with 4 nuts BUT it was also held to the plastic housing with some sort of adhesive that didnt wanna release, since I didnt wanna risk breaking the housing, I used a heat gun to heat that area up around the OEM speaker and then it pulled loose pretty easy. The Polk speakers have the same bolt pattern so it was easy to push the tabs onto the existing bolts and then re-install the nuts. I has some foam baffles but being pretty tight back there I cut them down some and cut slits in the foam where the wiring connects to the speakers and then used some duct tape to hold the baffle down tight to the back of the speaker so it would direct as much of the sound forward as possible. Speakers sounded really good after the install and seems well worth the cost. I will likely add an amp down the road but not something I am planning to do at this time. Will get the front speakers replaced at some point this winter and will also do a similar write-up when I do that. Happy Holidays!
- 1 reply
-
- 2
-

-

Started on valve cover gasket replacement process
InfinitySurf replied to InfinitySurf's topic in Watering Hole
Got it all back together to start it up earlier... started & ran real good once I dialed in the idle setting properly. Still misting and wet from all the rain here so after letting it warm up good I only drove it about a mile thru the neighborhood and it ran good so super stoked about that! Since in neighborhood it was only 1st gear with 2nd gear only in lower rpm's...only thing I noticed that may require some tuning was in 2nd gear at the lower rpm it "burbled" a bit when I twisted the throttle good, almmost sounded like it was running a little rich. Probably easily tuned out using the air/fuel mix screws. I know all the carb boots and air filter system is tight with no leaks but also gonna double check the exhaust flanges to be sure I dont have any air leaks there since I suppose that could also cause something like that, those short y-pipes are not the easiest to get on/off since you gotta flex them together for them to fit smoothly so hopefully I didnt bogger up either of those seals at all. What is the easiest way to check for air leaks there, spray bottle with soapy water? Gonna get my carb tune out and make sure all the carbs are synced well and then take a break to work on some other projects once I get it all running perfectly and know for sure I wont have to work on it once riding weather comes back. Last thing on my to-do list for this bike is to install 4) new DB402 polk speakers for the front/rear tho it will likely be a few weeks before I get back to that . Thanks for anyone who helped me thru this with comment/advice! -

Started on valve cover gasket replacement process
InfinitySurf replied to InfinitySurf's topic in Watering Hole
Got the new vacuum slide diaphragms installed last night & then re-installed the carbs, airboxes & fuel tank for a quick run test. Been raining for the last few days so fired it up inside the garage for about 30seconds just to confirm it would run and no more gas going thru overflow hoses. Would run on choke only but I am guessing that is partly because I still haven't yet re-installed the mid y-pipes or the mufflers so zero back pressure. At least now that I know it will run right and that my float heights are likely correct and no more air leaks from the diaphragms (I made sure each diaphragm was air tight by using air compressor to do a short blast thru the carb hole to make sure it would operate the needle slide from air pressure...glad I tested before installing the carbs cause one of them still had a minor air leak after install so I removed, adjusted & re-installed and then re-tested and it was good to go after that). Figure now I can put everything back together to give it a proper test. Since I had all 4 carbs completely apart I probably need to reset the idle and may need to tweak the air/fuel mix screws (assembled them at 3.5 turns out which is where they were set initially and also the starting point that Ivans Performance recommends it be started at after installing his needles & main jets). -

Started on valve cover gasket replacement process
InfinitySurf replied to InfinitySurf's topic in Watering Hole
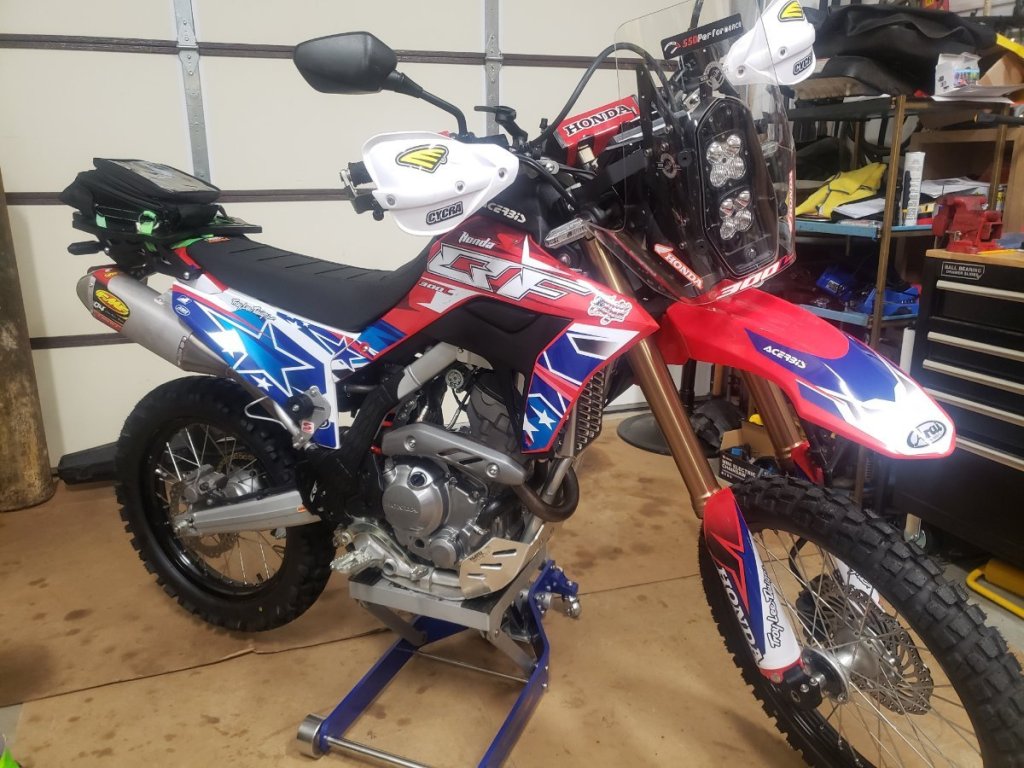
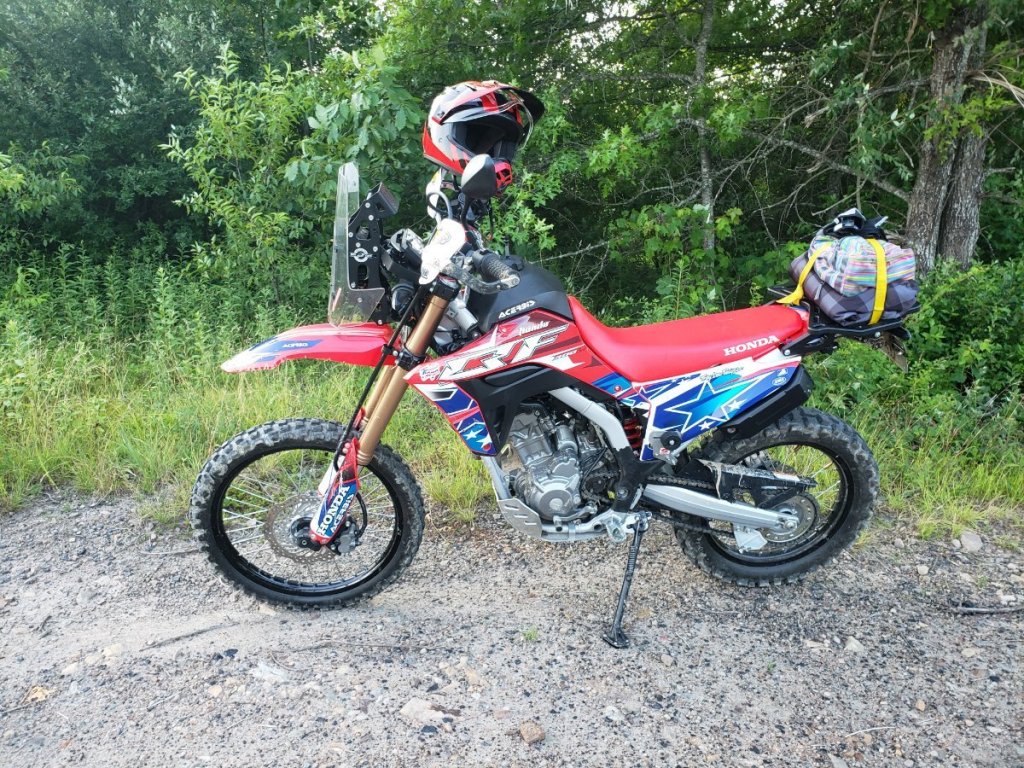
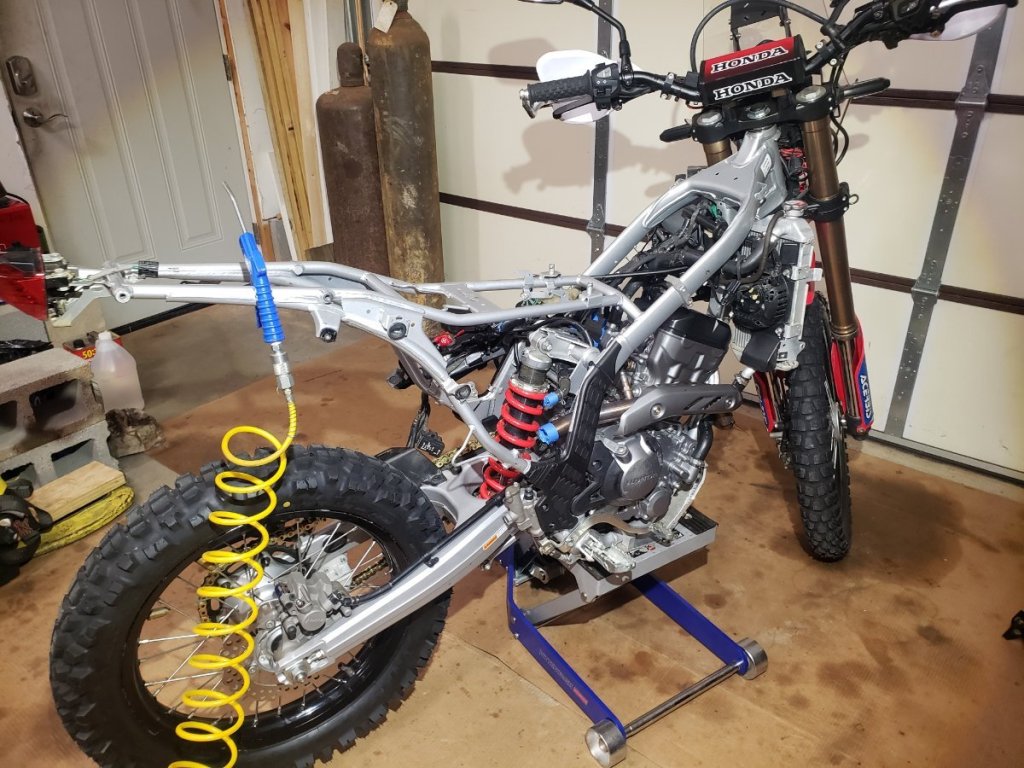
Received the 4 OEM diaphragm's in the mail today so planning to get the old ones replaced and the RSV back together again so I can crank her up & make sure there are no other issues. The weather has been pretty crappy this week so been in the garage quite a bit. I just finished putting my duel sport bike back together today (Honda CRF300L), had it stripped down to replace the cams and do some air box & throttle body mods and had the ECU re-programmed to give her a little more go juice. Still enjoy riding trails and doing occasional single track racing. Hope everyone had a great Christmas! -

Started on valve cover gasket replacement process
InfinitySurf replied to InfinitySurf's topic in Watering Hole
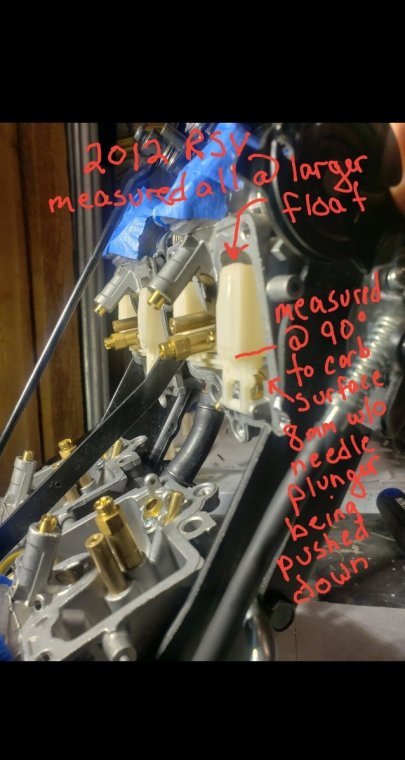
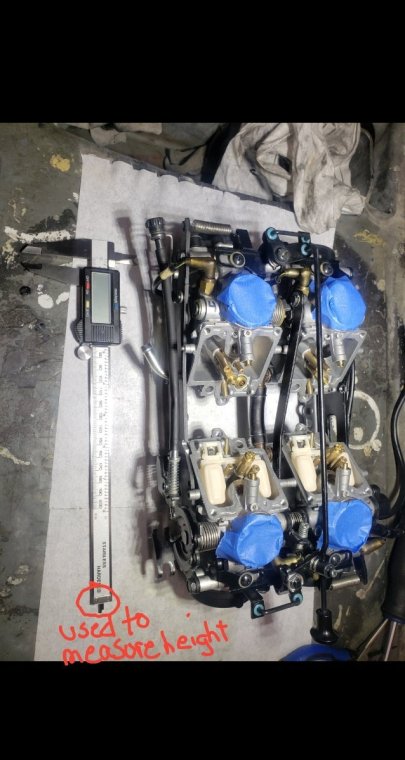
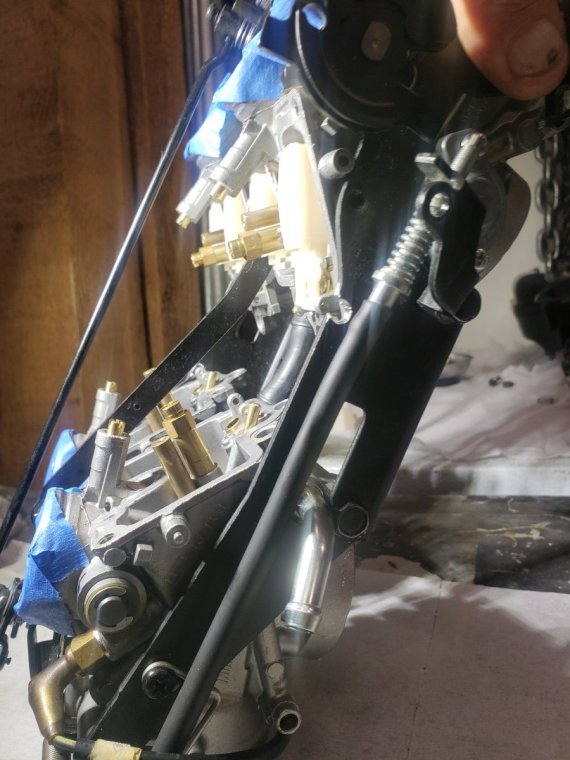
Was super careful this time around with these floats and am feeling good about it working properly this time around since I also found a thread earlier today where @V7Goose reset his floats a while back and used .034 or approx 8.4mm for his float heights and his write-up pretty much confirmed what I needed to change and how to measure (I think the 1st time I also used the skinnier float for the measurements not realizing that they sit lower than the fatter floats so I was originally probably closer to 9.5mm height which was No Bueno. Not sure how I missed seeing it previously since I searched a while back and didnt find it then but I sure as hell wont forget the lesson I learned doing it wrong the 1st time! Would have had to pull carbs back out anyway cause I realized after doing some testing that 2 of my 4 vacuum slide diaphragms didn't have a good air seal cause they shrunk some on outside diameter and are too deformed for me to make them work...figured out a neat trick to test them after install using air compressor to confirm they are properly seated. Anyway, set all the float heights at 8mm (using the larger float side on all 4 to measure height) and also held the carbs at approx 75 degree angle while measuring to ensure that the needle plunger was not being depressed at all since it doesn't take much pressure to compress them, even at 45 degree angle the weight of the floats will start compressing the plungers & throw the measurement off. Was one of the things V7Goose had in his writeup that made a lot of sense and worked very well. Thank you Goose! Soon as the OEM diaphragms arrive in a week or so I will change them out and then put everything back together so I can re-test. Fingers crossed -

Started on valve cover gasket replacement process
InfinitySurf replied to InfinitySurf's topic in Watering Hole
Got everything torn back apart last night and removed the carbs. Nothing was obvious regarding the fuel dumping out the overflow, it was the rear left cylinder #1, you could see a little fuel inside the intake boot mounted on the cylinder and the top of the piston was also wet when I removed the spark plug. No other cylinder pistons had any access moisture in them. Pretty sure it had to be one of the needles/valves not sealing properly that caused this. On side note I do think I set the floats a little too high (or low when carb is upsidown) since factory setting was really far off as other people have previously noted when they checked their float heights (mine were set at 6.0mm from factory and spec is 8-9mm). When tab is bent to "raise" the floats to the proper level, when it pushes down on the needle into the valve seat it pushes the needle sideways a little bit and I am guessing that had to be the reason the needle didn't seal correctly so gonna find a happy medium where I can get the floats close the the recommended height with the tab as straight as possible so that hopefully doesn't happen again (I did install new valves/needles/o-rings previously), thinking if I go with 8mm or .0315 it should prevent that and I will be within spec, initially I had set them at 9.0mm or .036 which is on the high end but when re-measured after taking the bowls off again they were all closer to 9.3mm so gonna be more careful this time around resetting them. Another thing was when I previously re-assembled the carbs after re-building them I noticed that my vacuum slide diaphragms had shrunk a little bit which I guess is too be expected being 12yrs old and they were tough to get back into the outer grooves when re-installing the outer diaphragm covers, I used a little dielectric grease on the outer edges of the diaphragms to help them slip into place but when I removed the cover for the Cyl #1 cover I realized that it had pinched the edge a little. So bit the bullet and ordered 4) new OEM slide diaphragms last night which will be here in a week. I know that would not cause the flooding/rich condition.... if anything once running a bad seal on the diaphragm would cause a lean condition but glad I caught that since I would have potentially fixed the flooding issue and then had to pull it all apart again later once I realized the bike wasn't running right since with a vacuum leak I would never have been able to sync up the carbs properly. Honestly if this is the only issue I run into after stripping the bike down as far as I did over the last 4 weeks including tearing off the entire rear end including the swingarm, I will be pretty happy! Once I got her back to running right my last planned upgrades for the winter include removing the front wheel to also replace the bearings/seals on the front wheel (already did the rear and there was VERY little factory grease in them)...same with the swingarm bearings tho I did not replace them, I just cleaned them out and re-packed them properly with Lucas synthetic marine grease as well as all the needle bearings in the suspension linkages. I also recently bought 4) of the Polk 402 speakers & foam baffles that I plan to replace to get a little better sound, maybe down the road I will add an amp under the rear trunk and install a good head unit where the factory cassette player currently is. The only issue on this bike I have never been able to resolve is the fuel sender gauge. Since buying the bike in 2021 the fuel gauge has had 8 blinks.... from my research that pointed to replacing the fuel sender assembly in the gas tank. I replace it in 2021 and the same thing kept happening, thinking I got a factory dud I sent it back and get another new replacement, installed it.... and same thing. I have ohm'ed out all the wiring and done everything else I can think of and never been able to figure out that issue so I have just always reset my trip when I fuel up and keep an eye on it that way but damn its annoying not to have a working fuel gauge even tho I know they are never totally accurate on motorcycles and boats. You know what, now that I think about it even tho I tested all the wiring the one thing I have not done that could cause this if all the components & wiring are good is make sure that the connector that you unplug to remove the gas tank is making a perfect connection when plugged together, think I will remove both of those connectors and direct wire them temporarily to see if somehow there is a bad connection there. See, sometimes talking to yourself gives you light bulb moments! Lol Happy holidays! -

Started on valve cover gasket replacement process
InfinitySurf replied to InfinitySurf's topic in Watering Hole
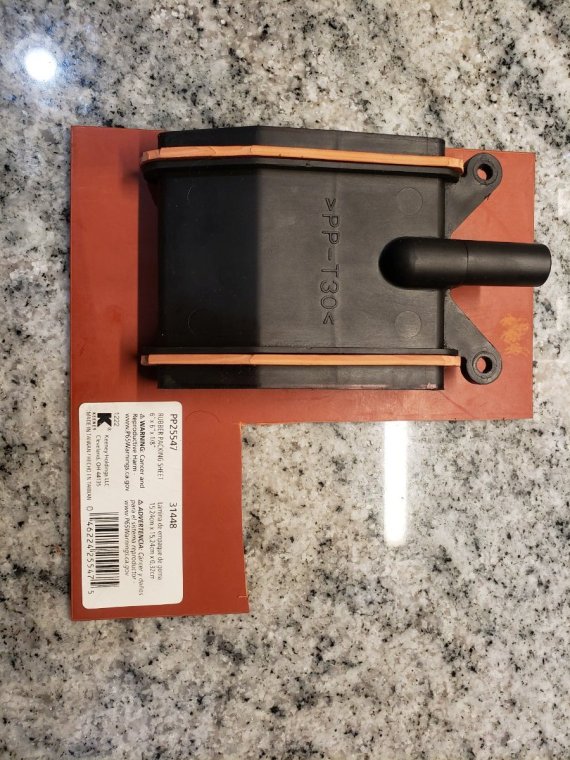
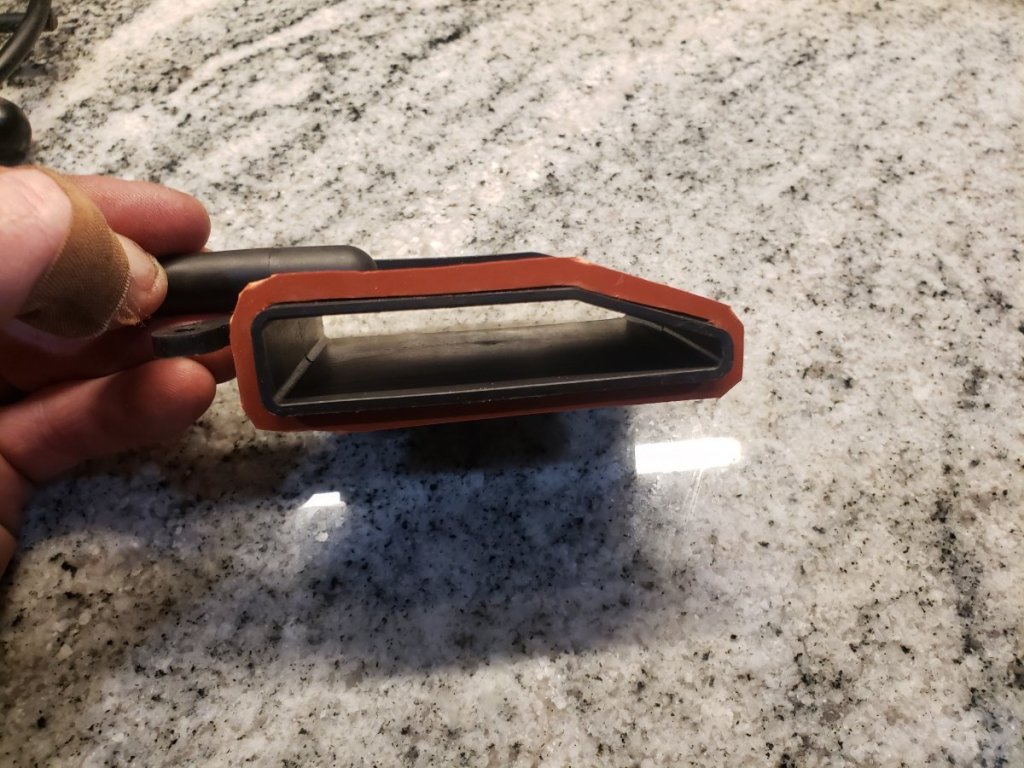
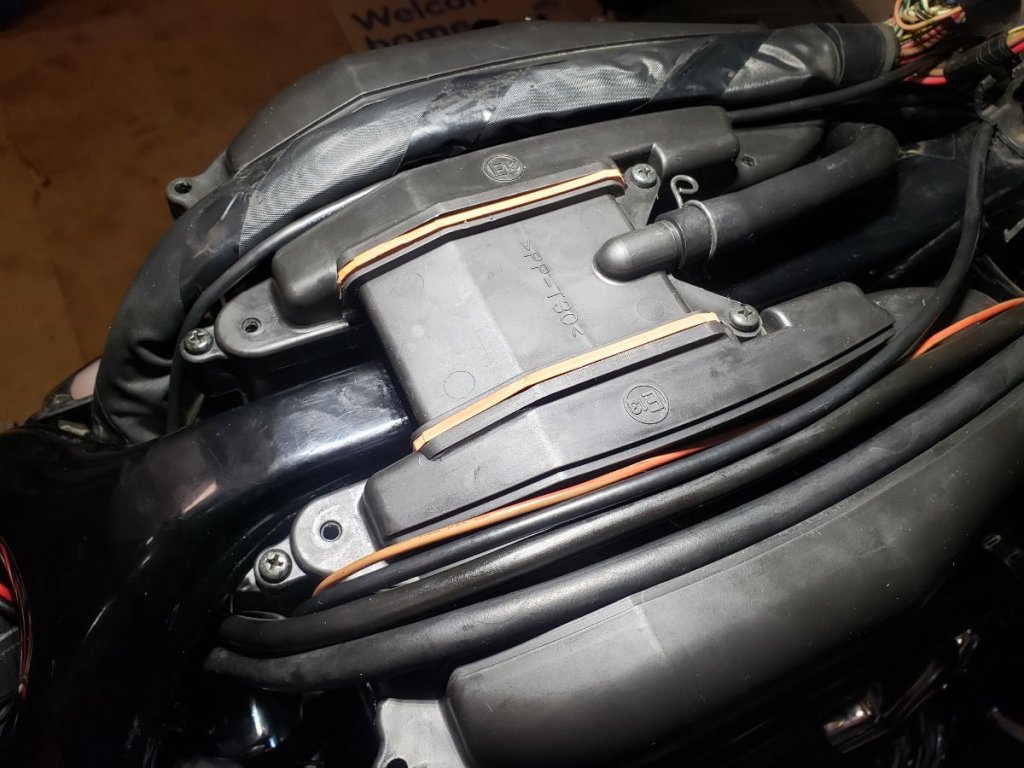
I did a gasket hack today. At top of the air filters where that middle piece goes between the left/right side those foam gaskets had fallen apart and you cant buy replacements. I had some 1/8" sheets of rubber laying around so I carved out 2 gaskets to replace them. figure the biggest purpose for those is to keep dust/dirt out. They will for sure hold up long term! Not my prettiest work cause had to carve the gaskets out with a razor blade. -

Started on valve cover gasket replacement process
InfinitySurf replied to InfinitySurf's topic in Watering Hole
Well, damnit. Got the bike all back together enough to fire it up this evening. Cranked it for about 10 seconds and fuel started dumping out of the right side hose overflow at air filter which would be the #1 & #2 carbs on the left side of the bike. Guess I have a stuck float or something like that. Will have to start pulling things back apart tomorrow and figure out what happened. Gotta say, out of all the different things I have done on this bike mod & maintenance wise, these carbs were the most complicated thing I have done so far. A complete clean/re-build of the 4 carbs is tricky to get the entire quad set back together right from memory + adding what it takes to re-mount the dang things with all the connections in that tight space was pretty time intensive. Had to look at my previous phone pics multiple times of when I took everything apart to remember all the exact routing of the hoses/wires. Hopefully I can easily pinpoint what caused that, hoping that my changing all the float heights per the service manual isn't behind that issue - good times! -

Started on valve cover gasket replacement process
InfinitySurf replied to InfinitySurf's topic in Watering Hole
Definitely enjoy it, always end up doing more that I really need to & call it preventative maintenance. I run high stress/stakes jobs so tinkering in my shop is my happy place and where I spend many of my evenings & weekends to unwind. Always have plenty to do since I DIY everything possible. 4 vehicles (2 are for my kids) the RSV, a Honda CRF300L dual sport, 6 quads and lots of chainsaws and other misc stuff with engines. My neighbors usually call me when they have mechanical issues on their boats/toys/mowers/etc doing that kind of work never gets old to me since its not a "job" :-). Doubt I would ever retire since I thrive in stressful situations and never sit still for long but if I ever did this is the kind of stuff I would do every day. Told the wife that when the kids move out I am getting 100 acres out in the woods somewhere, building a smaller home and a 20k square foot shop, lol -

Started on valve cover gasket replacement process
InfinitySurf replied to InfinitySurf's topic in Watering Hole
Tonight I replaced the 4) rubber coolant plugs and re-assembled most of the bike so it is ready to re-install the carburetors and once that is done get air filter system re-installed, gas tank, re-configure the wiring since I disconnected a lot to not put stress on the harnesses as I was taking everything apart. I re-filled the coolant (Used Prestone 10yr) and put in 3.5 quarts of Amsoil with a Mobile 1 110a oil filter.... should be able to finish getting it all back together by end of this weekend so I can make sure everything runs right and put it thru a heat cycle or 2 so I can double check coolant and other fluids and once I know everything is good to go and I wont have to tear anything apart again to troubleshoot any potential issues I will do a carb sync. I ended up doing a total re-build on the 4 carbs but did not replace the outer diaphrams, hopefully that does not bite me in the ass but figure as long as everything else is good I don't have to fully remove the carbs to replace the diaphrams if there ends up being an issue with them tho I dont expect to have issues... they were a little bit stretched, it was pretty obvious that these carbs had never been taken off the bike or worked on previously but they did not have any tears or other visible issues and overall the carbs were in really good shape. Only weird thing I ran into considering how well the bike ran was how far off the floats where set from the factory specs in the service manual...maybe my gas mileage will go up now that they are properly set - at least I hope I set them right :-). I installed Ivan's needles and main jets so will be interesting to see how that changes the bike attitude, assuming it will be a fairly subtle change. -

Started on valve cover gasket replacement process
InfinitySurf replied to InfinitySurf's topic in Watering Hole
Removed the "twinkie" while everything was easy to get too and cleaned up everything... there was a little crud in the bottom of that opening that I got all cleaned out before cleaning up all the parts really well. Put a little dielectric grease on the new gaskets and re-installed everything using the 7.2ft lbs of torque specified in the service manual -

Started on valve cover gasket replacement process
InfinitySurf replied to InfinitySurf's topic in Watering Hole
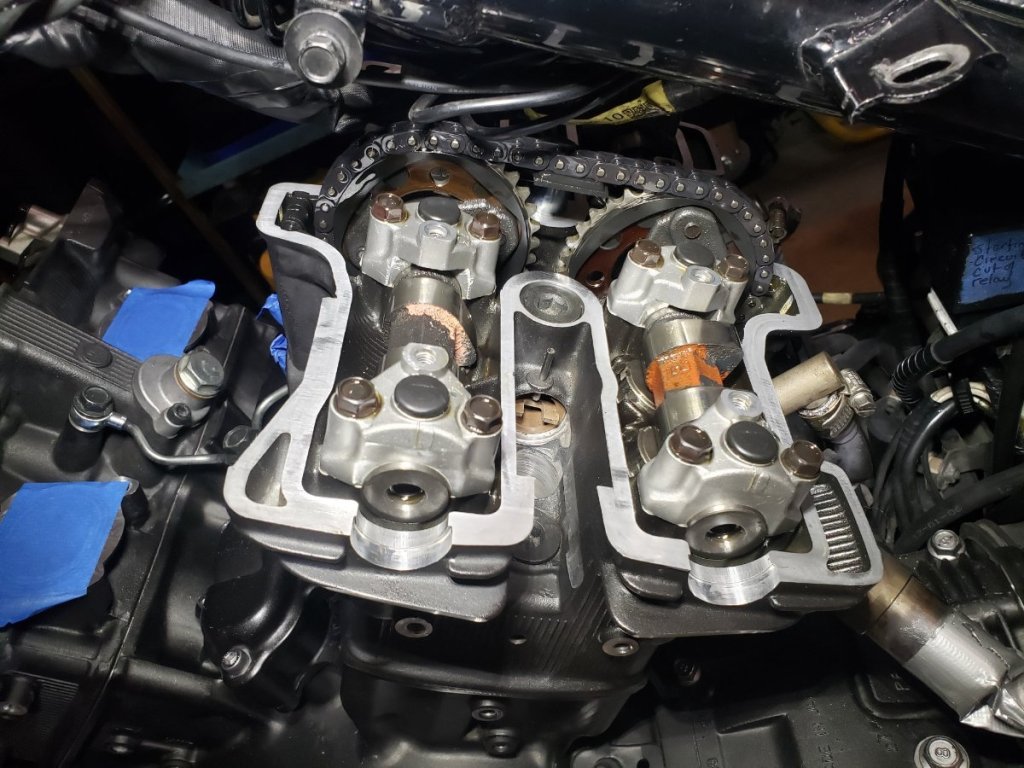
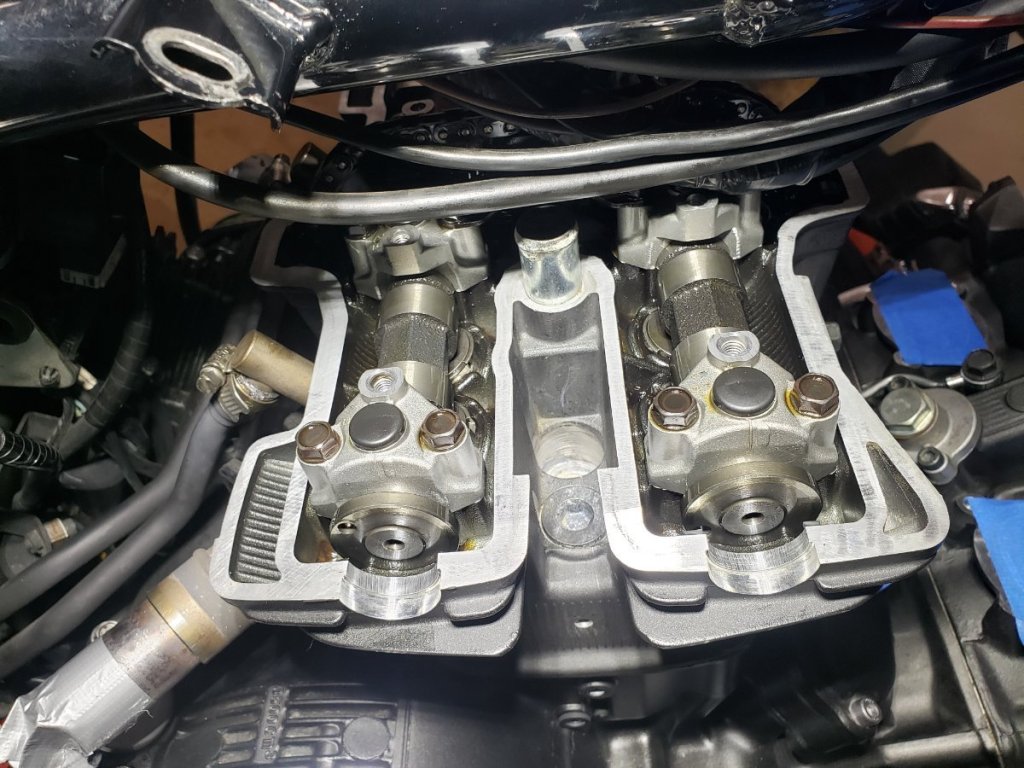
After checking the valve lash, got the valve covers re-installed. Was definately time consuming to get everything back into place and lined up right. I did use some permatex at the half rounds and also at the low side of the rear valve cover since that is where most of my leaking was happening and hoping to not have to deal with this again for a long time! -

Started on valve cover gasket replacement process
InfinitySurf replied to InfinitySurf's topic in Watering Hole
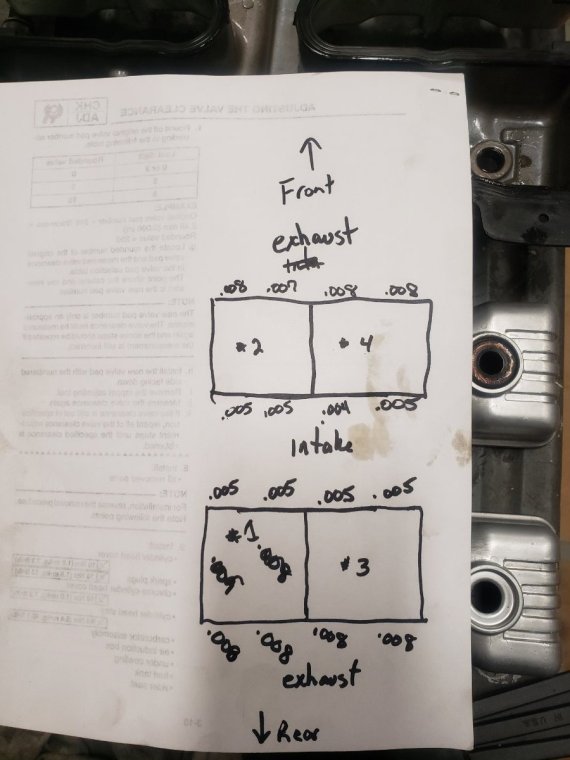
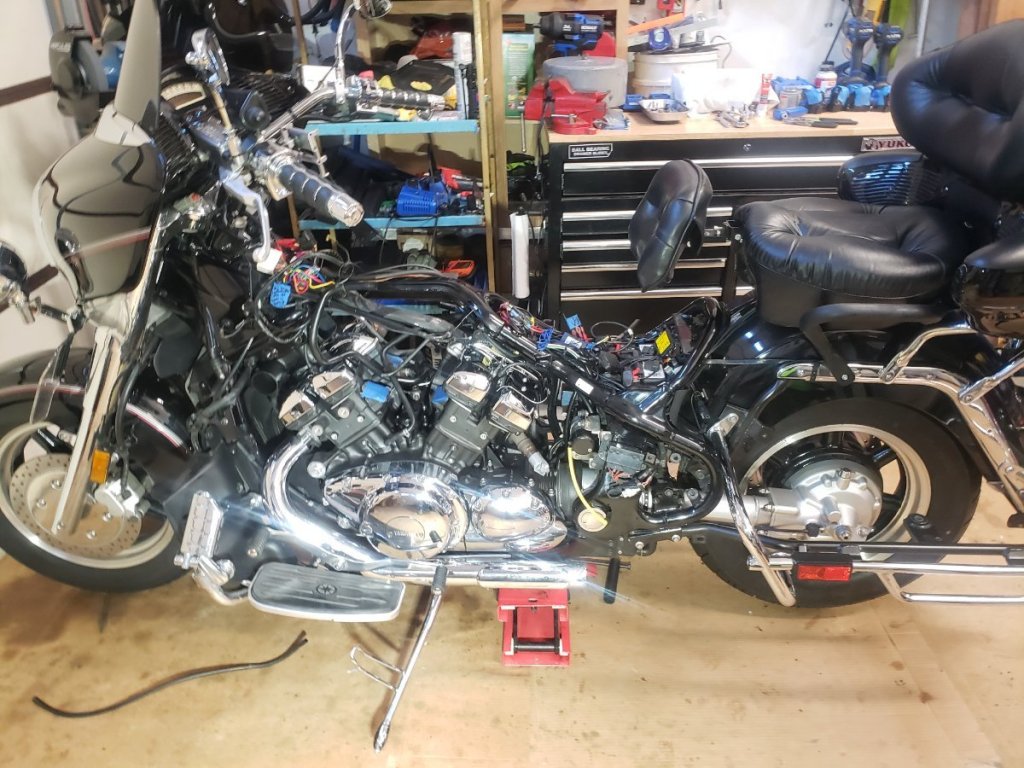
In retro-spec I probably should have put this thread in the 2nd gen tech section but initially it wasnt my intention to document everything. I know everyone likes pics tho and I know there have been many pictures on this forum that have been really helpful to me as I was first learning this bike when I got it back in 2021. Anyway - finally got back to work on the bike the other day now that I am back in town. Got the valve covers off and went thru the procedure to check all the valve lash clearances. Luckily everything was perfectly in spec so was good to go there! -
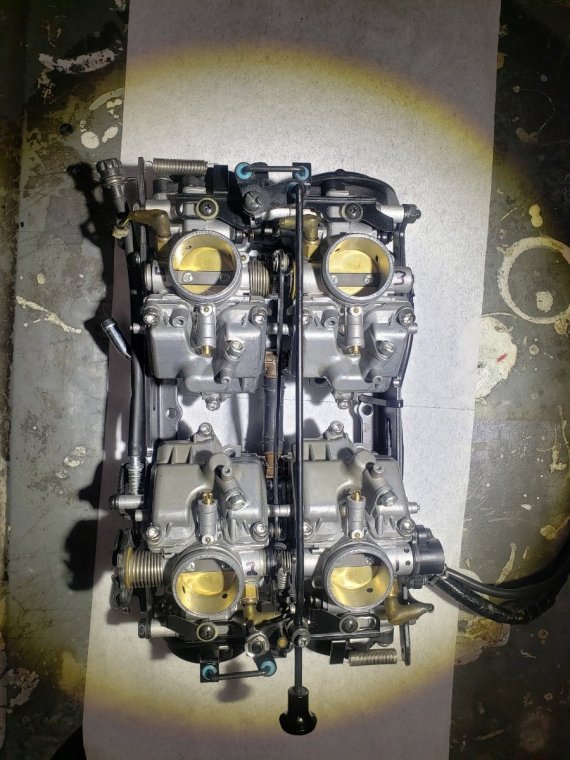
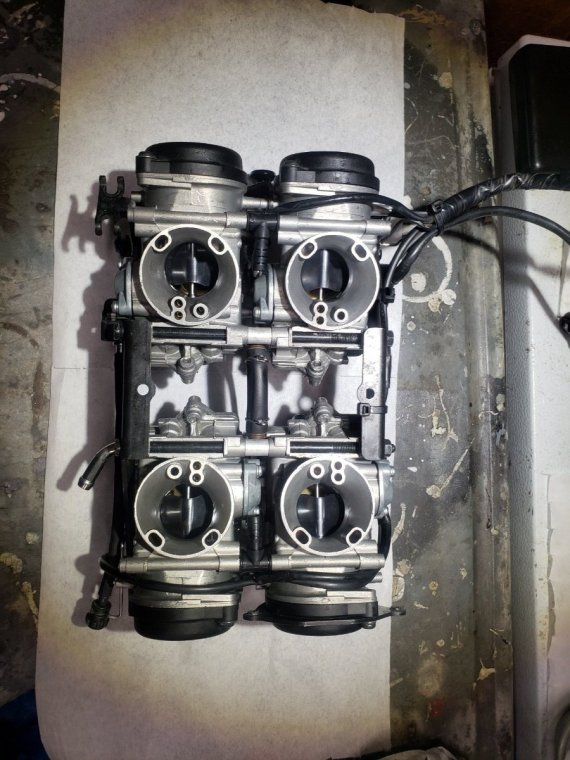
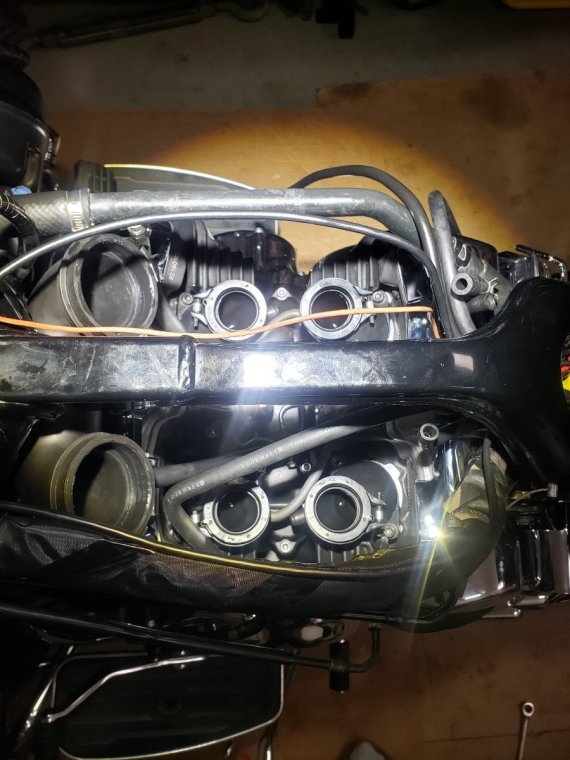
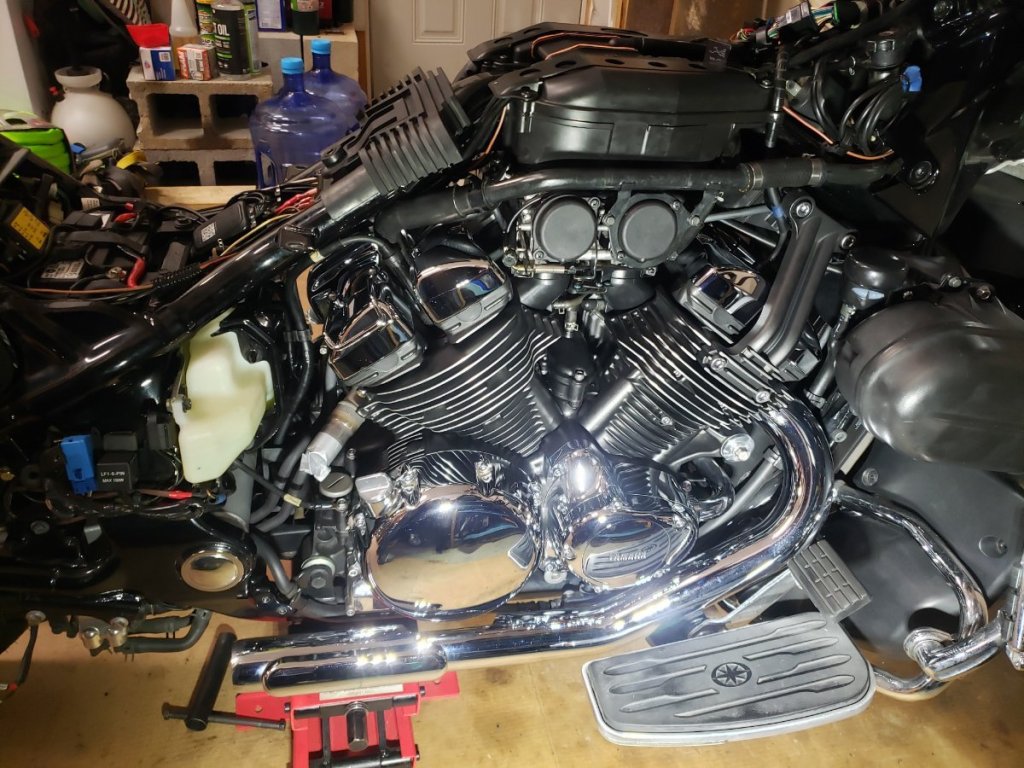
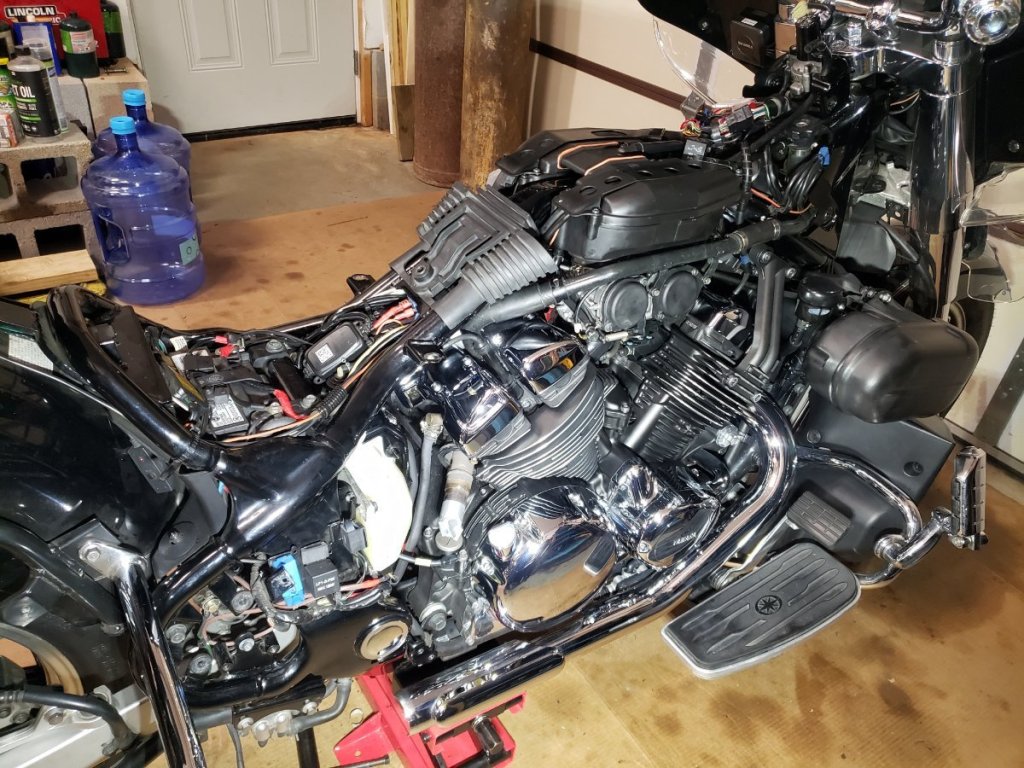
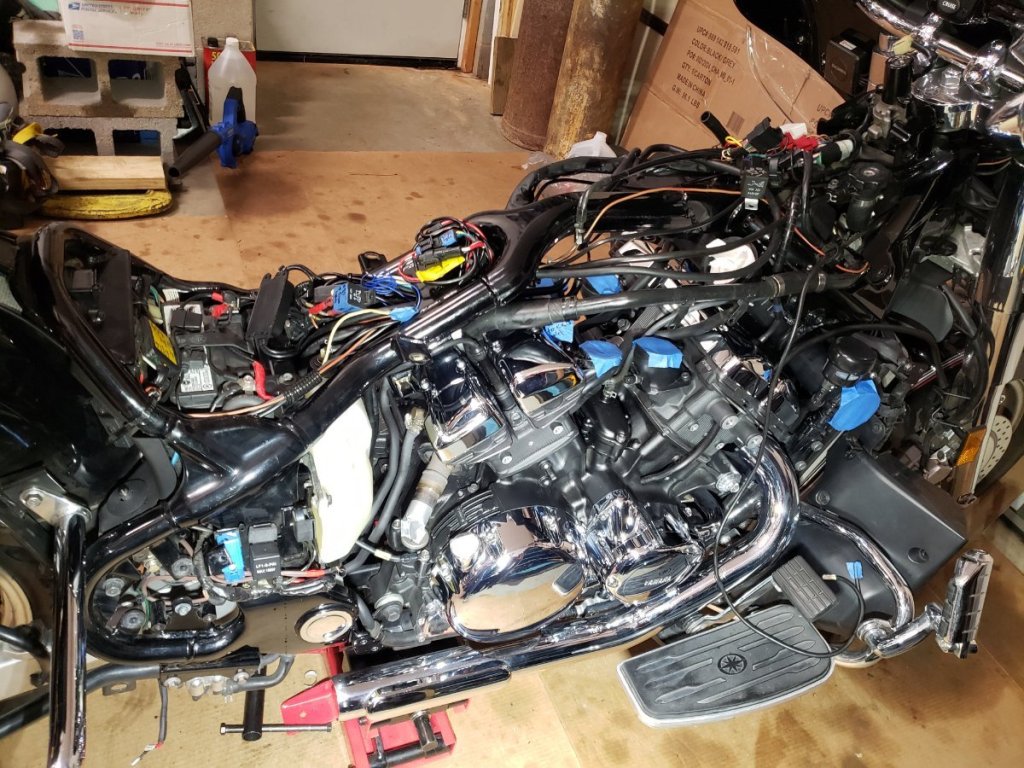
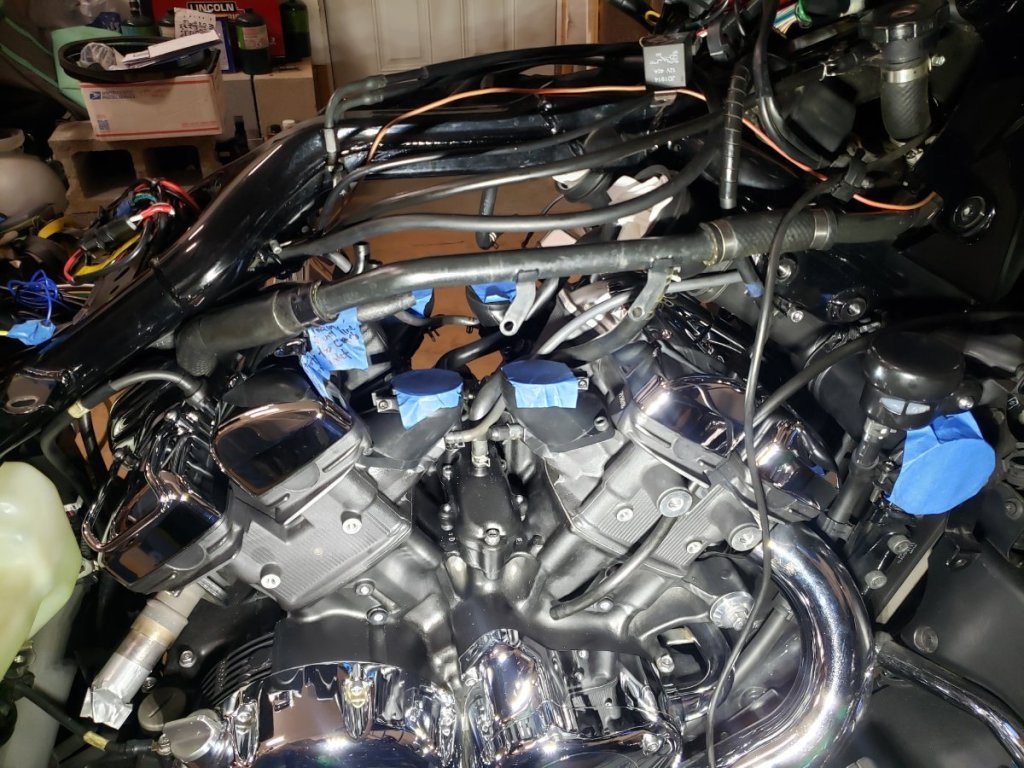
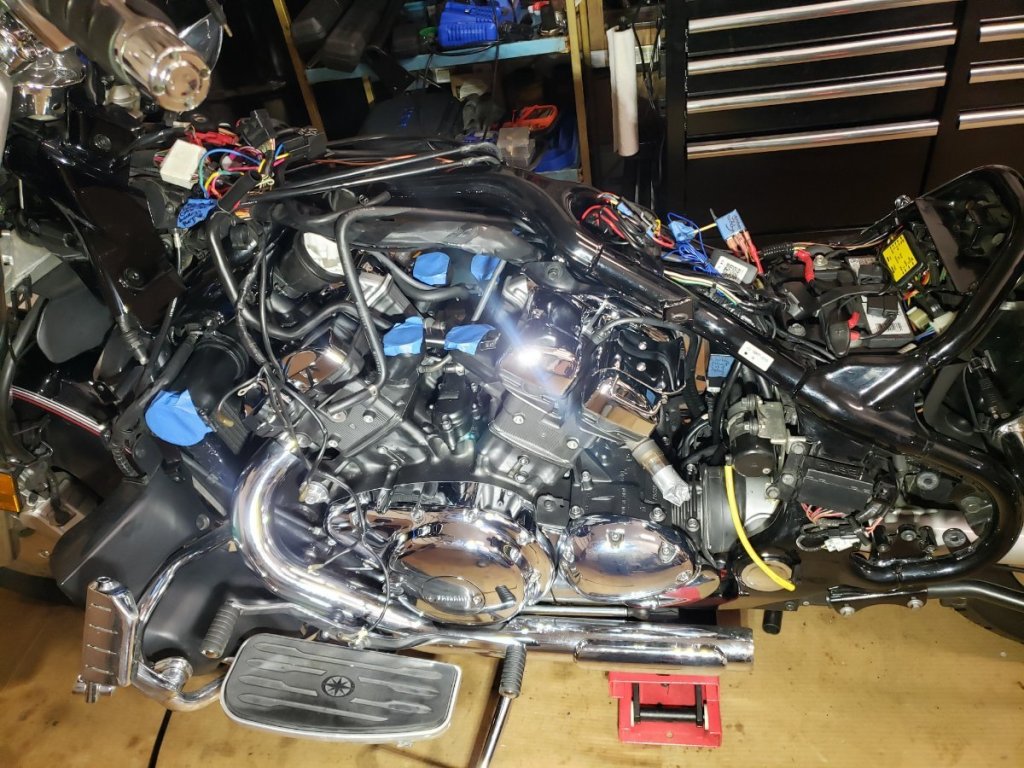
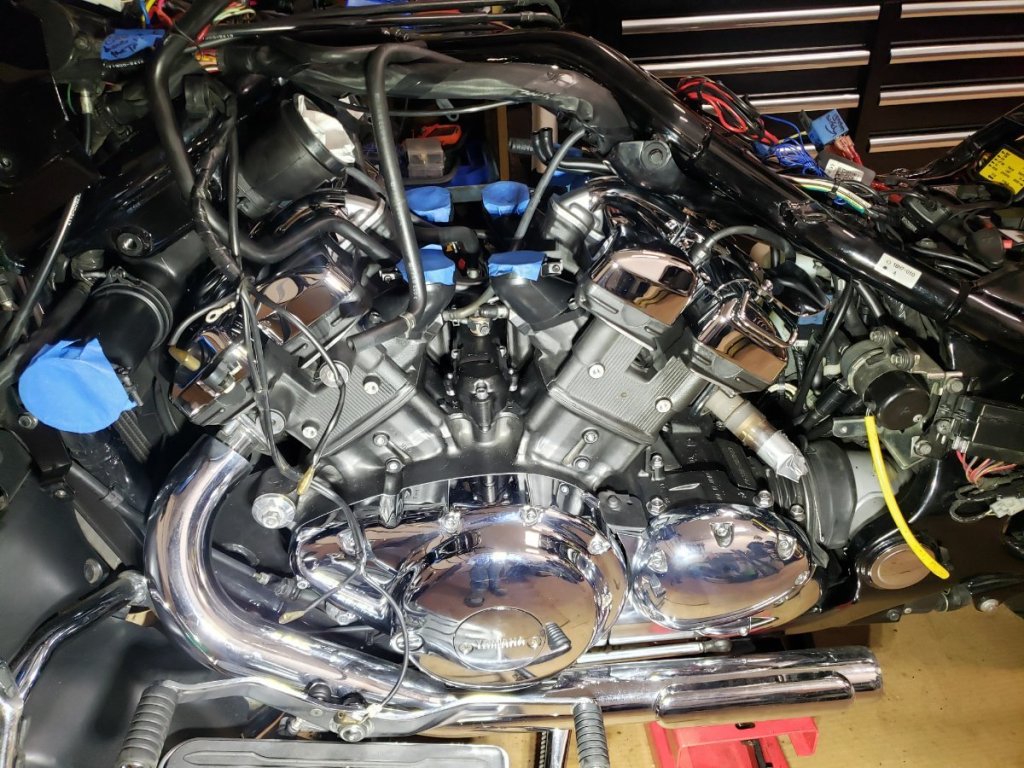
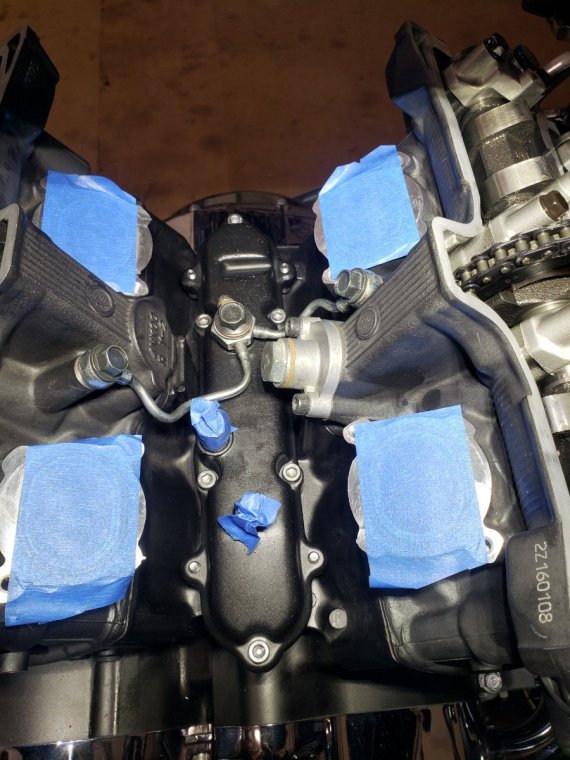
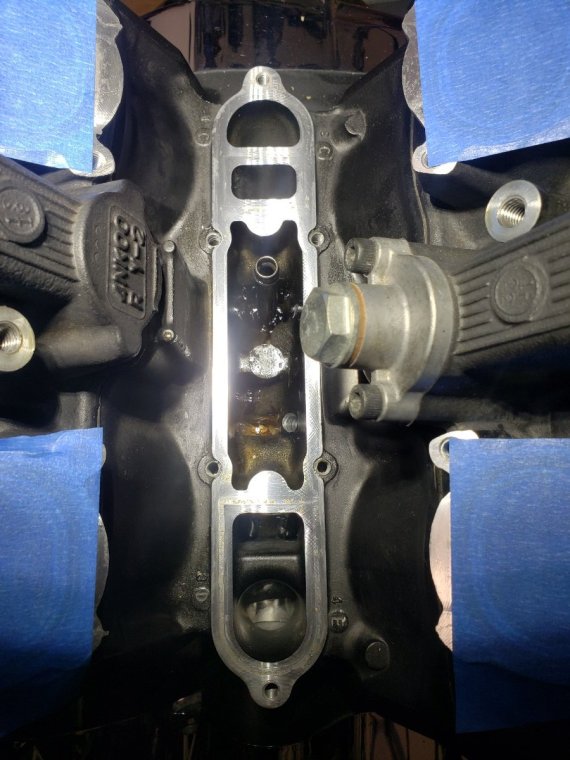
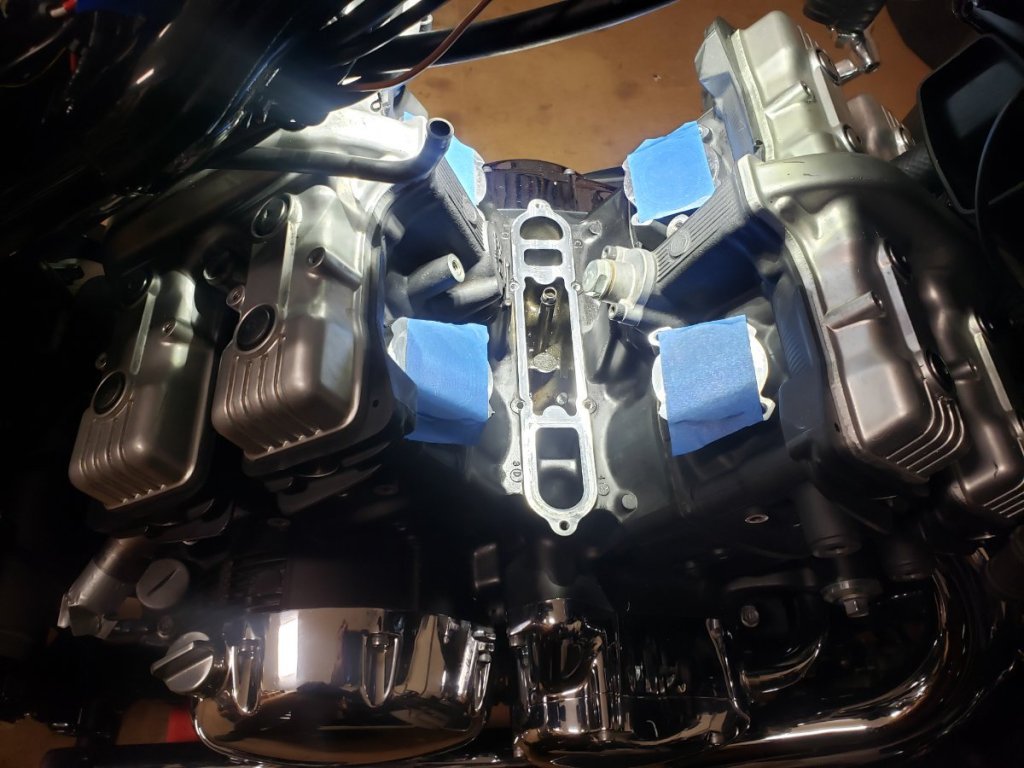
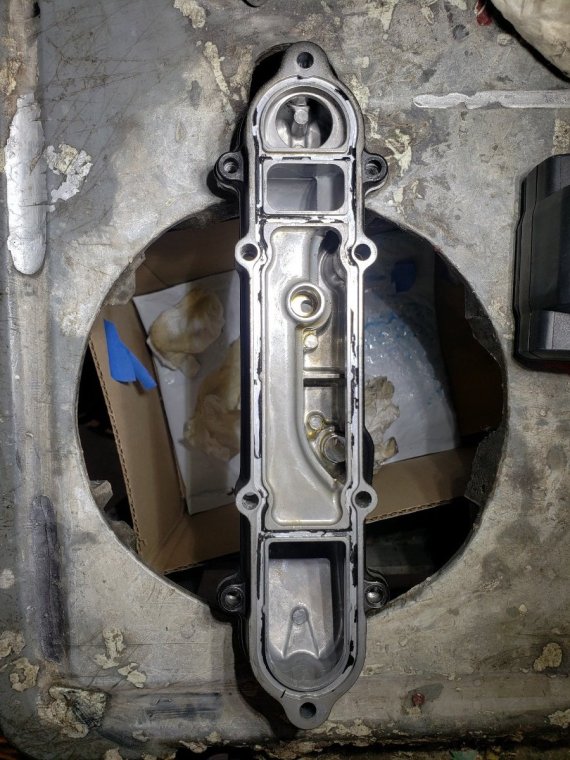
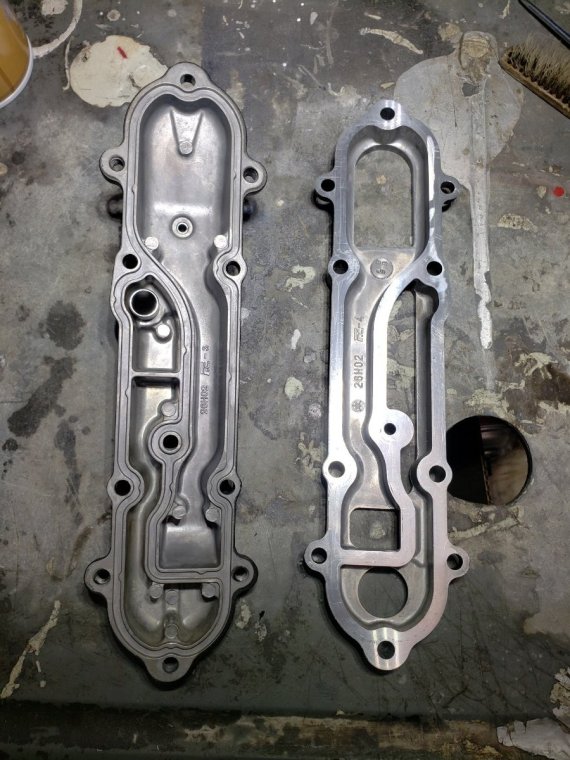
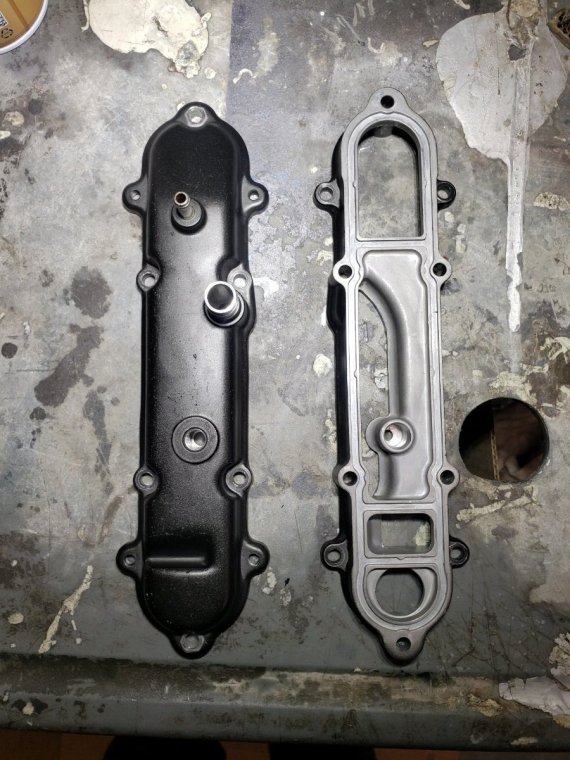
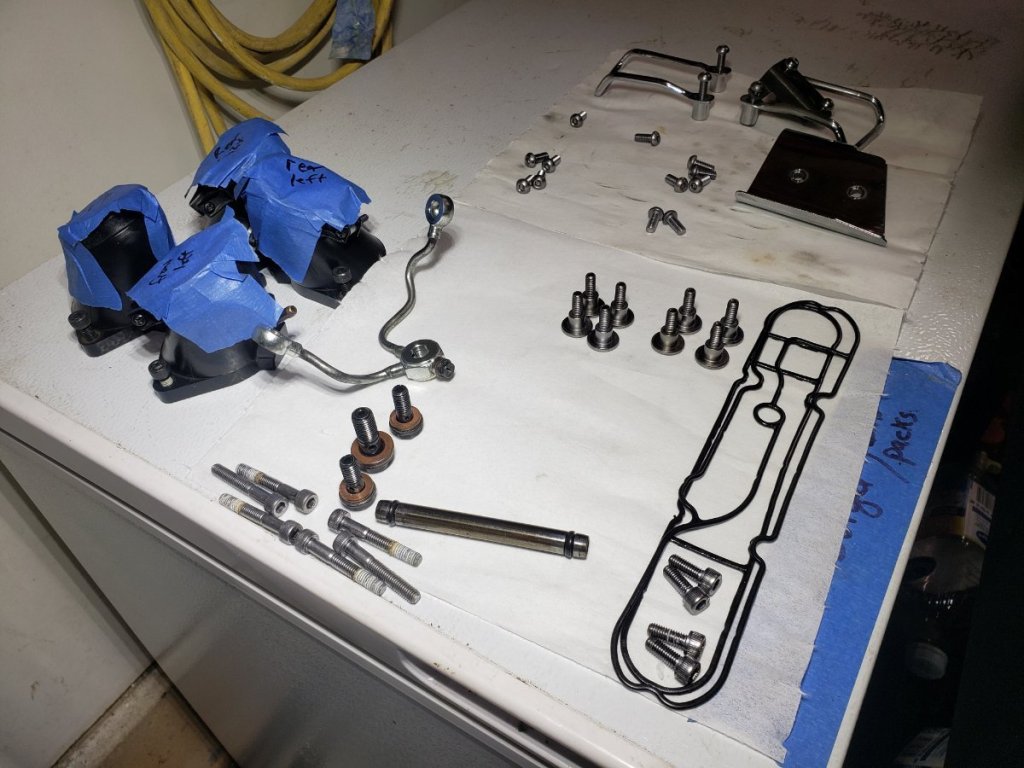
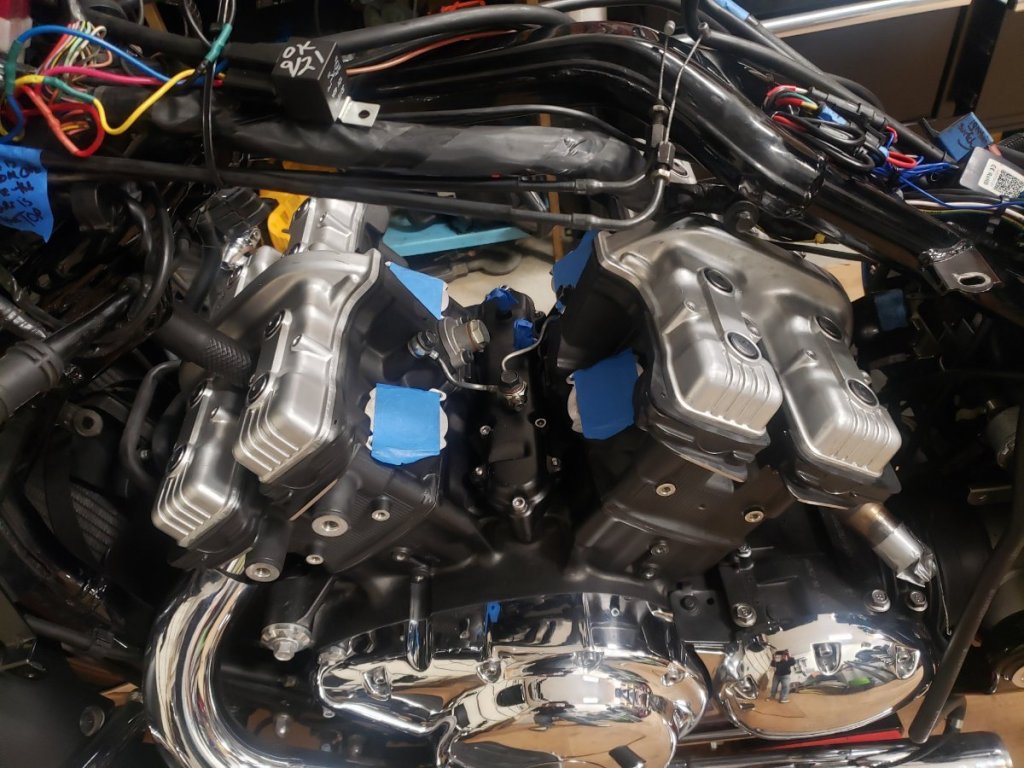
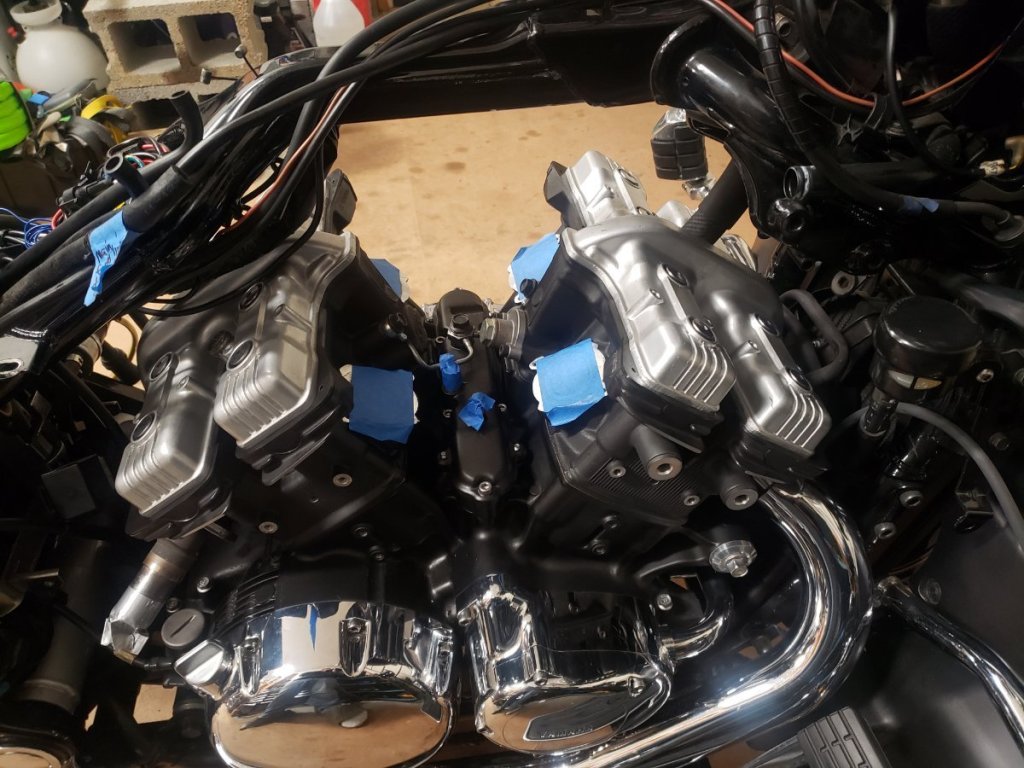
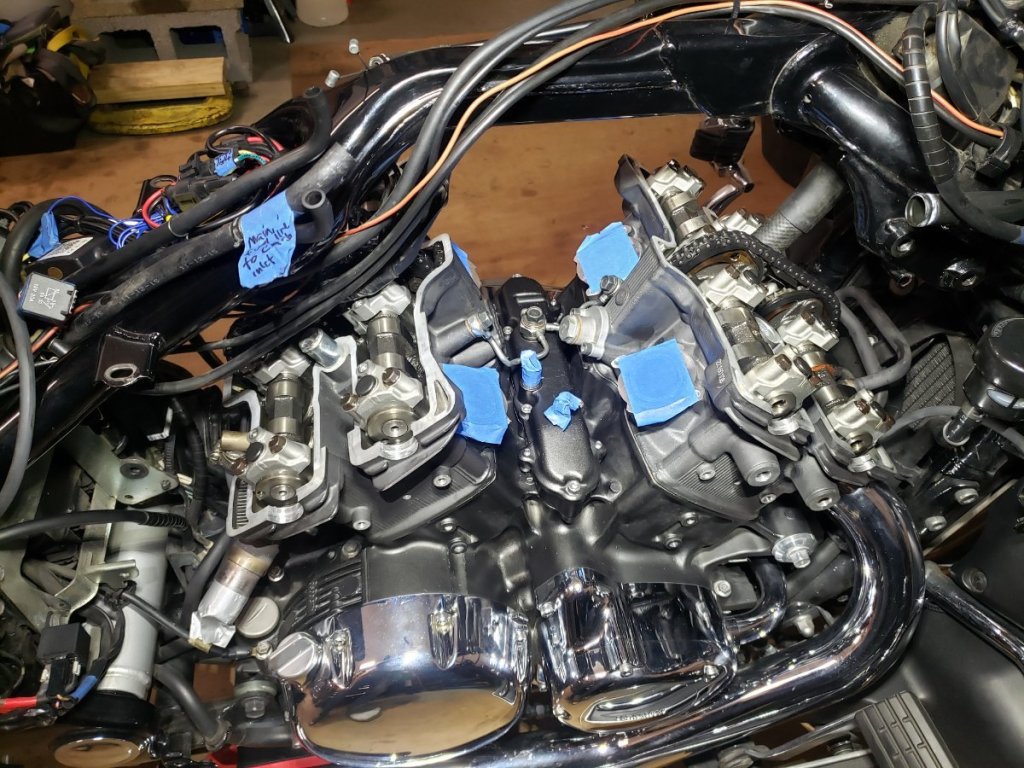
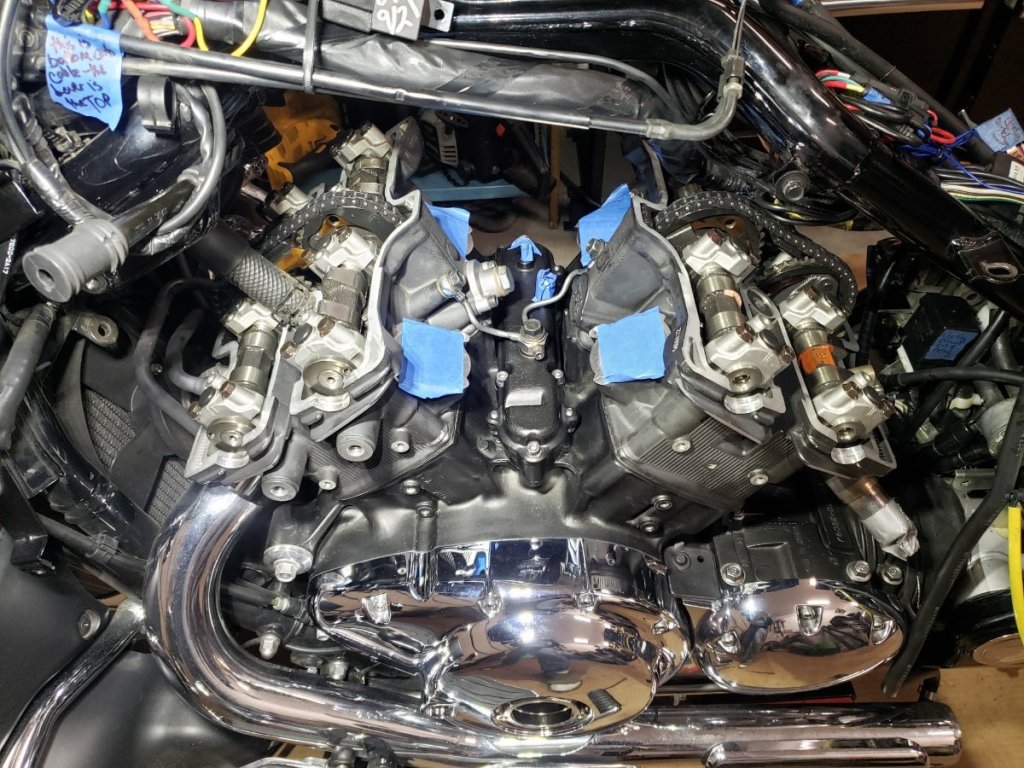
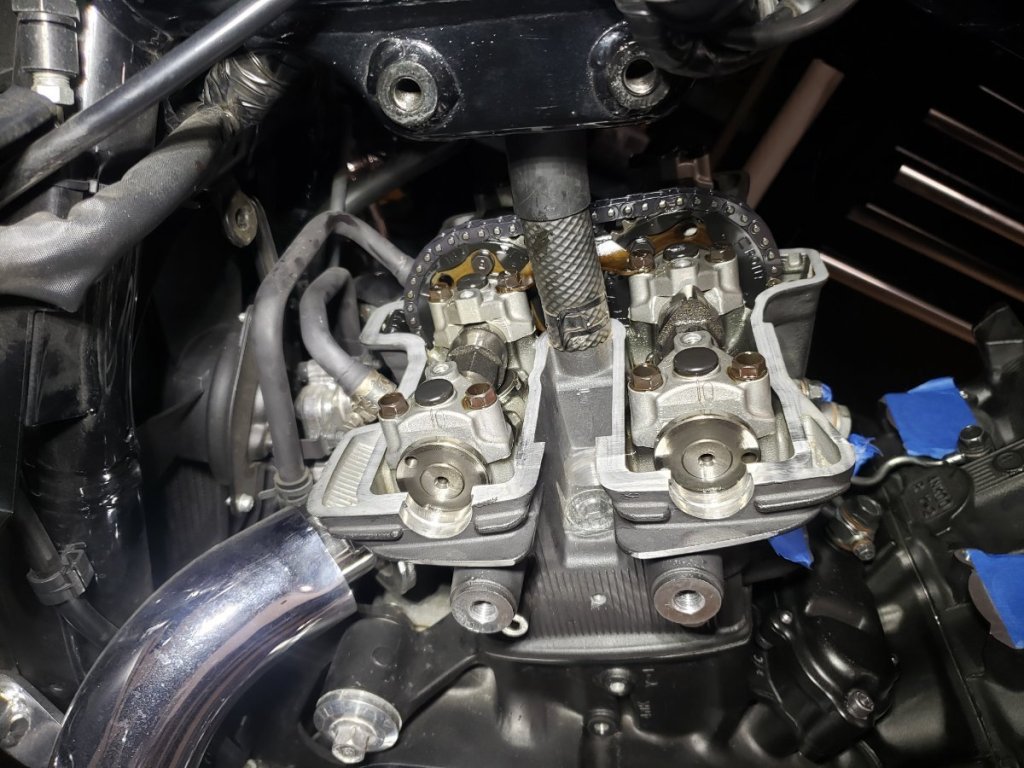
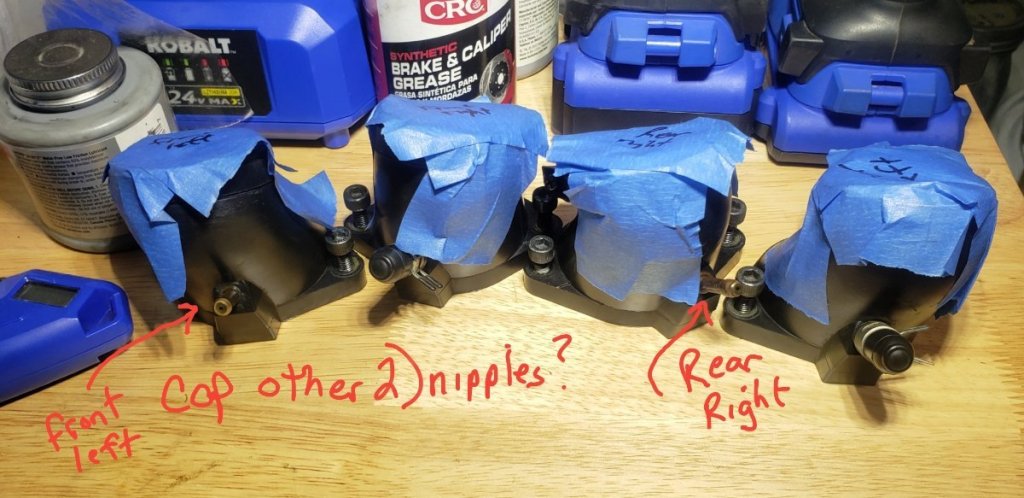
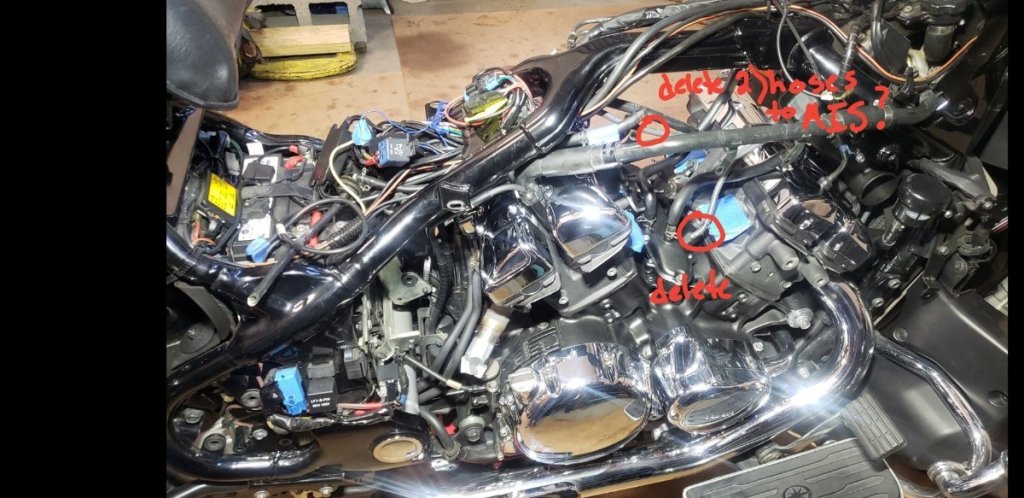
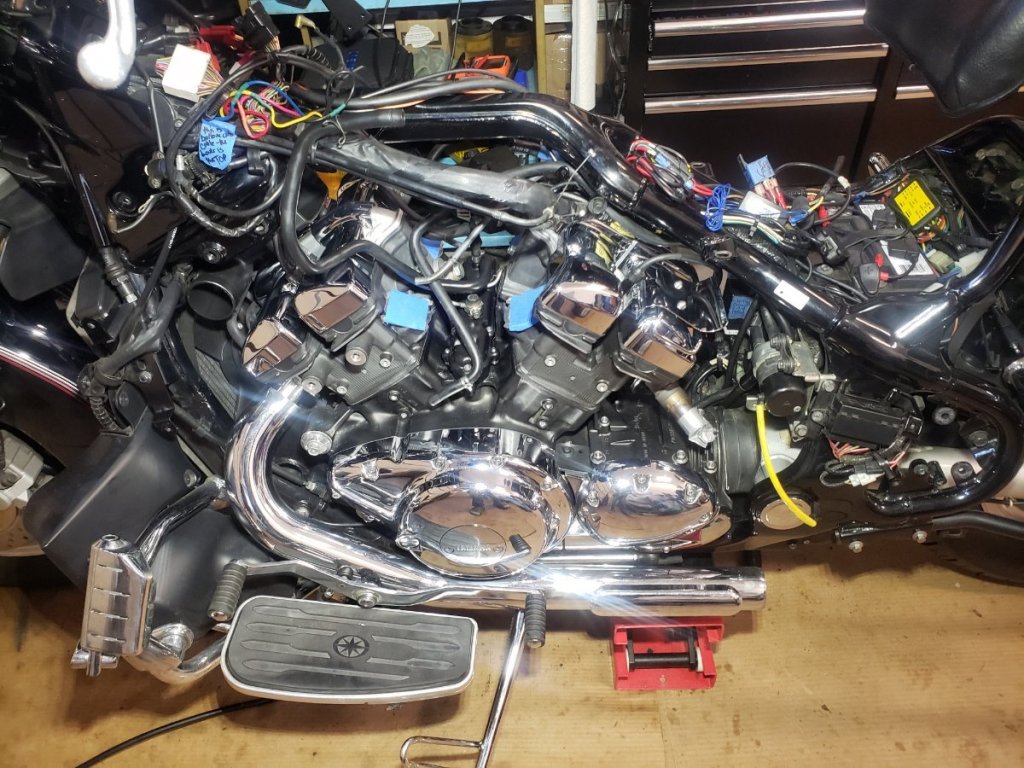
Question on my 2012 RSV. Just finished doing valve check (all within spec), replacing the valve cover gaskets and the gaskets in the twinkie.... as I am putting this back together I am wondering if I can DELETE the 2 hoses that connect to the front left and the rear right intake boot nipples since I previously plugged/deleted the AIS system in 2021? Dont see any reason why I cannot just remove those 2 hoses and install nipples to close them off like the other 2 cylinders but would like to verify since I saw a post a while back where someone says something about one of those hoses (maybe to the front left cylinder?) connecting to the cruise control so if plugged then the cruise will not work? I rarely use the cruise but would want to keep that option altho I cant see how that hose would make a difference to the cruise with the AIS system already plugged up. Can anyone confirm? Few pictures attached. Appreciate it!
-

Started on valve cover gasket replacement process
InfinitySurf replied to InfinitySurf's topic in Watering Hole
Interesting that the bike ran so well with the floats adjusted so low like that from the factory, theoretically that creates a lean condition since the holes in the emulsion tube behind the main jet suck in more air than the system is designed for. Multiple signs point to the fact that these carbs had never previously been opened up by anyone else. For what its worth since I have seen some posts about having the air/fuel mix screws turned out 2-2.5 turns... my bike was set at 3.5 turns out on all 4 and that is also what Ivan recommends to start with and depending on how it runs, potentially backing them off to 3 turns out if needed. Will be interesting to see if there is a noticeable bump in the felt power with the Ivans needles/jets installed as well as properly adjusted floats! Will likely be 3-4 weeks before I get ready to fire her up again since I am in no rush to finish and will be too busy over the next 3 weeks to do much anyway. I haven't even opened up the valve covers yet since I didnt want to leave the engine exposed like that for no reason over the next could weeks plus I plan to replace the 2 twinkie gaskets & might as well go ahead and replace the front wheel bearings/seals while the bike is down since I just did the rear and there was VERY little grease in the factory sealed bearings for the rear wheel. I always clean new "sealed bearings" in deseil and get ride of the factory water soluable grease and then re-pack the bearings with my Lucas synthetic marine grease, it has done very well in many other bearings I have done like that over the last 8yrs or so. BTW...the suspension needle bearings were also all fairly low....easy to re-grease all those when when the rear tire is off - I checked them cause I had a squeak when I sat on the bike so re-greased them as the suspension bushings & bolts, not sure which solved it but zero noises now. One other thing I was thinking about.... I blocked off the AIS system shortly after getting the bike in 2021 but never removed the 2 hoses that attach to the nipples on the boots that the carbs sit into on the side of the cylinders. There is no reason why I cannot just remove those 2 tubes while bike is stripped down and install caps like I have on the other 2 nipples as long as I also cap the 2 spots that those 2 tubes currently enter the AIS, correct? Don't remember where but remember seeing a post (may have been on the thread about the "Jason Mod" where someone said he thought one of those tubes was related to the cruise control system? Anyone know if that is true and/or would effect my cruise control if I go ahead and remove them? I wouldnt think it should effect cruise but want to be sure, I dont use cruise control often cause the speed varies too much but its nice to have that option available occasionally.

.jpg.5f37cd93c48c06459c767c46647b595e.jpg)
