JFootman
-
Posts
59 -
Joined
-
Last visited
Content Type
Profiles
Forums
Gallery
Events
Store
Everything posted by JFootman
-
When I quenched it I obviously heated then cooled rapidly. With the red Loctite, my assumption was that it needed to remain liquified so yes, I tried to turn it when it was hot, perhaps leading towards the stripping but I had tried it completely cooled as well so I don’t think it was poor instruction, @saddlebum. The bolt was VERY soft when drilling out. That combined with the red Loctite was a recipe for disaster when u combine them with, well, ME!
-
I know this is getting old for everyone (moderator can move topic to "Tech Talk" or maybe there's a forum "this is what a wrench is..." or "mechanics 101") as this has morphed into a greenie orientation into bike work but my worst fears have happened. Heated bolt (well beyond 500 degrees) and used Torx socket. The head of the socket twisted. Purchased replacement and heated the bolt & quenched x3 then heated again and no dice. Also tried the impact driver. Then used a small socket over bolt head and smacked 3x aggressively, heated to the point the shift lever assembly covering the shift segment was red hot (heat was focused on the bolt however) and yet another Torx socket twisted unfortunately buggering the head of the screw this time. I have drilled out the bolt & the head is removed, dowels and retaining plate pulled however the arms of the shift lever assembly will not move up or out far enough to remove the segment off of the remaining bolt. Another "walkthrough" on replacing the segment had recommended loosening the clamp on the shift shaft on the other side to move it out and up but after reading all the horror stories of leaking oil seals has made me reluctant to drive the shaft out forcibly but I don't see any other solution. I've loosened the clamp bolt hoping there would be enough play and there's not. My expectation now is to drive the shaft part of the way out from the other side, rotate the end assembly up, remove the segment I'm planning on replacing & exposing the bolt. Heat the remaining bolt directly and hopefully pulling without issue (yeah, like that's gonna happen!). Of course any monkey can tear things apart so we'll see about reassembly. I suspect I'm going to have to pull the muffler to gain access to the end of the shift shaft to reseat the (possibly now leaking) oil seal and clamp. Got a few more hours sleep last night but hope I'm thinking and explaining clearly. The original post might be apropos yet again if I keep screwing more things up....
-
Thx, @Marcarl & @saddlebum. Admittedly it was a sleepless night (all I can think about is shearing off the screw!) so this is brainpower with less than 3 hours of sleep on it so bear with me. Neither of you believe it is necessary to support or reverse the twist against the drum? Put it in 1st or 5th (whichever is at the end of the counterclockwise rotation) and start the heating process? I suppose the reason no one is making a fuss over the bolt is they are doing just that. I have a cheap-o Harbor Freight impact driver but again, not having gone to this degree of mechanic work I'm just anxious about screwing anything up. Beating on a screw or bolt when I can visualize the steel I'm pounding against is a more comfortable proposition! I guess I just need to man up and quit being a wuss about this. I also suppose the worst case scenario I strip the screw or bugger up the drum & I purchase a new one. I've always spent more than twice the time thinking about a problem than it takes to perform the task & usually it's the first solution I came up with!
-
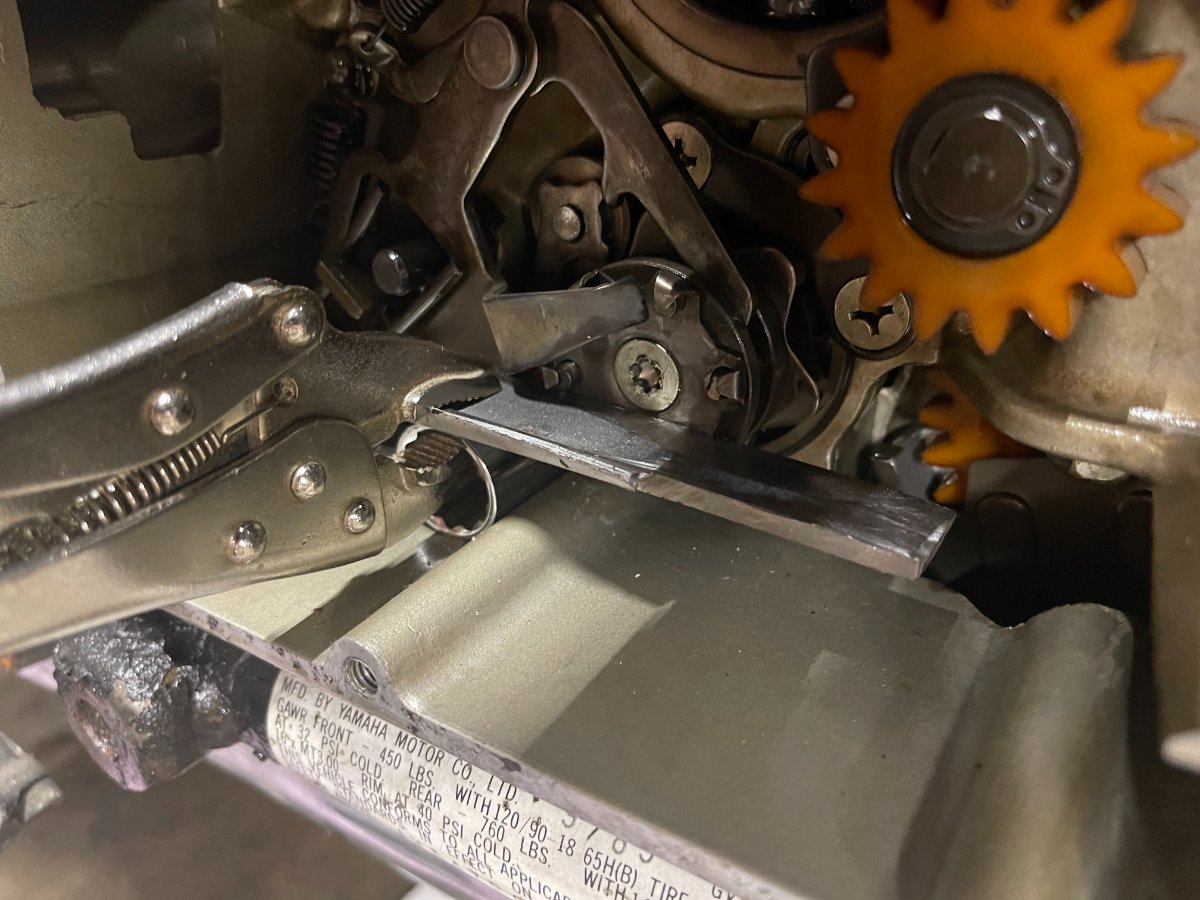
Still feeling like a bit of a boob as every forum post I have read grazes over the screw removal with exception of "don't strip it" and apply heat. I've tried to gain insight from the service manual but I don't see anything that describes the segment removal. I'm using THIS post as a guide (among others) but again I feel like I must be making a mountain out of a molehill or just not bright enough to easily see the solution. Will this work? The socket was placed under the shift lever to keep it out of the way. Small piece of steel vice-gripped to the socket and slid under the pin to prevent downwards rotation. I don't like the torsion that will be placed on the drum but I don't see any other way. There is no pressure on the shift lever but all the force will be downwards on the housing. I've got a Dewalt 1/4" impact driver with a Torx bit and also have a Torx socket and a breaker bar available. Fearing my membership dues may increase exponentially next year....

-
Ok, @Marcarl, @cowpuc, @skydoc_17, @saddlebum, @Flyinfool and anyone else willing to offer guidance to a puckered up individual. Tonight was supposed to be the night to complete the swap. Everything's pulled and I applied heat to the Torx but of course the shaft wants to rotate. One of the threads offering guidance said "Try to find some way to anchor it." Another said "you need to bring the shift shaft forward to make room. In order to do this, remove the clamp bolt on the other side of the bike where the shift lever connects to the crankcase... and bring the entire shift shaft forward to make room." Of course my priority is to first do no damage but I was hoping I didn't have to pull the shift shaft completely (unless this isn't that difficult and "safer"). The first recommendation of "try to find some way to anchor it" apparently is too vague for this ignoramus as my first thought was to use a pipe wrench but of course without "bringing the shift shaft forward" as the second recommended I don't know how this is possible. Recommendations? Anyone done this before and can tell me how to "anchor it"? Uggghhh... I hate having to rely on y'all so much!!! As always, thx in advance!!
-

Buzzing noise and won't start
JFootman replied to JFootman's topic in Venture and Venture Royale Tech Talk ('83 - '93)
I guess if nothing else this gives other "boneheads" the affirmation they're not the only ones out there! While I'm not sure what solved it, I topped off the fuel tank, switched the petcock back to "on", charged the battery, squirted small amount of starting fluid in carbs, put it on the center stand, confirmed emergency switch not activated, pulled the clutch and yes, she started. I've not pulled the tank before but it appears the fuel exits the tank on the right and as I had it on the side stand with a low level of fuel I'm ashamed to say this is likely one of those "doh!" moments. ("I can't believe this guy bought a 38 year old bike!!!") Thx agn, guys. Switching out the shift segment this weekend so I'll apologize in advance for the future questions! -
Buzzing noise and won't start
JFootman replied to JFootman's topic in Venture and Venture Royale Tech Talk ('83 - '93)
It's almost like you've dealt with boneheads like me before, @Marcarl!!! That would be my speed to not check all the obvious solutions! -
Buzzing noise and won't start
JFootman replied to JFootman's topic in Venture and Venture Royale Tech Talk ('83 - '93)
I was worried I'd flooded it as I tried minimal choke like I normally do and tried hammering it down. Hoping letting it settle until after work will resolve it. I replaced the plugs about 3 weeks ago but should I pull them and check them out, @SpencerPJ? PITA but willing to do so if recommended (and time doesn't resolve the issue). Might try the starting fluid option too. Thankfully last owner recently replaced the battery but I'm afraid you're right, @Marcarl. She was still strong but I could tell it was starting to circle the drain. Sorry I'm asking basic questions, gentlemen but appreciate your input! -
Buzzing noise and won't start
JFootman replied to JFootman's topic in Venture and Venture Royale Tech Talk ('83 - '93)
Quick update. Went home over lunch & filled the tank. I switched the petcock to reserve. The pump (I assume now) kicked on again and eventually shut off. Tried to start and initially acted like it was going to turn over then nothing. Kept trying and pump would kick on for a short time but after trying to start it repeatedly no more pump noise. Unfortunately she's not even trying to turn over now. Grrr... @saddlebum, the hose didn't go to the bottom of the air cleaner but went in the direction of the radiator. I assumed it was some kind of unpressurized hose as it's very pliable. The interior appears intact so I'll probably leave it for now but wanted to make sure it wasn't a factor in the startup issues. -
Buzzing noise and won't start
JFootman replied to JFootman's topic in Venture and Venture Royale Tech Talk ('83 - '93)
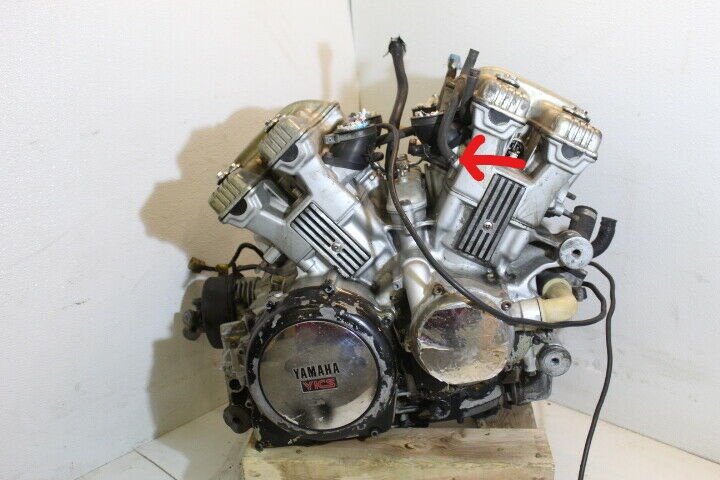
Sorry, one more question before I forget, what is the hose that was "repaired" with electrical tape? It looks to be a pain to replace due to tightness but want to make sure it's not going to bite me in the rear in the future. Thx agn. -
Buzzing noise and won't start
JFootman replied to JFootman's topic in Venture and Venture Royale Tech Talk ('83 - '93)
My OCD is kicking in... when I replaced the fuel filter I turned the petcock to off and back after completion but should I keep it on reserve for that specific reason, @saddlebum? I know it's hard to turn the petcock but I was able to do so with pliers. Thx again, gentlemen! -
Buzzing noise and won't start
JFootman replied to JFootman's topic in Venture and Venture Royale Tech Talk ('83 - '93)
Probably a better description would be the fast ticking so perhaps that's the culprit. Honestly that was my first suspicion (fuel pump) but I had 1 bar left on the gauge last night. I was letting the fuel deplete so I could put B12 in a fresh tank of gas. I ran Seafoam through the last tank and didn't want to mix the 2. I guess the simplest explanation would be the smartest to address! I'm just hoping I didn't affect the fuel pump when I replaced the fuel filter although that was days ago after numerous rides. Thx, @Marcarl. -
Went to start up my '83 Venture this morning and initially started (partial choke as always) then seemed to struggle and died. There was a buzzing noise from what seemed to be the left side. Started it up again and tried to start but acted like it was starving for fuel. Buzzing persisted. Tried a third time and same result. Turned off the key but when I turned the key back on the buzzing started again. Thoughts? Yesterday I had increased the idle and turned it back down a bit (overshot) but it ran great during an evening ride. I replaced the fuel filter on Monday. No liquids on the floor. I noticed last night the previous owner had applied electrical tape on the hose as indicated on the pic. I pulled the tape off & it looked like the outer layers of the hose had been sheared off (from pulling with pliers?) and I simply reapplied a fresh electrical tape. Other than those Items I've done little recently and other than carb issues when cold it's been running fine. Admittedly I haven't had time to troubleshoot but any thoughts? Thx in advance.
-
Thx for the encouragement, @Marcarl & @cowpuc. Unfortunately as you referenced your "pea brain" before, puc, after reading your explanation I must have a mustard seed brain!!!! Other than perhaps weak metal or a poor design, it doesn't sound like there's anything external to blame other than your #1 & # 2 points above. My take home message would be if it ain't broke don't fix it. If it's broken, fix it right (wish I'd follow my own advice!). So... below are my condensed instructions/summary thus far. As I've not received the parts, there will be more to follow. Please critique & I can change anything for a final post at the end of the thread or perhaps a link to a pdf to include everything. As I'm definitely a newbie, if the words/descriptions I use are inaccurate or difficult to understand let me know. I tried to use the terms from the parts catalog as well as the terms used throughout the thread. In an attempt to condense the shifting issues related pin loss secondary to bent ears on the cam plate I wanted to do a write up on both the diagnosis and fixing of the problem. This information has been garnered from Venture owners, gurus and individuals far smarter than I am so if anything doesn't make sense I will refer you to their expert advice! I will reference part numbers as detailed in the parts catalog found HERE. The first gen service manuals will offer additional details and guides and can be found HERE. I have an ’83 Venture so all part and page numbers will be referenced from those manuals. If there is an issue with bent broken ears with missing pins on the shifting drum many will describe a difficulty and eventual inability to shift beyond a certain gear or gets “locked” in gear. Easy things to check initially: Check for a bend in the shift rod (part #27, page C10) Check if the clamp that attaches the shift lever (#22, C10) to the shift shaft (#22, C10) is tight and not slipping (10mm nut). There is a second clamp on the other side of the crankcase cover (forward bevel gear cover) (#1, B12) however this will require removal of the cover and replacement of the gasket if you decide to inspect. If not previously done, purge remaining air in the line at the banjo bolt where the line connects to the clutch master cylinder. Although more messy, this can be done in a similar manner to bleeding brake/clutch lines but drained at the bolt instead of the bleed screw. This area is apparently notorious for retaining air and even tiny air bubbles may have an impact on shifting performance. Check that the tiny hole (return port?) in the bottom of the clutch master cylinder is clear. You will need a very fine wire to do this (don’t use a needle as I read someone broke off the tip of the needle and had a heck of a time removing it). To rule out a clutch issue, perform the “puc rock” test. See video: . Unfortunately if the above have been eliminated, the clutch pack will have to be removed to inspect the next most likely culprits. Although documented for a Vmax, attached is a very good pdf guide of the process of removing the clutch and inspecting/upgrading the weak end plate (#8, C9). The items I found different or did differently: I did NOT drain the engine oil I did NOT entirely remove the footrest/rear brake assembly. I just removed the 12mm bolts and allowed it to dangle. My ’83 Venture does not have the diaphragm retainer plate, the diaphragm spring, or the ring spring seat. I didn’t remove the center pushrod or the steel bearing. If you are inspecting all of the clutch plates you will need to remove the clutch plate retaining ring (#4, C5). When replacing, I used the trick of fishing line fed from the top of the clutch boss hole (#3, C5). Feed both ends through the hole creating a loop on the top. Connect the end of the ring to the loop and pull through. Repeat for the other end. I used a 30mm socket instead of the 1 13/16 to remove the central nut. I didn’t have access to an impact gun or a clutch removal tool. I used the non-ratchet end of a ratchet strap to hold the clutch boss (#3, C5) while turning the nut. Run the non-hook end between the teeth on the clutch basket (#1, C5) 3 times counter-clockwise (clockwise to tighten) and secure (frame, peg, etc) making sure that when tension is applied it does not bend the teeth of the clutch basket. Once the entire clutch pack is removed you can easily visualize the end plate and the potentially bent or broken ears and the pins they retain. There are different opinions regarding going fishing for the lost pins if they are missing and not on the bottom of the case. I will defer that decision to your discretion. If you decide to replace the plate with bent or weakened ears, the central bolt will need to be removed (#9, C9). This is Loctite’d in place & the bolt is somewhat soft and can easily be stripped despite being a 30mm Torx. Heat may be required to loosen the Loctite and free it up. Mine started to strip so I replaced when I purchased replacement parts. A thread that documents the updated parts can be found HERE. Look at post #3 from dingy. Of note, the part numbers for the pins are different in case you attempt to attempt to reuse the old pins for the upgrade. The upgraded parts are: 4NK-18185-00-00 SEGMENT Qty: 1 93604-12037-00 PIN, DOWEL Qty: 5 93604-16092-00 PIN, DOWEL Qty: 1 How To Update the shift Segment.pdf
-
While I’m sure anyone who’s read any of this thread realizes I tend to have diarrhea of the mouth (or fingers), there’s occasionally a reason to my madness. I wanted to give an update but more importantly wanted to ask for some background so I can finalize the thread with a summary so future individuals could avoid reading through all my yammering and hopefully glean some applicable information, especially if they’re NOOBs to owing a 38 year old motorcycle as I am. First the update… I took cowpuc’s advice and did a “cheater” fix. Not so much to save money but to get it back together and confirm the cam plate was my only problem. I’ve ordered the upgraded plate, pins, central screw & gasket from Partzilla (more on that in the future). I picked up a 4mm drill bit for the replacement pin (our “local” Menard’s was the only location that has 4mm drill bits). Wasn’t ideal as it still had a little slop (but less than the SAE bits) and it has a “triangular” base for the chuck like most modern bits so I had to cut it on both ends so the majority of the rounded shaft would fall between the two plates and articulate with the shift lever assembly. I was able to bend back the tab and realigned the others that appeared bent as well. Was shocked at just how soft the metal was. I put the clutch back together and sealed her back up. Thankfully it worked and took her for a spin with no issues to speak of. Of note, I believe that the dark coloration in the oil was from my being stuck in 3rd and “burning” the clutch plates after starting from a dead stop. I’m no expert and wish I had a microscope to inspect the oil but it looks more like microscopic fragments than just the typical dirty oil. There were also areas around the clutch parts that had a thick, dark material that didn’t appear to be typical sludge. Once the parts show up I’m planning on doing a repeat oil & filter replacement and hopefully it will be a non-issue. Will probably add some Seafoam just before in an attempt to clean out all the crud (comments or recommendations to the contrary?). As indicated above, I’m planning on replacing the clutch from skydoc this winter. So in an attempt to possibly do a full write-up including links to posts, videos, pdf’s and sites I used for the diagnosis and repair (my feeble attempt to give back to the community), I wanted to garner as much information from you guys as I can. Most importantly WHY did this happen? I don’t understand the mechanics behind the ears bending. If the 2 plates remain aligned and the pins themselves aren’t bending, what force is causing it? I didn’t see anything that appeared to articulate directly with the ears or pins beyond the plate although the “upgraded” plate maintained the same general appearance so perhaps I’m incorrect. If it’s rider error (improper shifting?) then I’m willing to accept that as I’m willing to change my riding habits and help others prevent the issue. Of course I’m short shifting because of 2nd gear and if that’s the sole culprit I’d accept that but even that doesn’t seem to be consistent in the posts I’m reading. When I called our local Yamaha dealer, the 70+ year old parts manager I spoke to said that in 40 years of ordering Yamaha parts he couldn’t recall ordering that part or having that issue pop up more than once. It was after reading that a rider replaced the plate THREE TIMES in one summer that I felt the need for both diagnosing WHY it happens but more importantly making a permanent fix. Thoughts, insights, etc. (including condemnation for my “finger vomit”! I’m obviously not used to posting in forums!)? Again, thank you to all who have added their $0.02 to helping work up my issue especially since there are a bunch of posts I found later discussing it from more experienced riders and “mechanics”!
-
You are correct, @cowpuc. The tab was not sheared off, just bent. You're a man after my own heart... cheap & quick! The clutch teardown wasn't that bad and will plan on skydoc's clutch upgrade (plus springs) this winter and now that I know what I'm getting into waiting on parts for 2 weeks won't be a big deal. Picking up a T30 Torx socket in the morning and will see about finding an alternate dowel pin. Tried a T30 bit I had lying around and twisted and unfortunately did some damage to the screw. Read that it's been Loctited so probably throw some heat on it and possibly my Dewalt impact screw gun. Thx agn!
-
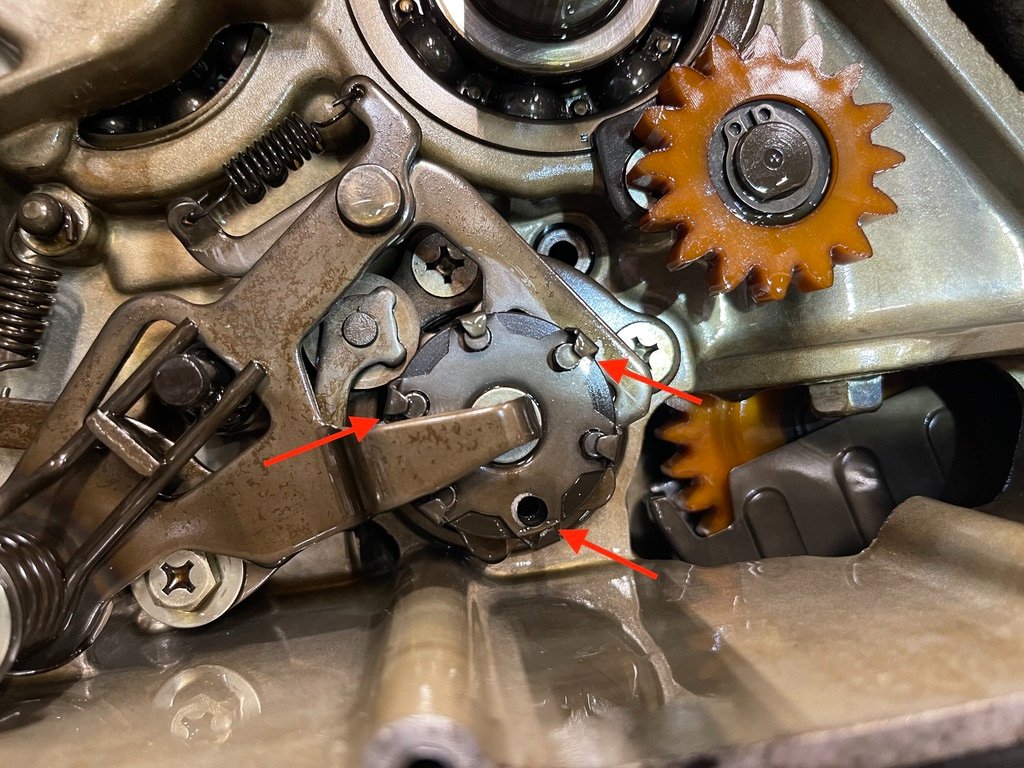
Not that anyone doubted it but you're a genius, @cowpuc! Case removed and before I got into the clutch I inspected the end plate on the shaft cam & found a bent arm and missing pin. Clutch and basket pulled. There appear to be at least 2 other teeth that are bent and on their way out the door. I can't find the missing pin but is this necessary? Should I drain the oil now and try to track it down or is it safe from affecting anything? To repair pin/plate failure I assume I need to remove the circlip and then the shift lever assembly covering the central starbolt, remove the bolt then the plate & pins (I can check the manual). Are there any caveats to taking these out or putting them back in? I've read where many substitute the plate for one from later models that eliminates the bent tabs but would you guys just replace with the OEM (part #26H-18561-01-00) or "upgrade" to a later model? If the latter, any specific model year recommendations for a drop-in swap? At this point, the bare minimum parts I need are the missing pin, the plate and the gasket. I will also replace the pressure plate springs as recommended. This summer I'm trying to keep all costs to a minimum but I'd like to replace the the entire clutch assembly from @skydoc_17 this winter (how do I order this from him?). I inspected the teeth on the clutch basket and while there are marks, there's no apparent wear of the metal. If I replace the entire clutch this winter, what other items should I be hypercritical of and inspect while it's open? All the gears do not appear to be excessively worn & no missing teeth. No obvious missing springs or broken parts but of course when you consider the source...!
-
No, @cowpuc I didn't. I pulled the drain plug & the oil filter and replaced. While I can see the bubble in the sight window, I definitely can't see through the oil. Can't be more than 20 miles since the change. I double checked & it was Rotella T4 15w-40. Honestly I was hoping someone would tell me "THAT'S IT! YOU USED THE WRONG OIL!" And all my woes would be over....
-
Thx. @Woody. At this point I’m willing to consider anything! Just puzzled why it turned black so quickly. Once I get her up and running again I’m going to change it out. So I’m going to pull the clutch and basket after lunch. I’ll take pics and see what everyone thinks. Other than visually inspecting the pins, anything else obvious I should be looking for?
-
Quick update. Went out to try and take video of the bike starting and running. Wouldn't start until I remembered it was in or in between gears so pulled clutch while starting. Starter engaged and lunged forward a bit despite full pull of clutch. Turned off and tried again but same result. Gear indicator showed 4th (as opposed to blank last night). Let it sit & tried again with no lurch. Remarkably was able to keep clutch pulled and shifted into neutral. Wouldn't go into first until I shut her off & did the "Puk Rock" and dropped into first after running back up through the gears. I think I'm going to pull the clutch tonight or tomorrow. Welcome any words of wisdom & insight! Here's a video walk-around for anyone wanting to offer their $0.02 on the validity of ~65k miles.
-
As the issues seem so sporadic and I can definitely feel and hear a difference in the amount of gear movement when trying or occasionally successfully switching gears, I'm leaning towards your assessment, @cowpuc. A gasket is the least of my concerns at this point and while I wish I could see the pins without pulling the clutch, after watching a number of videos it seems relatively straightforward (with some "tricky" parts mixed in). Since she's dead in the water now, I'm inclined to pull the clutch after scouring the forums for guidance. I will take some pics tonight & upload if my count's high enough. Had a neighbor who's ridden all his life (hardcore Harley rider) say I got a steal but since this is y'alls cup o' tea, I'd be thrilled to get a more balanced perspective. I have the same mentality when it comes to paying someone else to do work I can do myself. I can guarantee it'll take me longer and I'll likely work twice as hard to reach the same end but it's all about the journey and the pride in doing it yourself. If this problem doesn't require splitting the cases or end up with another major issue I have no intentions of selling her off. I'm thrilled to hear affirmation that it's "ok" to short shift 2nd and the transmission work may not be a necessity. "Nickel and diming" me to death is different with a motorcycle. Cheaper and not 100% dependent on its functionality so I'm definitely willing put in the time and effort as long as I don't wear out my welcome on your forum asking too many questions (without offering anything in return!)!!!
-
I used Rotella conventional 15w-40, @Woody. I found a number of posts recommending this but unfortunately there doesn't seem to be a definite consensus. As I indicated the oil was remarkably dark for less than 2 weeks old and minimal mileage. Will probably do another oil change once I get her up and running (IF I do!). What do you guys recommend?
-
So I confirmed the outer linkage clamp is secure and not spinning on the shifter shaft. I can't confirm the clamp on the assembly behind the gear cover. I can remove the gear cover if appropriate however I can say that as it will not shift into gear (up or down), there is very little play that would indicate slippage of the interior clamp. Needless to say, I'm still putty in your hands!
-
@cowpuc, you ARE the man! If a picture's worth a thousand words.... Sincerely appreciate your uploading the vid. I think our posts crossed at the same time. I watched the video & went back out and tried again as you demonstrated (as if my hand had magical powers!) but still sitting between 4th & 5th (or 3rd & 4th).
-
Ok, the good, the bad & the ugly. The good is that the banjo bolt bleed burped and definitely needed bleeding (thx, @RDawson & @cowpuc!). Checked the hole in the bottom of the reservoir (used a strand of picture wire) and was clear. Checked the adjustment bar from the shift lever to the shifting shaft in the engine per @Marcarl & thankfully straight. As indicated before, with engine off I was able to shift the gears from N-2-3 and back down by rocking without the clutch. Tried again attempting to get to 4th & got stuck in 3rd. Did the banjo bleed & out of the blue was able to shift into 4th & 5th then got stuck in 4th. Pulled clutch and released repeatedly, tried rocking and shifting then arbitrarily it was out of gear but not neutral. No neutral indicator light and no gear on display. I wish I was more help explaining things. All the above was without engine running. Thx again for all the help.