HermanK84VR
Supporting Member-
Posts
82 -
Joined
-
Last visited
-
Days Won
18
Content Type
Profiles
Forums
Gallery
Events
Store
Everything posted by HermanK84VR
-
Hi Everyone Finally got a response back from AllBalls Racing with respect to the Rear Caliper rebuild kit, basically telling me I need to order a second kit which I already had done, but still no answer concerning the Rubber seals between the 2 halves, fortunately these 2 seals are not exposed to weather because they are sealed in -between the two halves and are still pliable. I have a couple of o-ring kits but what I have that are thick enough to seal are a bit too large in diameter or if I drop a size to fit the diameter they are not thick enough so it will compress to seal. I will try a couple suppliers to see if I can find anything if not I will clean up the originals and re-use if I have to. Herman
-
Hi Everyone Another productive weekend on the Bike Build I have the Front Subframe and Dash assembly back on the Bike and Got to work adding the New Controls and Masters onto the Handlebars I was able to Fish the wires inside the Handlebars so the only things that will be outside are the throttle cables and Clutch and Brake hoses. Now that all the plumbing is complete I filled the rad with Coolant and found 1 small leak on the Lower Pipe that slips into the bottom of the Thermostat housing I pinched and damaged the O-ring when I installed it. tore it back apart and put in a new O-ring and all was good. Fired up the engine to purge the air and so far all is good Temp came up just under the half way mark on the Gauge so all is good. Sorted out some of the wiring so I can adapt the new controls in and now it is just a matter of cutting and Splicing the wires I will re-purpose the Radio control switch to use for the venture Cruise. Replaced the old Fuse Block with a new ATC blade Fuse 12 Fuse Block This will be relocated in the left fairing along with the Ignition module. Also extended the main fuse Wire to the New Fuse Block to have the Main 20A fuse in the new Fuse block as well. Went to work on the Headlight Frame and Bezel to Fit the new LED Headlight it is Nice and Bright. Video attached is the bike Idling at about 750-800 RPM Thanks for all the Comments so far. Herman IMG_3279.MOV
-
Hi Everyone Picking away on getting things done on the Bike Installed the Handlebars last nite with the new Krator Risers Not sure if they are set at their final position but they are on and Ready to have the controls mounted. Now have the new forward control Rear Brake master permanently installed after retapping the Outlet for the M10x1.25 banjo the hole was originally M9x1 and near impossible to find a Banjo to fit it one of the joys of Amazon. Started to rebuild the Rear caliper and found out the AllBallsRacing Rebuild kit only has the Piston and Dust seal for 1 side so now I need to order a second also missing was the rubber washers that are in between the 2 halves so i have contacted the manufacturer we will see if they respond. that is it for today Herman
-
Hi Everyone I did not get to work on the bike much since last week, the head cold turned into some sort of upper respiratory Infection lots of Coughing up of stuff , fever and Headache. Spent Friday , weekend and today feeling like crap. Did manage a couple hours in the garage yesterday and part of the afternoon today, I managed to get the Rad Hoses installed and Rad mounted so I am ready at anytime for Anti-freeze/Coolant, Re-installed the Coil Bracket and coils and installed the new Plug wires and Iridium Plugs. Installed all the remaining misc Hoses Vacuum Pulse Hose Breather Hose(also installed the Baja Air filter) all new Fuel lines from the Tank outlet to filter -new filter- from Filter to Pump then new line from the Pump to the Carb all visible hoses are sleeved with SS Braid Put all new Spring and Screw clamps. I found these 2 kits on Amazon both kits were under $20 ea Nice to have in the shop Installed the Fuel tank and rear subframe started to finalize the Forward controls on the Right side then ran into a snag the new master cylinder Banjo Bolt threads are different M9x1 versus Yamaha M9x1.25 Hopefully i can source one locally and then ran out of steam. I have also included a Picture of the Russell Brake lines I am using these are Factory made and DOT certified for US/Canada . as always here are some pictures to update you all on the progress. Have a good Night Herman
-
Hi Everyone I wrote an update on Sunday Nite but for some reason it did not post, I spent the first hour or so going over the Bolts installed the previous day to confirm I did not miss any and checked for correct Torque, refilled the Final Drive with new 80w90 gear oil. I spent some time test fitting the Vmax Silicon Hose set I purchased off amazon and made a list of Hoses and clamps I need in order to replace all the hoses on the Bike. Only one hose was too short for the Top Rad to the Fan Sensor tee, but I was able to source a piece of hose at a local Industrial hose supplier, the other issue I ran into was the Hose Diameter was about 3mm larger and the Spring Clamps would not go On the Hose so I found a kit on amazon with the larger Clamps I need. Also finished putting the Head bearing races in the Frame and Mounted the Triple Tree and then went to work on assembling the Front forks. Finished up Sunday Evening by Polishing the SS Exhaust Pipe I built and cleaned up and polished the Front Cylinder Pipes. Monday Morning I was off to the Hose Supplier to pick what I needed, then back in the garage. First order of Business was to install the Exhaust on the Bike, then I went to work on making the Block off plates for the Front forks and gave them a coat of Paint to match the new Black Lowers. Replaced the Clutch Slave Hose and re-installed the Steel Clutch Line on the frame and installed the new Speed bleeder. Filled the forks with new Synthetic Fork oil by Amsoil (10wt) as suggested by Progressive, installed the Springs then closed them up. Changed out the front Axle Seals and checked the bearings they were clean and turned smooth with no play so I opted to leave them and repacked them with bearing grease then installed the Front wheel. The bike is now back on both Wheels with new tires. Went to work on dismantling the rear subframe to get it prepared for a fresh coat of paint, and the day was done. Toke the Nite off from the Garage tonight as I feel like I am coming down with a cold so I will get some rest over the next couple nights and go back at the bike on the weekend. I am hoping to get the remainder of the Mechanical work complete over the weekend with the front and rear subframes re-attached, rebuild the 3 brake calipers, and finalize all the different plumbing, hopefully test fire the Engine again to fill the engine with Antifreeze. That is it for now have a great week all Herman
-
Hi Dano When I first purchased the bike roughly 5 years ago I signed up on this great site and researched thru all the info on this site and basically toke all the advice and recommendations then decided what I envisioned for my project, I am the type of guy that likes to work on things and make them my own so for me the upgrades serves multiple purposes it revives an old bike , I am using modern materials that improves reliability and safety, it also tests and improve my abilities and workmanship. because it is an older bike it is simple in its functionality and easily modified even with all its advanced electronics of that day, as an electronics Technician the wiring and electronics do not bother me. I have always worked on my own mechanics of my cars Snowmobiles and boats and Motorcycles and enjoy the work. Did I need to do all the upgrades, No , but when I look at the age of the bike and during planning I will always plan to replace wearable parts , brakes, bearings, bushings, seals, hoses, brake lines etc. because you just do not know if the previous owner actually maintained things. the other reason is I have the Tools, ability and garage space to perform this restore/upgrade so why not, much more fun then sitting on the couch watching the tube. take care Herman
-
Hi Everyone Here is an update on the Bronze Bushing replacements and Installation in the Lower control arm. The Challenge is finding the Metric Sizes we need for these Swingarms the worst bushings were the 2 that are in the small swingarm link that connects at the Shock lower mount and and the Larger swingarm link. The remainder of my bushings were fine. the 2 on the Larger swingarm link to the swingarm rear mounting points had some wear but was not critical. I have added grease nipples to all 5 points and they are now well packed with grease and the 2 bushings are now Bronze bushings. To accomplish this I purchased from Princess auto a pack of 4 Bronze bushings OD7/8x5/8ID, $14.00, placed this on a 3/8 bolt with washers and put it in my drill press, with the drill press spinning this assembly I used a large flat file to gently mill down the bushing to the required 22MM OD, only need to remove roughly .225mm off the 7/8 OD, once that was done I was able to press in the bushing into the swingarm using my bench vise. Next Step clamp the swingarm into your drill press vise, square it up to the Drill bit then drill the bushing with an 18mm drill bit (amazon purchase $17) go slow using lots of oil. Last thing is to drill and tap for a grease nipple this can be done before or after you drill the bushing to the 18mm. Now an update to the Build my buddy came over to help get the engine mounted in the Frame and I must say it is much easier to install the frame over the engine then muscling the engine into the frame I built a wooden Engine holder out of 2x6 so we could get the engine off my Engine stand and sitting on the Bike lift we then picked up the bare frame and easy peasy engine was bolted in with the new delrin mounts within an hour. We then started reassembling the rear swingarm components and Final drive and Rear wheel with the new Tire. I then started to work at replacing the head bearings and seals, it blows me away how so many MC owners neglect this critical component the Bearings were seized the bearing races were beat to death and not a bit of grease left on the bearings. The bearing Race removal was a bit of a chore as there is now discernable lip on the back side of the race to tap out the old race, so next best thing was to weld the old bearing to the race then pop it out worked like a charm. Front end will be put back together tomorrow as we are heading to family for the day Happy Easter all Herman
-
Hi Marcarl The main site I found that had the largest selection of metric Sizes is Mi Motion (motioncanada.ca) they are an industrial supplier. these are not Plastic bushings like the original these are Bronze bushings. I would say once the swingarms are drilled and tapped with Grease nipples and these Bronze bushings installed they would outlast the life of the bike. With regards to the paint Normally I would wait but I am on a time crunch to finish the Bike at least a week before we head to the 100th anniversary of Laconia this June so I can run some miles on the bike before the trip to work out any kinks and dial in the single carb. Besides I have been maintaining 17-18 degrees all week in the garage with the electric furnace so that is keeping the dampness down and helping cure the paint. The paint I am using is VHT Hi Temp Caliper Paint directions say Paint must be dry for minimum of 2 hrs before vehicle can be driven (when applied to a brake Caliper) I pulled the Forks apart tonight to clean up the lower fork tubes and replace the seals and install the new progressive springs, The lowers recd a coat of Gloss black as well to complete the Blacked out frame. The lowers were just starting to pit where most of the factory clear was gone so a light sanding with 240 that smoothed out pitting then a couple coats of the gloss black. I will post additional pictures tomorrow Night Herman
-
Hi Everyone I have been out in the garage every nite this week as my Wife is Baby sitting for Friends at their house for the week. I now have all the Major frame components sprayed with a fresh coat of Gloss Black Caliper paint, I have been using VHT brand paints for most of my projects as it has very good coverage and is High Heat and Chemical resistant. I have 2 good coats over all the parts; tomorrow after work I will flip over the frame and just need to apply a top coat on the 2 top pipes Friday Morning My buddy is coming over to help me put the engine in the frame then I will continue to re-assemble. I had my new tires installed today and many parts orders arrived including my new Plug wires and Iridium plugs from Fortnine. So the question posed by MarCarl on what to do about the swingarm bushings. I measured the Swing arm sockets and the internal Diameter of the bolts or Sleeves depending on what Pivot point. The worst Bushings were the 2 that are on either side of bottom shock mount of the smaller Steel swing arm link these measure 22 mm on the swingarm socket and the internal Diameter is 18 MM, I have found a source in Canada for metric Bushings but have yet to get a response as to availability of the sizes needed. However My solution at this point is to take some SAE Bronze bushings that are readily available 7/8 OD x 5/8 ID, I will need to turn down the 7/8 (metric value is 22.225 mm) to the 22 mm to fit the swing arm socket then drill the ID from 5/8(16mm ) to the 18mm finish diameter (drill bit should be here tomorrow) drill a hole in the side of the Bushing slightly larger than the Grease nipple to allow grease to be pumped in, press this into the Socket and we should be good for a long time. The Flanged bushings of the larger Aluminum swingarm link that attaches to the bottom side of the swing arm is 23-24 mm sleeve with internal diameter of 18 MM these bushings have very little play in them so I am not going to change them at this time just because of my time constraints to complete the build, however i will be adding grease nipples to these points as well. All remaining Bushings appear to be in decent shape with little to no play, the Swing arm Pivot bearings just require a good cleaning and repack of good bearing grease and should be good for a long time yet. as always see pictures of the progress all thoughts and comments are welcomed. Have a good nite Herman
-
Hi Everyone Pulled the rest of the bike apart today to finish all the cleaning and prepping the frame for paint, Found the Bushing bad in the swing arm lots of play there also drilled and tapped holes to add Grease nipples on the swingarm/Shock linkages. I am hoping a local bearing shop has some bushings to fix up the linkages. Frame is completely degreased and rinsed with warm water with the help of my Pump sprayer. Painting hopefully over the next couple nights so the Paint is dry enough to mount the Engine and start re-assembling. Herman
-
Hi Everyone Finished up the floorboards today and finished all the welding, the Forward control Bracket is complete, this one bolt on Bracket accommodates the Forward controls , Floorboard Mounts and Lower Engine guard Mount, It bolts up using the Original Engine Guard Mounting points on the Frame. Sitting on the Bike My feet are now comfortably forward with my Knee slightly opened up from 90 Deg once the Highway pegs are added I will be able to completely stretch out my legs. Let me know what you all think Disassembly of the front and Rear tomorrow Have a good Night Herman
-
Hi Everyone Ignition Module Preventative maintenance was a success tested the module on the second bike and all 4 cylinders are firing as they should I am going to get some more Diodes and do the same to the other module of the Other Bike I will be selling Just for peace of mind. I used 1N4001 rectifiers these are good to 50V and 1A. a solder sucker and Solder Wick is a must for working on Double Sided Boards. Herman
-
Hi everyone I decided to have a look at my TCI module to replace the diodes as it is a recommended Preventative measure well it was a good thing I decided to take it apart I am not sure how these diodes actually still functioned. They were all puff of powder as described in posts, but my case the diodes were literally being held together by the solder that held them to the board everyone of the diodes once unsolder fell apart. I even toke some time to resolder other Cold joints on the remainder of the PCB. I will test it on the second Bike on the weekend. Herman
-
Hi Everyone Spent the last 2 days in the garage and made some progress with help from a good friend yesterday, spent Friday Evening Polishing the Pipes with the Dual Action sander I have most of the Grinding marks out of the Pipes with 240 need to pick up some 600 and 900 grit to continue on but you can start to see the shine of the SS. Finalized the forward controls Mounting, then sorted out the New Engine Guard Mounting locations, Slight modification to the Rear Bag mounts, Pulled the old Block I used to Mock up and Fabricate the Exhaust Pipes, Last thing to Fabricate are the Floorboard Mounting brackets, almost finished all the fabrication and welding then my Batteries Die for the Auto Darken welding helmet, Tried welding with my old flip up Mask and it was like I forgot how to weld. Funny How we get used to these new auto darken masks you don't realize until you go back to a standard helmet. Anyways I have attached some additional Pictures of the Forward controls and The Engine Guards and a couple sneak peek pics with the Plastics to give you a better Idea of how it should Look when I get it complete. Once the Floorboards are done , next job is to pull the rest of the Bike apart starting with the Front end and completely rebuild , new Head bearings, front Axle bearings , rebuild the Calipers, install the Progressive springs, and replace the Fork seals Make up a set of Block off plates to delete the anti dives, then After that is the Rear swing arm and Rear subframe and Fuel tank pull everything apart and Clean up and rebuild it completely inspect all bushings and replace as needed add Grease nipples on all swing arm joints etc. and give the Frame a new coat of paint. With the weather starting to get above 0 deg C I should be able to get in the garage in the evenings without having to preheat for an hour. Until next time Take care all Herman
-
Thanks guys I was happy to hear it run!! This is a 1300 out of an 87 Venture with a set of Vmax heads, Intake manifold is by VTC Motors in Lithuania and the Carb is a VW Pict 34-3, Carb was purchased off amazon for about $120 Cdn. The bonus with this it has a fuel cutoff solenoid when the Ignition is Off as well as an electric Choke, the Carb is easy to adjust and there are many Jet sizes to fine tune this for the bike. When I first ran the engine I knew right away the timing was out as it was backfiring bad and actually dislodged the Intake manifold, I found out these manifolds are built out of Schedule 80 Copper Elbows but they did not provision any Grooves, similar to the carburetor throats to help lock it into the intake boots, so after I corrected the timing I went to work on Fixing the Manifold design. Because I work in the HVAC industry I have access to Silfoss Brazing rods for Welding Copper so I built up a ridge at the bottom of each Runner that now locks into the Intake Boot below the Ridge that goes into the Carbs Groove, it also makes a better seal once the clamps are tightened down so I should Not have any issues with this manifold slipping out of the Boots. Herman
-
Hi Again Everyone Work has been too busy and I haven't had much time to work on the project, I did manage to get the forward controls Mounted by Making a removable Bracket that bolts up to the Existing Engine Guard mounting points. Still need to complete the Floor board mounts which will also be attached to this Bracket assembly. Some of you may recall I built an engine stand adapter for the V4 engines it should be in the archives this bracket is strong enough that I was able to test fire the engine and found my timing was out, I found a good Vmax1200 Video from Morley Muscle showing the correct Timing sequence, pulled the valve covers and corrected the timing and it now runs strong, I have attached a quick video of it running with the Single Pict 34 Carb. More Updates to Come Herman IMG_3141.MOV
-
Back in the shop today and was able to finish up all the modifications for the HD Saddlebag Mounting Brackets and Muffler Hangers, I was able to Order a set of HD Muffler hanger Bushings then built the hanger to fit the bushings. Also had to make some alterations to the Pipe I built, the 2 Front Pipe V Flanges with the Clamps were too tight against the oil Pan, I cut these back just behind the oil pan and extended both front Pipes and weld 2 new V flanges in place. it actually looks cleaner. I had also Ran into an Alignment issue with the Left Side Muffler and had to Cut the Pipe and rotate it to level out the Muffler, re-welded the SS pipe and all looks straight now. Will be working on the forward controls and Floor board Mounts tomorrow.
-
Hi All here is another update on the build I have the pipes all welded up but ran out of gas in the Mig so I have some grinding and touch ups to do on the pipes. This past weekend was bitterly cold -29 deg C plus wind made it - 48 or 49 so working in the garage was just a bit too cold. These pipes are made up from an old set of Harley sportster pipes (donated) and new 1 1/2" 304 SS Mandrel bend Exhaust pieces I purchased from Llyell's SS exhaust in ONT, I cut the top off the original collector box so I can retain the original Exhaust Mounting points under the engine and have the Joint to the rear down Pipe, the front Header pipes were cut at the slip joint and was replaced with a V Band SS Flanges to allow for future service and no gaskets are needed, the exit Pipes out the back are all 2" HD header pipes cut and rewelded using the existing bends to get past the venture center stand and swing arm components and provides straight back pipes for the Mufflers to slip onto. I will post additional pictures once I have cleaned up the welds and complete the Muffler hanger points at the rear. I will working on measurements tonight to get started on the Forward controls and Floorboard Brackets more to come on that.
-
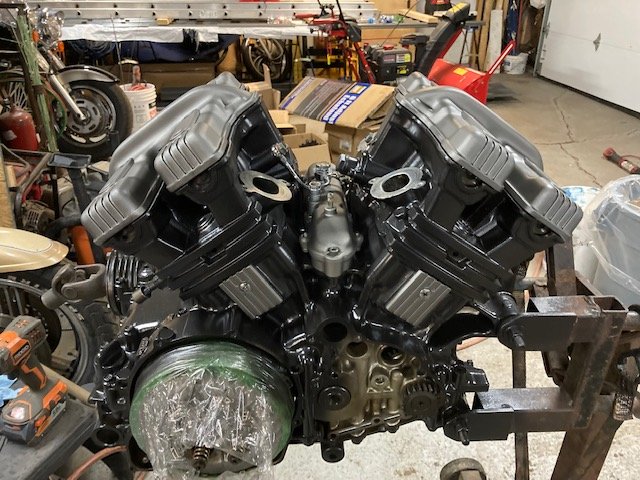
Making progress on the build, Engine is now all done with Vmax heads , updated clutch, Fresh paint and ready to bolt in. Started on the Bike, bolted in the old 1200 bare block and covers to Mock up the custom exhaust pipes, to adapt to the Road King Mufflers and HD saddle bags. I should be finishing the Exhaust today, then start working on the forward controls, mounts and Mount adapters for Floorboards. More to follow next weekend.
-
thank you good sir
-
For the spacer just the Right hand Side when sitting on the Bike, . the Speedo gear is on the left and do not recall a spacer on that side.
-
PM sent Thanks
-
Hey Saddlebum send me a PM to let me know what you want for the spacer, the other thing is a set of solid mounts if you have a set you want to part with and Block off plates to remove the anti dives. More of a want is the Gen 2 front forks and R1 calipers I missed out on these when i purchased the engine from NCK cycle salvage in Woodstock Ont. he had a set but sold them before i got back to say i wanted them. let me know Thanks Herman
-
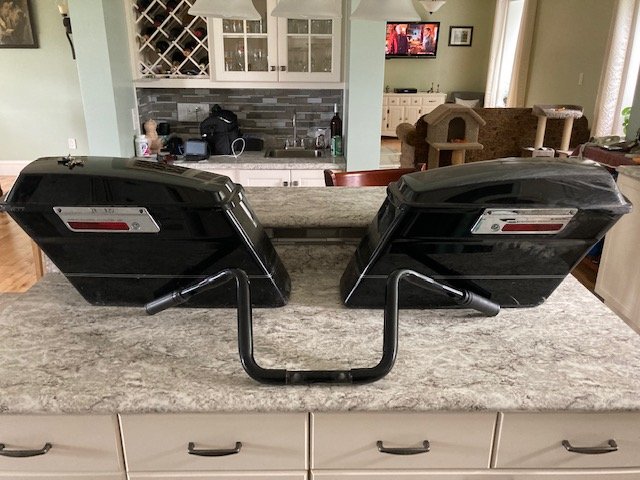
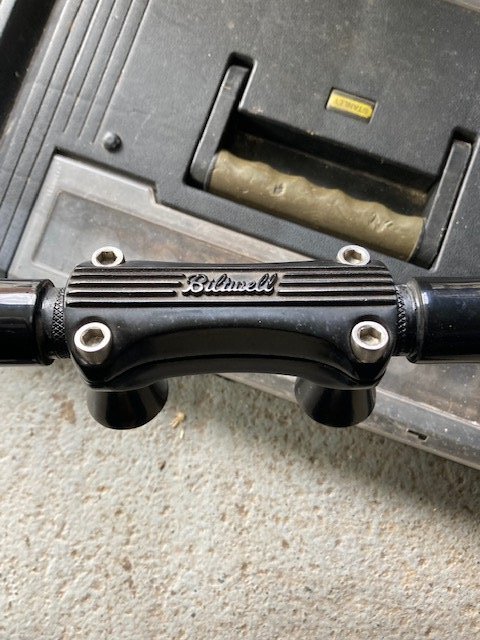
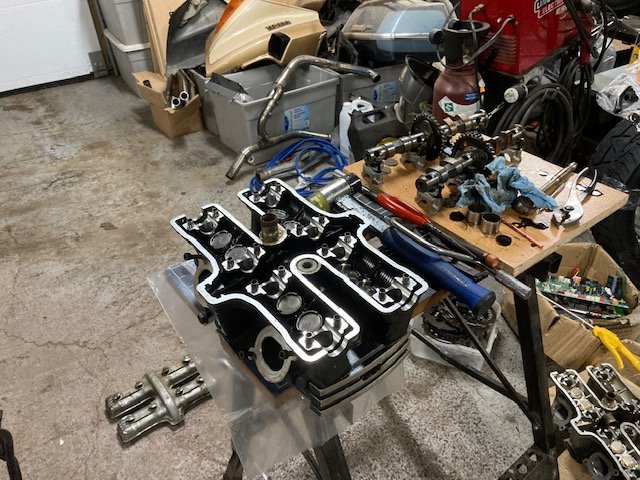
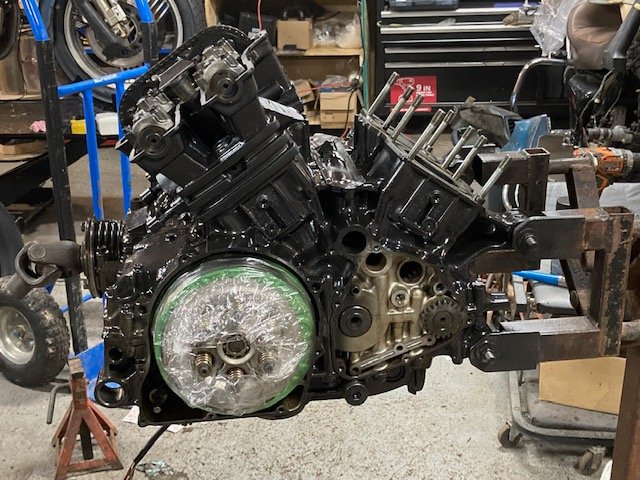
Hi All I am finally getting my Venture Max HD Build started and have been collecting parts for the Bike since I purchased it in 2018 **I am missing the Front axle Spacer so I am hoping someone on here has one that I can purchase. **I am also looking for a set of Solid Motor Mounts I have the drawing to have some made but thought I would check to see if anyone has a set for sale before having some turned for me. Here are some details of the build the plan is to have the bike completed and ready to ride from NB Canada to the 100th Ann of Laconia this coming June 2023 The starting model is a 1984 Venture Royale, I have pulled the 1200 (bad second Gear) and purchased a 1300 from a salvage yard out of an 1987 Venture from Ontario, found a set of Vmax heads with Cams from another salvage yard on ebay out of Georgia. Engine is currently being re-assembled all new Gaskets and seals painted with Black metallic for the Main Block and heads, as well as the Clutch , stator and Water pump housings, Thanks to Skydoc providing some knowledge and feedback on the Clutch mods to save some $$$ I was able to use the 6 spring clutch pressure plate and push rod from the 84 1200 and use it with the 1300 clutch basket, removing and replacing the 1/2 friction disc with a full disc, purchased a set of HD springs and the clutch is ready to go. Carburation will be the conversion to a single carb using a VTC motors Intake and VW pict 34 carburator. Exhaust Piping I will be custom building new pipes out of SS Exhaust pipe, HD sportster Headers and a set of 2002 HD Road King Mufflers. Block plates, valve covers center Twinkie, oil filter housing are all painted with Ceramic Hi heat header paint color is Cast Iron, all Chrome inserts to be polished and to remain Steering will be handled with a new set of 1 1/4 in bars 10" mini apes mounted to the triple tree with a 1 piece bitwell HD Riser, new set of Brake and clutch masters, and handlebar mounted Mirrors, HD Handlebar controls. New set of Steering bearings, swap in of new progressive springs into the rebuilt front forks with new seals and dust caps, removal of the anti-dive units and install block off plates. Rear brake Master is being replaced and the addition of HD Forward Controls are being added with custom mounts for Floor boards Rear master will be included on the Forward controls kit up front. Brackets to be fabricated All brake and Clutch lines are being replaced with Russell Brand DOT certified brake hoses and fittings, with the addition of speed bleeders all original Calipers to be reused and rebuilt. All new Brake pads to be installed Luggage boxes I am swapping out the side boxes and replacing with a set of HD hard bags as they have more room and personally prefer the look of these style of bags, purchased a set of HD Saddlebag brackets to cut down on some fabrication time. I will retain the original Trunk and Fairing, and windshield and repair as needed with a plastic welder and plastic welding staples., all body panels Fenders and luggage containers to be painted thinking of Candy apple red over Black to give me a Black cherry Final color. Headlight and all bulbs will be replaced with LED, I am also replacing the old fuse box with a new ATC style fuses. New Tires New Engine Guards will need to be re fabricated to accommodate the forward controls. I will continue to add to this post as the build progresses
-
Hi Mike As Well as all the previous good advice check for any corrosion/rust where the starter is bolted up to the engine. besides having 12v on the solenoid you also need to have a good ground at the starter. it could be as simple as backing off the starter mounting bolts and re-tightening to clean up the ground connection. Hermank84VR


