cami
-
Posts
37 -
Joined
-
Last visited
Content Type
Profiles
Forums
Gallery
Events
Store
Everything posted by cami
-
 I had exactly the same problem. Replaced the horn fuse under the left side panel. Solved the problem for me. Mike
 -
1999 Royal Star Venture has a problem with choke
cami replied to FAAQ2's topic in Poor Man Tips and Fixes
Try adding some Sea Foam to clean your pilot jets. As a temporary work around adjust, raise, your idle speed to get out of the idle circuit, by using the idle speed stop screw adjuster located below the bottom of the fuel tank. As the pilot jets get cleaned out you will have to slow the idle speed down. I had to rebuild carbs, change fuel hoses and fuel filter but the problem returned so my next step will be to clean the fuel tank and reseal it. My RSV is a 99 also which sat unused for a time allowing the fuel to go bad, or maybe the prior owner was using a alcohol fuel mix. -
-
Lots of junk in my 99RSV gas tank. Changed out fuel lines, pump and filter but pilot jets continue to plug up after using Sea Foam to clean them. IMO the only place left for a contamination source is the tank. I pressure washed tank and got a lot of junk out but it obviously needs a better cleaning system. Living in Mexico I need to import chemicals from the states and that is why I am asking for help and opinions so I can do it correctly. Thanks Mike
-
One method to remove caps or plugs on pilot screws is to VERY CAREFULLY drill a small hole in the cap or plug so you can start a sheet metal screw into the hole. Using a long screwdriver you can tighten the screw which will back the cap or plug out of the carb body. I am not familiar with your bike's configuration as I have a 1999 RSV. On other bikes I have used this system with excellent results. You may have to remove the carbs to get good access. Good Luck Miike
-
Help: Where did the mount the cut out relay and the ignitor on a 1999 RSV. Following the schematic from RSV manual, page 409 and 410, I have power after the start switch but not to pump input line. Pump tested good with temporary power. Good power from ignition fuse, but need to find the other end of the wire. When I depress start switch on I get a red water temp warning light. All other things, turn indicators, horn, lights, etc. work ok. Now I only need parts locations as the parts manuals only give general area. After finding parts and I am unable to solve the problem I will ask for help again. I hope I am on the right track Any and all help is greatly appreciated as I live in Mexico and the closest Yamaha dealer is a long trip. Thank You Mike
-
Repair Kit for 86-93 Venture fuel Petcock
cami replied to cimmer's topic in Venture and Venture Royale Tech Talk ('83 - '93)
I live in mortal fear that I will forget to close the fuel petcock on my 99 RSV and damage the engine. My petcock started leaking and was very hard to turn off. I also looked for a repair kit but did not like the prices I was finding on E Bay. I own a 1995 Yamaha Virago 750 that has a vacuum operated fuel petcock, this same valve is also on a 1100 Virago. I have had this valve on my Virago for 25 years with no problems. I cross referenced the valve to tank gaskets and mounting screws Virago to RSV and all were the same part numbers. So all you have to do is hook up a vacuum source from carb manifold to fuel valve and do not worry about hydro lock any more. This valve also has a on -off- reserve and prime function. My 2011 V Star has a similar type but different configuration vacuum fuel valve. So do your homework and cross reference all the bits and pieces to be sure this will work for you. Mike -
My fuel pump is starting to work intermittently, electrical side is good. Any thoughts or recomendations on which fuel pump to buy for a replacement would be greatly appreciated. My thoughts, Facet, Posi flow, with check valve, solid state, no moving parts and can accept adidtives and alcohol based fuel, 2.5 - 4 lbs pressure with more than adequate gph. 1.6 amps/hr Thanks in advance for your help Mike
-
Our thoughts and prayers for a speedy recovery for you and thank you for your wife for pushing you to go to the E.R. Buenos suerte y bien salud. Cami
-
You can buy stainless steel 1" Bimini rail clamps on EBay for less than 10.00 USD for two. Clamps are hinged to fit around crash bar and are very strong. Will also accept flat bar stock for brace going to floorboard.
-
Look on E Bay, I just looked now and found lots of sight glass's new and in different sizes, dirt cheap. Mike
-
At my age, 78, I try to run 350 to 400 miles per day. If I am really worn out I have no problem stopping sooner. In Mexico and the south west United States I find the weather, heat and humidity are a very big limiting factor.
-
I do not understand why a 14mm master cylinder is preferred over a 16mm. Please explain so I can learn more about upgrading my brakes. Thank You Mike
-
DAVID: You told me it is mine but I have not received any postage quote from you to Nogales, Az. 85621. Your private messages are turned off. Thx Mike
-
Thank you for your reply. I will pursue the variable rate flasher relay and if I get the flasher system working correctly with the new relay I will repost. Now I have to find the little flasher relay the feeds the pulse to the hazard relay which is the one shown in the posting you directed me to. I split my fairing to rebuild the shocks completely and thought I found the little relay above the headlight but when I removed what I thought was the flasher and turned the left turn indicator on to flash it work perfectly. Wil try the area down by the battery next. Mike
-
Thank you for your response and suggestions. I am planning on using a relay similar to the one on ebay. My problem is I have been unable to locate the flasher relay, #17 , on the schematic to make the change so I can vary the pulse rate to the hazard flasher. Any suggestions where the llittle relay is hiding? Thanks again Mike
-
on the 1999 RSV factory manual schematic there are two flasher relays listed, #17 is a two pin flasher sending a pulse to the hazard flasher #18 . On ebay there are electronic variable rate flashers listed as a LED upgrade, with two pins that could feed a pulse to the hazard relay. My question is, has anyone tried replacing the stock 2 pin flasher with a upgraded variable flash rate flasher? The electronic ones are generally rated at 150 watts which is way more than we would require. The stock 1156 bulbs are 100 watts for all four. Thanks for your advice Mike
-
A small bungee cord wrapped around the throttle with both ends going to the hand brake will work also. Mike
-
Cruise control/speedometer
cami replied to wrscomncents's topic in Royal Star Venture Tech Talk ('99 - '13)
All switch contact get dirty and make problems. My cruise control would not work properly, no set, accelerate or decelerate functions. I have used WD-40 spray, ( as a contact cleaner), to clean a switch and it has always worked for me. Also used it on other switches, clutch, turn indicator and brake, on my other Yamahas to eliminate a problem. After using WD move the switch to different positions several times to help clean the contacts. Similar problem but different area, use a pencil eraser or WD to clean PCB connections and eliminate chip creep problems. Hope this helps. Mike -
The operation of a clock is a timing circuit normally dependent on voltage. This will be very hard to trouble shoot as the service manual has no schematic for the clock circuit, only the inputs to the meter pcb and bulbs. If all other parts of that instrument cluster are working ok you do not have a control problem but I believe a voltage problem. A few tenths of a volt on a 12 volt circuit will play havoc with a clock but bulbs and other things will be ok. Battery spec voltage I believe if 12.8 volts minimum for a RSV. The clock works 24 hours a day so the ignition switch contacts problem only comes into play when you turn the ignition on. If you decide to work on this you must use a very good DIGITAL VOM. Now my fairing is apart for a shock rebuild so I went and looked at the wiring connectors. Unfortunately I was unable to determine the connector to goes to the instrument cluster. Sorry. It is also possible that a capacitor or resistor on the clock PCB is starting to fail effecting the timing circuit accuracy. If you open up the fairing and pull the instrument cluster open and close the connectors to that area. It is also possible that the connectors are dirty causing a voltage drop and moving them will make a better connection. It may be less frustrating to find a used instrument cluster to tear apart so you can identify the proper wires or buy a handlebar mounted clock on ebay. Mike
-
Found on Ebay 6/12/19 Only available for Gen 1 and Goldwings YAMAHA VENTURE XVZ1200 1300 SINGLE VW CARBURETOR CONVERSION MANIFOLD KIT Hope this helps Mike
-
One of the little nipples (41) on the fuel line T (43) is leaking. Anyone have a similar problem and were you able to find a source for the nipples other than Yamaha? The numbers refer to the Yamaha parts site, carb section. Picture attached. In any event it appears I will have to pull the carbs and split one pair apart to make repairs. Living in Mexico is great until you need parts for your ride.

-
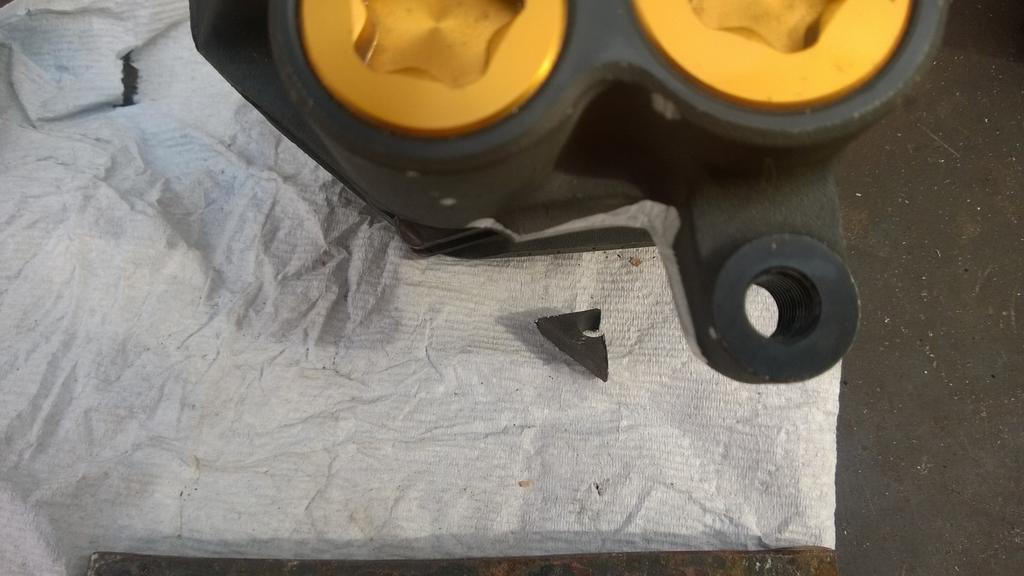
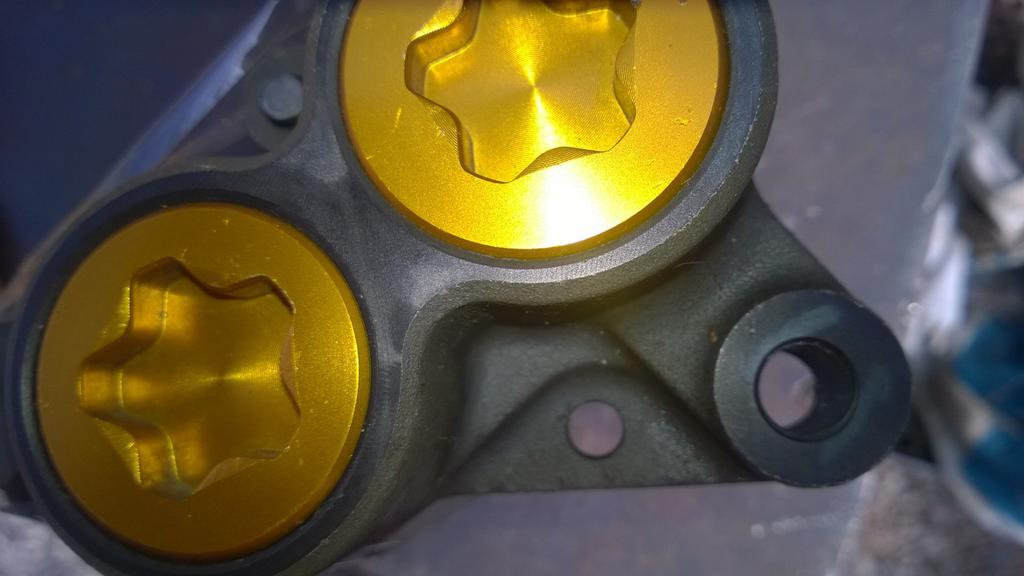
I have a 1999 RSV, and have upgraded the front brakes with R1 calipers. Putting the same caliper on the rear I had a problem, I also have a 27 inch inseam so I have installed a Barons lowering kit. That is where the problem started. The R1 caliper would not mount up correctly due to interference from the Barons mod. So I modified the R1 caliper so it would fit on the Barons brake relocation arm correctly. I have included before and after pictures of the modification I made to the R1 caliper. Now the R1 caliper is very similar in form to the stock Yamaha caliper I removed. The picture are in reverse order. I detailed the cut so it is a lot smoother. After making the relief cut the R1 caliper bolted up very well. Next I will lower the front end to improve handling and to make it easier for me, at age 78 to get the Venture on center. Stay safe and enjoy your ride. Mike
-
Dragging front brakes: Normally this is caused by contamination in the calipers not allowing the pistons to retract. Normally a good cleaning will resolve the problem. BUT ,, here is another cause. If the piston in the master cylinder or the bore is contaminated or possibly a weak return spring not pushing the master cylinder piston to its home position, the pressure your create when applying the brakes will not be relieved because the intake/relief hole is blocked by part of the master cylinder plunger piston seal. Therefore you front brakes or rear for that matter will drag. I removed my master cylinder and flushed the cylinder bore with brake cleaner in both the input and output sides. I was amazed at the crude that came out of the intake/relief hole. Now my front brakes after cleaning the master cylinder bore and piston are working correctly. This was completed on my 1995 Yamaha 750 Virago, but I will clean the master cylinder on my 1999 RSV also.
-
Go confidently in the direction of your dreams,, Live the life you've always imagined. CONGRATULATIONS, enjoy your retirement. Do what your have always wanted to do TODAY, do not wait and put off your decision until tomorrow. Cami