Spokane Dave
-
Posts
13 -
Joined
-
Last visited
-
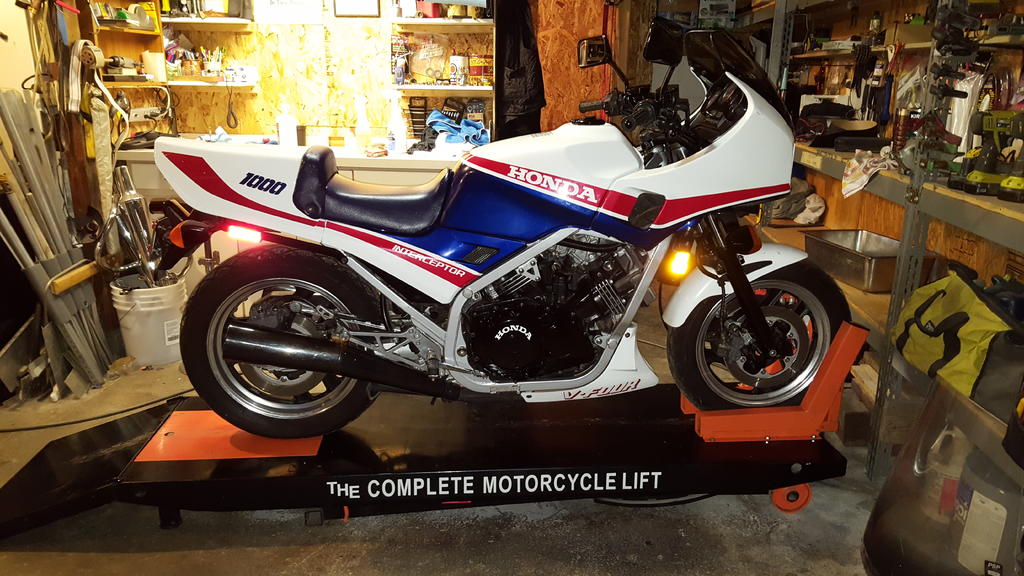
Hey Bob I am in the design stage of making some outrageous custom front crashbars that may get me pulled over, but will be worth the occasional LEO inquiry = (Think dummy Machine guns and strings of dummy bullets) (will post pics as they evolve), so that being said . . . I am going to sell the whole floorboard package. Make me an offer I cannot refuse . . . . . I'll pull the eBay ad if the price is acceptable, and you can pay me via paypal, as there is no need for ebay fee's if sold via the forum. "Click" Here is the ad so you can see detailed pictures
-
I am going to go ahead and list the Markland Floorboards for sale, so I can scratch up some extra funds to throw at the build . . . . Does anybody have any idea what span of years I can claim they will fit if they came off a 1984 Venture ?

-
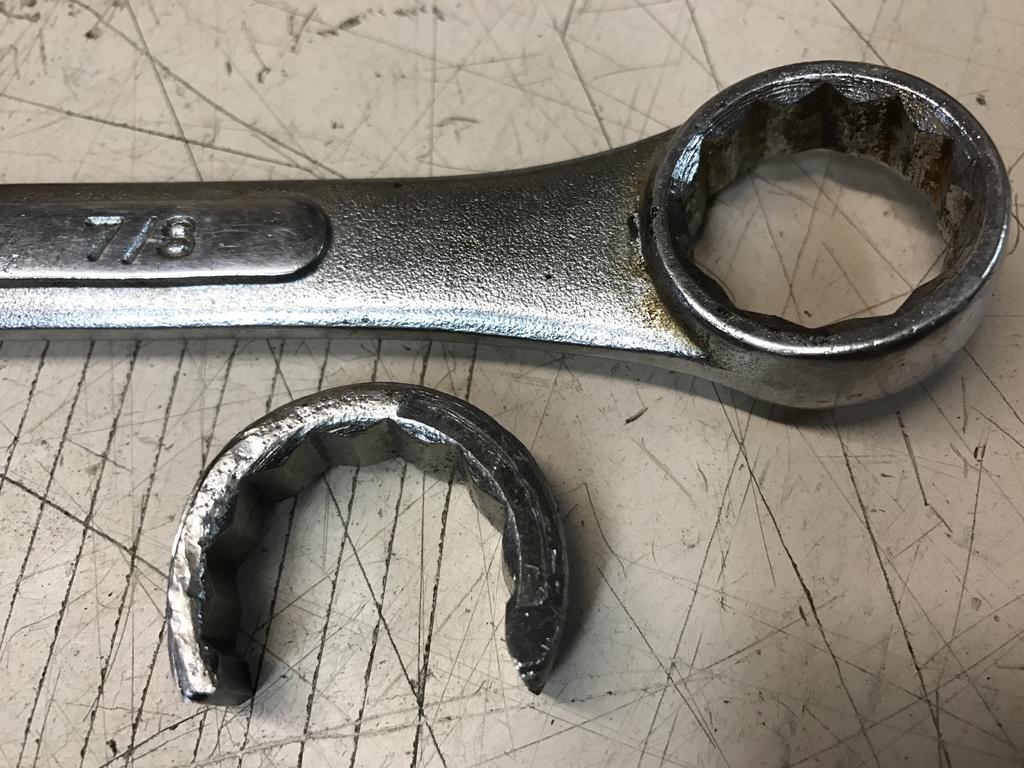
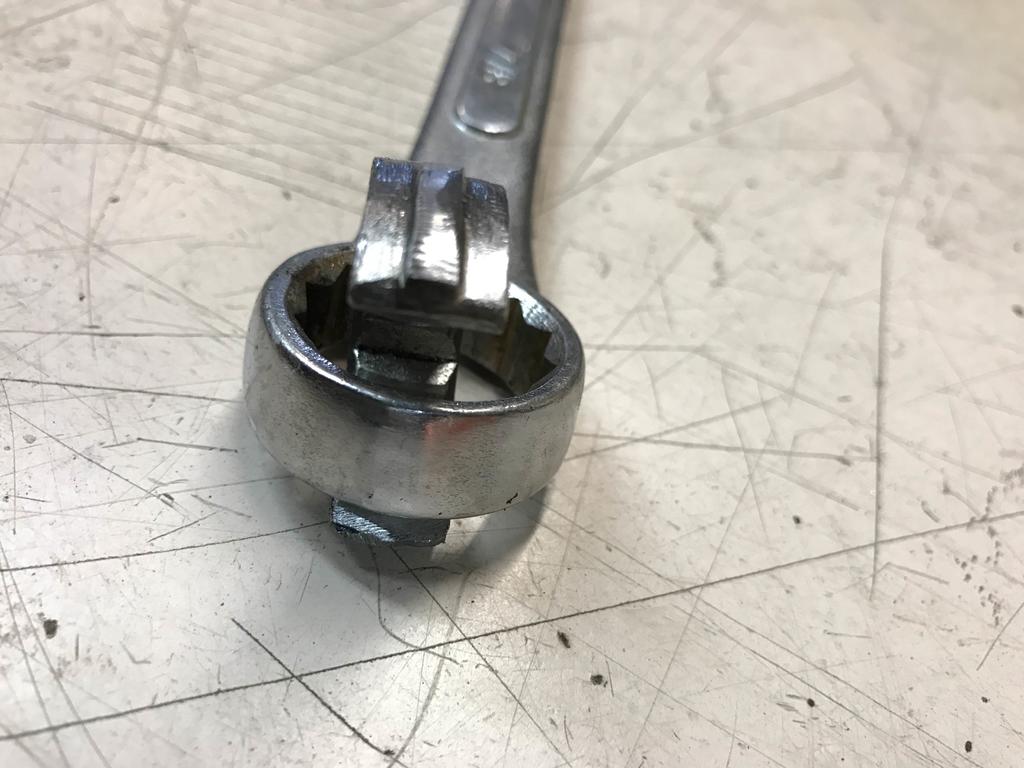
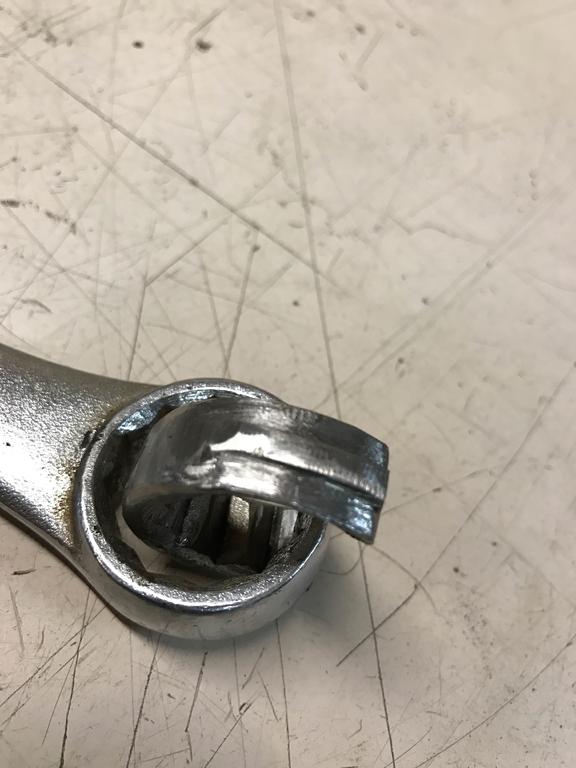
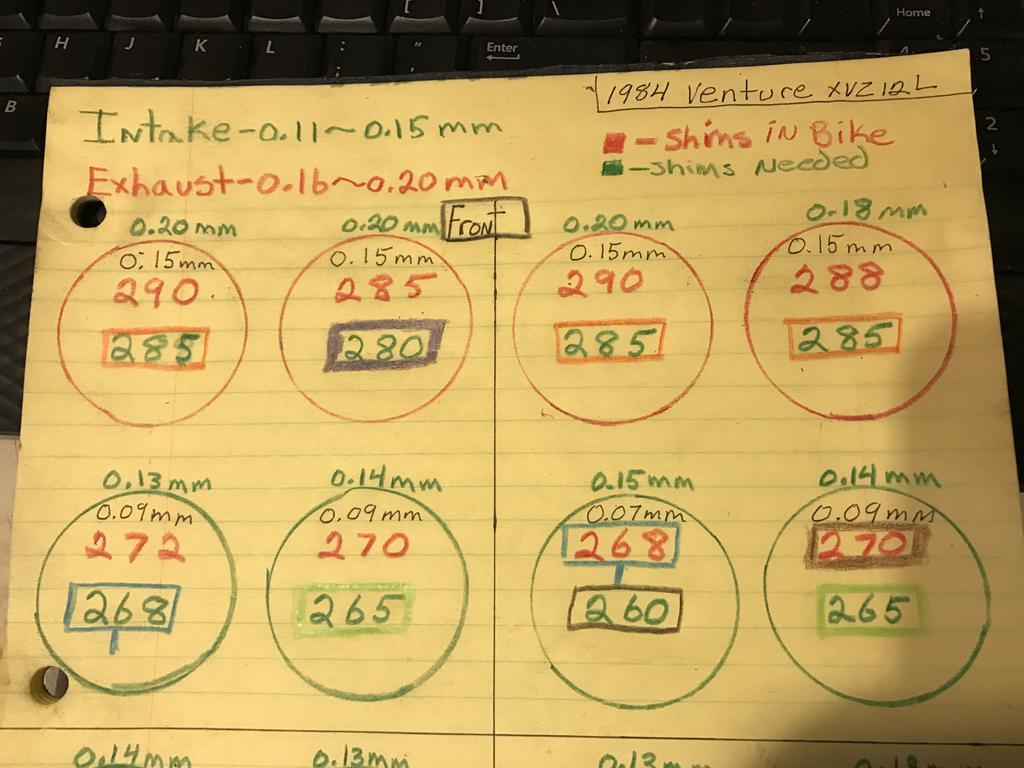
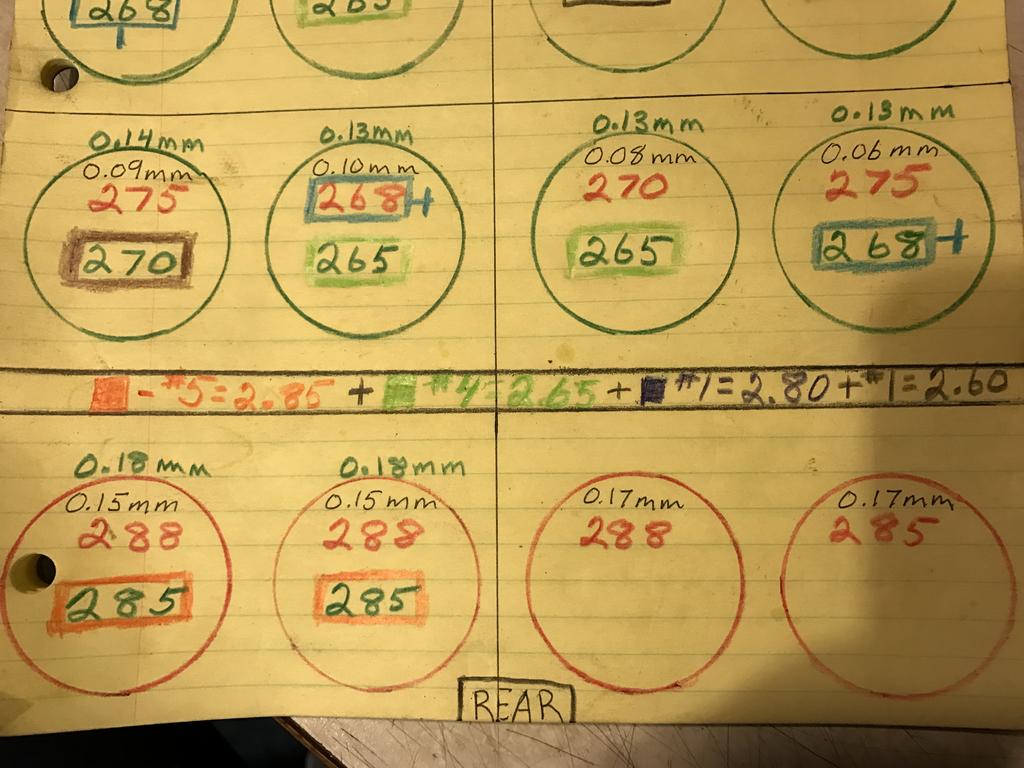
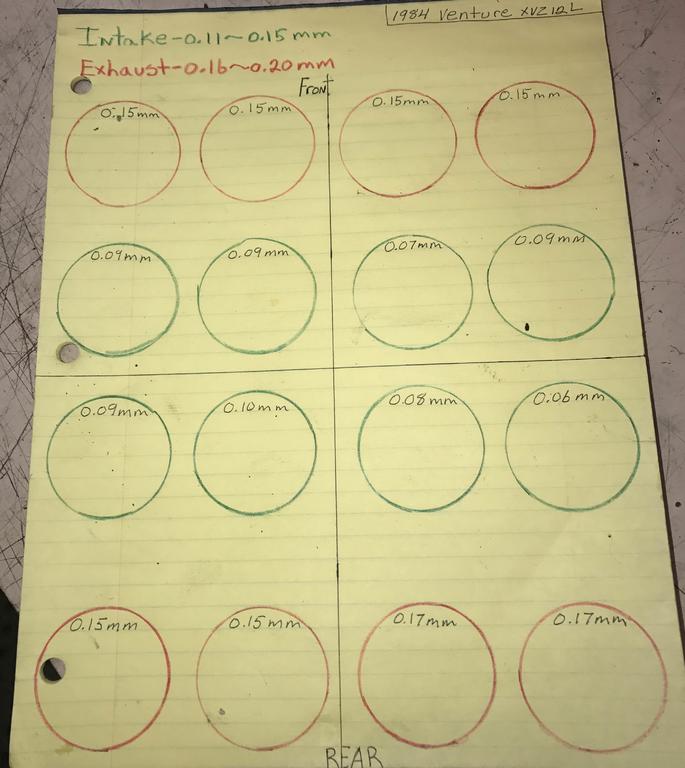
Hello. . . ALL Life got crazy = Family - Got Sick - Dealing with persistent Thieves Finally got some spare time to make a Valve Shim tool out of a 7/8" end wrench so I could figure out where am with shims I have and shims I need A 5 point box end wrench would have worked better, but this was simple to make and was the proper width / thickness Have my own way of working the numbers on a valve job, but all reaches the same info - Beings I raised two daughters and the wife is a teacher - we have a plethora of colored pencils and they helped keep this easy to decipher. Black Measurement top of circle is actual gap / Green is gap after new shim Red numbers are installed shims / Green are shims needed - Color coordination was to group re-usable shims and ones needed Out of 16 shims I am able to reuse #4 - #2 will stay the same, so I need to buy #1 0 total #4 2.85 / #4 2.65 / #1 2.80 / #1 2.60 Leaving an excess of 25mm shims #2 2.90 / #3 2.88 / #2 2.75 / #2 2.70 Tried to give the local shop business (always do), but unfortunately they are severely lacking in customer service skills, so alas I will be ordering them online. Stay tuned = the saga continues = as soon as I get my shims i get to fire the old girl up again
-
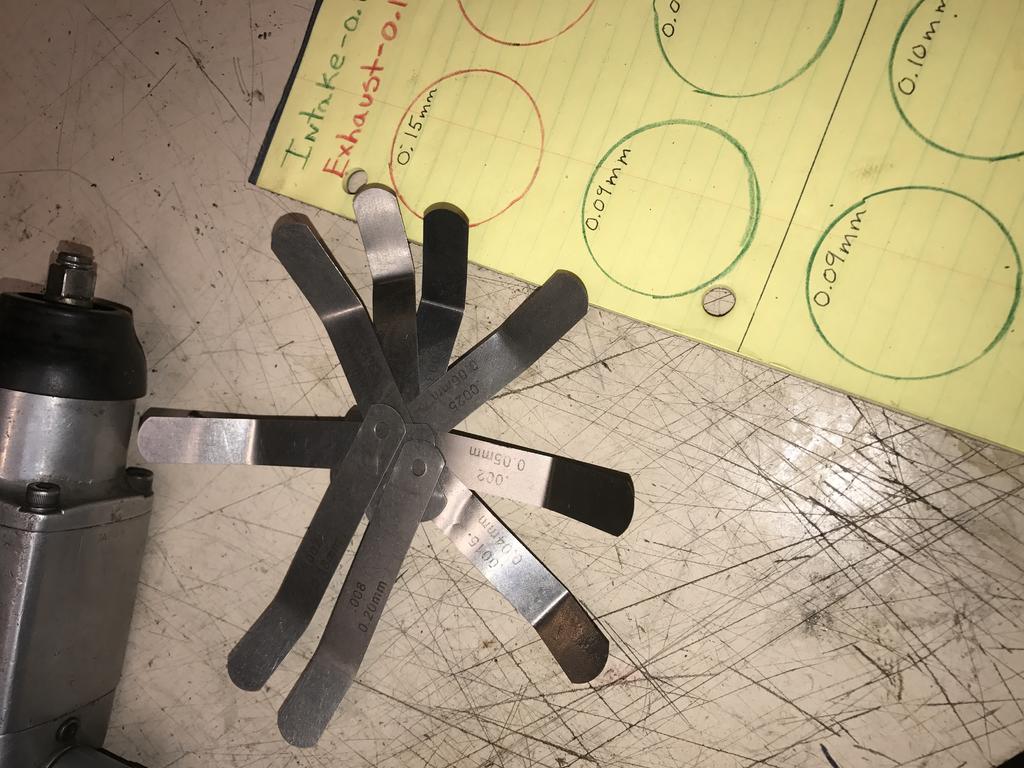
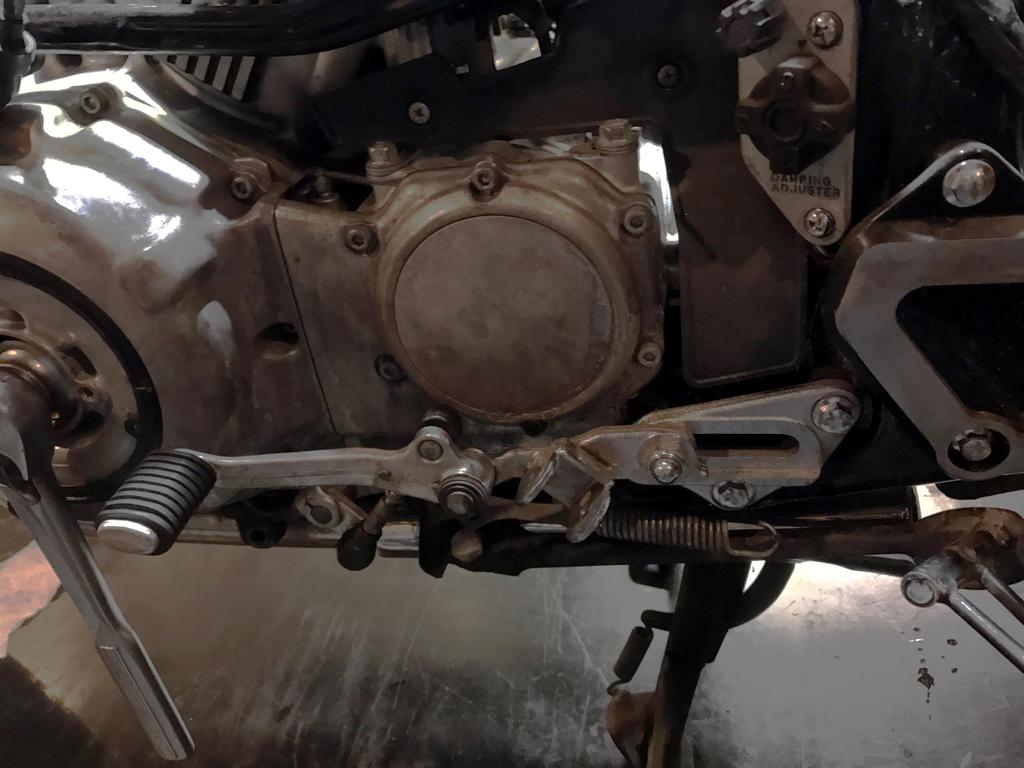
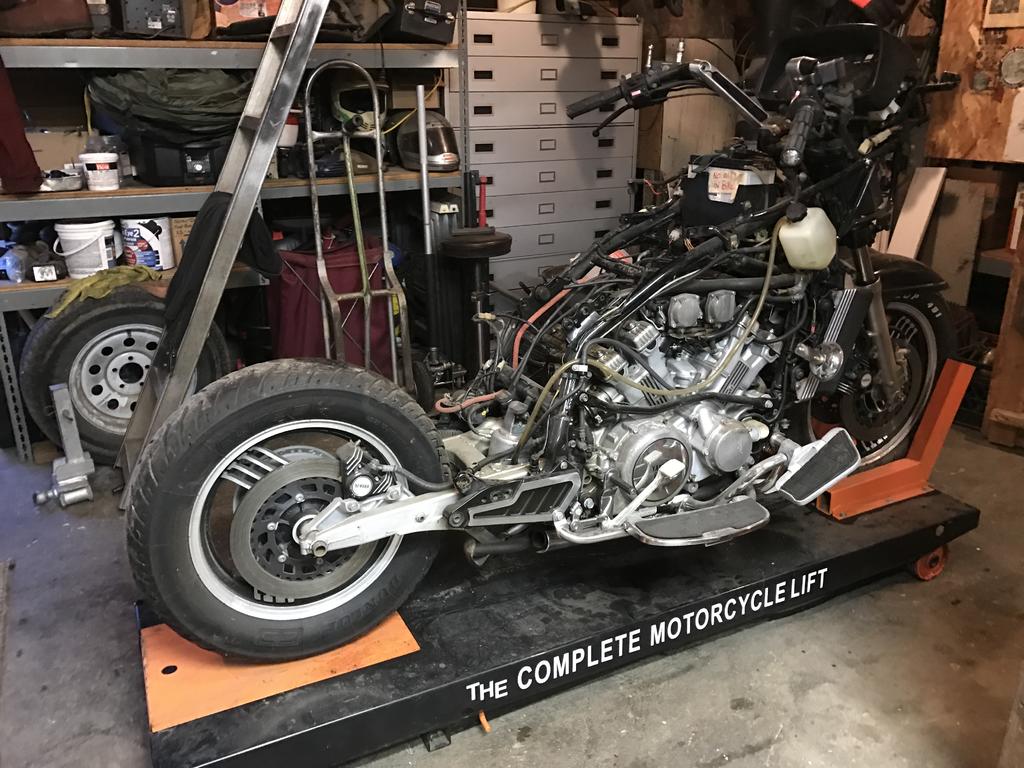
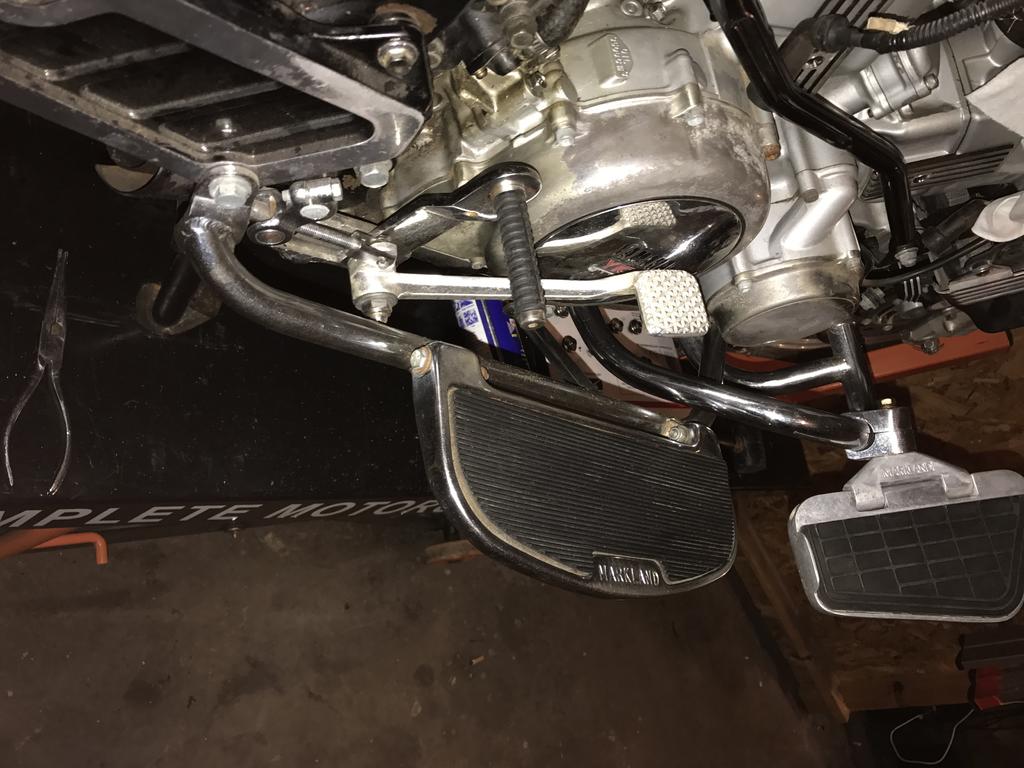
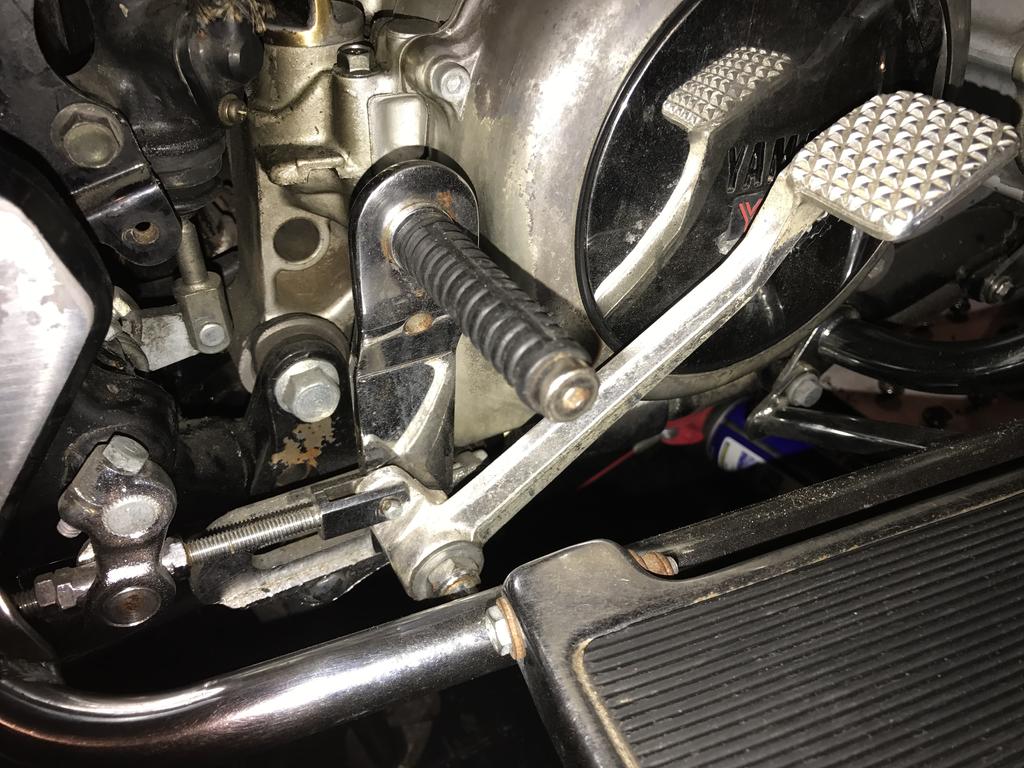
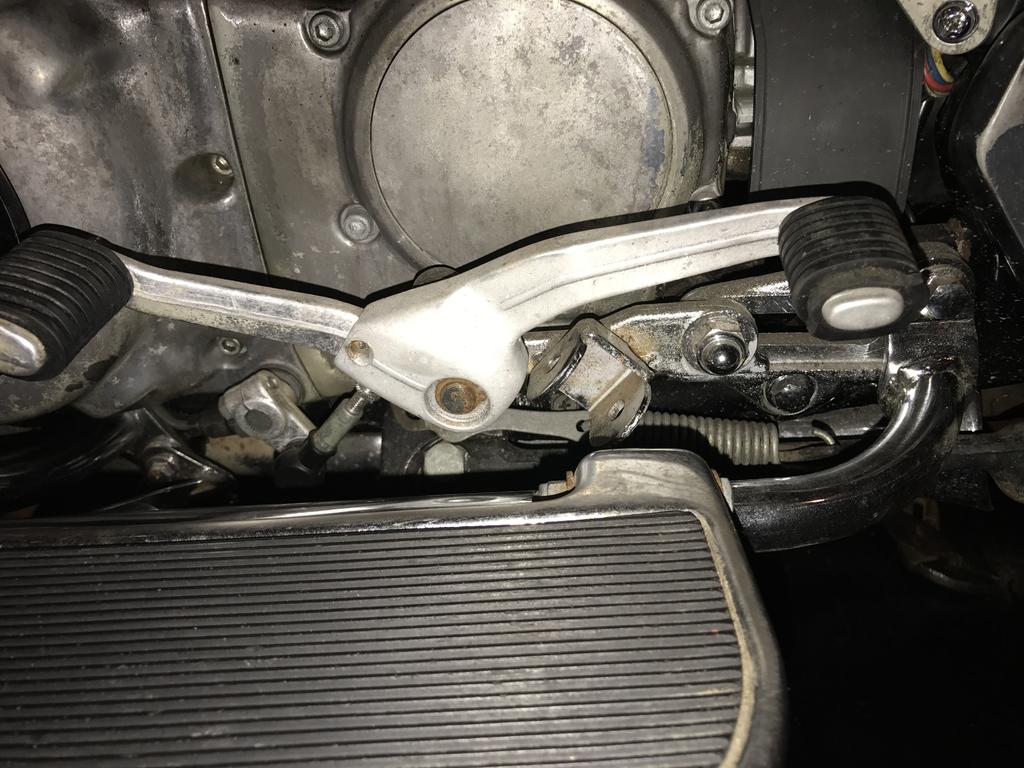
Well been snowing to beat hell hear all day so figured it was a good time to get to the valves. Every stickin one is tight, so glad I checked them Now. . . I either need to make, buy or borrow a valve shim removal tool - hate to buy it to use once so If I cant find one from a local buddy I might have to make one. Here are the measurements from the valves if anyone is interested I did find removing the needed feeler gauges from the pack and adding a slight bend did help in checking them properly I did remove the floorboards and forward crash bars / highway pegs, and will be selling them as a set along with the heel shifter and rear brake footpeg. Bike looks much better, and lighter with them off Left peg bracket is there just waiting for me to make some custom pegs However, as mentioned prior - there is NO bracket for the right side to even mount a peg to what so ever, so I think I need the stock mount only minus the peg:think: Hey Gary - can ya post a pic of the right side footpeg "bracket" - is it stock ? I think I will wait to ride test the combo brake system and see how it is, but most likely will be separating the front from rear as I am a big fan of skid steering This looks interesting and I will have to look into the mod more when the time comes as the anti dive sounds like a good feature Especially where I plan on AD-Venturing to
-
Well - I can tell ya = It is one hell of a tool !! While I am still refusing to grow old - Getting old sucks and the knees and hips just don't like working / whallering on / at or just above ground level Your not going to believe the deal I got . . . . Found slightly used on local Craigslist and picked up the package for $350 Air Controlled - foot operation / can be run off a pancake compressor Sold by an outfit in Northern Idaho Deck raises from about 5" to 31" Came with Table - Wheel Vice - Ramp - Removable plate for rear tire removal - Side Extensions (not on in pics) so you can put quads / rider mowers / razrs etc on it - and it comes with a table length extension (Not Pictured) for those victory vision riders or other bikes that are ridiculously long - and finally a low profile table / scissor jack. It has been a body saver thats for sure
-
I am on base with that mentality, and the minute I realized where the fuel cell was and how low center of gravity was / was when the AD-VENTURE dualsport theory came to mind. I might mention I love Railing forest service roads on the KLR at 60+, so this thing is going to be my rendition of a solo rider 1200 ad-venture bike. So where under the trans did you put the batt
-
Always like to hear everyone's input At this point I have $400 into it, and my "Plan" is to spend as little $$ as possible on this build. . . My time will be plenty but I don't watch TV and this type of stuff keeps me sane Assure it is running good / right is my Primary goal, and then I will go from there. Only customizing I plan to do is replacing the original mufflers . . . Thinking about running custom Tail pipes back then up at an angle and putting tractor caps on them Ta ting ting ting
-
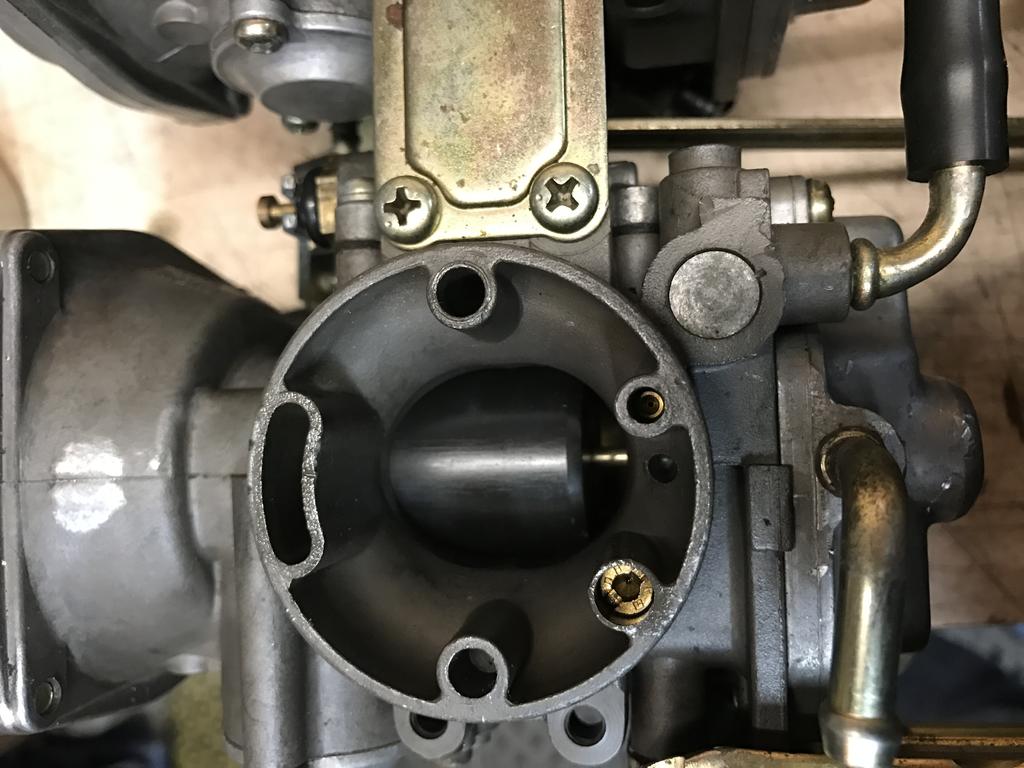
SO your saying there is another way to restrict the air restriction issues simply with a brass plug in the carb inlet port? Carb is sideways in pic, but "As Seen" there is #5 ports (Like a clock dial) for ease - lets say 12 -2 -4 -6- 9 which port is it you are talking about, and correct me if I am misunderstanding, but you claim is by altering that port size eliminates the need to restrict airflow as zagger did with the washers in the airfilters?
-
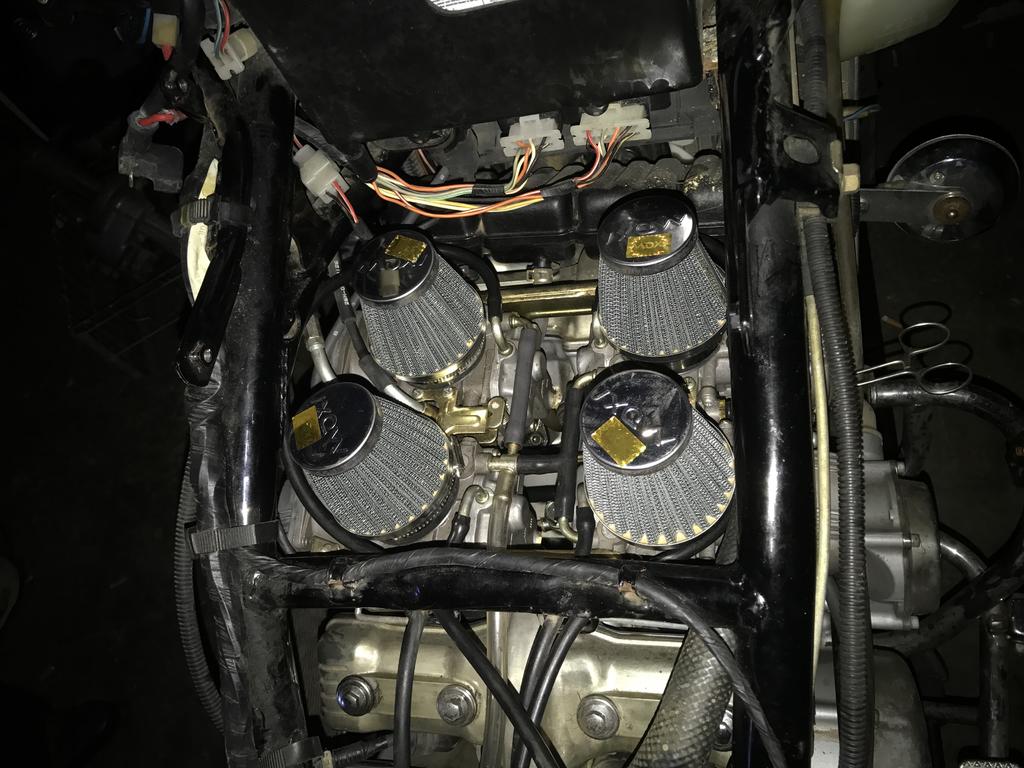
Loving all the input / replies, and if I cannot resolve the intake air pressure issue I am not totally ruling out the airbox, just would prefer to do with out it. I figured I was going to add some oiled / foam slips over the filters to adjust for that and the dirt conditions I will most likely be riding in, but that is still an issue I had not gotten to / resolved yet due to progression of the build. I realize you most likely are using different air filters, but curious what brand you use, and what I.D. did you end up with the washers on your filters, as this could save me the R&D F.Y.I. = I am making sure the engine is running properly before investing to much time / money - Just getting started on it now, and as soon as I get back from the dentist today I will be checking the Valves then refitting carbs and starting the old girl back up again
-
Thanks for the pics / idea Zagger Kindofa - playwithit - tillyagetit thing I would imagine Any avenues for the shims if needed other then Yamaha dealer Also - curious as to your suggestions for prepping the entire bike surface areas prior to painting - had a guy suggest using brake clean on it - any suggestions ?
-
You know. . . It's kind of ironic you chimed in Pics of your bike floating around online is what got me steering in the direction i am with the customization LOL As for the engine vent - I actually have the very same system you mentioned that a guy in Northern Idaho invented back in the 70's / 80's for old v8 engines. Separates the oil / vapor / blow by etc. = collects oils in removable canister and allows vapor back through carburetor. I thought about using it but it is not to sleek shall we say for the bike. With your system - where does the gases line go ?
-
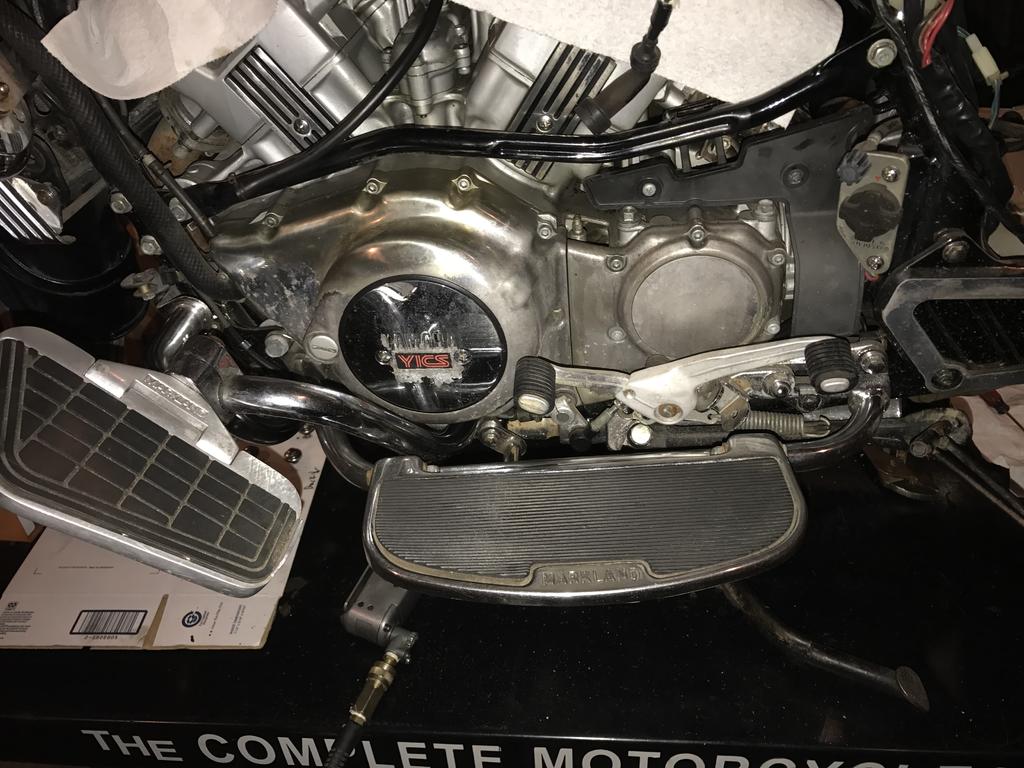
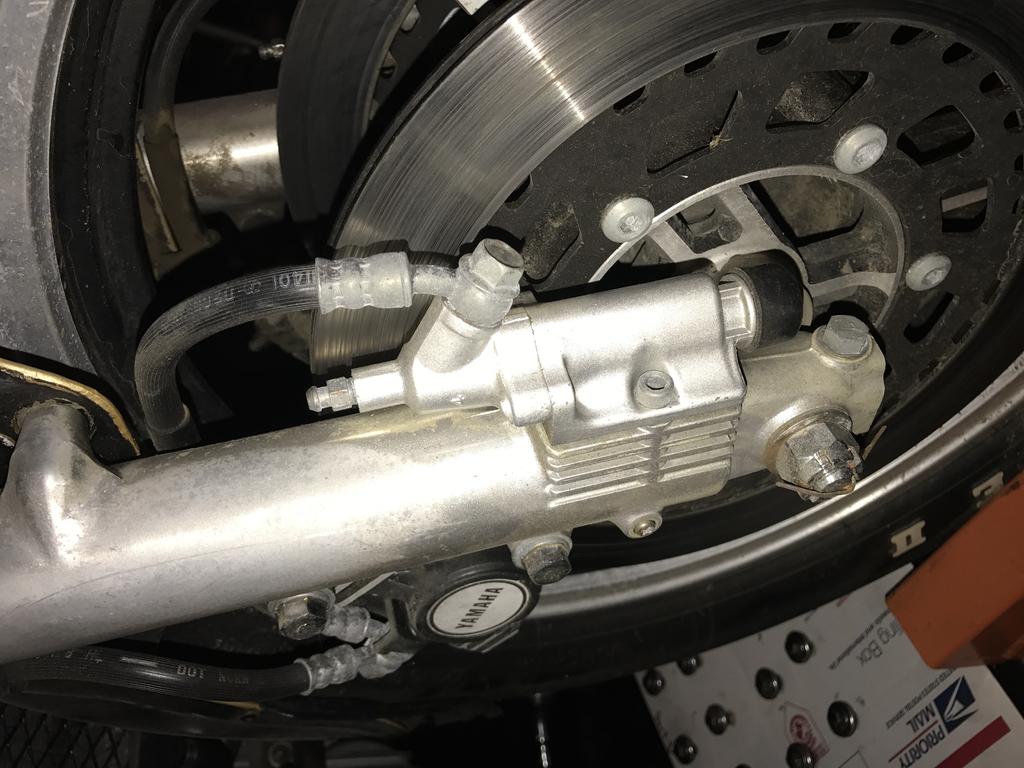
Curious as to why to remove the anti dive system? Is it faulty or ? I probably have the parts laying around to separate the front / rear brake system If you look a the picture - the rear portion you see on the shifter does in fact come off and goes with the Markland set. Been looking at pics online but not that familiar with this bike in particular so lacking in confidence as to what is needed to get the pegs back to stock
-
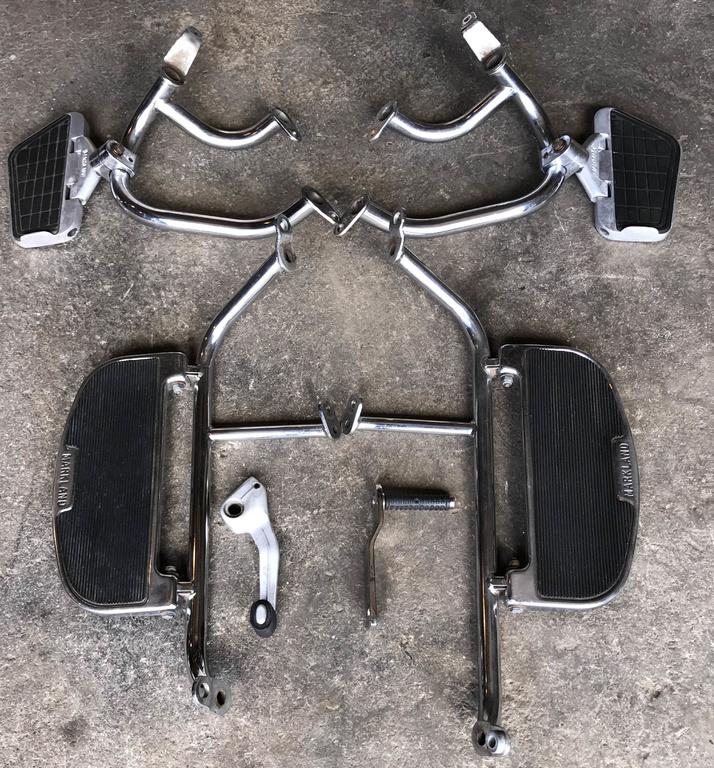
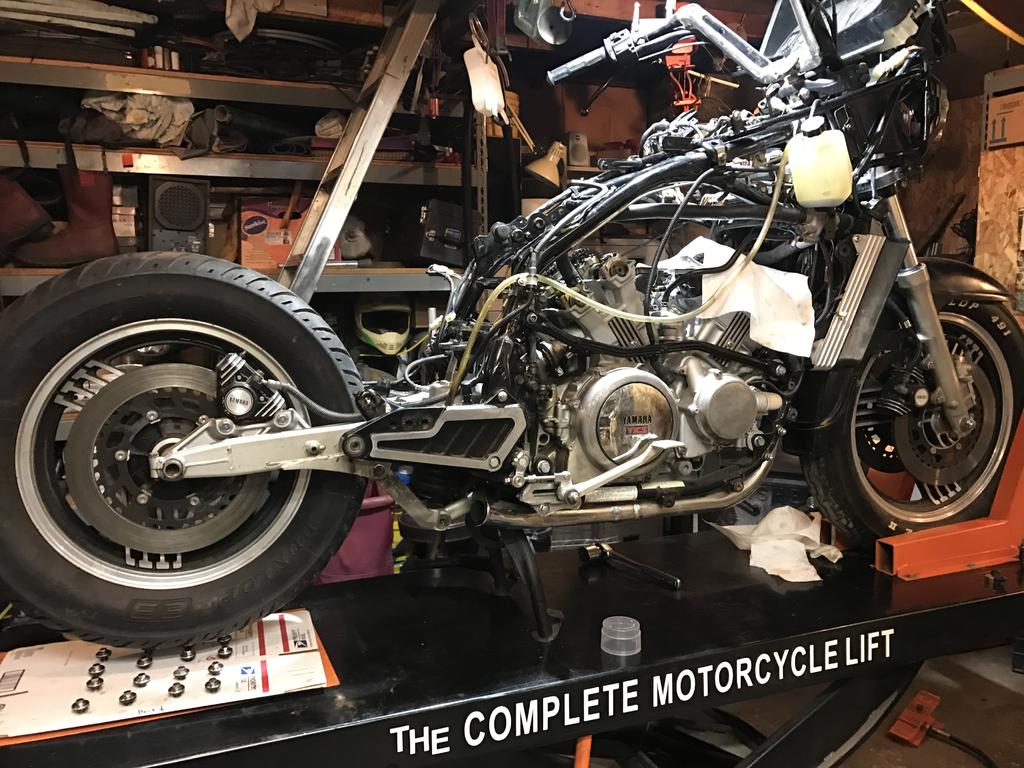
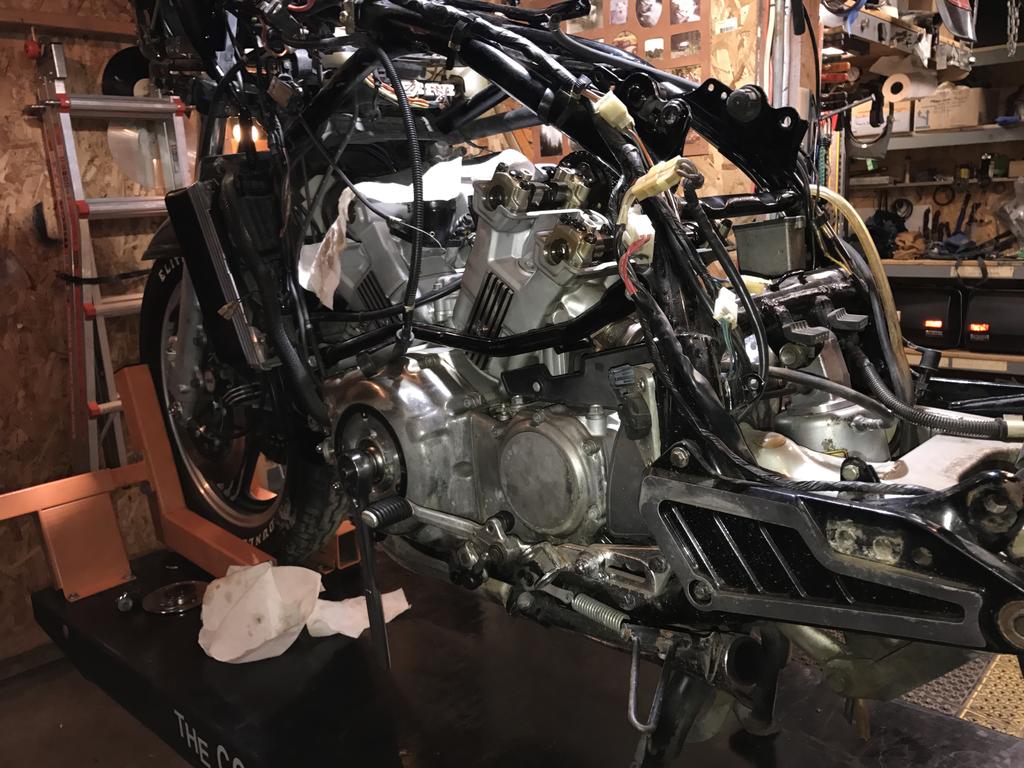
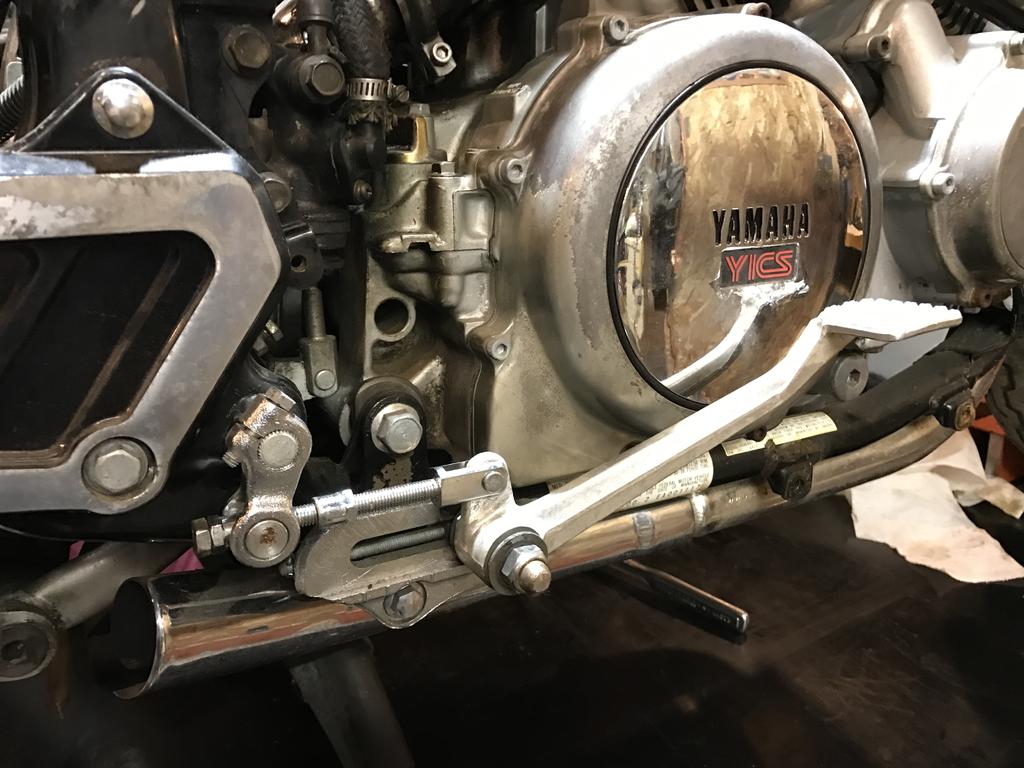
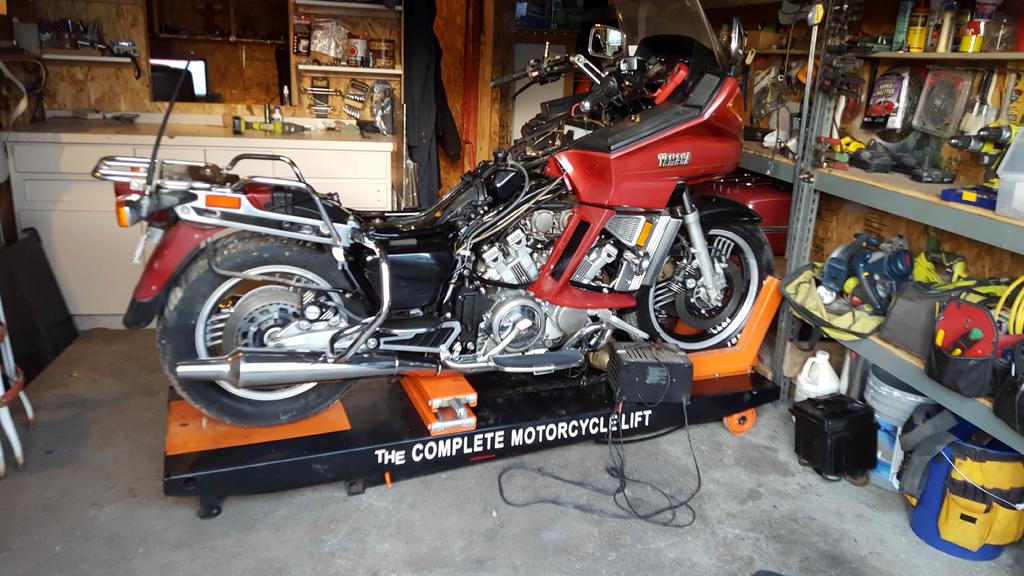
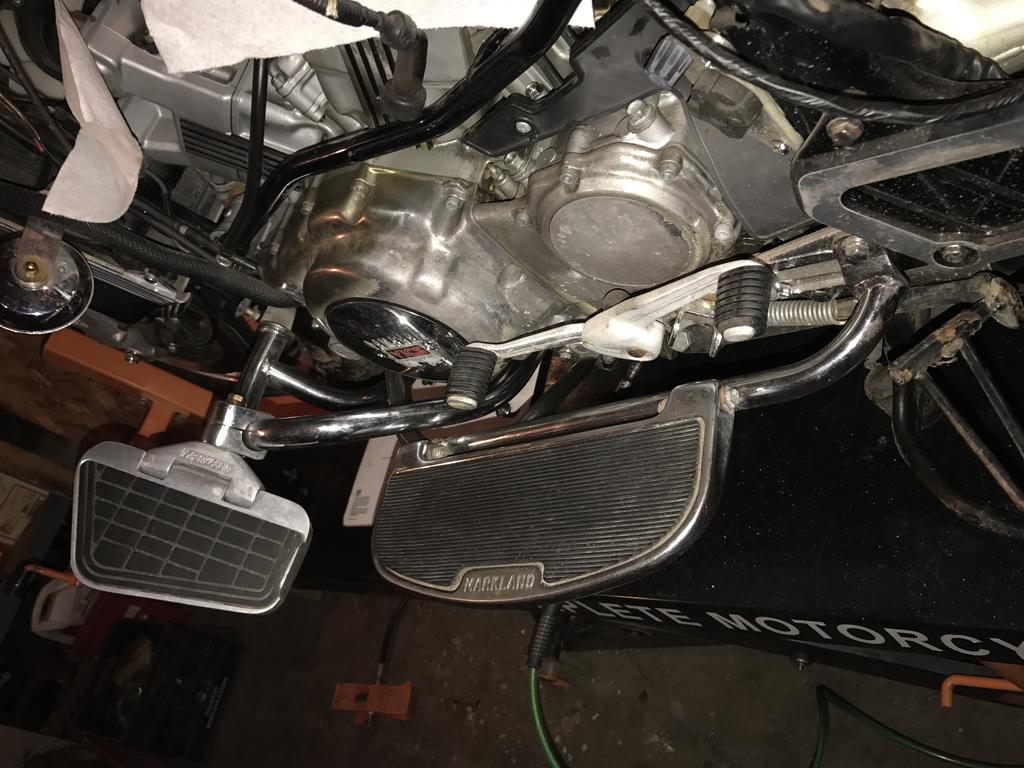
Hello. . . All I picked up this 84 XVZ12L for a song last fall, and due to the crappy plastics / heavy crap they pile on these bikes, as well as the new found desire to build a custom bike = I am now in the process of stripping it down and converting it to an AD-VENTURE Dual Sport machine or more commonly called Mad Max bike / Rat Bike / or perhaps may turn into some sort of Steam Punk look . . . Plan is to go to kind of a scambler style with as agressive of tread I can get, and I am going to paint the entire bike Flat Black. Shortly after I picked it up and cleaned it up, as nice as it looks - there were a LOT of cracks in the plastics at connecting pionts, so I decided it needed to become a naked bike The more you take off = The sexier this bike looks !!! Not to mention all the weight that is getting removed I have eliminated the big #$%^& air box and have gone with some simple air filters. Bike started and ran "fairly Well" I have since removed the carbs and thoroughly cleaned them out, but am going to do valves and a few other things before re-installing the carbs. If carbs end up needing total rebuild / Diaphragms etc. I am going to make a 4 into one intake and will be converting it to a 2 barrel carburetor. I have removed the funky air box on top of the front cylinder that the Exhaust ports vent to and will be plugging the ports in the engine with 1/4 /20 /3/4" Allen head bolts and a little RTV. The fuse block is absolutely shot, so I will be updating that with a new one with newer style blade fuses. I have been divulging through all the tech info on the sight, but have a few questions for you guru's 1. In removing the airbox I have eliminated a place for the engine case vent to insert into for re-circulation through the engine, any suggestions what I can do with the vent line = PCV Valve or ? 2. There is a small rubber hose coming from the cooling system where the fan / temp sensors are, and it goes down to the same cover between the Cylinders that the case vent comes from. What the Heck is that hose for from the cooling system? 3. Considering the bikes name = AD-Venture - I am hoping to find an aggressive tread pattern for the tires, but as we all know 16" are a rare commodity in the MC tire industry, so if anyone has any suggestions I would appreciate it. Clearly they need to be sufficiently weight rated and speed rated for at least a buck and a quarter (125mph) or preferably higher, as while I am getting old I am still a throttle junkie who loves triple digit riding when the rural open country environment allows it. 4. I am going to do the valves in the next couple days when I can find the spare time. I was wondering if there is any "custom Creations" people have made that work like the Yamaha tool for removing the valve shims without the need of unbolting the cams like I have to do on the Connie and KLR? 5. The Bike came with a complete set of MARKLAND Crash bars / Floorboards with highway Bars / floorboards as well. I am going to be removing the Markland system and reverting back to stock footpegs due to the type of riding I will be doing to allow for more sure footing / not so wide a stance. We have a salvage yard here, but they are still buried under a foot plus of snow, so it may be a few weeks before I can get in there and see if they have the stock pegs I need. Trying to nail down what goes with the Markland setup and what I need to get to get back to stock footpegs: I see on the left side where all I will need is the footpeg as the cradle is still there, and the back half of the shifter system will be removed as it is a part of the markland system, so as far as I can tell all I need is the left footpeg for the left side. Can anyone confirm that? Left Side: The right side however is a different story. There is a plate with peg mounted to it for braking that will be removed with the markland system - Does the right footpeg bracket and peg just bolt in where the plate and peg is in the picture? Right side: I looked around and could not find any of the vintage Markland sets for sale, as they where made in the 80's and no longer available from what I have derived. I am going to be selling the complete Markland after market Crash bar / floorboard setup, so any suggestions as to what a fair price is would be appreciated. They are not removed yet, but are in remarkable condition as you can see just a little dusty. They are pretty heavy I would imagine so shipping may not be to cheap ? If anyone is interested in the set let me know. Would be more economical to just pick them up personally if you happen to live in the beautiful Pacific North West. 6. I see the front forks have what appear to be anti fork dive system is this what this is ? I see where the back brake applies the rear and front left brakes, and the front applies the right front. I made an attempt to bleed these when bleeding the brake system with a vacuum bleeder but it did not appear to bring any fluid out? Am i Missing something? I am sure there will be more questions, but that's all I have for now. . . . and I thank any and all in advance for any info / or insight you can give me. Make it a GREAT DAY!!! Stay tuned and watch this crazy creation come to life !