-
Posts
6,432 -
Joined
-
Last visited
Content Type
Profiles
Forums
Gallery
Events
Store
Everything posted by Eck
-
Stripped Thread Repair Options for the Goldwing Passenger Hand Rail
Eck replied to Eck's topic in Honda Goldwing Tech Talk
I know what you mean, but it was a heck of a lot cheaper to install the one and only SAE bolt on it then it would have been to go out and purchase the Heli Coil kit and tools to repair it.. Also, I did not want to chance loosing ANY of the metal chips by placing grease on the tip of the drill or on the tap (which I have done before too), and that is why I built the plastic protective barrier around where I was drilling and working and also had the vacuum running the whole time. I didn't want even ONE chip falling down between the frame and all the wires to cause me other issues at a later date. -
I am in agreement with Backinthesaddle...
-
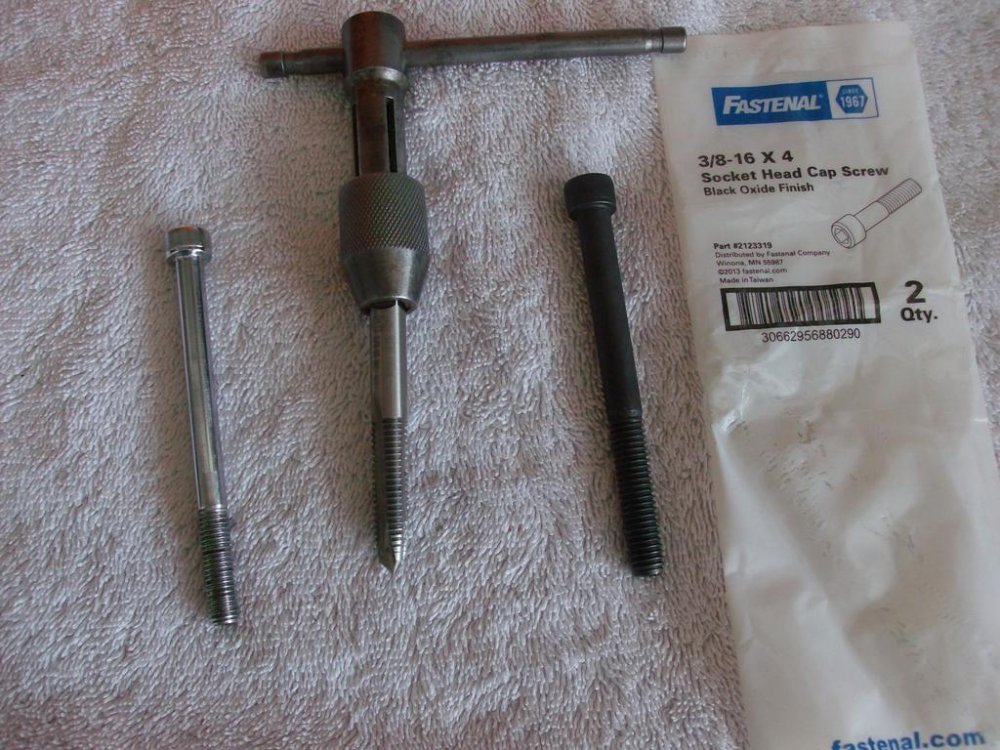
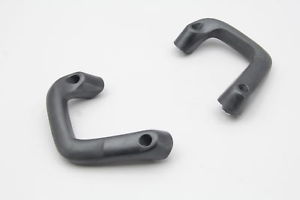
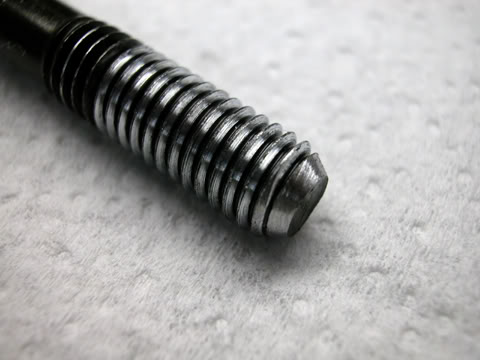
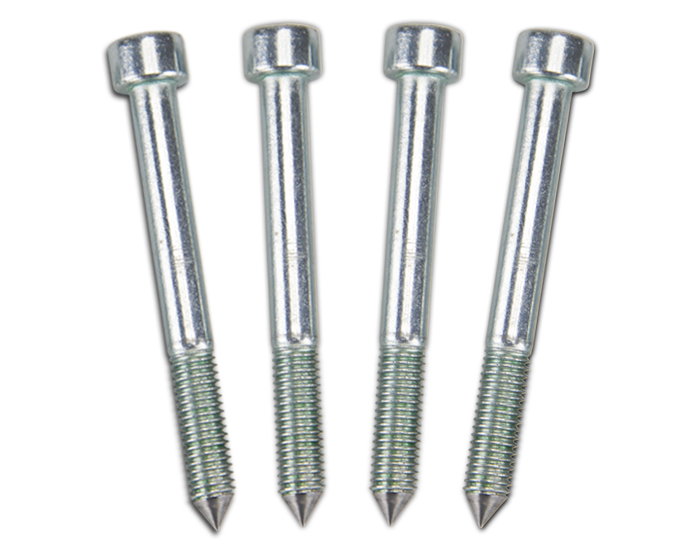
So you found you have a stripped out hole in your frame where the mounting bolts go for the passenger hand rail. Good news: It can be easily repaired. Goldwing 1800 frames are powder coated after all the holes in the frame are tapped at the factory, making all threaded holes in the frame very easy to cross thread if you are not careful. The mounting bolts that hold the Goldwing passenger hand rails or passenger grab rails on, can easily bind and strip out. This is especially known to happen on the left hand side hand rail due to the repetitive load or strain being placed on it during lifting of the bike when placing the bike on its center stand. The hand rails are held on by inserting steel bolts into an aluminum powder coated threaded hole. During manufacturing assembly, the powder coating inside the hole is stripped away when they insert the steel bolts. The tiny bits and pieces of powder coating remain lodged in the threads of the bolt and frame until the bike owner or dealer removes the bolts for the first time. Even then, not many even think of cleaning the mounting hole in the frame or the threads off of the bolt before reinserting it which adds to my point of it being very easy to strip out one of the mounting holes in the frame. So, how can one repair a stripped out handle hole in the frame? There are a few options available. You could purchase and install a Heli-coil to replace the defective threads. M8 x 1.25 is the size needed and you can reuse the stock bolts. You can purchase a Heli-coil kit which includes the tap, the bit, and the insert tool, and a bunch of the insert threads. You will have enough to do all yours and some of your friends. Or you might find just the individual inserts but you have to have the right tap and bit. Other options include the installation of Timeserts and Keenserts which seem a little more substantial than old style Heli-coils. Check out installation videos on both by doing a search on Google. The aft handle hole on the left side of my bike was stripped out by previous owner. I did not notice this of course until I went to remove the seat from the bike. The repair option I chose, was not to reinstall the metric bolt, but to install the next size larger bolt than the metric which was a 3/8-16 standard thread socket head cap screw (Allen head bolt- see attached pic). After removing the seat from the bike, using plastic baggie, I created a protective barrier around the aft left handle mounting hole in the frame so that metal chips could not fall down inside or outside the bike frame during drilling. I then used masking tape and securely taped down the end of my shop vacuum on the inside of the frame so it could suck the chips out as I slowly drilled the hole to a larger diameter of .3125 which is required for the 3/8-16 tap. Next, using the 3/8-16 tap with a little oil on the end, I slowly and carefully tapped the hole. After the tapping was completed, I did a trial and inserted and then removed the new mounting bolt and “Wha-lah”, it fits. Next I removed the vacuum end and made sure the area was indeed cleaned of metal chips / debris before I removed the protective plastic barrier from the frame. To ease the seat / hand rail bolt installation: If you have a grinder, you can “taper’ the ends of the bolts to make aligning the bolts easier or you can purchase Chrome Tapered bolts for around $15.00 on line, (see last pic).
-
Myth: WD-40® Multi-Use Product is not really a lubricant. Fact: While the “W-D” in WD-40® stands for Water Displacement, WD-40® Multi-Use Product is a unique, special blend of lubricants. The product’s formulation also contains anti-corrosion agents and ingredients for penetration, water displacement and soil removal. WHAT'S STODDARD SOLVENT? Myth: WD-40® contains Stoddard Solvent. Fact: Over the past few decades, the name Stoddard Solvent was synonymous with all mineral spirits. Today, the mineral spirits found in products like ours are more refined and processed (see hydrogenation, hydrotreating and distillation techniques) providing mixtures with varying boiling points, cleaning ability, and chemical composition. The catchall phrase “Stoddard Solvent” is no longer adequate to tell the proper story. WD-40® does indeed have 50% mineral spirits, but they are refined and purified for specific characteristics needed to meet today’s performance, regulatory and safety requirements. Myth: WD-40® cures arthritis. Fact: This popular headline, appearing at least once a year in the tabloids, is completely FALSE. WD-40 Company does not recommend the use of WD-40® for medical purposes, and knows no reason why WD-40® would be effective for arthritis pain relief. WD-40® contains petroleum distillates and should be handled with the same precautions for any product containing this type of material. MORE FUN FACTS ABOUT WD-40® A bus driver in Asia used WD-40® to remove a python, which had coiled itself around the undercarriage of his bus. Police officers used WD-40® to remove a naked burglar trapped in an air conditioning vent. Crayola® Stain Removal Tips recommends using WD-40® to remove (regular) crayon marks from a variety of surfaces. The WD-40® Book, featuring many user testimonials and the wacky humor of Jim & Tim, The Duct Tape GuysTM, was published in 1997. The familiar blue and yellow can has been featured in other books ranging from The Big Damn Book of Sheer Manliness (General Publishing 1997) Polish Your Furniture With Pantyhose (Hyperion 1995) to WD-40® for the Soul: A Guide To Mending Everything Leslie Nielsen portrayed agent Dick Steele (a.k.a., Agent WD-40® ) in the 1996 movie Spy Hard WD-40® has a Fan Club with more than 100,000 members. Join today and share your stories, get free, fun downloads, check out the eNewsletter, receive the eTip of the week, and much more... As The Duct Tape Guys say, “You only need two tools in life, Duct Tape® and WD-40®. If it’s not stuck and it’s supposed to be, Duct Tape it. If it’s stuck and it’s not supposed to be, WD-40® it.”
-
SO far so good, thanks @RandyR
-
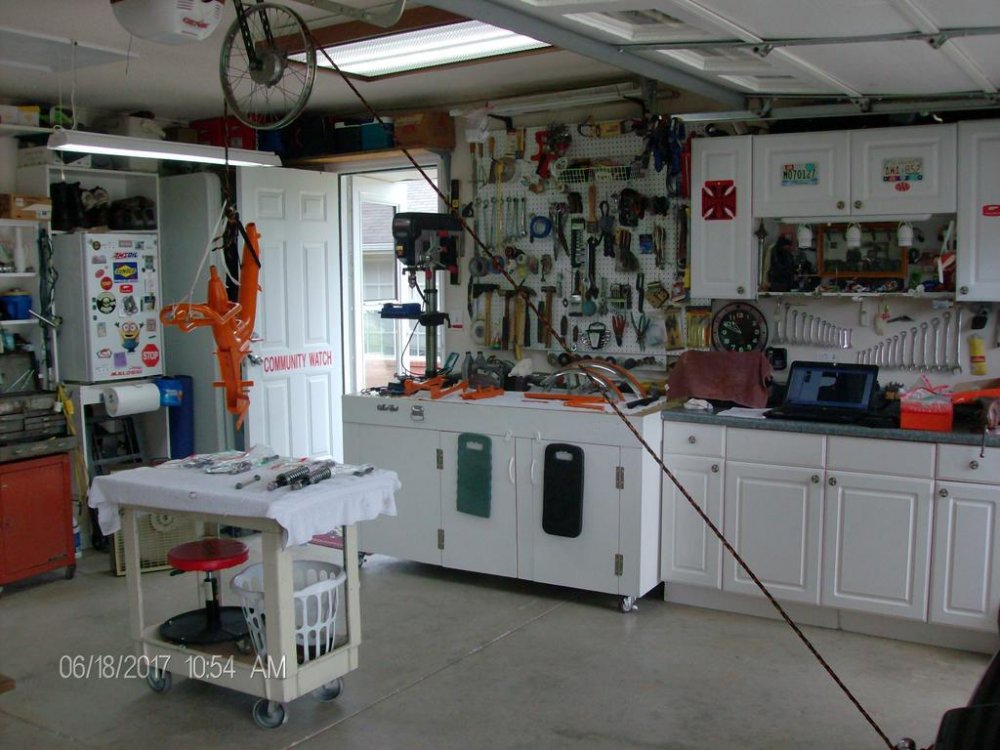
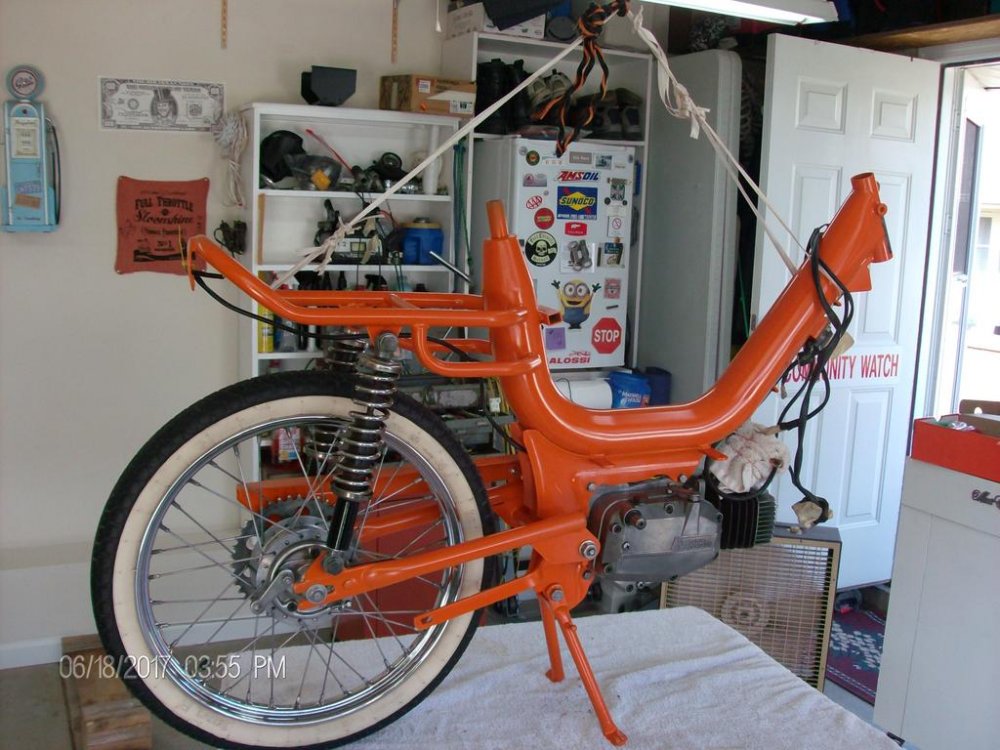
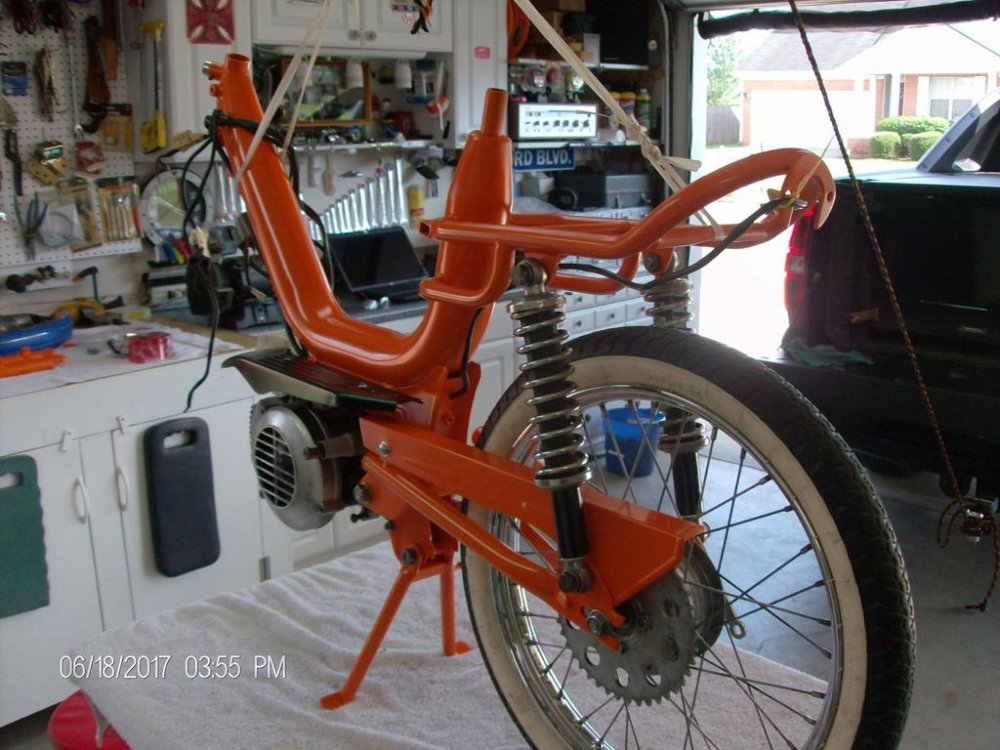
Thanks guys for all the nice comments. I am planning on keeping this one for at least a month or so just to look at, but then I will either sell it or donate it to Cyclemos Motorcycle Museum like I did my last restore. I know I will never get out of it what I put into it. I have been keeping a detailed list on everything I bought for it or paid to have done like powder coating, seat recovering, honing the head cylinder out, exhaust, wheels and tires. and supplies, and MAN it adds up fast, that I can tell you..! Thanks also for the comments on the neat / clean work space. This is one thing I always strived for with all my employees at Boeing. Clean as you go. If you don't have something to work on then clean up. I always know where my tools are and they are cleaned before hanging them back up. Something my dad pounded into me as a child.... I have not forgotten to un-tie the Avalanche ...yet....and hope the heck I don't. lol... All in all, I only used my hand to pull down on the rope which lifted the frame / bike enough to where I could turn it or make a few adjustments as I was reassembling it. My old time "GETTO" engineering worked well for what I had to do..
-
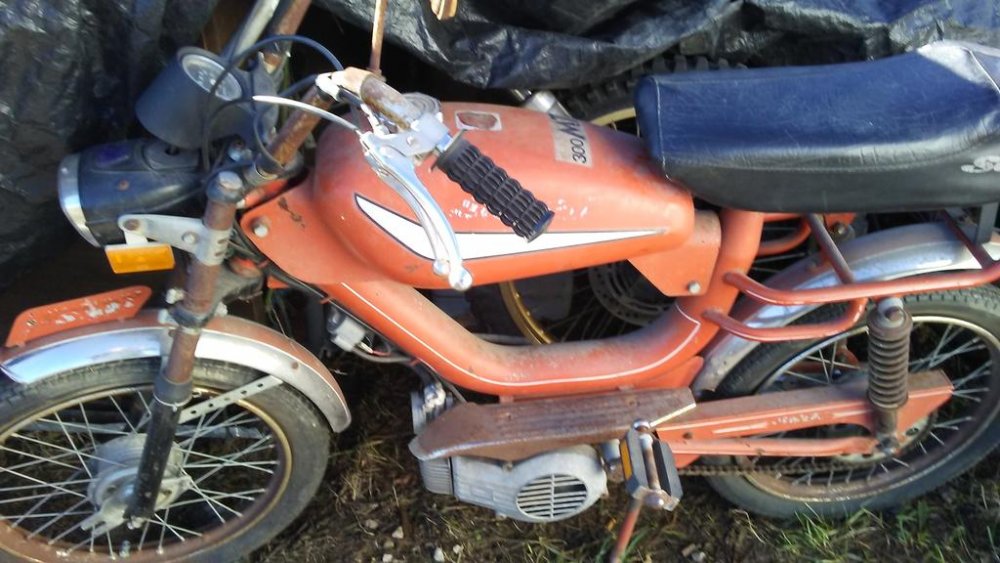
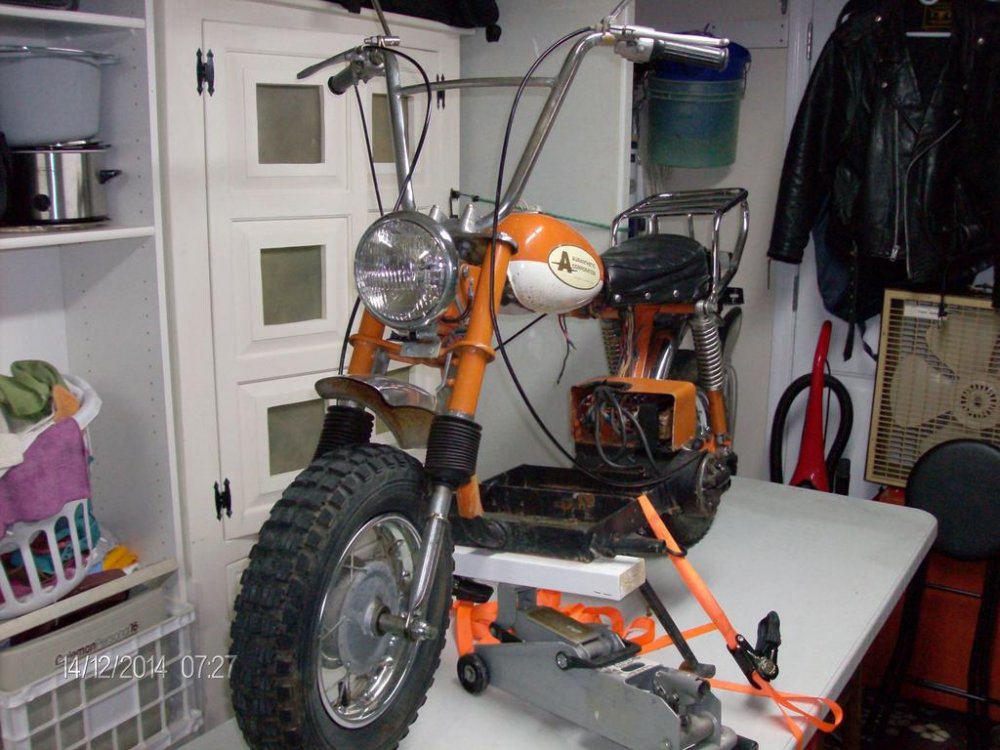
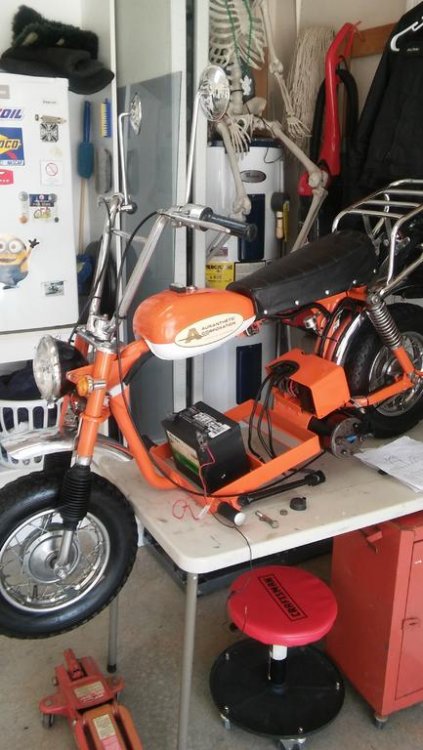
It has been a while since I posted here. Just thought I would share what I was working on with those of you who may be interested in where I have been or what I have been up to. Back in March I purchased a 1978 Safari MT300 Turbo moped that was sitting outside for quite some time. When I saw it, I was sickened to see this rare vintage bike just rotting away as you can see in the 1st picture attached below. This picture was taken where it was sitting on the day I purchased it. As you can see the bike was pretty well roached... Since then, I have rebuilt the engine with new piston & rings, bearings, seals and gaskets including rebuilding the carb & choke. Every nut, bolt and washer has been removed and polished and is ready for re-installation. One can see the all the work involved as the attached pictures are being viewed. Take note of my home made hoisting system. I attached a spare spoke wheel to the garage ceiling and then used a rope tied to the frame of the bike and to my avalanche. I pull down on the rope and the bike goes up. I slowly release the rope and the bike is lowered.. lol.. It worked great for what I needed..
-
I found this information on another site. Just thought it might be useful to those of you who camp out and are looking for a FREE campsite. This seems to be a nice tool to find campsites for free. https://freecampsites.net In North America there are plenty of them listed. For the rest of the world it´s terra incognita more or less. Here is another one: http://ioverlander.com/ You have to flag "informal campsites" and "wild camping" This link has a much better global coverage than freecampsites.net. Eck
-
Alabama Meet & Eat - sorry for the short notice Where: Jefferson's Restaurant - 230 Spring Branch Rd, Oxford, AL 36203 - http://jeffersonsrestaurant.com/oxford-alabama/ When: This coming Friday, April 14th Time: 11:00am "ALABAMA TIME" For those interested, Dragonrider (Lewis Cramer) and I are going to meet up this coming Friday for lunch at Jefferson's Restaurant, and we would really enjoy some company. Those interested in following me down to Oxford, Al. from Huntsville feel free to call me @ 256-429=8623 or email me at knace@att.net Those wanting to ride in with Lewis, please contact him, see his profile for contact info. Hope to see you there!!! Eck
-
After I retired, my wife insisted that I accompany her on her trips to Target. Unfortunately, like most men, I found shopping boring and preferred to get in and get out. Equally unfortunate, my wife is like most women - she loves to browse. Yesterday my dear wife received the following letter from the local Target: Dear Mrs. Nace, Over the past six months, your husband has caused quite a commotion in our store. We cannot tolerate this behavior and have been forced to ban both of you from the store. Our complaints against your husband, Mr. Nace, are listed below and are documented by our video surveillance cameras: 1. June 15: He took 24 boxes of condoms and randomly put them in other people's carts when they weren't looking. 2. July 2: Set all the alarm clocks in House wares to go off at 5-minute intervals. 3. July 7: He made a trail of tomato juice on the floor leading to the women's restroom. 4. July 19: Walked up to an employee and told her in an official voice, 'Code 3 in Housewares. Get on it right away'. This caused the employee to leave her assigned station and receive a reprimand from her Supervisor that in turn resulted with a union grievance, causing management to lose time and costing the company money. We don't have a Code 3. 5. August 4: Went to the Service Desk and tried to put a bag of M&Ms on layaway. 6. August 14: Moved a 'CAUTION - WET FLOOR' sign to a carpeted area. 7. August 15: Set up a tent in the camping department and told the children shoppers he'd invite them in if they would bring pillows and blankets from the bedding department to which twenty children obliged. 8. August 23: When a clerk asked if they could help him he began crying and screamed, 'Why can't you people just leave me alone?' EMTs were called. 9. September 4: Looked right into the security camera and used it as a mirror while he picked his nose. 10. September 10: While handling guns in the hunting department, he asked the clerk where the antidepressants were. 11. October 3: Darted around the store suspiciously while loudly humming the 'Mission Impossible' theme. 12. October 6: In the auto department, he practiced his 'Madonna look' using different sizes of funnels. 13. October 18: Hid in a clothing rack and when people browsed through, yelled 'PICK ME! PICK ME!' 14. October 22: When an announcement came over the loud speaker, he assumed a fetal position and screamed 'OH NO! IT'S THOSE VOICES AGAIN!' 15. Took a box of condoms to the checkout clerk and asked her where the fitting room was. 16. October 23: Went into a fitting room, shut the door, waited awhile, and then repeatedly yelled, ‘Hey! There's no toilet paper in here.'
-
Sorry I'm late on the bad news here, but glad it is over for him and he is at peace now. A great guy in many ways he was!
-
BREAKING: Bridge collapses on I-85 during massive fire. Fire officials extinguished a massive fire on I-85 on Thursday night after it burned for more than an hour and led to the collapse of a bridge on the interstate, fire officials said. The bridge on I-85 northbound just south of Ga. 400 near Piedmont Road collapsed about 7 p.m. Thursday, Atlanta fire spokesman Sgt. Cortez Stafford said. MARTA spokesman Eric Burton said all trains are running as normal and have not been affected by the fire. “MARTA seems like your best bet to get out of the city,” Burton said. Some bus routes have been affected, MARTA reports.
-
Prayers for Rick Butler
Eck replied to Freebird's topic in Inspirational, Motivational, Prayer Requests, Etc.
So sorry Rick. Prayers sent your way for you and family with our deepest sympathy. -
Prayers sent your way Dan.
-
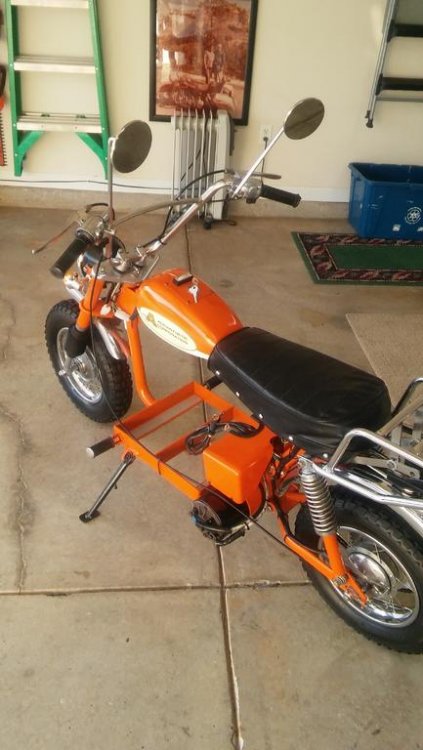
@Yammer Dan and @BATMAN, I thought I posted the end results on the site here but it has been a while so I will just give a quick update on it. I completed the 100% disassembly and total rebuild on this bike around Feb of this year. A two year project. In March, I delivered and donated it to Cycle Moss Motorcycle museum which is north east of Nashville TN. You can visit their link here: (http://www.cyclemos.com/) I attached a couple of AFTER / FINSHED pictures showing what it looked like when I donated it to the museum, and I attached a BEFORE picture to show what it looked like when I first got it. Many thanks to all who were interested and following me on this two year journey.... Eck
-
To all: Please be advised that I made a mistake and accidently deleted every request from those who wanted to join the Ventureriders Facebook site. Sooooo what does this mean... If you submitted a request to join the Venturerider closed group FB site, and you do not presently have access to this site, then please re-issue your request again on FB. We have no way of seeing who submitted a request, thanks to my huge mistake.. I clicked "ignore all requests" on my cell phone by mistake and it remove every request of those wanting to join the FB page..I thought it would only remove them from popping up on my cell phone. SO SO sorry for the inconvenience I have caused. Eck
-
Me too..............Had to take a break and go wipe up the drool...
-
If it is too cold the paint will wrinkle or crack Create a temporary spray booth over your bike using plastic sheeting inside your shed / garage. This not only keeps the overspray from going everywhere, but it is also a place to spray paint when it is too cold to go outside. Just be sure to open the shed doors while you spray and then close them when you are done. Use a heat lamp inside the spray booth to keep the temperature up. Put a thermometer in there with you if you want to keep an eye on the temp as you work. You can quickly lay plastic over the rest of the bike with minimal masking to keep over spray from hitting other areas of the bike. Don't forget you will need some fresh air circulation if you plan in being in the temporary paint booth for a long period of time. If you are just spot spraying here and there as you mentioned you were going to do, hold your breath, do a spot spray here and there, then go get another breath of fresh air..
-
Thoughts and prayers are with you Bob. I know the feeling all to well when the back is out. Hang in there bud!
-
Yes, the alternator can be removed without removing the seat. I have removed three alternators already per instructions listed below. If you have any question, give me a call at 256- four two nine- 86 two three Send me your home email address and I can send you pictures of the tool set up and pictures of how the magnet helped me remove the inside bolt Instructions: -Disconnect the positive (+) cable from the battery for safety. Use a wire tie to ensure it does not move back into position and touch the battery post as you remove the alternator...you don't want that to happen... -Remove the left chrome side cover to gain access to the alternator. -Disconnect the wires from the rear of the alternator. (This will provide the needed clearance to be able to loosen the inside bolt. Rubber boot needs to be slide back to gain access to remove wires. -Remove the two accessible bolts with a regular box end wrench. I have ratchet type box end wrenches which make it real easy to do. -Now for the hard bolt - Use a 9.5 inch long 1/4 inch drive breaker bar and a 3 inch extension with a short well socket to get to the inside bolt. This bolt is a PITA... You can slide the extension/ socket up in behind the alternator and swivel the socket and extension to line up with the inside bolt head. You may need a pen type (telescopic) magnet to help guide (and or lift) the socket onto the bolt head. You can not get your fingers in there. Once I broke this bolt loose and turned it a couple times outward, I used my pen type magnet and placed it over the head of the bolt and slowly dragged it outward (towards me), turning the bolt with the magnet. Its tricky but it worked! There is enough room to rotate the breaker bar handle down to loosen the bolt but you will only get 1/4 turn each time. Like I said, it is a PITA.. During installation of new alt, just add a 7 inch piece of rubber hose to the head of the inside bolt and you can slip it in and turn the rubber hose to get the bolt started, and you should be able to turn the bolt 90% of the way in leaving you very little time using the breaker bar and extension to complete tightening it. DO not tighten this bolt until you get the remaining other two bolts started in their holes and snugged up. Now tighten all three bolts. Don't snap one off or you will be in deep doo-doo.. Again: If you have any question, give me a call at 256- four two nine- 86 two three Send me your home email address and I can send you pictures of the tool set up and pictures of how the magnet helped me remove the inside bolt Eck
-
ECK is my first name, not my last name. In my 64 years of life, I have met only 3 people with the LAST name being ECK. I have YET to meet anyone or know of anyone else in this world with the first name being ECK. Yes my name is different and I grew up in a life being teased the same as the boy named SUE. Over the years I have grown to accept my name and I am proud and honored to carry it. How was I named ECK you ask? Truthfully; My (fathers side) / grandfathers name was Edgar. As he was growing up someone by accident called him ECK. All his friends laughed. Since that day, he lived till his death being called ECK. When I was born, my Mother and Father named me after my grandfathers nick name............ECK. You can call me ECK or anything you wish for it does NOT bother me whatsoever anymore what I am called. I could care less what anyone calls me, but I do wish to be called a friend to anyone and everyone who knows me and with those I have never met. If you need something, anything, just ask me and I will do whatever I can in my power to help you, however, just like you, I never want to be taken advantage of either. Eck
-
rubber caps on the carb vacuum
Eck replied to Krewl's topic in Royal Star and Royal Star Tour Deluxe Tech Talk
You can also get them from Amazon. Search for Automotive Replacement Carburetor Caps.


