Bob K.
-
Posts
167 -
Joined
-
Last visited
Content Type
Profiles
Forums
Gallery
Events
Store
Everything posted by Bob K.
-
 Sorry for the confusion, Chaharly. In that photo, I was trying to explain a problem I was experiencing, not making an imperative statement about how the needles should be positioned. When properly adjusted, the needles will close off the fuel supply during wet bench testing.
 -
Thank you! The second two won't work since they aren't inline fuses on the positive wire. They have common positive and negative supply terminals. That first one, however, looks nice, but I suspect it would be too long.
-
Great suggestion! I've been searching for "crepe pan" this entire time. No wonder I haven't found a 6 or 8 position, inline, mini-ATM fuse block yet! Ah, just kiddin'. I haven't looked in months. Ran another eBay search and one popped: https://www.ebay.com/itm/282415704870?hash=item41c149ab26:g:doAAAOSwnGldPLiT What I'd really like is a square, 10-way micro ATT fuse block. (I have a few extra circuits added with standalone fuse holders along with the cruise fuse that I'd like to consolidate). Barring that, I might settle for a low profile ATC/ATO fuse holder with posts I can use as commons. Maybe find one of these in a 10-way. Or fit in a 6-way and 4-way.
-
Huh. I've never seen one. Not in my local auto parts stores, not in Harbor Freight, not on eBay, and not on Amazon. I'd love to find one.
-
Where in the world did you find a fuse block that takes mini ATM fuses??
-
Light bouncy front end in sweepers
Bob K. replied to Pasta Burner's topic in Venture and Venture Royale Tech Talk ('83 - '93)
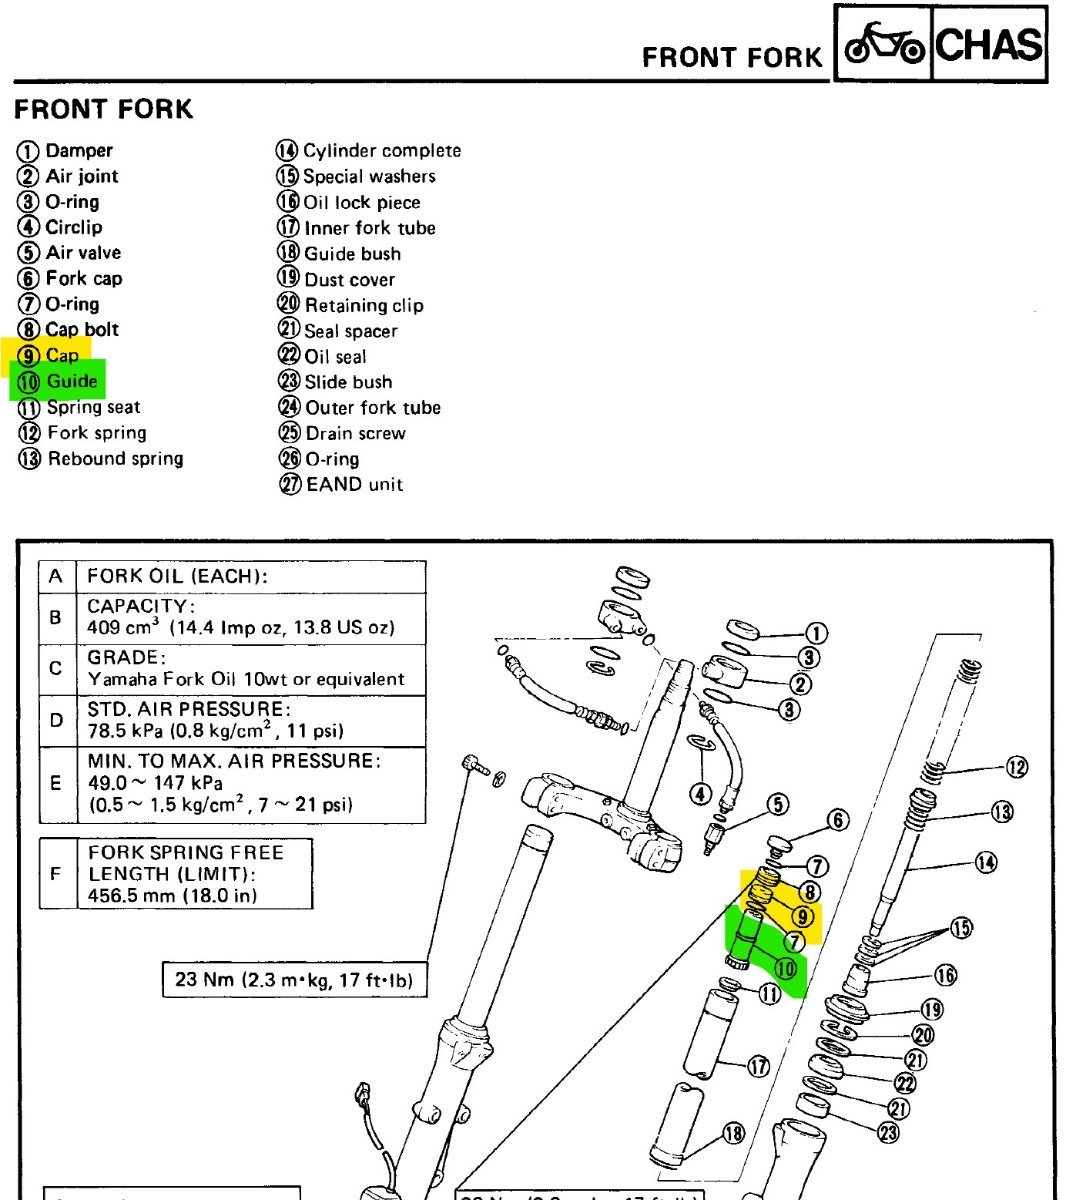
I checked my notes from my 2005 installation of Progressive springs. The PVC spacer was 1 1/4" tall. I didn't use it. Instead, I installed the OEM metal spacer with the o-ring that Prairiehammer referred to as the "cap" in the above photo. It is approximately 1" tall. I'm 175 pounds. That shorter OEM round metal piece is indeed called the "cap" and the original longer spacer is called the "guide". Even with Progressive springs, a Superbrace, and a Furber Fix (steering stem washer replacement), I don't like this bike in higher speed sweepers either, especially if there are bumps. It's worse at lower speeds. The front end seems bouncy and untrustworthy. There seems to be a lot of uncontrolled weight up front in the steering assembly, forks, calipers, tires, etc as if the forks are undersized and not stiff enough for this bike. I notice this if I'm at a stop and I give the handlebars a rapid, sharp jerk to one side or the other: I can feel the oscillations in the handlebars until the momentum dissipates. Problem is, this is my first big bike and it has been my first big bike for 20 years, so I have nothing to compare it to. Maybe this is just normal for a bike with 1980s technology and engineering. Following intently.
-
Yup, my money's on broken-down fluid. There's clutch fluid down at the clutch that is exposed to lots of engine heat. Over time, this breaks down the fluid and it can no longer perform its hydraulic function. This happens on my bike every so often: It was o.k. when cold but as soon as the motor and fluid got hot, the clutch would start to fade. I'd have to pump it up several times before quickly shifting gears and put it in neutral at stop signs in order to get it home. Suck out or sop up the old fluid in the reservoir. Refill with new fluid and bleed away until it's nice and clean at the bleeder. I'll bet everything ends up back to normal.
-
Cruise Control Problem
Bob K. replied to V4Power's topic in Venture and Venture Royale Tech Talk ('83 - '93)
Welcome to the club. 🙁 When I experienced the same problem, I checked every component in the system and even replaced the cruise control module a couple times. Over time and with use, my problem mostly went away (oddly seems to be somewhat affected by altitude, so might be air pressure related). The only thing I haven't checked in the system is the speed sensor in the dash. My this'll help you get started. Do you have the link to the online manual for the troubleshooting procedure? -
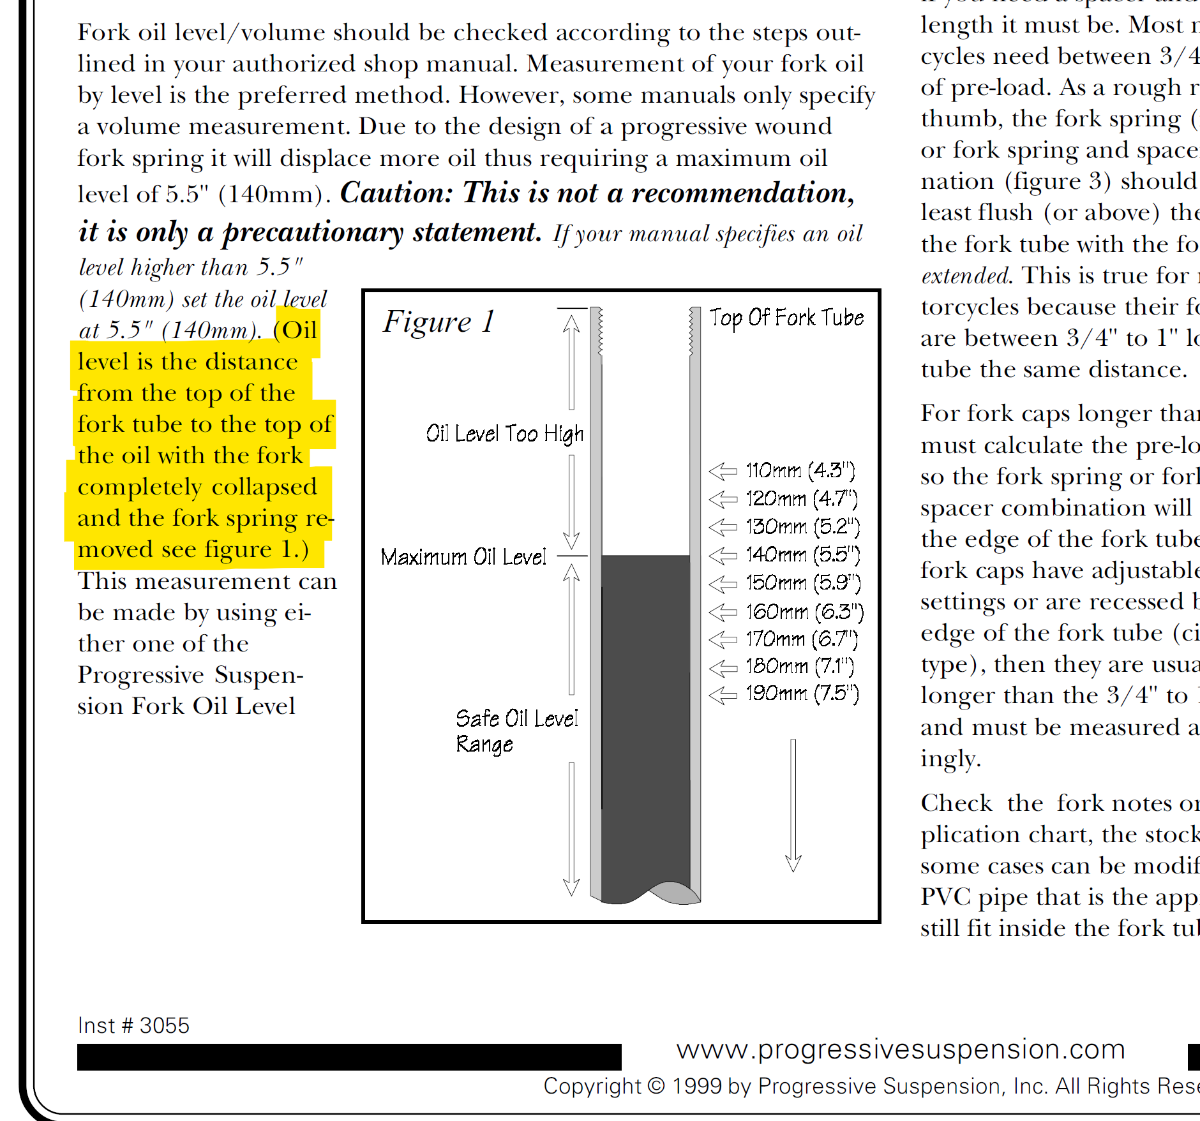
In the instructions that came with my springs back in about 2004, Progressive says oil level should be measured with the springs out. Have the instructions changed since then? Oddly, I don't see instructions for the Venture in Progressive's current tech section: https://www.progressivesuspension.com/install-sheets/metric. @Pasta Burner: When I installed the springs back in 2004, I didn't think about exercising the forks to make sure oil filled all the nooks and crannies before I checked oil level. When I rebuilt the entire front end a few years ago, I put oil in and exercised the forks several times to distribute oil. I was surprised by how far the oil level fell from the initial fill. Something to consider if you go back in. Progressive Spring Instructions.pdf
-
Replacing seal on drive shaft
Bob K. replied to Yamaha32088's topic in Venture and Venture Royale Tech Talk ('83 - '93)
The metal ring is indeed part of the seal. It's a tight metal-to-metal friction fit. Rather than trying to pry the old one off, I used a Dremel tool with a cutoff wheel to carefully cut through the metal ring. I lubed the new one a bit to aid re-installation & used a flat blade screwdriver to carefully tap the new one into place. -
Good luck! I've tried the propane method and the carb cleaner method for finding vacuum & air leaks. I didn't have much luck. When I sprayed around the carb boots, I discovered that enough of the gas or spray would rise and get sucked in through the normal air intake to affect RPM.
-
Top Oil leak suspect locations?
Bob K. replied to Pasta Burner's topic in Venture and Venture Royale Tech Talk ('83 - '93)
Maybe you can buy it, but the search will lead you to making your own by combining wintergreen oil with rubbing alcohol. I believe I used 3 parts alcohol to 1 part wintergreen oil. I soaked the items overnight in a mason jar. If the rubber overexpanded, I'd let the piece sit for a day or so and it would decrease in size. I used it on a couple dozen items when I did the big refurb a couple years ago. Stored in a mason jar, I imagine it'll last for just about forever. -
I second loosening up all clamps. That, combined with pliable boots, allows some movement for all 4 to settle in. I also reassembled all 4 carbs while they were on a flat surface in order to make them all as even as possible for re-installation into the boots. If worse comes to worse, you could try loosening the hardware that holds the carbs together.
-
Improving My Brakes
Bob K. replied to Idrys's topic in Venture and Venture Royale Tech Talk ('83 - '93)
+1 for replacing the rubber lines with stainless steel braided lines. I also looked for more aggressive brake pads. Years ago I installed Carbone Lorraine Series C685 (p/n 2305A3) brake pads. They had significantly more bite/roughness/friction than the previous EBC pads that were installed. -
Still have the link for that particular seller & product?
-
Yes. Stage 4 is a float charge.
-
Top Oil leak suspect locations?
Bob K. replied to Pasta Burner's topic in Venture and Venture Royale Tech Talk ('83 - '93)
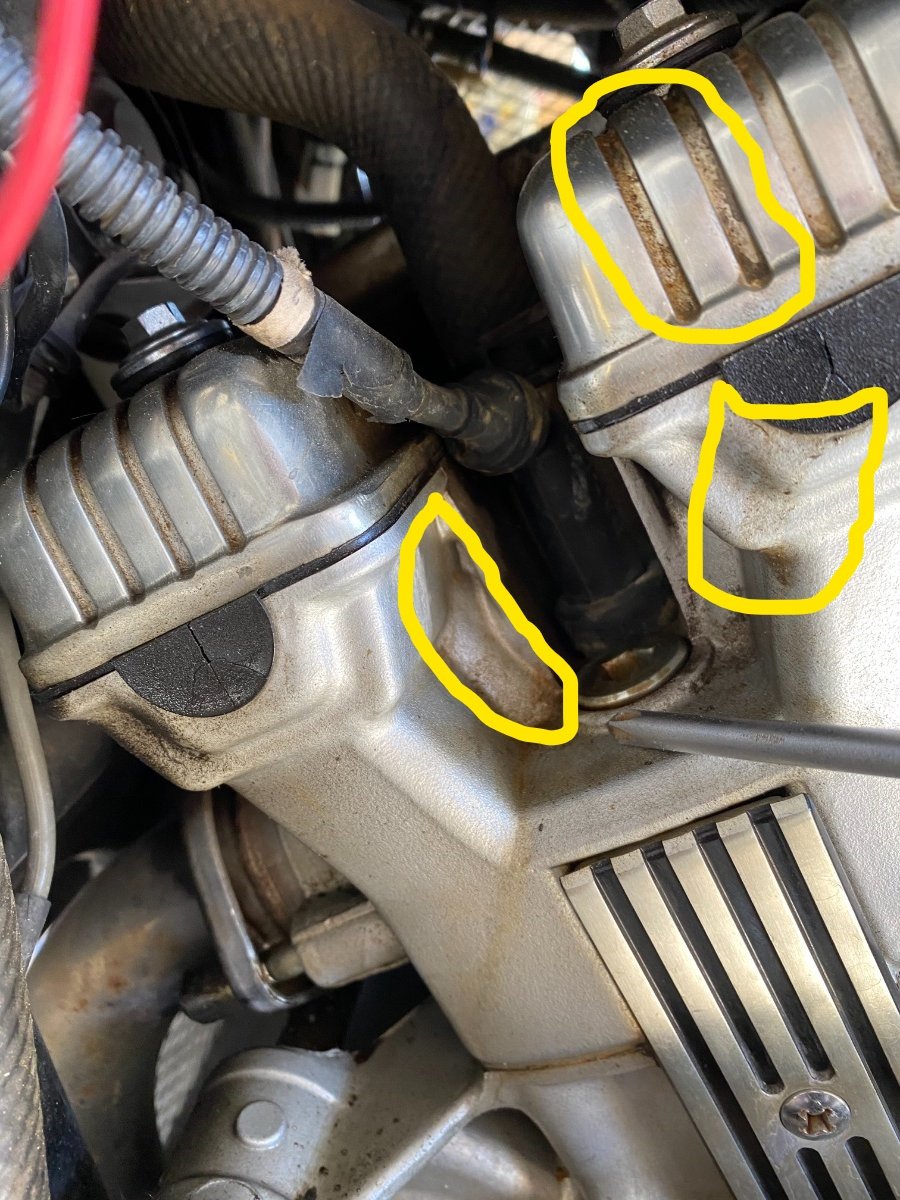
Cleanup is a great idea so that you can see where the fresh stuff is coming from. From the photo it looks like you have seepage in 3 places: Somewhere up on top near the valve cover bolt and a couple places seeping down from the valve cover gasket. If the bolt rubber grommets have shrunk with age, search the interwebs for "wintergreen oil alcohol recondition rubber". Worked marvelously on my '93.
-
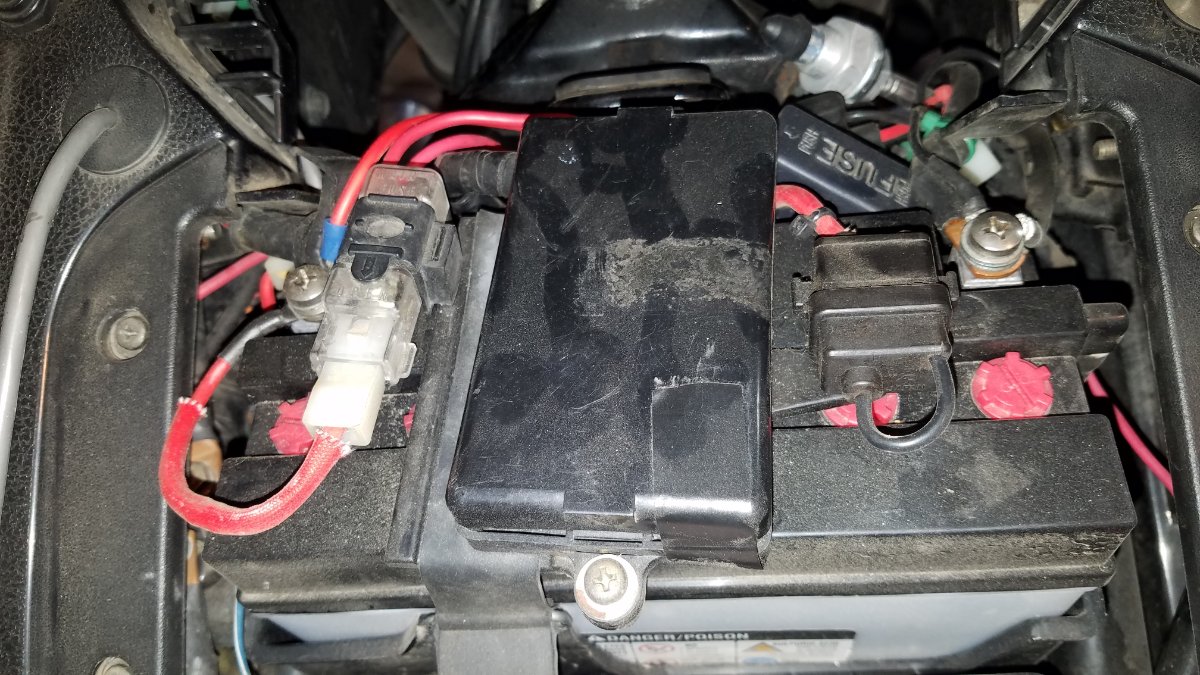
See if this pic helps. The plastic base plate slides under the rubber strap. The main fuse then slides down onto the little tab on the left. The cruise control fuse attaches to the right of the flat base plate. The fuse box goes in the middle.
-
SuperTech Engine Degreaser from Walmart. It's cheap, so you can use lots of it, and it foams up to expand and fill cracks and crevices. Rise off with water and reapply as many times as is necessary to cut through thick crud. Did I mention it was cheap? So you can apply, rinse, and reapply multiple times without doing a lot of detailed scrubbing.
-
The extent of your fumes might determine whether you have a leak or whether this is "normal" evaporation out of the carbs. I have no external leaks on my '93 but if I put a hot bike in a hot garage, I'll get evaporation out of the carbs that will give me a noticeable gassy smell in the garage. The fuel system is pretty extensive. If you think you have an external leak, you can trace the fuel lines from the tank to the filter to the fuel pump up to the top of the carbs. Also check for carb leaks and for carb drain line leaks. Should be able to see all the fuel lines and distribution on top of the carbs by removing the air filter box.
-
O.k. Sounds like I'm not completely out of the ordinary on hot days in a hot garage. Thanks for the inputs!
-
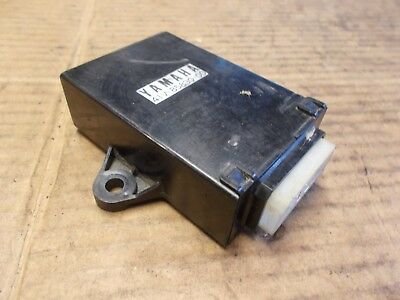
Ditto here. No effect on cruise with CB, radio, and cassette removed. The cruise brain is a little 2" x 4" x 3/4" black box behind the headlight near the right blinker on my '93.
-
Coolant overflow tank
Bob K. replied to Pasta Burner's topic in Venture and Venture Royale Tech Talk ('83 - '93)
It's a closed system, so if your coolant reservoir is running dry, you have a leak in the system somewhere. Check for a cracked reservoir or reservoir cap. Check the water pump weep hole. Check around the twinkie. Check the radiator cap. The reservoir holds a tiny amount compared to the full volume of the cooling system so I imagine you could go for a long time with a slow leak without seeing signs of overheating. -
What's your favorite method for getting the 1st Gen off the center stand? I sit on the bike, put up the side stand, grab the handlebars, rock the bike backward on its back tire, and then push hard forward on the handlebars & with my feet. I can usually get it down with one bounce. Sometimes it takes two cycles. It's there a more graceful way to get the bike off the center stand? I can't imagine getting it down by standing beside the bike.
-
The silly thing has only gotten better with time. I just completed another 1,300-mile trek. The cruise malfunctioned one time about 10 minutes out of town (disconnect for inability to maintain 65 mph). Then it worked flawlessly the rest of the time. Works throughout all speed ranges, no surging, no lazy operation. It quickly rolls on the throttle going uphill and smoothly rolls off the throttle going downhill. Not a single disconnect. Weird. Maybe the speed sensor was dirty and finally cleared itself out. Patch--How hard is it to get to the speed sensor reed and clean it?