lonestarmedic
-
Posts
889 -
Joined
-
Last visited
Content Type
Profiles
Forums
Gallery
Events
Store
Everything posted by lonestarmedic
-
It has a pre-amp stereo output. So with a bit of switch work, it could feed into an intercom system. This and a chatterbox type wired intercom could replace the entire mess in the left fairing. C.B. can be wired into the chatterbox. PTT button can be traced down. Only thing that would not work would be the small control pods for the individual adjustments of passenger and driver. Might be able to use the volume, but the seek, scan, and mute probably not. Most interesting question is where to find a left side top plate for the fairing from a Standard Venture. Or a way to cut out the present dual plate system and add the components. JB
-

Need a front tire? $59/free shipping on Amazon
lonestarmedic replied to cowpuc's topic in Watering Hole
I preferred them on my 1986. Great wear and great traction in rain. However, they were discontinued by Continental a couple years ago. So now I am finishing off a Contitour on the front and have an E3 on the back. No problems on the match. Should replace both after the summer. And Conti Tours run about 50lbs at full cold inflation. Never did it, but quite a high pressure. JB -
Can run it to Leakey if needed. Or I do not mind a Houston run one weekend. Have hitch and standard 4 pin flat on the 1986. JB
-
Put up a post in the Meet and Eat for a Three Sisters run in May. Just tagging this here so folks know about it. JB
-
My lift is the older style. It has the top flange. The pics from the link show someone elses newer lift. Two things happened. The first is the weak safety stop bar. The second is when it deformed enough to fold down alongside the vertical surface. It was then able to push outward and deform the main frame. Most of the frame on my older one is C shape. Where the wheels attach right under the contact point of the bar, the lower edge of the C is cut away for the caster assembly. I would unpack any Harbor Freight lift at this point and refuse it if it had the new style frame. Copy the failure pictures and information and show them why. JB
-
I know many own the 1000lb. Harbor Freight Table lift. I also have one and us it frequently. Now it appears that the supplier of the lift has changed. The original lift is part number 68892. The new lift is part number 69904. The new lift is proving to be structurally unsafe. It has a main beam that is "L" shaped. The foot of the L is on the bottom. The new stop bar is a hollow tube. When the lift is lowered onto the stop bar and the weight of the load is placed againt the main beam the tube bends and the main frame deforms. Down goes the load. It would do no good to replace the stop bar with one of solid steel. The main beam would still bend, even worse. The original lift, 68892, has a "C" channel main beam and a solid steel stop bar. Much stronger. Mine is the older unit and has held Venture Royals, Royale Star Ventures, full dress Harleys, and Goldwings. It is 2 years old now with no problems. http://ngwclub.com/forum/viewtopic.php?f=13&t=48993 Best to watch what is on your Christmas list. JB
-
Bob- We rode the 2013 RT Limited a couple times on test rides. Two up with the wife was very comfortable. She is 5'10" and I am 5'9". Neither of us are skinny folks either. Forward and aft room was very good. Seat width was decent but could use a bit more bucketing to suit us. Think Corbin style. Riding position with the floorboards was very nice. The only thing I felt was the need for the adjustable handlebar option. Now, we were on a Rotax 990 with a 5 speed. It likes to rev, so shifting is above 4000 for best results. I cranked it 5000 and just punched the upshift paddle without letting off the throttle. It did very well and was precise. Wind it on out to 7000 and it moves out very well for 1200 pounds with 2 people. Not an 1800 Wing, or even a 1300 RSV but I was satisfied. The 3 wheel ABS is fantastic. Stomp the right foot pedal and it stops NOW! Controlled and no skidding. Now on to the handling. Run it like a four wheeler or snowmobile. I found that in a turn rather than totally pulling the bar back to turn, I was able to control better with a push on the opposite side. Kinda like countersteering on a two wheeler. So a push and a pull. A loose arm stance and light input to the power steering made a smooth ride. As we hit corners, we found how to shift our weight by increasing downward foot pressure on the outside leg. Just think push and brace. Most of the time the wife could keep her hands off the grab rails in normal corners. When we hit them hard, she learned to grab the handhold at least on the inside. What was different was learning to shift our weight in unison as we hit twisties. The passenger is more active. At least with our weights. I think if I had all the suspension adjustments right for us, I could leave a lot of riders in the dust on a Spyder in the twisties. We hit the stability nanny once. And that was on a tight left 90 far in excess of normal!! The amenities are avery bit as good as any touring bike. And it has an electric windshield. Stereo is not quite as nice as the Wing, but once you find the tone and balance controls it sounds good. Most of the demo bikes were set very flat. Controls were intuitive and the multi buttons would be easy to learn. The ability to pull a trailer using factory supplied hitch and even trailer is a plus. No worries about voiding a warranty. And the regular gear drive reverse as opposed to electric is fantastic. I am looking forward to riding the 1300 triple with the 6 speed. With 40% more torque in a much lower powerband it should be a real winner. The fuel mileage on the twin was not that good. The triple is supposed to give exellent range and mileage. Over 200 on a tank. One tester reported 38mpg. So, call it a roadster, be open minded, and give it an honest evaluation. Will I buy one? Definately yes. Will I give up the 2 wheels? Not until I have to. The wife wants one of her own. And of course, if something happened to me, she could drive and I could sit back. Or she could even bring it home solo. Bottom line is different, fun, and fills a definite need. JB
-
They are put on with a hot glue. A heat gun or hair dryer used carefully will soften the glue. http://www.venturerider.org/forum/showthread.php?t=21986 I did mine back in 2008 and haven't had a problem since. I picked up 2 sets of rear lenses and a spare light bar but have never needed it. Notice that I ground the inside smooth and painted it before I installed the lights. JB
-
So, the rubber on my OEM footpegs is getting pretty worn. 1986 Model. Looking to either replace the rubber portion or possibly mount a different peg. The rubber is currently about $35.00 per side. Kinda hurts the pocketbook on that right now. Any suggestions for something different and/or cheaper? JB
-
I have purchased a lot of items from these folks. Always good quality. The prices are reasonable and they ship quickly. My rear stop/running light bar for my 1986 came from here. My purchases span a couple years, so they do have a good track record. J B
-
Adventurer08. Just a note, these are for the 1983-1992 series. Youe signature shows a late model. Just to make sure.
-
When I was making them I used the welding cable, and a commercial hex crimper. The cable is a tight fit but does help a lot. Takes some patience to get them threaded in. Then soldered the lugs. The hardest part was the accessory leads. I solved this with the ring terminal as shown in the one picture. The ground side used a large posilock. Hardest lug to work with was the 90 degree on the ground cable. Since there seems to be a lot of interest in the cables again, I will make up a few sets. I do have all the components and the crimper. About 130 feet of cable. Just been quiet on this subject in order not to step on any toes. I believe I can do a complete set of three cables with accessory leads and the extra leads for about $55.00 inside the U.S. Not sure on Canada, it was about an extra $7.00 for priority shipping. Will dig out my stuff and get set up. Take a week or two with my present schedule. No pre-pays or orders yet. I will put them up as they are done. JB
-
Sent money for 4 patches. Dropped $10.00 in your paypal. Send someone a free one, or defray manufacturing costs etc. JB
-
Can't see to type. J and M
-
Many of us signed a check of one sort or another in our lives. Today those of us that had them returned pause to thank those that had their's cashed. many of you remember fallen military. I myself remember my father, a WWII veteran. Along with all of those, I remember my fallen firefighter brethern and those of other public safety that hold the line here at home. Those who help others and put their lives on the line are a different breed. J.B.
-
I used the show Chrome grips for a 1500 Goldwing. There is a size difference. Right side is a bit larger due to the plastic throttle sleeve. JB
-
I here you on a stock lift. Especially if the tie down poins are low on the bike like yours. Getting off and strapping down cannot be easy. Trick for coming down backwards on ramps. Put the bike in 1st gear and leave the brakes alone. Use the clutch to control descent. Always seems to be more controlled to me. With feet on the ground you tend to skid the front wheel on occasion with the brake. Clutch feathering works better for me. JB
-
Get one made for a trike. Figure 1500lb. capacity. A trike lift has a bit different bracing and geometry to avoid flopping over or buckling. The other choice is Greg Smith Equipment. He sells a 1500lb. lift with wings on each side suitable for the big 4-wheelers with side by side seating. Or a lift set up for big golf carts.
-
Almost forgot. The pivoting angle and the upright are pretty loose inside the bracket of the chock. It translates into bike wobble. I grabbed a bag of narrow rim (SAE) washers, or maybe metric ones and shimmed between the angle iron and the pivoting lock. Tride to put an equal amount on each side while threading the rod through. I actually used enough that I had to push them down in with a flat tip screwdriver. The "flipper" was a bit tight until I used some silicone spray, then it was fine. Did the same to the upright where the tire hits. It is a small thing but the whole mechanism is very snug now. When I dismount the bike is secure. Not sure what it would take to yank it over, but the force would be considerable. JB
-
Looks like we will hit you up at the Motor Trike run. When you get into the states and get a handle on the days give a post and I will take a day or two off work and come over to Houston. JB
-
ScarryL.- I agree that there is a lot of learning for a lift. However, it probably is not nearly as dangerous as I make out. Once outfitted with the wings on the side and a good chock it becomes as easy as riding up a trailer with a wide drop gate. Actually easier as the lift is only 6" off the ground. I tend to warn for the worst so people avoid my mistakes. However, I too use a floor lift a lot. Depends on what I want to do. For you 2nd Gen folks, the Carbon1 stand is perfect to change oil etc. Once I get the wings on where I like them I will post again. I want them to also follow the ramp. Reason- If you are vertically challenged, you can lose touch with the floor at a point. If you are walking the bike up the ramp, not good. Best thing I ever saw was a garage with a recess in the floor for a lift. Talk about an easy thing to use. JB
-
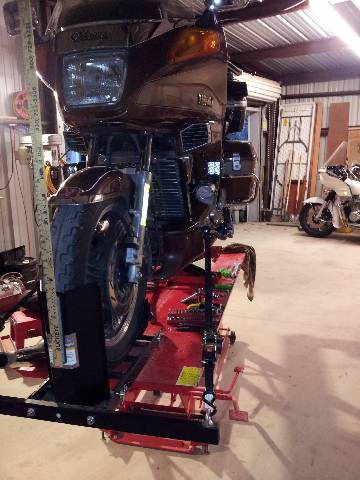
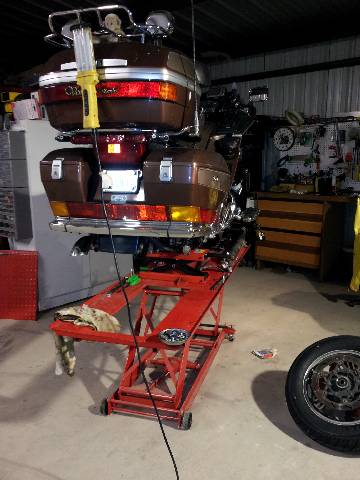
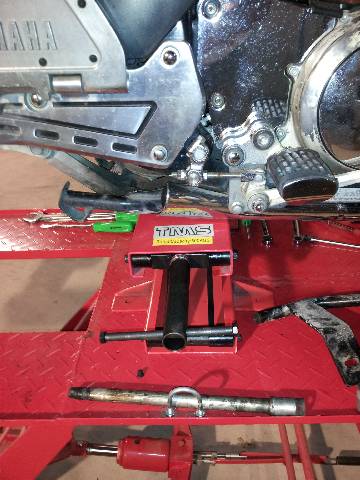
Here is a picture of the way I cut and used the chock. It is very secure. Almost too secure!! I have to work to get the bike back out. Got to really pull back and yank. It usually take a couple times. Kind of compress the front forks and use the spring back of the suspension to help get the weight moving. Notice where I cut the chock. I left enough for all of the adrusting holes to be retained. And I cut the rear at a taper to avoid having a sharp corner. Would hate to be off on my aim going up and hit a sharp corner! Warning for all - The lift is narrow! So watch your step or you will miss the sides going up! I have included pictures of a couple side wing extensions. Not sure which I will use but I intend to add something for my feet when I go up. Also, if the lift will not go up, it may be low on oil. Sometimes shipped nearly dry. Add through the rubber plug when DOWN. If it still will not raise the bike, then the pressure relief is set too low. And it can be adjusted. There is a place to get to it and screw it in a bit. I will need to get pictures of the spot and post them. My lift will raise with the bike and a person on the bike. Use the front lockdown screws to hold the lift stable to the floor. I contact to the floor then give about 1.5 turns further to get the weight off the front casters. NEVER NEVER move the lift on its casters with a bike on and raised. However I have done so when down. But I have 4 tie down straps retaining the bike when I do so. I use the self-retracting ratchet straps on the lift. Keeps the table area neat. Harbor Freight also has packs of soft strap loops if needed. JB
-
Here is my lift with a U.S.General wheel chock. I cut the back off, redrilled the chock and then fastened to the lift with flathead bolts. It has held a Harley Electraglide and my 1986 VR without a problem. The chock position allows for my small jack to raise the rear and drop the tire out. Otherwise the centerstand sits on the dropout panel. It is on its 2nd year and very stable. I have a yardstick with a magnet on one end. Stick it on the chock for a cetering guide and run right up. I can jack the front up, remove the chock parts and then remove the front tire. The chock really did not move the weight bias at all. I think the tire position is forward by only a couple inches. I did check the weight bias before bolting things down. JB

-
If you are in Rio Medina and 28 miles east of San Antonio................... better get a new compas or a better GPS:) Last I looked you are west of S.A. and over near BuddyRich. But then again I am a transplanted Buckeye. JB
-
The only way to get rid of them is a shotgun:) Hunt them down and blow them off the walls!! And it will work on the iddy biddy froggies too. Should only take a night or two and all we be silent...... and well ventilated. Come out to our place a bit above Floresville in a few months. About 15 miles south of San Antonio. Frogs, bugs, donkeys, dogs, a pig or two, lots of hotty owls, and in the early AM I can offer roosters and a turkey gobble or two. JB Oh, look on map. We are at State Route 181 South and FM775