lonestarmedic
-
Posts
889 -
Joined
-
Last visited
Content Type
Profiles
Forums
Gallery
Events
Store
Everything posted by lonestarmedic
-
 Look under Motorcycle LED.
 -
But the work was worth it in my opinion. Sent from my SAMSUNG-SM-T217A using Tapatalk
-
Yes that is the headlight I installed. A bit of work. Sent from my SAMSUNG-SM-T217A using Tapatalk
-
To answer a few questions, the 9003/H4 unit I put in does have a hi/low beam that works well. I did not notice any interference from high frequency but I will check. Currently I run Pandora on my phone mounted to the right handlebar. It goes into the stock system. The LED unit seems to draw about 3.5 amps. Not sure as I checked it with my inductive clamp on meter. At any rate it is very low draw. Website says it is a 40 watt unit. It is from Opt-7. Listed under their motorcycle selection. You can also find it on Amazon. I did not do an install on it because it is straight forward. The bulb removes from the base for easy of installation. The fan unit on the rear blocks the mounting clip from swinging down. 1) Of course access headlight. Remove upper chrome trim, the colored bezel and take out two large Phillips at the top of the headlight module. 2) Remove old bulb, wrap in something and save. 3) Set aside the rubber dust cover to be stored away or trimmed for install around the headlight. Fan unit sticks out back and cannot be covered. 4) Plug the little regulator/driver module into the stock connector. It is the size of about 4 SD card stacked' 5) I put it up in the harness behind and to the left of the headlight (direction of travel) To the right is the horizontal aiming adjuster. 6) DO NOT mount anything behind the bucket. There is plenty of clearance for the new unit, but nothing else. Any stock wires are ok. 7) Remove LED headlight from mounting ring. Not orientation as to what faces into the headlight. 8) Drop tabbed mounting ring into headlamp bucket. It is indexed and fits only one way. 9) LED unit is also indexed to the mount plate. Push in and turn to lock. 10) Plug pigtail into the little driver and that is it. Guide bucket back in place and pay attention to wires etc. 11) Turn on and check results. If you are like my 1986 the hi/low will work just fine. But the CMU will have a warning light for headlight out. I chose to remove the Reserve Lighting Unit and alter the Computer Monitor Unit. The unit is a cool idea but can mess with modern LED and HID headlights. I will take a picture I guess tonight. Did not think folks wanted a picture of glaring headlights. I left the rubber dust cover off for now. But think I will trim it to fit around the base of the new LED unit. Not tight to interfere, but enough to provide a bit of coverage. In the other thread for the alteration of the CMU, Prairiehammer added pictures for me with the various components labeled. Do NOT be staring at it close up when you turn it on!! The light is almost pure white. Maybe a touch of blue. I think it is in the 6000K range. If this bulb continues to perform well, I cannot see going back to a standard bulb. We are Heading to Houston early Saturday morning. And I have a Garmin Virb camcorder mounter facing forward. Guess that is a setup for a film clip of LED in action. Anything else, just ask. J.B.
-
Very cool Prairiehammer. I will grab your pictures and store them with mine. Sometimes difficult to find. Toms of the earlier ones shown. Thanks so much for the addition.
-
Could be TCI. Or it could be the fuse block if is original. The clips on the glass fuses are notorious for breaking with age or losing tension. Or as simple as a wire shaking loose. Wonder if you can see a relationship between bike warming/heating up and the shutdown?
-
I decided to try one that could be bought through Amazon on Prime. That way I could have a hassle free return. I ran into a unit from a place called OPT-7. A lot of claims about reliability, waterproof, bright, and working correctly. It came in and I pulled the headlight and followed the directions. It went in as described. I tucked the little driver module up in the wiring harness and hit the switch. All I can say is WOW!!!!! The beam is bright white and focused really well. No dark spots and it has a nice vertical cutoff. Spread is fantastic. Lights up the road edge much better. I set the vertical where I thought it should be by measuring against my garage wall. Bike with tire touching wall I marked beam top cutoff. Backed up 30 feet and put the cutoff edge 2 inches below the first mark. Waited until dark and went to field test. I took a major 2 lane state route and passed about 15-20 oncoming cars with no one flashing me. Low beam out there about 2-3 times brighter. Went to a straight deserted level road and checked hi beam. It kicked out there and really did its job. about twice the distance out from the edge of the low beam. I could not be happier. Then I kicked on my Rigid LED driving lights in addition. This bike lights up the night like the sun. And the LEDs are super efficient. Yes, the LED headlight tripped the CMU and threw a headlamp out indication. But, it did NOT trip the Reserve Lighting Unit!! They claim Can-Bus compatible. But I did not expect it to be fully compatible with a 30 year old system. So, I have removed the Reserve Lighting unit, jumpered the CMU system and all is good. This unit is about $55-$60.00. My opinion is very worth the trouble. I put another post up showing the rear of the CMU on my 1986. And there are write ups on jumpering the RLU. But, if anyone want my version just ask. JB
-
To keep the diaphragms in the groove try this. Pop the air filter cover off and the air filter out. Look down and see the slides/needles. Take a long thin object such as a long screwdriver or dowel rod and stick it into the carb. Avoid the needle. Now, when you set the diaphragm in cup it so the slider protrudes. Call it convexed out. Slide the unit in until the diaphragm is in the groove but the slide is still protruding. Us screwdriver to keep slide in this position. Put spring in. Grab cover and make sure springs are around the tabs inside the cover. Push cover against carb body as you use dowel to keep slide locked. Hold cover flat and install screws. Tighten down then remove dowel. Keeps the edge in the groove. I have done this so much I lay the cover, spring, and screws out and can have a slide in and cover tightened in about 2-3 minutes. I keep a 1/4" wooded dowel around for this. However a long cabinet screwdriver works well also. The dowel holds the slide great and does not need to be pushed on at all. JB
-
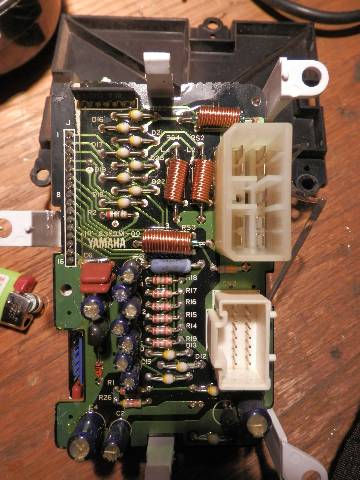
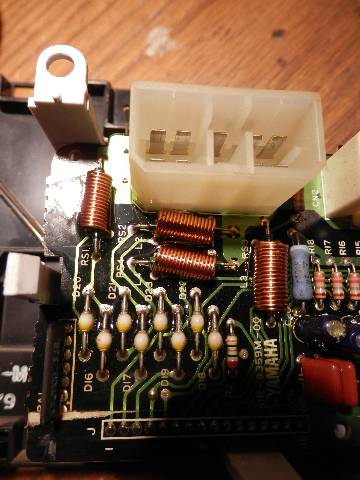
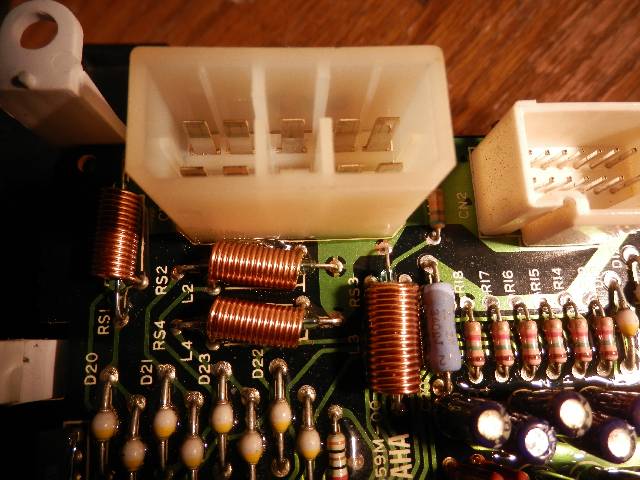
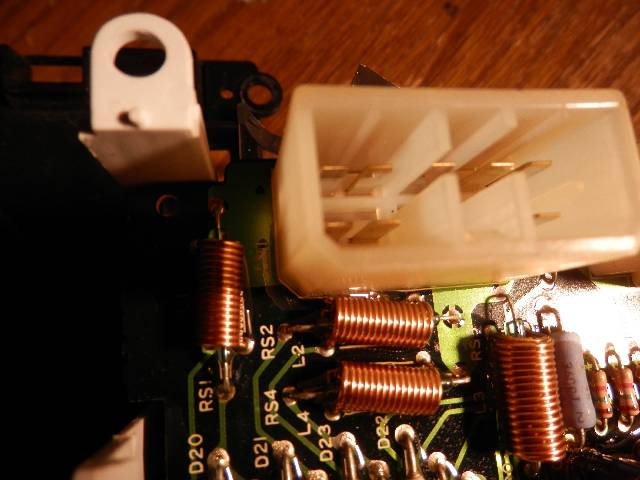
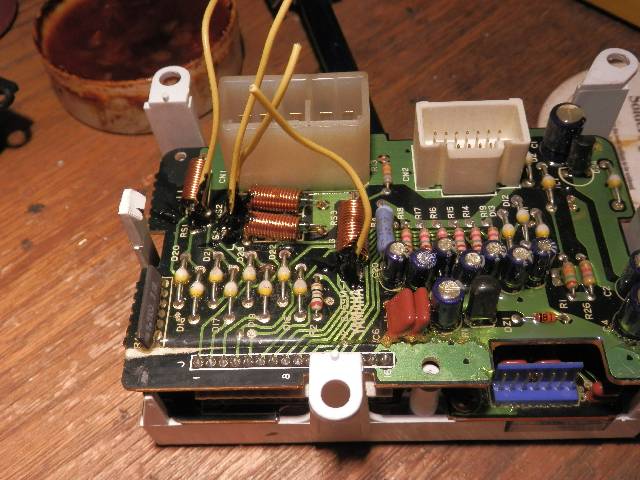
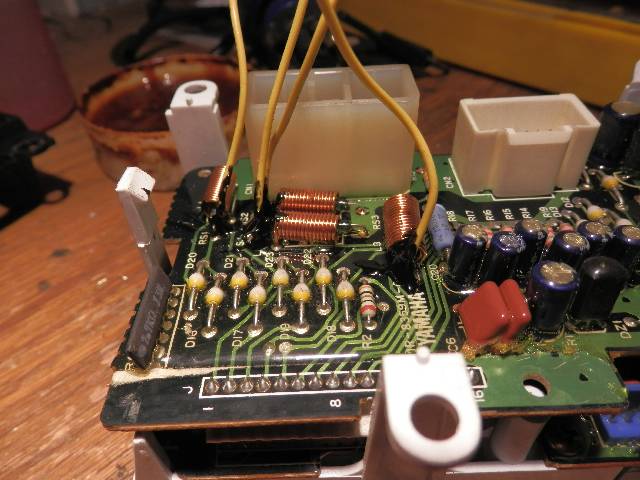
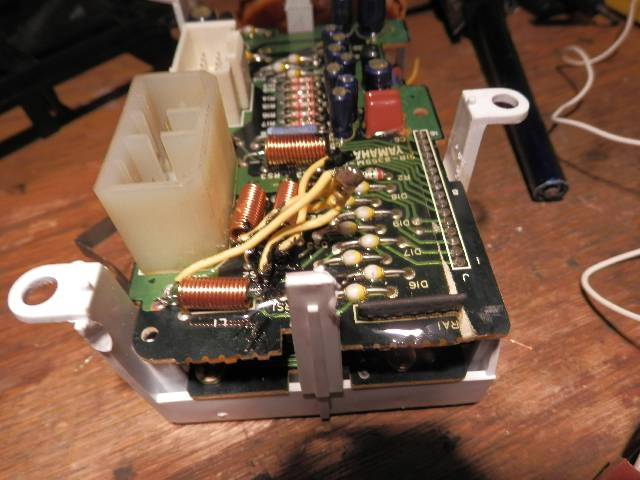
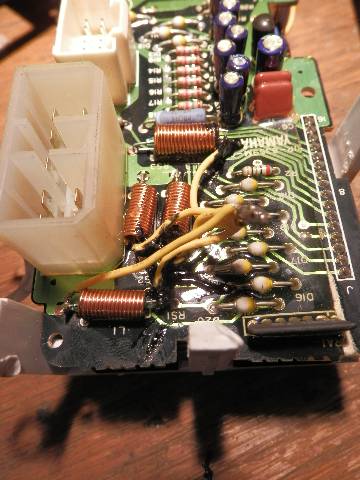
One of the things that has always seemed to be missing are pictures of the CMU circuit board on the 1986 and up and/or Royale circuit boards. So when I jumped the 4 reed switches on the board I snapped a couple pictures. All the reed switches go to a common ground so I just made a small harness and sent them to 1 ground point. It saved soldering on both ends of the reeds. The reed switches operate by the copper coils creating an electromagnetic field that trips the reed module going through their coil centers. So, when jumpering you are after the center connectors, not the coils. I did not bother chasing which one did the brakes, turn signals, running lights or headlight. I intend to install some LED lighting in the other circuits so I just did them all. My main goal was the headlight indicator. But, why go back in a second time? Feel free to use these and copy. If someone knows which reed runs which circuit by all means label them. The reed switches are marked on the board as RS1, RS2, RS3, and RS4. After I soldered the wires, I coated the solder joints with black liquid electrical tape to reseal them. The multi wire joint was protected by taking a piece of clear fuel line and sliding it over. I filled the inside of the piece of fuel line with some clear RTV sealer.

-
MKII Trailer Hitch Mount ?
lonestarmedic replied to GolfVenture's topic in Venture and Venture Royale Tech Talk ('83 - '93)
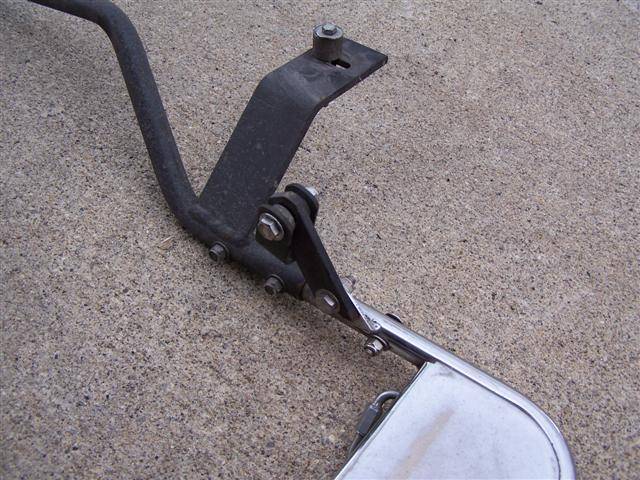
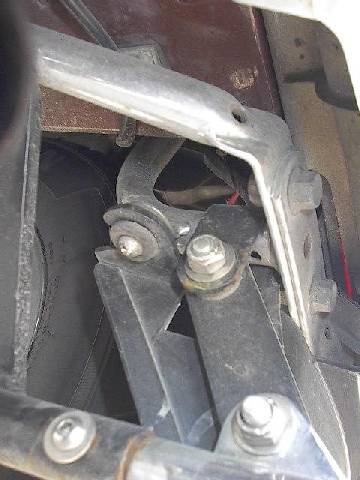
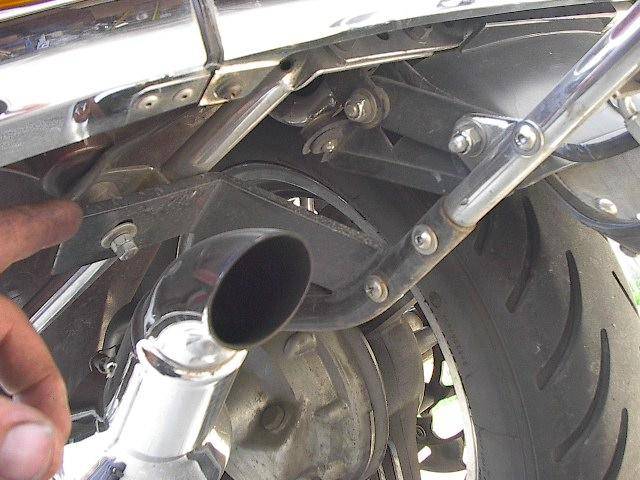
Hitch off bike. And pics scavenged from someone when I mounted mine.
-
MKII Trailer Hitch Mount ?
lonestarmedic replied to GolfVenture's topic in Venture and Venture Royale Tech Talk ('83 - '93)
I thing you spotted it. The angle iron piece is bent and pulling the hitch rearward. Just checked mine and it is not angled forward -
MKII Trailer Hitch Mount ?
lonestarmedic replied to GolfVenture's topic in Venture and Venture Royale Tech Talk ('83 - '93)
That is strange. Front should go behind muffler mounting bolt. Bar goes back to angle iron mount under bag. Then hitch plate slides in and has 2 tabs that mount to a set of flat hangers that are in the rear. Will fire up laptop and look at my pictures. Sent from my SAMSUNG-SM-T217A using Tapatalk -
Bad Battrey or bigger problem
lonestarmedic replied to Gunny's topic in Venture and Venture Royale Tech Talk ('83 - '93)
That is pretty normal for a first gen. When you hit the brakes you also turn on those electric anti-dive solenoids. On the front forks 2 electromagnetic coils. Mine will drop about 1.5 volts. Add a marginal battery and it will drop fast. I can tell when my battery needs replaced by that and the hard hot start/slow crank. -
How much Seafoam in tank?
lonestarmedic replied to volmann's topic in Venture and Venture Royale Tech Talk ('83 - '93)
Half works good. If you are going on a longer run I have used a whole can! Run the tank down half then fill up. First jolt heavy and 2nd lighter. -
Platform foot rest
lonestarmedic replied to mariohcastillosr's topic in Venture and Venture Royale Tech Talk ('83 - '93)
The auxiliary ones that attach to the saddlebag rails? Or something different? Those aux. ones are difficult to find. Watch eBay, ask around. And be prepared to pay a premium. -
Progressive front fork springs
lonestarmedic replied to blaine1's topic in Venture and Venture Royale Tech Talk ('83 - '93)
Installing just springs is done from the top. Remove bars and bar mount. Use big allen wrench to unscrew top plugs. Curse because you did not drop pressure on front forks and got oil all over. Pull little phillips screws at bottom of forks and drain. Unscrew second top plug. Fish out springs and spacer tubes. Flush forks with something like kerosene. Drain out or shove shop rag in top around a air hose blow tip and pressurize slightly. Put in new springs, washers, and spacers. Fill with proper amount of fork oil. Install plugs. Realize new springs need serious compression to get plugs installed. Get big allen wrench socket on 1/2 inch drive. Stand on pegs up and over forks. Press down on ratchet, extension and socket. Make sure plugs are not cross threaded by turning plug counterclockwise until you feel a click as threads line up. Carefully screw in. Curse and pull apart because you forgot a washer. Line up and re-install. Get other side installed. Reassemble bars. -
The tool I bought was from http://www.sealmate.net I know people make these out of all sorts of plastic, but I like the hook contour on these. I carry my spares in my owners manual.
-
The rear is more difficult. I suspect you might almost have to remove shock to try the above. Usually not a grit problem there but a leak in the sustem. Easiest thing there would be a good used shock.
-
Sounds like you have the electrical gremlins on the run! As to losing air, sounds like dirt in the front seals. When the fork operates and moves the air is allowed to eacape. Before tearing down the forks, look up fork seal cleaners. Along the same lines as the old 35mm film film trick. Run the thin plastic between the seal and tube. Drag it all the way around and pull it up and out. Wipe off and repeat several times Then roll forward and hit brakes a few times to compress, move, and reset the seals. Old dirt bike trick. Will not fix torn or worn out. Also when you pull up the dust boot clean it and the groove it sits in really well. Otherwise you shove a dirty boot back down and defeat the purpose. I think I bought about 6 of these gizmos for less than 10 bucks. Came in the mail in an envelope.
-
carb rebuild
lonestarmedic replied to Mike Swartwood's topic in Venture and Venture Royale Tech Talk ('83 - '93)
Get JIS Phillips screwdrivers!!! And be prepared to vise grip some screw heads and replace. Also take the time to get flat screwdrivers and grind down to fit the jets. Or be prepared to buy jets. I have 4 different ones custom sized. 1) The parts to reseal the needle seat are not in a kit. You will need a disc, screen, and o-ring. They are pressed out and in. Using a socket at the outside and a pusher and a small c-clamp or vise. Notice the stake marks around the disc. I would use a dremel or file GENTLY to remove. Now, as long as the original seats are good I would not replace them, just use the new needle. What I do is use a small mirror and light to look in the seat for corrosion and scoring. Then I use a q-tip with carb cleaner and compressed air. Finally a q-tip with a bit of WD-40 for a starting point. 2) Idle adjustments screws behind the little brass disc below the big diaphragm cover. Put a stop on the bit so it does not go too far in. Before touching a screwdriver to the idle screws shoot penetrating oil in the cavity and let them sit. Then flush out with brake cleaner. Finally a fresh shot of penetrating oil. THEN go ahead and try to move the screws. Do not just unscrew. Go out a turn and then in a turn to get the oil in the threads. Then in until seated and count the turns if you like. I just set mine 2 turns out then adjust on the bike. I use the old idle-drop method. Along with the premise that too lean will cause the throttle to "hang" when revved up. And the throttle will drop below idle then back up to idle if too rich. All sorts of tricks on the idle enrichment. 3) Included vs needed rubber parts. You probably need the rubber jet block plugs. one small and one large per carb. About $6.00 each. Not in kit. The little O-rings next to the diaphragm are not in most kits. The o-ring under the jet block and around the main brass tube may not be in the kit. Main jet access plug o-ring on fuel bowl may not be in kit. 4) I just did a complete overhaul of my carbs and finished last week. I replaced all 4 of the idle enrichment valves. Also known as cut off valves. Under a three screw cover on the side. 2 were good and 2 were hard and wrinkled. I used the K&S brand at $20.00 each. Bought them from Dennis Kirk. In stock, decent shipping, and good price. The K&L are also good, just about $10.00 more money. 5) Pull the idle jet and emulsion tube from the jet block and clean like crazy. That itty - bitty idle jet is a pain to clean out. Any questions do not hesitate to ask. I am not an expert on the carbs, but the experience is fresh in my mind. JB -
black plastic heat shields
lonestarmedic replied to garyS-NJ's topic in Venture and Venture Royale Tech Talk ('83 - '93)
I removed mine about 65,000 miles ago and it was in 2008. So far the electrical has held up. I had the box out a couple months ago and the capacitors were good and I saw no warpage. I agree that the shields are more for the components than OUR components. I did not pull my coils and examine those. JB -
black plastic heat shields
lonestarmedic replied to garyS-NJ's topic in Venture and Venture Royale Tech Talk ('83 - '93)
Mine have been out for years. No ill effects I have found. Maybe the do deflect a bit of heat, but I did not see a difference myself. They are in my parts bin if needed. -
Too Rich OR Too Hot Outside?
lonestarmedic replied to syscrusher's topic in Venture and Venture Royale Tech Talk ('83 - '93)
1/3 gets about 2000 rpm cold for me. -
Too Rich OR Too Hot Outside?
lonestarmedic replied to syscrusher's topic in Venture and Venture Royale Tech Talk ('83 - '93)
Hmmm, I start full and drop to half within about 2 seconds.