VerntureVet
-
Posts
123 -
Joined
-
Last visited
Content Type
Profiles
Forums
Gallery
Events
Store
Everything posted by VerntureVet
-

Loose Dash
VerntureVet replied to Iron Horse's topic in Venture and Venture Royale Tech Talk ('83 - '93)
Sounds like a good use for one of the 2 universal fixers. No JK I put washers on mine also works great.
-
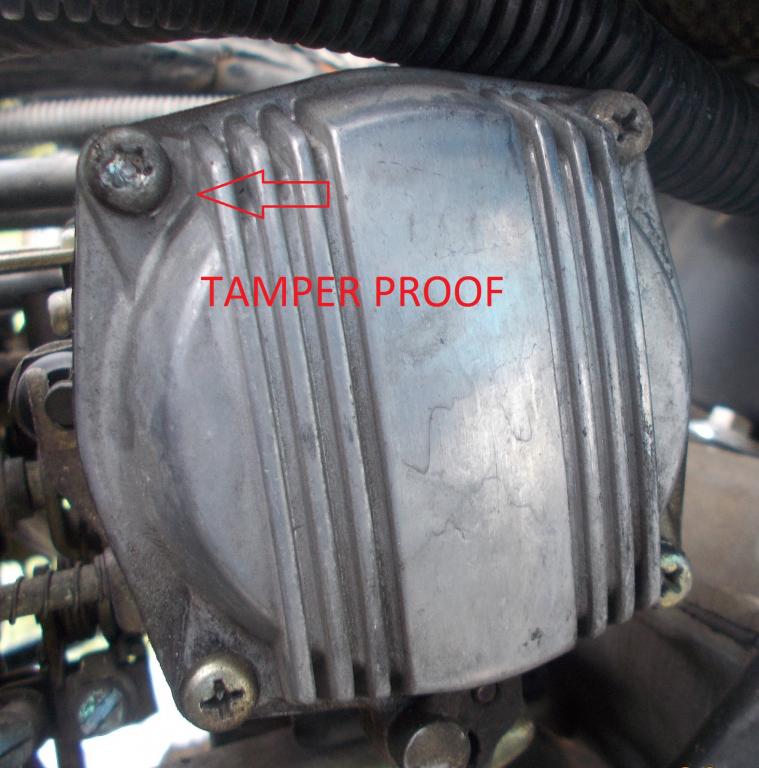
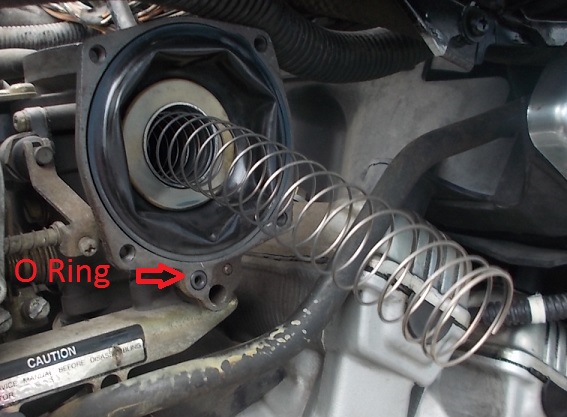
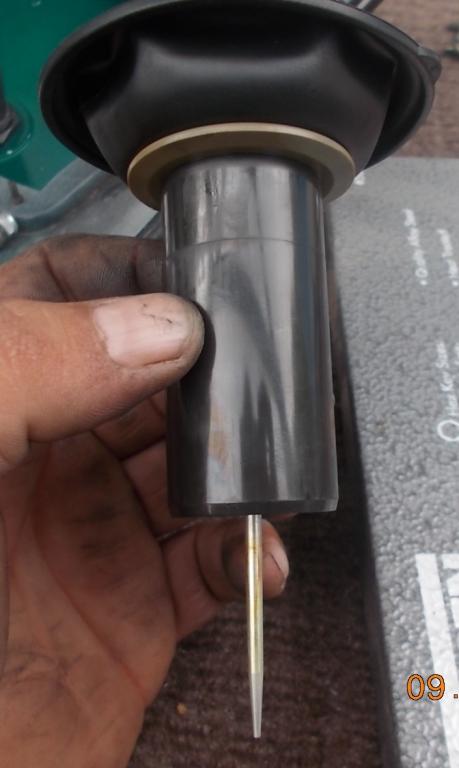
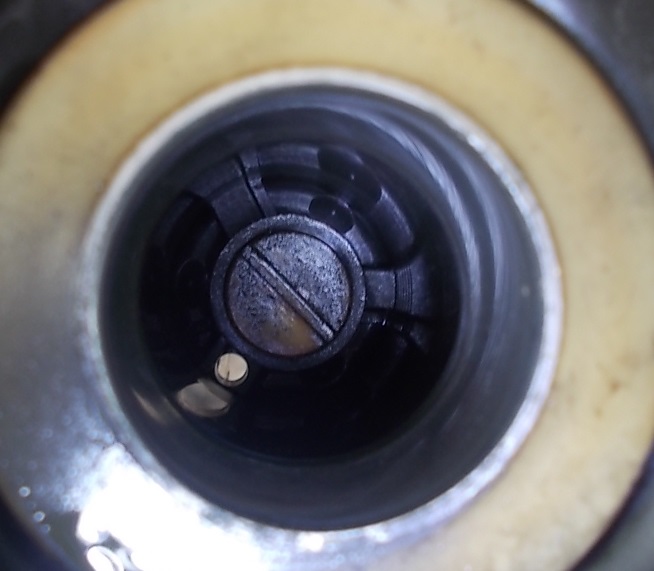
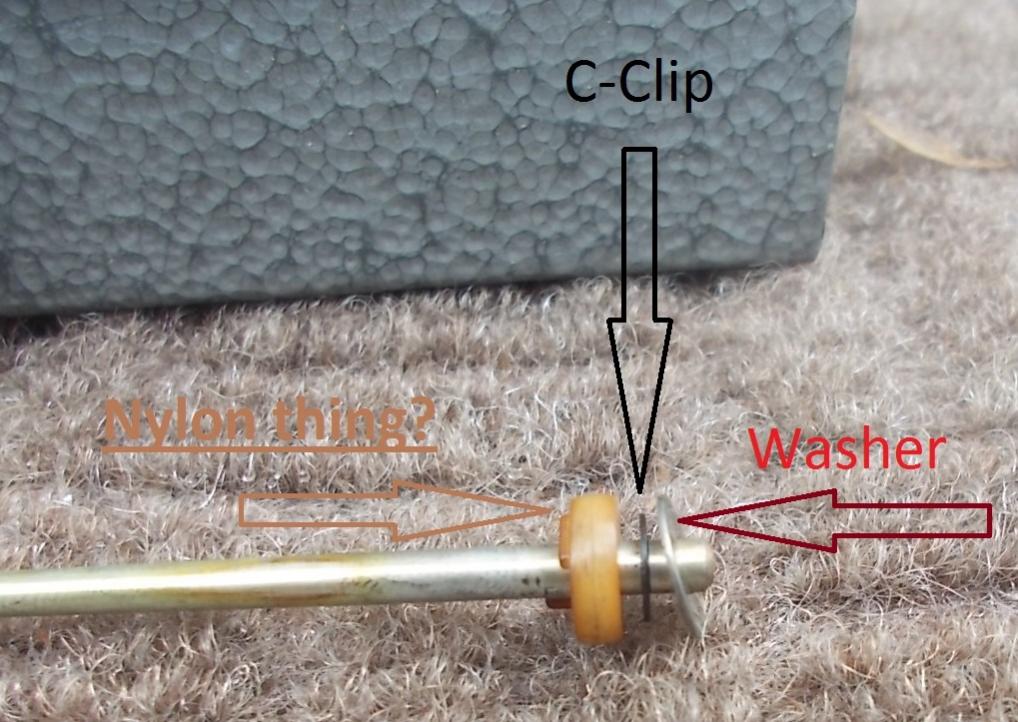
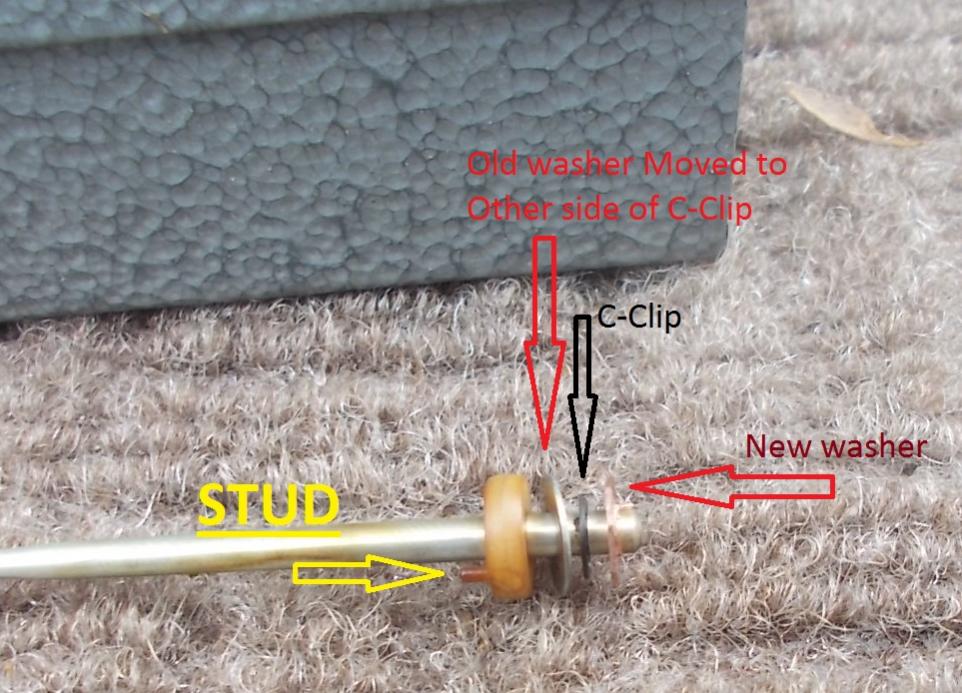
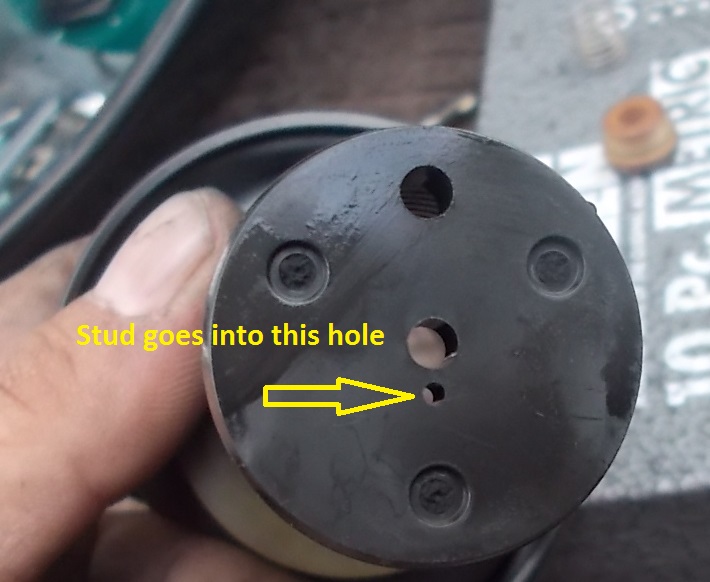
I Read this in another post maybe here. People talk about enriching there carb after modding the exhaust (baffle removal or open pipes) The best way to correct lean or rich is a rejet and exhaust analyzer but for those who don't want to tackle digging deep into the carb this may help you get threw until you do it the correct way. On another note this same MOD has been said to improve throttle response on stock and bike with MODed exhausts. Correct me if I am wrong. What you are actually doing is retracting the Jet needle out of the Jet some. This should result in a faster opening main or even possibly a partial open main jet I am not 100% sure. What I am sure of is that I knocked all but the forward most baffle in my stock mufflers and even that one I left with 4 X 3/4in holes. Naturally after that I experienced a sluggish motor. After doing this the bike woke up like a cat in a thunder storm. I would be happy to edit this to reflect accuracy feel free to educate and correct. So lets get to it. Gain access to your carbs by removing a many covers as you need to get in there with a screwdriver and tamper proof socket. I could not find my tamper proof socket set so I used a rotary tool to grind off the stud and get it off with a standard one. When you get to the last screw hold the cover there is a big spring that will push the cover off. Also note the O-Ring This would be a good time to consult the service manual to check the length of the spring. I didn't get that into it rather I just stretched the longest one out 1/2in and the stretched the rest to be the same length when sitting on the table. I am sure there is a spec and you really should not cut corners like I did unless you want to get back in there and do it again. Now carefully work the diaphragm loose and remover the assembly from the carb. Head to a nice clean work area so you don't loose any small part. Take care not to damage the needle or diaphragm. Look down inside and you will see a (nylon?) nut. Use a flat screw driver and remove the nut. Take care as there is a spring under this nut also. Once the nut is off store the spring in a safe place unlike me who just laid it on the table and ended up looking for one for almost an hour. Remove the needle gently you will find it has a (nylon?) ring, a c-clip, and a Washer on the shorter end. Slide off the Nylon ring and the washer. Then put the washer back on from the point end of the needle and reinstall the nylon ring. You then want to install a new washer in place of the old one. The original washer is just the right size on all 4 carbs trust me I MICed them however the ones I installed had a slight variation in thickness. Its function was to keep the needle from sliding thru the spring so just moving the washer is not enough you need one. NOTE THE STUD ON THE NYLON RING When you put the needle back in be sure the stud on the Ring seats in the hole. Reinstall the small spring and put the nut back on. Now would be a good to do clean things up. If your needle is dirty you can buff it lightly with aluminum foil to clean it up. Take care not to damage or bent it. The entire needle does not have to be clean the most important part is the inch or so on the pointed end. OK now work in reverse and put it all back together. Rinse and repeat for the other carbs.
-
Reflective lens on trunk
VerntureVet replied to MrOflam's topic in Venture and Venture Royale Tech Talk ('83 - '93)
The OP was about him needing a reflector. I chimed in to offer mine to him for some stuff I needed as a trade if he was interested. -
05 V Star 650 Custom second cylinder not getting a spark
VerntureVet replied to jjven68's topic in Poor Man Tips and Fixes
To properly test a diode you can't just use ohms. http://en-us.fluke.com/training/training-library/test-tools/digital-multimeters/how-to-test-diodes-using-a-digital-multimeter.html -
The black probably isn't coming off because the surface is still to rough (porous). Even though a standard piece of stainless may look smooth it can too rough to polish as polish is nothing more than micro sanding compound. As I mentioned before wet sanding it to an almost mirror finish. The best way to do a flat piece is with a padded sanding block with the finest piece of paper the leaves a noticeable scratch pattern up and down. Move up 200 grits and sand left and right. When your happy with the finish was with soap and water and maybe some grease and wax remover. Then you can hit it with the Mothers or Nevr-Dull. wipe off the black with a clean lint free rag and keep moving to a clean part of the rag. I will post an aluminum/stainless/copper polishing guide for you folks with b4 and afters when I am dont with my engine covers.
-
I took off the side stays today and went on a nice 70 mile ride with the wife and to be honest I couldn't tell any difference. The parts book has them listed under cowling parts and not the frame. Guess I will roll with it as is. On another note I synced my carbs with one of them home made tube deals. I found that the #4 was sucking so hard compared to #3 and #1 that it almost sucked all the oil out of the tube b4 I could pinch it off. Some back and forth between #1 and #4 and #1 and #2 got them in line with each other. a minor tweak to #3 and #4 pair and it was sounding much better. On the ride today I found that my hand didn't go numb after 20 miles like it did in past long rides.
-
I took them off today and went on a nice 70 mile ride with the wife and to be honest I couldn't tell any difference.
-
May be a dumb idea but I already relocated my CLASS and battery to the left saddle bag. I would love to move the battery under the seat where the gas tank is instead and free up some room under the upper cover for some custom gauges. I have a 2 gallon fuel cell that would fit perfect in the right saddle bag and was wondering it the fuel pump would work well enough to pull the gas from that low. Just ask because as it sits the stock petcock is above the tank and gas kinda flows down hill to it. If not I have also thought about moving the stock pump and or installing an in tank pump that can get the fuel moving up.
-
Low voltage at Brake Light ?
VerntureVet replied to jcdas's topic in Venture and Venture Royale Tech Talk ('83 - '93)
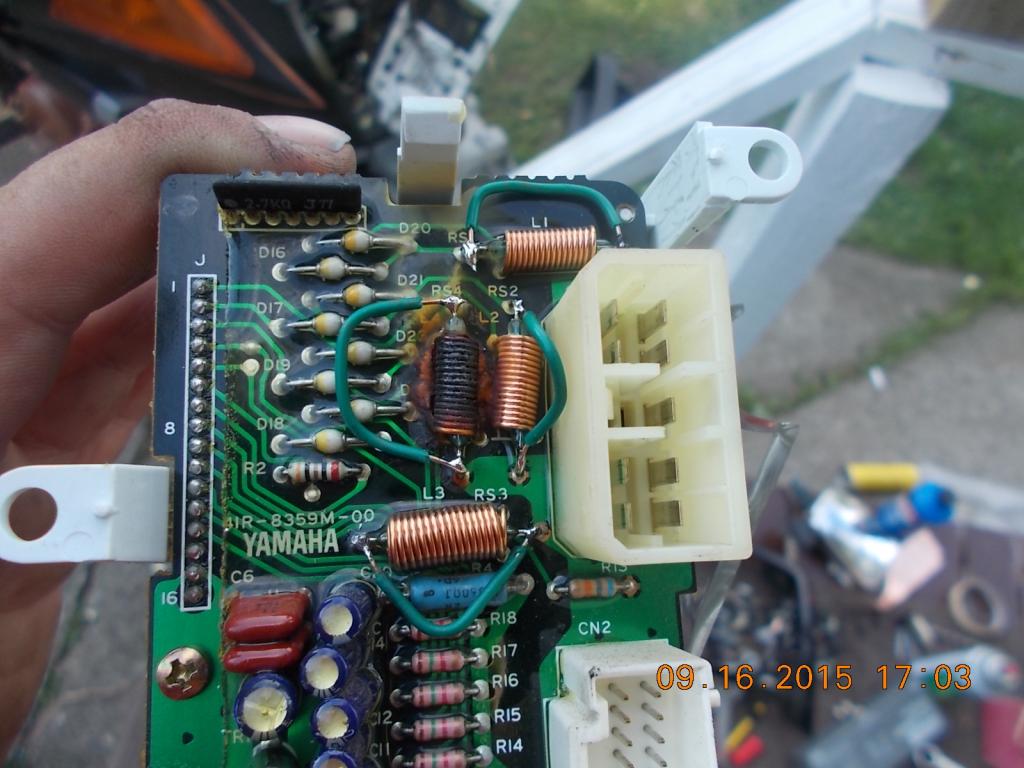
First you have to consider that most LEDs are driven by 5volts someplace in most assemblies they will drop the V to them with a regulator or resistors. so 10V "typically" should drive them full bright. Second know that voltage will drop under load of the running and headlight. Good charging voltage does not come in until around 2000 RPM You could have a lazy Generator like mine that does not want to give up the goods until 2600ish or a weak rectifier. What I would do: Pull the fuse or disconnect the headlight and all other running lights and check @ the Tail light again. Check voltage @ the Battery with the engine @ 2000-2500 RPM you should be getting 13.5-15 volts If you have that Pull the covers and seat and run down the connectors start @ the Tail light and work your way back to the Fuse. I say that backwards because its just easier to follow from the end and more times than not the connector under the CLASS or seat is just dirty. If your not getting 13.5-15v @ the battery @ 2500rpm then you could should check. Battery-> stator coil-> Rectifier Chapter 7-19 to 7-23 in the 86-93 service manual. If none of that helps you hit me up and I will do my best to help you chase the wires. P.S. The Class compressor and all the rear lights are tied to a common ground wire. on my bike I had dim tail lights and it turned out to be the ground there were all tied into one wire soldered and taped. I soldered that area and it was back to normal. -
Pops has a FrankenBobber made up as best I can remember a 76 Sportser frame raked out with some 24" hangers and a 74 Shouvelhead. I was digging for some pics but can't seam to find the old 110 prints. I'll take some state of the art photos next time I am in his neck of the woods if he is home. Since he retired he has been on a mission to see US landmarks with mum. As far as getting the little carbon fiber one from china IDK if pops would put it on his bike or wait for 2 months to get it. He got the zip tie from a Marathon gas station he stops @ all the time to top off his fluids and air for nothing. Take the time someday to find those old timer owned places and hang out a while you would be shocked what they will do for you if you just ask.
-
Sounds good! Your bike is one I was looking @ that had it removed. I have done a fair bit of fabrication in the military and my experance told me what you just said about it being too chintzy to actually work as anything but a place for the covers to rest. I will not need to mod mine as I will not be using the side covers once I get a saddle and tank or make up a fake tank to stash all the electrical stuff hiding in the front cowlings. If all goes well ALL of the stock covers will be history soon as I work out Head, turn, brake, and mirrors.
-
@Prairiehammer $900 Reserve still not met that's already $300 more than what I have into the "88 I have now. Its a cool looking bike but there is something about hacking a perfectly good bike yourself. Beside Texas is a long ride home to Ohio lol @zagger Thats a nice ride you made there. Call me crazy but I always liked the look of an old car/bike tailored to ones own taste. It show individuality, ingenuity, and creativity. Someplace down the line I hope to Steampunk style my bike but for now I just like to shed the cowlings and stock rear end. Then over the winter I can add some nice details for the spring flings.
-
To me with what I am doing its just looks out of place. Maybe I will take it off and if I don't like the way ot handles I will put it back on after wrapping it in copper like I will be doing to the other frame parts. that you both for the feedback.
-
Yea I saw that on my quest to see what other people pulled off. its another one with the support running over the engine removed I am tempted to take off
-
Yea that is what mine look like. Ya see the put a clear coat on them covers when the are made just like the front forks. Over time 20-30 years it chips, wears, and yellows. best bet is to get some 220 grit and sand the coating off. From there hit it with 400 then 600wet 800 wet 1000 wet. after the 1000 you can recoat it with clear header paint or press on to 1500-2000- 0000 steel wool - nevr-Dull. Here is the progress I have made on my engine while still on the bike. I like to tackle it when I am out in the garage with a beer hiding from the wife and kids. Still some work to do and for sure it would be better to do it off the bike but for now its my only Ride.
-
I know someone else had a setup that used a pole from a sign. My dad has an old Harley and in his silver years he had issues with longer rides. This works well because it will not keep you from returning the throttle if you have to slow down suddenly.
-
When I was in the AirForce I had the pleasure of being the 1st flight to cycle threw a newly renovated dorm. every doorway had a stainless trim and transition plate from room to room. We used 600-800-1000-1500-2000 grit wet sandpaper and finished it off Nevr-Dull. It was rough stainless when we started and a mirror when we finished.
-
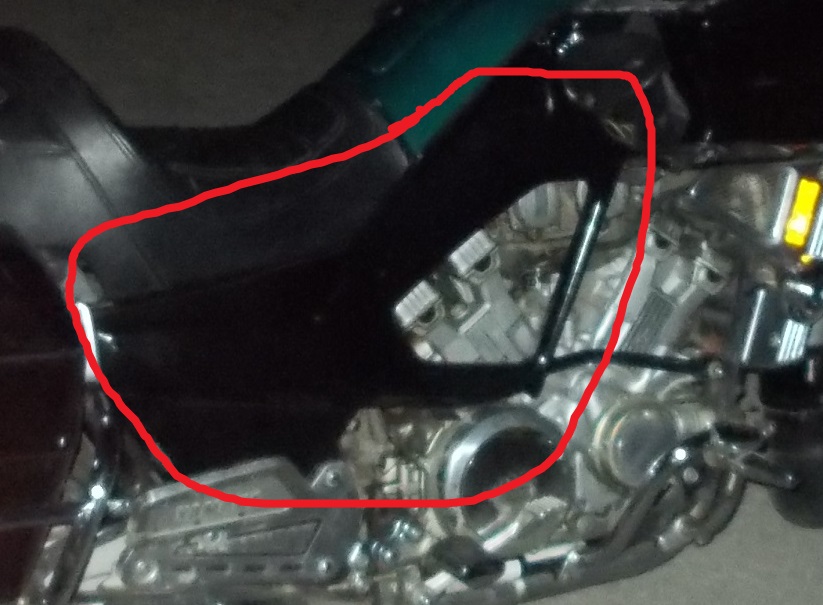
Ok so I have found more than one bike project that has removed this. I am leery to remove anything that could be there for a reason. Is this thing needed or was it just there for the side panels?
-
you talking about the one with the vents that cover the side of the engine? I do plan on keeping the Computer Monitor System for now.
-
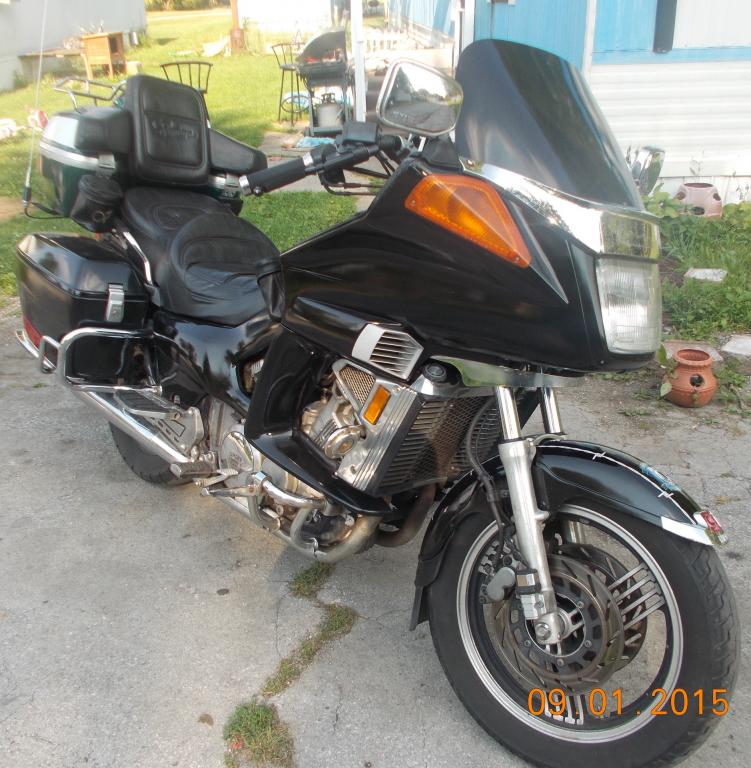
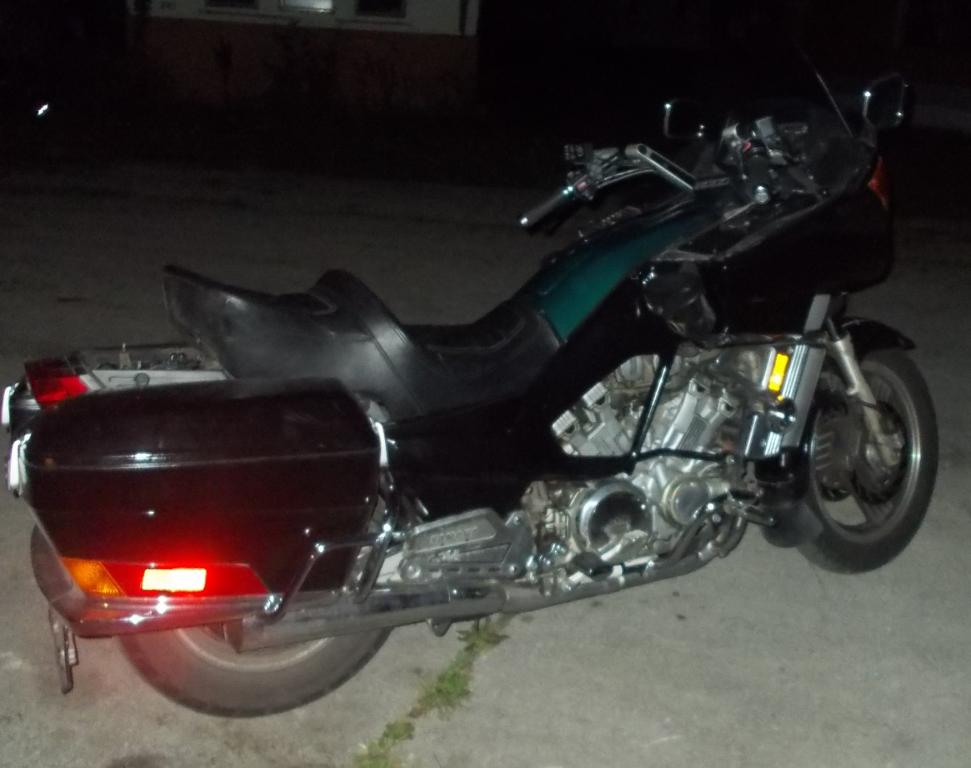
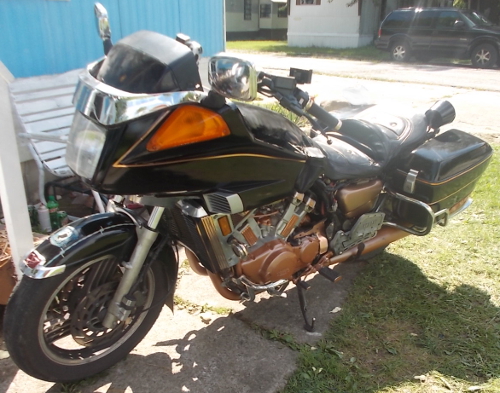
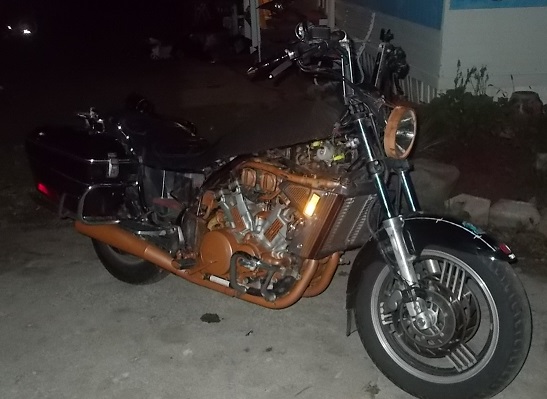
Will be converting the 88 Venture Royale xvz1300 to a Bobber / Rat Rod or Frankenstein whatever you want to call it. Has anyone ever relocated the gauge dash or replaced the needed stuff with something else? Also I saw someone else removed the brace that runs over the engine. it that brace needed or is it there just to hold the covers on? Done So Far. Relocated my CLASS and Battery to the saddle bag. All relays and components that use to be in the Front cowling are now in the spot that battery use to be. Replaced the Air intake Box with PVC pipe intake I saw someone else did. Removed entire Trunk and passenger seat back. Removed Side and lower cowling. Need to Do: Move the Dash cluster. I have already bypassed the burnt out light indication. Bypass the Reserve lighting system. I saw someone said they did this just not sure how to do it. Remove the front cowling and install round headlight and some turn signals. Replace Tail light and install some turn signals so I can remove the ones in the saddle bags. Replace the seat with a Bobber style spring seat. Replace the rear plastic fender with a metal on that can support a Passenger seat pad. I am willing to trade or sell anything that I take off if you provide what I need to get it off. Ie Front cowlings can come off if I get a Round Hedlight, turn signals and Mirrors. I am not super picky @ this point so for example I would swap the entire front lights and all for Mirrors Headlight and Turn Signals Bought not running with a paint job that was cracking and coming off for $500 cleaned carbs and rejeted. Shaker canned it Started taking stuff off 9/11/2015 I took off the side stays today and went on a nice 70 mile ride with the wife and to be honest I couldn't tell any difference. The parts book has them listed under cowling parts and not the frame. Guess I will roll with it as is. On another note I synced my carbs with one of them home made tube deals. I found that the #4 was sucking so hard compared to #3 and #1 that it almost sucked all the oil out of the tube b4 I could pinch it off. Some back and forth between #1 and #4 and #1 and #2 got them in line with each other. a minor tweak to #3 and #4 pair and it was sounding much better. On the ride today I found that my hand didn't go numb after 20 miles like it did in past long rides. 9/17/2015 I went on to taking off even more stuff. In prep. for installing a LED headlight and to resolve an annoying warning light on the CMU every time I put on the brakes. I went into the CMU and found the coil for the brakes was burned up. I jumped the Reeds for all the lights. I also removed the Reserve Lighting box and bypassed it. I removed the stock tail light and made up a rustic looking can style light. It worked out well enough so down the line I may put some time into making a better one. I remover the gas tank. Moved the battery under the seat Moved the cruise control and everything from the front cowling in the void from the battery under the airbox cover Temp installed a larger airbox cover Temp installed a headlight Installed new mirrors and hand grips with built in marker/turn signals thinned down the seat for a lower ride Flipped handle bars Removed CMU and bypassed its functions installed LED warning lights to for Temp, brake and oil pressure on venture cruise panel installed digital speedo, volt meter and tach on handlebars I also rejeted and installed KN filter and opened up the airbox by adding 3x 3/4in holes in the front opposite the stock inlet and a few other things
-
Reflective lens on trunk
VerntureVet replied to MrOflam's topic in Venture and Venture Royale Tech Talk ('83 - '93)
Wasn't a question. My trunk is on a shelf of my shop and will not be going back on. I was basically offering him a trade for some cheap mirrors and other stuff I need for what I am not going to use. -
Reflective lens on trunk
VerntureVet replied to MrOflam's topic in Venture and Venture Royale Tech Talk ('83 - '93)
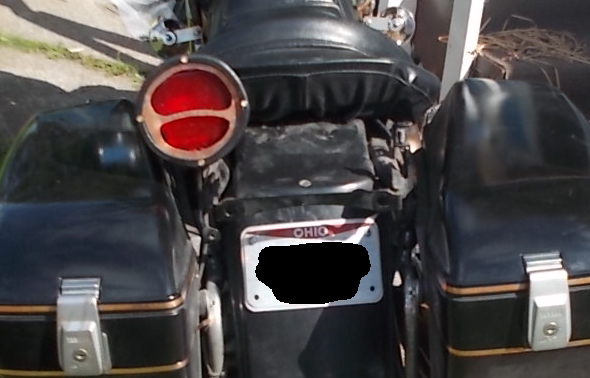
I have a 1988 Venture Royale xvz1300. I took off the trunk and it has a good reflector. I need Mirrors that will mount on the brake/clutch masters on the handle bars, a round style headlight, fender mount tail/plate light, And some Turn signal lights for the front and rear. No worry if the do not 100% match upto the VR. As long as I can make a bracket to attach em somehow.
.jpg.6272b9c1e060d8f587631e85475ec2f9.jpg)