VerntureVet
-
Posts
123 -
Joined
-
Last visited
Content Type
Profiles
Forums
Gallery
Events
Store
Everything posted by VerntureVet
-
So I was @ the Grave Yard today and wandered over to the V-Max area to scope out some possible V-Boost parts. both the bikes that had it both missing the V-boost stuff. Can't imagine why...... But the one had just the parts under the carbs with no servo motor. It was just the tubes and the butterfly crossover things. Now here is my idiot question. If I understand the V-Boost essentially opens up the intake between the 2 cylinders making the off carb. sort of act like a secondary. The controller monitors vacuum, rpm, and speed then tells the servo when and how far to open? So what if one would use just the tubes and make them manually adjustable. With the valves set right to allow some but not full draw from the 2nd carb. Could that not correct a lean runner without a rejet or possibly give you the ability to tweak air fuel without messing with the carbs?
-
 @Flyinfool We can just consider it a General Lighting modification Thread for now. If you forward me the place and brand of LED you used I will compile all the data into a single Lighting Mod post covering RLU removal LEd headlights, LED dash lights, led marker/turn and LED brake lights. Now the reason I got LEDS from DigiKey is that I know for a fact that I can run KingBright 3mm 470NM leds far past there rated lifespan even over driven. Meaning if an LED is rated for 3.2 volts/20mA and you drive it from a 5V source you only need a 1/4 watt 100 ohm resistor to get its rated brightness. I have run Kingbright LEDs over driven with a 50ohm 1/2 watt making it insanely brighter and 49 of 50 outlasted 10000 hours. I still have the array I built 3 years ago over driven and I use it as a night light in my shop. Still has 48 bulbs running. On the flip side if you under drive a LED it is likely to last well past its rated life. Picked up a LED 194 from the auto parts store today to check them out. the seam to have xenon LEDS and are supper bright. after ripping it apart I was very disappointed the see them to have used 5 LEDs in parallel with no load resistor. I assume they used 3-3.5volt leds to give them an operation range of 12-14 volts You end up with an inoperative or crazy fast flasher. So you have to install a load resister to slow them down. Now your right back to the same amp draw as a standard bulb @ 15x the cost counting the bulb and load resistors. This is a poor design and I asume they do it this way to make them cheaper. Anyhow without going into electronics 101 When I am done the flasher relay will be history also taking even more load off my battery. You can drive multi LED arrays with a simple transistor blinker or 555 timer chip. When all is done a single 1x2x4 project box will house all my lighting controls and total power draw with everything on should be less than 1 amp or ~2 amps with the 50 accent and show lights running. The total conversion less a Headlight Should cost less than $50. Last longer than off the shelf plug and play LEDs bulb replacements. Offer expansion for show lighting and sequence programming. Allow for simple brightness control and blinker rate without adding heavy draw load resisters. Allow for almost endless color combinations. I am not against off the shelf bulb replacements totally. But what is the point in getting an LED blinker to save power (IMO the only good reason to change them to LED) and then add the saved power draw back with a load so they blink right. For the non blinking lights on the bike. Cheap construction and poor design motivate me to do it like a true electronic engineer would.
 -
@stanG Flyingfool used off the shelf 194 LED replacement bulbs Most auto parts stores have them ranging from $2-$9, big department stores like k-mart or wal-mart also have them. Its the easiest way to replace them and Flyingfool said the stock dimmer still works. try Super Bright LEDS they have lots of other colors the stores may note have. Myself I built a driver unit out of a few cheap cigarette lighter usb chargers from the $1 store, a project box, some LEDs from DigiKey, and some 100ohm resistors. The only advantage I guess my setup has is the I am able to control how many amps the bulbs draw as a total package, I got to puick colors I wanted like red, blue, white, purple, yellow, and green, and with a future addition of a cheap PLC I can program the strings. I have all the dash lights, Running lights, Tail/brake Light, turn signals, and over 50 accent lights all over the engine and bike. All costed me under $30 and a few days wiring. I have a test button on the box that lights up all the lights. with all over them on the total draw is only 2.4 amps and I can light up the engine, wheels, fenders, and road in any color I want.
-
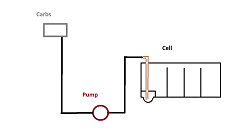
Thanks Great white I was not sure if the Y would keep the tanks (=) because the fuel outlet is on top of the tank with a copper hose running to what I can best describe as a hump @ the bottom. There are some plates in it with 3/4in holes @ the bottom. The low spot has a 4x4 box around it with 1/2 in holes on each side. I will take pics of the install when its done looking clean and not a hodge podge experiment. The pump is the stock pump and location even the bottom of the cell is higher than the pump still. If I cant get the cells to equalize with the top feed I will just have to braze on a fitting in the hump @ the bottom. This will all enable me to keep riding once I get the tank off. I still have no car and cooler weather is sneaking in on us. I will ride untill snow hits the ground and then I am limited to work and groceries on my road legal Pit bike.

-
That was what my 1st though was to run the feed lines with = length hose to a Y to under the stock tank (it will be removed once testing is positive.) Then feed it to the pump. What my fear was that one tank would drain all the way causing air to get sucked from an empty tank. I guess next weekend I will install the other cell and the Y setup like you suggested but add a shutoff valve b4 the Y on each line just in case. I would hate to have to only run one tank and then manually switch over after only 2.5 gallons. that would mean I would have to stop and turn valves every 60-80 miles to keep moving. Looks like shutoffs and a Y are the plan for next weekend. I will post back after I go for a nice ride and see if the tanks draw (=)
-
Just a fast update. The top feed fuel cell has been in for over a week now. The fuel pump has no issue so far and just in case I got a back up from the Motorcycle Grave Yard and tossed it in the hard bag. Time to install the other one on the other side and work out how to connect them to equalize so one does not run dry and suck air. I was thinking about tapping the bottom of the tanks and connecting them with a 1/4 in copper line. But I fear the up and over the drive will still keep it from being = level under the highest part of the line.
-
Its been a week since I bypassed the RLU and installed LED head lamp. I feel comfortable now with the way I bypassed it. If your RLU is toast and you just have to have it let me know and I will send you this one. Please don't ask for it just to have a spare in that case IMO you should buy one. I am offering it free to someone in need to save em a buck.
-
FlyinFool Nailed it. I installed an aftermarket LED headlight and the RLU had a fit so it had to find a home in my miss. parts box. On a side note I was getting a non stop CMU warning for the Headlight and the brake light when it was working. After bypassing the RLU I had almost 2 amps less draw on the battery. Changing to LED head light gave me almost another 3 amps less draw. changing the marker/turn lights to LEDs dropped it by 3-4 more + almost 1.5 amps when blinker or tail brake light was on but cause a rapid blink so installed load resistors to slow it down and lost some of the gain. This will work until I solder up a low power solid state blinker relay replacement. As it sits with the MOD about I have dropped idle battery draw by 8-11 amps. I am also working on replacing my dash lights with LEDs by using $1 cigarette lighter usb adapter and LED and a 1/4 watt resistor.
-
88 venture royale Carb Jets
VerntureVet replied to VerntureVet's topic in Venture and Venture Royale Tech Talk ('83 - '93)
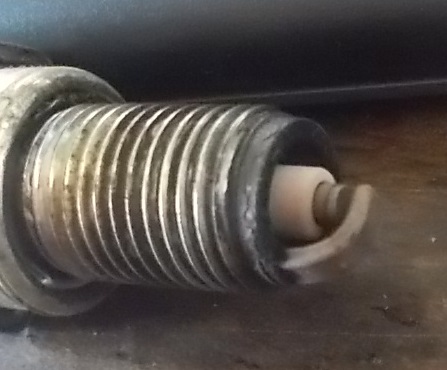
I agree it is a tad border line. I did a high RPM in 2nd geat @ about 60MPH and @ the same time I pulled the clutch and hit the kill switch. The plugs still looked about the same. So Great White if I read correct the main jet is a 125 would I be off in thinking a 130 or 135 jet would be the next step and then check plugs again? I think I found the part number for the stock jet but I can't find a nice table or excel sheet showing the jet sizes with part #s or even if all 1300's have the same jets P.S. I didn't add ram air so to speak it was the side effect or piping an intake out of PVC to the side of the motor to get into cooler air. it has to be ramming some air in @ speed the way I had it. For now I put the stock box back on. -
88 venture royale Carb Jets
VerntureVet replied to VerntureVet's topic in Venture and Venture Royale Tech Talk ('83 - '93)
Here are my plugs sitting idle. they looked the same if I kill the bike @ 1500-2000rpm. I have never been good @ telling with the plugs but this looks somewhat normal if not borderline leanish. What do you think? I'm not dead set on removing the air box with the battery moved there is enough room for everything that need to move from the front end except the Venture Cruise stuff. I was trying to thin out the airbox to make room for cruise vacuum stuff. if push comes to shove I will just extand the cable and hide it under the seat when the tank comes off.
-
It could be that its late and I am 1/2 asleep But I been digging for info on the 88 Venture Royale carb main jets and can't find what I am looking for. The local bike shop is more of an off the shelf trinket shop and the closest Yamaha dealer tells me the don't work on bikes as old as mine. so I turn to you all. To my understanding opening up the exhaust will draw more air threw the engine and cause it to run lean (less fuel). I thought more air flow would allow more pilot air making a richer (more fuel) running engine. I am also playing with the air box to get more room and as a result there is not only less restriction of air flow I am getting ram air. SO here are my questions Should I be looking to getting bigger main jets to get more fuel? Will restricting the air intake with say a plate make it run richer? What is the stock main Jet size? Please for the love of whatever entity you follow tell me what I can tell these people @ the bike shop to get me the jets I need. I read someplace that jets off V-Max and some Hondas are the same as in the 88VR1300 carbs. I would love to just walk in and say "Bill I need this XXX jet off this XXX bike. It's likely they have what I need sitting in there little carb jet box but its just labled for anouther bike, and Bill just don't know any better because he is just a guy tending a shop and not a real bike mechanic. Links to need info is fine. Thank in advance.
-
Not bike related but- Im SOOOOOOOOOO happy to hear this
VerntureVet replied to Eck's topic in Watering Hole
People these days are just not scared to do insane things even if they are not insane, because they have no fear. A friend of mine and I have CCWs but we choose to open carry. The CCW is just a technicality so we can have weapons while riding our bikes as open carry in Ohio is totally legal but having a loaded firearm on a motorcycle is not even if it is being open carried. Most local gas stations have no problem with us taking long pit stops and hanging out around the Ice machine outside as we eat our hot dogs. The manager has told us since we started hanging out the store has less loss due to theft. Now don't get me wrong we are not gun toting wanna be cowboys looking for an opportunity to fast draw our Colts and pump lead into some punk kid shoplifting. Nore are we vigil-antis. We are welcomed @ many stops we regular because just like the old west a criminal has some sort of fear when he thinks there is a chance some crazy fat bikers may just try and stop him from doing what he was thinking about. To clarify my mindset. If someone jumped on my bike while I was in the store and took off there is a 100% chance I would not pull out the Colt and try and shoot them as they drove off. However I tend not to worry about that happening because its not likely someone would take the bike of a man with a Colt strapped to his leg for fear I may. As less good people take advantage of there constitutional rights to protect themselves and there property. There are more bad people willing to take advantage of that without fear or the posse. There is a balance to it all and @ this point in our society it is tipping the wrong direction. -
Thanks guys!! The right side has been loose and slipping off since the day I got the bike and I just put a little set screw in it. So no issue there. I don't have a compressor but I did put a flat head on and the grip did come away and compress the foam stuff some. I suspect its glued on or maybe just sticking from being on for almost 30 years lol. I will try the air trick next time I am @ my pops garage. At least now I know I am not missing some kind of screw or something. The grips I got are 1" and the salesmen sold me some shims so it will fit the left side once the stock one is off. The right is also 1" and has the cable connects. My plan for that is to trim the part that would go inside the housing and just slip it over the stock 1" slide tube. I'll put up some pictures once they get here and I have them on. Thanks again.
-
Free Venture project 1983 - lost interest.
VerntureVet replied to john castaldi's topic in Paying it Forward
You still have this? -
Before I go over board and get out my Dremel I got me a new 1" left handle grip and 1" Throttle grip with some shims for 7/8 to 1in per the dealers recommendations. The salesmen said it would take some tweeking to get them on the 88 VR but anyone with mechanical and able to make minor mods could get them on. BUT HOW do I get the left side hand grip off without destroying it? I would like to save it in case I can't get these new ones to work.
-
Rustolium Aged Copper 1200 degree From Menards. The ridged thing on the side of the jugs and the ridges on the valve covers, and the ridges on the radiator as well as all the pin striping and various other things like the hand grips is 1/4 in copper foil from Hobby Lobby in the stained glass area set on with its stick back side of the foil tape lightly brushed with high temp rated epoxy. I also put on some 20thou copper plate on as many spots I could with ease like the plastic covers over the rear break and fuel pump. The paint is a pain in the azz to put on the chromed parts and and the exhaust pipes. Even the not chromed parts. You have to rough sand what you want to pain with ~220 and then smooth it out with 400. You have to get ALL of the old clear coat on the parts off down to the metal. Then you HAVE TO de-grease/wax and clean with a solvent. Once the paint is dry (1-2 hours) You will want to start to cure it. The engine does not get hot enough to get a solid cure on some parts just by running the engine. I used a heat gun set to 200 and kept it in the areas painted for a good 5 minutes then moved to another area. Let it cool and repeated @ 400. let it cool and then took the bike on a nice hour long ride. MOST of the pain held up good after that but there are a few areas that need redone to be perfect. I did the paint because I just finished making some Copper Sulfate Electrolyte for electroplating aluminum and steel parts. Once snow hits the ground (because I ride until the snow stops me) I will be pulling the engine to give it a good gloss black high temp paint job and fix my clunky shift pins. The parts that I like painted will get taken off and copper electroplated and treated for a more natural copper look.
-
Updated OP with current work done.
-
Sorry musta missed it I PMed you back. The plan is to put one on each side. Because the draw tube would be on top the tanks could never cross feed so one running empty could cause it to suck air. I figured I would put a shutoff valve on both run on one use the other as a reserve. Guess I didn't consider the ease of testing this would be as simple as connecting it and swapping a hose. Thanks for pointing that out sometimes I overlook the simplest concepts in my brain storming. As for long rides I have already done over 300 mile hops between stops. I have this nifty 5 gallon tank with a bottom of tank connection that fit in the upper trunk when it was on the bike. It just will not fit in the side saddles. I thought about making a mount for it to go behind the seat once I iron out these other MODS. Here are some pics of the bikes life cycle since I got it. http://www.venturerider.org/forum/showthread.php?109597-88-Venture-Royale-Bobber-Project this is the current look
-
In short I want to install the 2 fuel cells that when fully topped off are 2.4 gallons each. However the fuel outlet for the cells is on the top. I know the fuel pump puts out ~3psi if I recall so I was wondering if that was enough to draw from the top of the cells. I refuse to put the cells in the saddle bags with any other electrical as even venting the cells out of the box its still dangerous to have compressors and battery in the same closed area. So basically I moved the battery to make room for gauges and relocating the front cowling electronics. Now I want to move the honking ass tank and use the extra room to move even more crap around. There is a lot of crap in the front cowling than just needs a new home. P.S. I have already been asked why I don't just buy a different bike. more suited to my vision. My only answer is that it would not be the same just to buy it when I got this one so cheap and have all but $800 into it. I savaged just about every thing I have done so far.
-
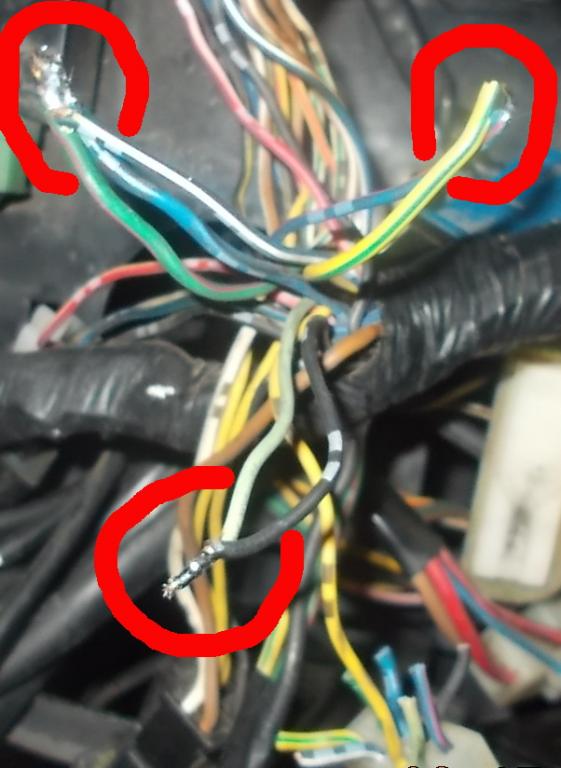
The title says (RSU) that was a typo I should have put (RLU) Other posts covered this but a picture says 1000 words. To bypass the RLU on the my 1988 Venture Royale I unplugged the wires and soldered them together as shown in the picture. This will give you a functioning low/high beam and will also push power to the High Beam indicator when you have High beams on. The extra wire left on the plug would goto the Headlight Out indicator on the dash and is no longer needed. As the best indicator of a burn out headlight it lack of illumination on the road. Tie Together the Green/White + Blue/Black + Blue/White Tie Together Yellow/Green + Blue/Red Tie Together Black + LightGreen This will allow the High Beam light to work and let the light dimmer on the handle bar change from between Hi and Low Beam The Yellow wire if for the White Head Lamp Out Indicator and is no longer useful.
-
You can check the valve clearance yourself follow the directions in the manual. I got my "88 not running with 60k+ and would put a good bill that it was never done on my 88. Yet the valves were in tolerance and did not need re shimmed I would shim the valves myself if needed and you feel comfortable doing it. The most pain in the rear part is not knowing what shims you need ahead of time and some of the shims run $30-40 from the dealer. Check fuel float level Then sync. your carbs and check for vacuum leaks. check that the crank vent hoses under the air intake are still connected. Believe it or not sometimes even a 1/2 hole in the air-box can make the 1300 have fits. Set your Pilot by turning it all the way in till it gently snugs and back it out 2 turns to start. Your popping noise on deceleration and load change could be from running lean. UnBurnt air/fuel in the exhaust is being ignited in the muffler due to high exhaust temps from a lean burn. Slow diaphragm movement can also give you them acceleration fits. While your in the outer carb checking the Diaphragm. Clean up the piston and make sure your springs are all the same length. This may also be a good time to install a washer on the Jet needle. You can use carb cleaner and open the carb drain as you spray threw the jets and other accessible orifices. If none of that helps then think about breaking the carbs down for a good detailed cleaning and adjustment.
-
05 V Star 650 Custom second cylinder not getting a spark
VerntureVet replied to jjven68's topic in Poor Man Tips and Fixes
The 650 Ignition looks pretty straight forward. Run do previously mentioned steps and check power to the coil. if you have power disconnect the ground going from coil to the ign. unit and run a wire direct to it. -
Carb Vacuum Ports
VerntureVet replied to AlbertaClipper's topic in Royal Star Venture Tech Talk ('99 - '13)
Jason's MOD I tried it on my bike after syncing my carbs and could not tell any difference other than a change in my exhaust sounded a bit chopped like I installed a mild cam. Mind you I am running an almost straight exhaust so I hear every change @ full volume. It rained all night last night and this morning was unseasonably cold had to put on a jacket to not freeze my hangers off. I went to get on the gas in 4th and bogged out under load lost RPM @ 5k had to go easy to get home. Checked the sync on the carbs with minor adjustments and put them vacuum tubes back to stock. Let her warm back up and the issue went away. Now for my run on about this. If you think about it We sync our carbs to get equal vacuum on the 2 cylinders. If you ever used a home made sync tube setup you would notice that when the carbs a in good sync that the fluid in the hose pulsates back and forth because the intake strokes on those 2 heads are back to back. Connecting the 2 ports gives the opposite carb a head start on vacuum but going threw that little hose there is not enough volume to really make a huge difference. V-Max engines do the same thing in a way with the V-Boost but it is done prior to the carbs and with a larger volume that can make a difference and then if I understand only when you are on the main jets under heavier throttle. I can see how maybe it would help if your carbs are slightly out of sync. Just my hypothesis. I would have to see a dyno sheet on the same bike to believe it help more than it hurts. An engine is designed to run a certain way. Although they may set them a little lean and detune them a bit for retail sale changing the design results in a balancing act. De-baffle your exhaust or run drag pipe (same concept) You gain some throttle response and high end power but suffer a drop in mid range operation. Counter act that by installing a simple toggle bold to break up the exhaust wave you get a little back but nor you lean. Jet up and you loose something else until you get it the way you want it. When the day is over just remember live with the loss to get the gain you desire. I never found my Drag - Touring - Cruiser so I bought 3 bikes........ -
05 V Star 650 Custom second cylinder not getting a spark
VerntureVet replied to jjven68's topic in Poor Man Tips and Fixes
Get you one of these or something like it to for a visual aid. Ignition Tester Verify cylinder compression is within specs via your service manual. Verify the seat for the plug is clean and free of anything that could dog out the grounding of the plug on both the plug and the head. You can tape wire around the outside of your plug socket letting an exposed piece of copper wrap around to the inside of the socket. Seat the socket onto the plug and put an ohm meter on the wire and make sure you have a good ground to the battery. Also check for -0- ohms from the plug base to someplace close to your coil. I have in the past found that some crap on the plug seat on the head had cooked on over time and caused a bad ground. Install a new plug after checking spark gap. Install Ignition checker on a working plug to make sure it works and to get use to how to read it. Move it to the suspect plug. No Spark = change the plug wire or swap it with one you have verified works on other cylinders. Check your wire routing and make sure its not getting messed with. Hard to tell with wires sometimes but if it works on another head it should be OK. Still no spark after that you will need to check the coil. Now you can unplug the coil and do the checks by ohming them out. Don't just unplug the suspect coil. Unplug them all. WHY? typical multi coil ignition systems will share a common Hot fed from the fuse box and the ignition Box gives the coil its ground when it is time to fire. You don't want to be reading threw another coil. I have in the past found a good checking/new coil not fire because of ANOTHER coil that did fire but was malfunctioning was bleeding off enough power on the hot side that the misfiring coil would not fire. If the coils all check out good connect them back up. Swap them around if possible and make sure the issue does not follow the coil. try more than on coil if your setup allows it swap 1 for 2 and 2 for 3 etc etc. A mini clamp on current doughnut connected to the hot on the coil could tell you if the coil is even getting a pulse but those can be pricey. The trouble with coil signals is that they happen too fast for a Digital meter to read the ground pulse. (RPM / cyl. = pulses per minute). An analog meter causes its own issue because it applies a small current to check for continuity. In the Electronics world we would use an oscilloscope. I use to have a contraption a friend made back in my MOPAR days that he made with a transistor and an LED but thats not helping you. If the misfire is still hanging consider this. 1988 Venture Royale xvz1300 has 4 coils. Three of the 4 coils get there ground directly from the Ignition box. But 1 gets it from the Ignition box and shares the same ground wire with the fuel pump control relay and the tachometer and my fuel pump relay was causing a misfire when I bought the bike. Link me the wiring diagram to your specific bike with the exact Make/Model/Year you have and I will have a look and see if I can point you to getting this fixed. -
If my cruise is on then my feet are stretched out on the highway pegs. I just drop alternating hands to my knee so as not to be far from the handle bars. No thats not me or my bike but thats about the position.