Flyinfool
-
Posts
13,152 -
Joined
-
Last visited
-
Days Won
7
Content Type
Profiles
Forums
Gallery
Events
Store
Everything posted by Flyinfool
-
Unfortunately the place I got my HID from (HID Country) started out as a great place,I bought 7 HIDs from them for various vehicles and they were all great. But they went down hill and changed to all China systems and started ripping people off till they went out of business, reopened under a new name but kept the poor practices and shoddy Chinese junk and again went out of business. Not sure if they have again reopened or not under another new name. Really a shame, they originally had great stuff. I did some research and it looks like they are open now as The Light Pros. I have no info on this new place good or bad. Only that when I entered the HID Country web address this place is what opened.
-
Unfortunately the place I got my HID from (HID Country) started out as a great place,I bought 7 HIDs from them for various vehicles and they were all great. But they went down hill and changed to all China systems and started ripping people off till they went out of business, reopened under a new name but kept the poor practices and shoddy Chinese junk and again went out of business. Not sure if they have again reopened or not under another new name. Really a shame, they originally had great stuff.
-
A lot of those LED adds still bother me. When they list the amp draw as a nice small number, and then list the wattage as a big number because many people equate wattage with brightness, but the numbers do not add up. One place they say 2200 lumens per bulb and another says 4000 per bulb. They say there are 3 LEDs per bulb, the LED that they are using draws 1.2A each, so 3.6A per bulb, The LED outputs light at 120° but they claim 360° beam pattern, yet the picture shows the 3 LEDs all in a row pointed the same direction mounted in a metal heatsink, Last I checked Scotty has not yet given us the formula for "transparent aluminum", for the light to shine 360° thru the heatsink. And now with telling you it is shipped, and then later telling you that it is not in stock. That seller is raising red flags. For those interested in all the technical dodo here is the data sheet for the LED chip they claim to be using. When a LED bulb supplier tells me which LED chip they are using, I always look up the specs. If the math don't work, then I have a hard time trusting the parts of their claims that I can not check out. The LED technology does exist today to equal and possibly exceed the output of a HID system. But I doubt that it will be found first in the bottom end of the price spectrum. I am hoping the LEDs actually do get as good or better than HID, before my 6 year old HID burns out. They are getting real close.
-
A new plate is 3mm (.1181 inch) thick. The wear limit is 2.8mm (.1102 inch) thick. Not much difference from new to worn out.
-
Mama, bring your tent stakes................
-
I am another one that never touches the petcock. With a full tank of fuel the fuel level will be above the float level in the carbs, So if the pump and float valves fail it could allow gas to drain thru the carbs. the overflows should let the gas drain out on the floor before overflowing into the engine. I would really hate to turn that thing, crack it without noticing the crack (because they are soooo easy to turn) and then have it fall apart on the road and leave me stranded with no gas and a tank that will not hold gas.
-
 I find it interesting that these are aluminum slides with a hard anodize coating, the OEM are plastic. Hard anodize is really hard and abrasive, I would worry about wear to the bore in the carb body. Gas is a lousy lubricant. Being a different material I think you would want to replace all 4 as a set, just so they are all the same weight and all the same diaphragm characteristics, and then should all have the same response time. The ebay add does say that there have been 53 sold, so someone has tried them.
 -
should I rejet? Maintenance Day?
Flyinfool replied to baaloo.phd's topic in Royal Star Venture Tech Talk ('99 - '13)
All bikes are welcome, this is about the people not the bike. If it is not a venture, you may have to put up with some good natured ribbing. -
Congrats! Let the fun begin.
-
I broke that same bone in my right hand, I was still a kid and broke it doing something stupid that I was not supposed to be doing, had I told parents I prolly would have had other broken bones from them...... It eventually healed, even though a bit crooked. The good thing was I learned to be ambidextrous and still am, always looking for the silver lining.
-
Clutch slipping has gotten worse
Flyinfool replied to Patmac6075's topic in Venture and Venture Royale Tech Talk ('83 - '93)
I seem to remember something about Barnett having 2 different springs for your bike, you want the heavier ones not the standard ones. -
Clutch slipping has gotten worse
Flyinfool replied to Patmac6075's topic in Venture and Venture Royale Tech Talk ('83 - '93)
It is pretty common to get the stackup wrong when you put it back together. Make sure that the parts are not 180° out of phase. There is only one correct way to put it in but there are 2 ways it can be put in. -
So how do you have the phone mounted to the handlebar, I was looking for a way to mount mine. None of the ways that I have looked at look secure, If the phone were to hit the road at 75 MPH there would not be enough left of it to bother stopping to look for it. It is built in to all newer smart phones that are running android. you may have to turn it on and do some setup, and give it permission to do what you ask, but it is there.
-
Brakes act like no pad
Flyinfool replied to snyper316's topic in Venture and Venture Royale Tech Talk ('83 - '93)
Describe acting like metal on metal, I have never had brakes metal on metal.........yet. -
How old are your spark plugs. These bikes really like fresh plugs.
-
My bike is always ready willing and able. I have started it in as low as 10°F. It took full choke and 3 seconds on the starter instead of the half choke and split second on the starter it takes in the summer. My bike will not start with no choke unless it is over 100°F, or the engine is still warm from riding.
-
Beautiful, absolutely beautiful...............
-
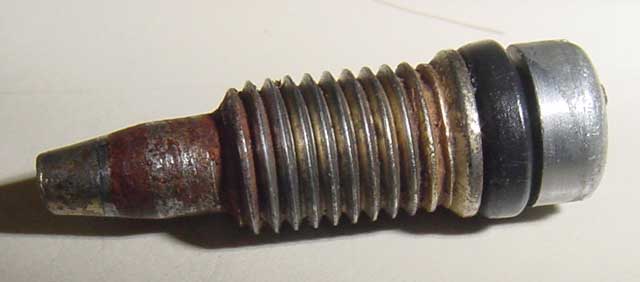
Here is the screw out of a junk carb. I can see where if your screws look like this that the mechanic might want to replace them. This one has definite rust pitting on the taper part where it seals. BUT then If it were mine and I could not find replacements, I would probably just clean it up with some emery paper and stick it back in there.

-
Yes I will cave an O2 sensor. it will be on the exhaust pipe of one of the front cylinders, just because they are easier to get off than the rear pipes so I can be on the bench to drill the holes and weld in a bung for the O2 sensor. I was also debating putting the O2 sensor on the collector so it will see an average of all 4 cylinders. But I do not know if there is room. But you still need to tell it what AF ratio you want under all of the various conditions there are several big tables to setup AF ratios based on rpm, throttle position acceleration deceleration engine vacuum. you want to run a bit leaner while cruising at a steady state but you need to go richer when you yank the throttle open. Yes you can just set all of the tables at 14:1 and it will run and be safe. but acceleration will be sluggish and gas mileage will be bad it will be popping out the exhaust etc. That is what all must be tuned in. Fat fingering an entry could be bad news.
-
Clutch Fluid replacement
Flyinfool replied to djadam's topic in Royal Star Venture Tech Talk ('99 - '13)
The exact same procedure also works for the front brake. -
Normally, the lighter the load the faster they blink. That is why people add the resistors to add more load to slow down the "hyper flashing" when LEDs are installed. I wonder if you may be having issues with weird internal circuitry in one or both of the LED bulbs? There are some bulbs that will not work on our bikes because the blinker system does not just turn off the power during the off part of the signal, but the bike actually grounds the bulb during the off cycle. Some of the 1157 LEDs have the two input leads connected together internally with just a very small resistor on the lead for the running lights so that when the turn signal is off and grounded it is effectively shorting out the LED part of the bulb, but there is just enough resistance in the system to not pop the fuse. I did a bunch of research on this problem a while back and the only solutions were to get different bulbs that did not have the internal connection (There is no way to tell if a bulb has the internal connection other than to try one and / or take one apart to see what is inside) or to add some diodes to isolate the bulb from the grounding. There were 3 different bulbs that I tested that did have the internal issue. One was from Autozone, and the other 2 were from ebay. Try putting in the front LED and the rear stock incandescent. If that works then try the rear LED and the front incandescent, maybe you can narrow it down to which one of the LEDs is causing your problem.
-
The engineer in me is leaking out, I lost count of how many times I have modified the design. There is always a better way to do it. It started out with the design being purely functional, but it was not nice to look at. I now have it looking much better but also a lot harder to make. For instance, the finned cover with the hole in the middle, It started life as just a flat piece of 1/8 thick aluminum plate. I added the fins just for the sake of appearance. this plate replaces the diaphragm cover on the carb so it is right out there and visible. I intend to make the cover black and then mill the edges of the fins back to bright, then clear coat to keep it looking good over time, should look much nicer that just a flat plate. Once I get the injectors, the injector will be sticking out through that hole in the plate, injectors are not very pretty so I may redesign the cover to hide more of it or see if I can come up with a cover for the injector, its wires and the gas line. Although I think I am going to use braided stainless gas lines just for the looks so I may not have to hide them. So far the design exists only in my computer and between my ears. My ears have been known to leak ideas out also....... As I mentioned earlier, this is a long term project, due to both financial and time reasons. Some of the parts I will have to buy expensive tooling to be able to make them. While the guy that designed the basic system has CNC to make the parts I am all manual machines so it will take a lot of time. My biggest concern is getting fuel mapping correct, to lean and the engine melts real quick. To save some cash I will be building the controller myself from a bag of resistors diodes capacitors ICs and other electrical goodies. The controller will be able to do both EFI and ignition. But this in its self will take a lot of time. As to if I will sell any or all of the parts, It will depend on just how much time it takes to make them, how much of a PITA it is to make them, and can I make them at a reasonable cost. I am expecting this conversion to cost me between $1500 and $2000 just in parts and materials alone, that includes nothing for all of the time it will take to make the parts that are custom to the application.
-
Some of those do look good, but I wonder about that much weight out on the end of a plastic fender. I have had the fender break and nearly lock the steering with nothing mounted on it, but then Wisconsin does have the second worst roads in the country.
-
Specifically which part number bulbs did you put in?
-
Clutch Fluid replacement
Flyinfool replied to djadam's topic in Royal Star Venture Tech Talk ('99 - '13)
To expand on what has been said. Not only is brake fluid an incredible paint stripper, it is also wonderful and making ABS plastic go away. One drop can make a 4 inch hole in the fairing or other plastic part. Cover everything with towels and plastic to catch any splash. If you should happen to get any brake fluid on a painted surface IMMEDIATELY wash it off with lots of water. Once you take the cover off of the master cylinder, only move the clutch lever very slowly, there is a tiny hole that if you move the lever to fast it will squirt fluid high up into the air and it will get on everything. Start by draining as much of the old fluid out of the master as you can. I use a paper towel to sop it up and wipe any dirt or sediment from the bottom of the reservoir. Refill the reservoir with fresh clean fluid. Place the cover back on, just to help prevent an accidental squirt. Put the clear tube onto the bleed nipple on the slave cylinder and run it into a jar with just enough brake fluid to cover the end of the tube. Now crack the bleeder open and slowly squeeze the clutch lever all the way to the grip, then while holding the lever to the grip tighten the bleeder then release the lever slowly. This should have pushed some of the old fluid into the clear tube. Repeat the squeeze open close release procedure until the fluid coming out of the slave is clear and clean. Keep a very close eye on the fluid level in the master, DO NOT LET IT RUN DRY or you will push air into the system and that is harder to get back out. Top off the master to the correct level and put the cover back on.