Flyinfool
-
Posts
13,152 -
Joined
-
Last visited
-
Days Won
7
Content Type
Profiles
Forums
Gallery
Events
Store
Everything posted by Flyinfool
-
 The bug is starting to nibble again.......... My Rem 700 ADL, Stainless Steel, 7MAG deer gun is showing its age. It has devoured thousands of rounds over the years and the throat is pretty well shot. I have been debating with myself whether I should replace it with a new one, or rebuild and accurize this one. If I rebuild it it will cost about the same money as a new one and it will effectively be a new gun. If I go new I can probably sell this one for $600-$700 to recoup some of the costs. It looks like new on the outside, But the group size had opened from 3/4 MOA to about 1.5 MOA. For most deer hunters this could still be the most accurate gun they ever owned. I have sold my "worn out" deer guns before and the buyer was always super happy with it. Rebuild would include; Recut bolt face to square it up. Recut lugs to square them up. Remove barrel and get a blank barrel to make for the gun, which would include cut taper, threads, crown, and chamber. A new glass stock, that would have to get aluminum bedding. Bigger recoil lug. Reface receiver face and locking lugs. New scope. Either way will be around $2K, and be a wonderful gun. What to do? What to do? What to do? What to do? I know, I know, If in doubt do both........... but........:mo money:
 -
please help, what would you do?
Flyinfool replied to made2care's topic in Venture and Venture Royale Tech Talk ('83 - '93)
Especially the TCI. The TCI has drain holes in the bottom that are now facing up and you could very easily fill it with water and destroy it. -
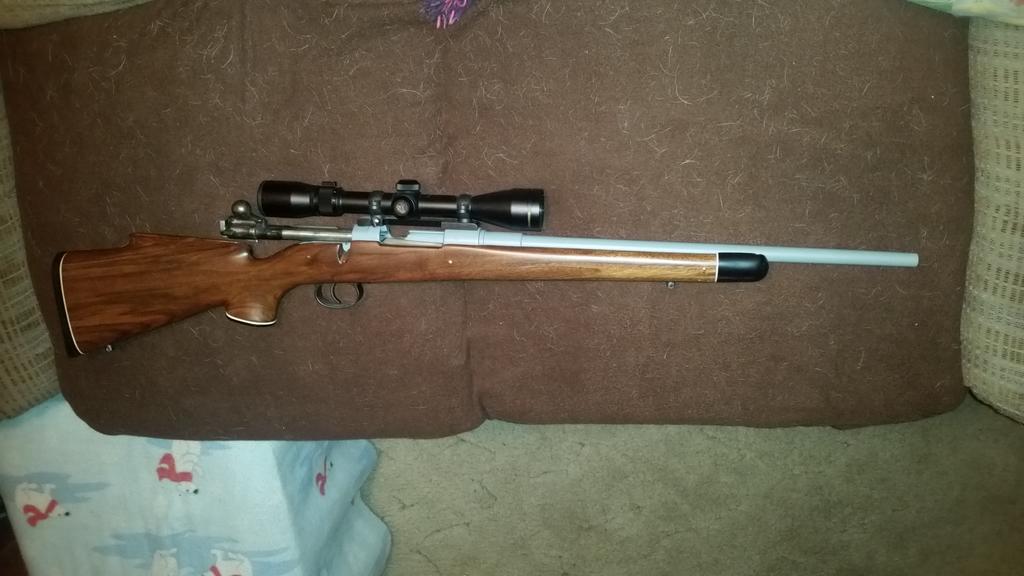
The crown is just a standard 11° target crown, nuttin special. I have a piloted cutter made just for doing 11° crowns. This was about the easiest part of the whole build. Pick the correct pilot stick it in the reamer and a few turns later, a perfect crown. I will see if I can remember to get a pic of it. Yes it is still a 6.5x55 Swedish. I load 140 grain bullets, I started out with the 140g Nosler partitions, only because at the time there was no 140g ballistic tip. This is a deer gun first and foremost and was a fun project gun second. for maximum accuracy the rounds can not be put in the magazine, they must be individually loaded directly into the chamber. This is because the Partitions have a very soft lead nose that is easily damaged feeding up the ramp. If I load the mag the accuracy drops to "only" 1 to 1.5 MOA. The ballistic tips are well known for extreme accuracy and low drag t o help retain velocity down range, that hard plastic tip also is very hard to damage and upset trajectory. The longest shooting range around here is 300 yards. So that is pretty much the farthest that I shoot anything under controlled conditions. I can play out to 600 yards when in the woods. But this gun has not been shot at more than 300. In a stock mil surplus 6.5x55 I tested several over the years and in everyone of them the NoGo chamber gauge fit in the chamber just fine with the bolt closed. After more research I found that there is also a "field" gauge. this allows for an even bigger chamber. In all of the guns I checked I only ran into one that the field gauge closed the bolt on. I recommended that the owner take it to a smith and have the chamber fixed BEFORE shooting again. When shooting ammo out of these sloppy stock chambers you could only get 1 or 2 or sometimes 3 if you were lucky reloads before the brass would split. Sometimes it split on the very first firing. The Small ring Mauser action is not very strong so loads have to be kept pretty light for safety. But since I made my own chamber right at minimum specs the brass fits nice and tight so I can load a bit hotter, and the brass only needs the neck resized for reloading. This certainly the most work that I ever put into any one gun with all of the custom machining. And then there is all of the special tools and holding fixtures to do all of that machining that had to be made or acquired. If you include all of the expenses it cost :mo money: :mo money:And it took me 3 years to do.
-
I just really hope that I never have to change the exhaust on my Pacemaker, I do kind of like that it runs silently...... These pipes sound really interesting, I will be curious to see how well they really work in the real world.
-
Some of us are just more different than others.
-
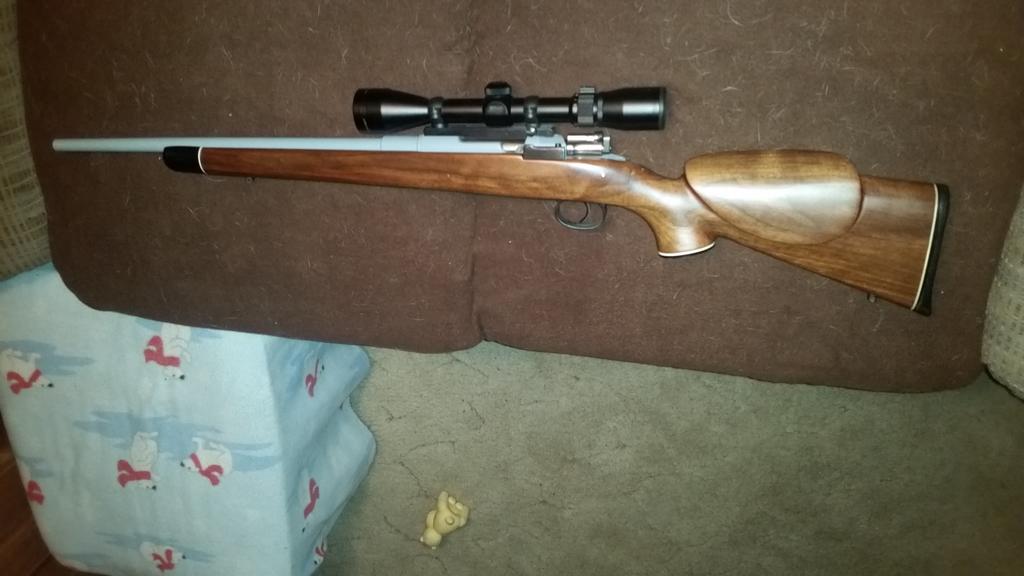
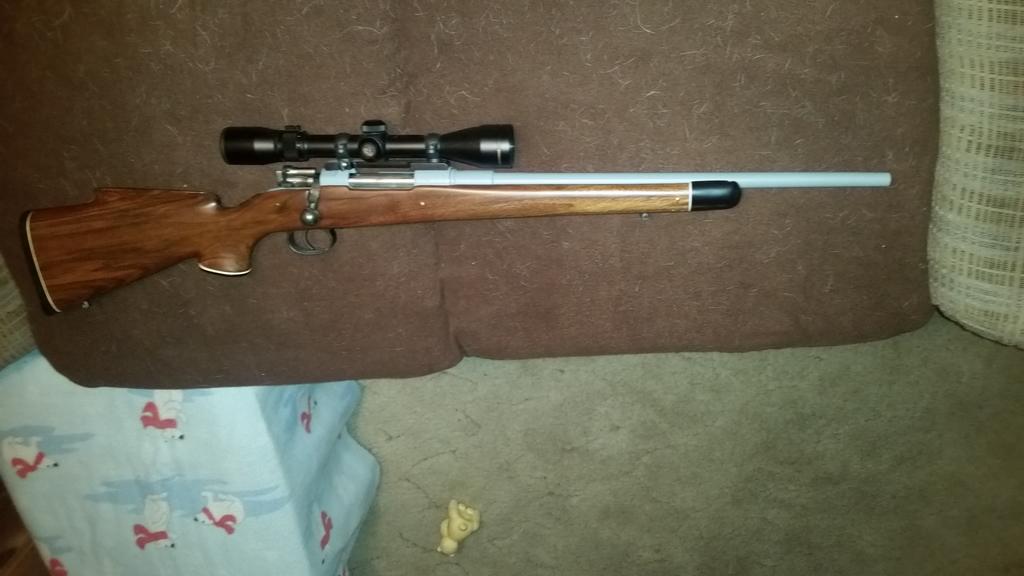
Well I figured that I had better get this next installment on the way. At the rate @cowpuc is drooling here ,,,,,,, Well lets just say there is already enough flooding in the Midwest part of this country. This one started life as a 1943 vintage Swedish Mauser chambered in 6.5x55. There is now nothing more than a couple of screws that are still either from the original gun or still in a stock configuration. I found an old cracked sporter stock for the gun and stripped it down to bare wood,, I then repaired all of the cracks. Those brass dots that you see all over are #4-40UNC brass threaded rod that was run thru the stock to reinforce all of the cracks. That is why they are not evenly spaced, they are structural not cosmetic. I then recontoured the space for the barrel to have a free floated barrrel and at the end I glass bedded the action into the stock, the final finish is all automotive, 2K PPG satin clear coat. I brushed on the first coat heavy with a foam brush to get it into all the pours of the wood, using the slowest drying reducer and hardener to give it maximum time to soak into the wood good. Once fully cured, I was able to sand it down to remove all traces of wood grain at the surface and not break thru the clear anywhere. I then sprayed the final coat of the same clear to get a perfectly smooth low gloss finish. Next part was the receiver, since this is the part that carries the serial number it is the part that is legally considered the gun. The first thing I did was to drill and tap for Leopold steel scope bases, This was tricky because those old Swedes new how to make metal HARD. When I first set it up the first HSS drill bit instantly melted when it hit the surface of the receiver, not even a scratch. OK so grab a cobalt drill bit, yup it melted the tip off too and left not a scratch. Soooo I had to special order a 3 flute solid carbide drill bit, As expected that drilled thru with no problem. Now how to tap this stupidly hard receiver???? A really good quality tap broke as soon as the cutting edges touched the receiver. So what I did was to place one of the burnt drill bits shank into the drilled hole and heat the drill bit up to a very bright orange heat until that heat was getting into the receiver a bit, then slowly reduced the temp of the bit until it was no longer glowing then let it all air cool to room temp and repeat for each of the next 3 holes. This process allowed me to anneal just the small area around each hole so that the tap could cut the threads. I unscrewed the barrel and tossed it in the trash. It was literally so rusted that you could not see daylight looking down the bore. The PO had put the gun back in its case wet from hunting in a snow storm and then left the case and gun in the garage until the next deer season. The next step on the receiver was to get it set up in the lathe and face the front of the receiver to square it up, and face the lands for the bold to get them nice and square. Then the bolt was next up, I did start with the original bolt, I loaded it up on the lathe and faced the bolt face, and the lugs to get them all squared up. I then cut off the bolt handle since when the bolt is opened the handle is pointed straight up, this will not work with a scope. so the handle had to be forged into a new shape and then welded back on at a different angle to allow operation of the action and still clear the scope. The stock safety was also not possible to use with a scope so it had to go. This meant changing how the safety worked as well as modifying the shroud to accept the new safety design. The firing pin also had to be modified to work with the new shroud and safety, the firing spring was also replaced with a lighter spring since I did make a significant reduction in the weight of the firing pin. Now the fun parts, I ordered a new Shilen barrel blank in 6.5 mm with a 1:9 twist. It comes as just a bar of metal with the rifled bore. I had to cut my own taper and do all of the threading to fit the receiver and then cut my own chamber, and crown the other end. This all took a lot more time than it did to say. It took many setups on the lathe before it was all done. For the trigger I put on a Timney adjustable trigger to give me a real nice clean break with no perceptible over travel, unlike the stock trigger that felt like pulling your finger thru a box of rocks and literally had about a quarter inch of travel before it broke at some random point. After all of this it was just a matter of putting all the pieces together. The gun once assembled was painted grey using a Teflon / epoxy finish that has held up perfectly over the last 15 years in the deer woods. The automotive clear coat finish on the stock has also held up perfectly to the woods and all of the cleaning chemicals used on a firearm. I am sure that I probably have forgotten a lot of the little things that went into the building of this gun. There are a few small details that I would like to clean up, like I never did finish making all of the bolt work pretty, there are still some visible tool marks and welds, but it shoots so good I hate to mess with anything. Once I got it all together and put the first 100 rounds thru for proper break in, this gun, IF I can do my part will shoot 1/4 MOA groups. It is not often that I am good enough to do that, but the gun is.

-
please help, what would you do?
Flyinfool replied to made2care's topic in Venture and Venture Royale Tech Talk ('83 - '93)
As you can see from your frame, a poor repair will still fail. Your new frame is possibly a poor repair based on the look of the welds. It is even harder to make a bad repair good than it is to start from scratch with a fresh never broken frame. I agree with the above that you should first contact the seller of the frame to see what he is willing to do about it. And then contact ebay, and what ever funding source that you used to pay for it. Ebay and PayPal are both very good about siding with the buyer. Credit cards are also pretty good about protecting you. BUT there are time limits where you will loose your ability to do anything. So don't think about this too long. Find another never broken frame to start from, like one of the frames that @cowpuc offered. -
Geeeez Justin. Glad to hear that you are still with us, and the docs are getting things under control. I just had a new tuner installed a week ago, they do got ways to get stuff under control. As for the flavorless food, Toss in a Carolina reaper and it will have instant flavor, and they are not bad for you. Let me know if you need a few, had a great crop last summer.
-
Depending on exactly when and where it is held, I would like to try to make it there too.
-
And that ticket was even bought just down the road from me............... But I aint saying nuttin............
-
The winning ticket was bought in the Milwaukee WI area. I better go check my numbers.........
-
I broke that same tab off, was no big deal to fix. I just cut out a new one from some scrap ABS sheet that I had laying around and glued it on with ABS pipe cement and reinforced with some fiberglass cloth applied with the ABS pipe cement. Was ready to mount after drying over night.
-
I am just dreaming of the bang toys that I will be able to buy tomorrow after I win powerball tonight.
-
Can you get that breakage done today so that there will be one more unlucky person out of the pool for tonight's power ball?
-
Heated grips or anything else heated.
Flyinfool replied to grubsie's topic in Royal Star Venture Tech Talk ('99 - '13)
LEDs everywhere will help a lot, Watch close on the headlights, Some LED headlight bulbs actually use MORE amps than the incandescent that you are replacing and put less light down the road in the process. Having lots of extra lights all over will also eat up some amps. Make sure that all aux lighting is on switches so that you can turn it off when you are using heat. If you go to a High Output stator, you should really match it up with a High output Regulator rectifier. The bigger battery will help at a stop light but you really do not want to be running off the battery while riding, so the bigger battery does not really help for riding. -
While the D.E. 50 is on my list to replace, just because it was so much fun to shoot. A new set of reloading dies for the 50AE is also VERY expensive. In the meantime the 50S&W was invented, So now I am a bit torn between the two. I have not priced the dies for the S&W 50. I know that the "logical" solution is to just get both. But right now neither of them is anywhere near being in the budget. I "need" a new deer hunting rifle first.
-
please help, what would you do?
Flyinfool replied to made2care's topic in Venture and Venture Royale Tech Talk ('83 - '93)
Just a tip on your shop crane, I have the same one. I replaced the 2 bolts that hold the vertical to the base with the same size as all of the other bolts, then I welded all of the nuts to the crane. now it can be quickly assembled or disassembled with just one wrench. Mine has to be stored in a corner of the basement but then hauled up the steps and outside to use. This makes it a LOT more convenient. I also replaced the bolt for setting arm length and bolt for chain attachment with pins and clips like what are on the folding legs. This also makes it a lot more convenient to use. I then made a holder for the pump handle so that it has a place to live. -
For hand gun deer hunting my first was a Colt Anaconda 44 mag with 8" barrel, all stainless and a red dot scope. After a while that got upgraded to a Desert Eagle in 50AE, and that finally upgraded to the 7mm-08 that I showed earlier in this thread. Unfortunately when times were really tough I had to sell the Colt and the Desert Eagle. I really liked that Desert Eagle a lot, a replacement is back on my wish list. It was also my favorite sleeping buddy while camping in bear and wolf country. That 50AE could launch 325 grains at 1800 fps.
-
It could even be that some docs will prepare you for worst case and then you can be pleasantly surprised latter on. Or I am sure that there are some that will do a complete reinstall needed or not because it will pay more and vacation time or Christmas is getting close.
-
I am also a reloader. Reloading can save you money. I can often buy cheap factory loaded ammo for less than I can buy empty brass. So when I get a new gun I buy a buy a couple hundred rounds of the cheapest ammo I can find. By the time I have used up that cheap ammo to break in the gun, I will now have a small pile of empty brass for reloading. I almost always use the trigger puller to get bullets out of the cases. With reloading, premium rounds are very expensive, I can hand load using premium components to create a round that is tailored exactly to MY gun. If you are loading for just cheap blasting ammo it is hard to actually save any money. The savings come from making quality rounds. If you buy something like the RCBS Rock Chucker Starter Kit, it will come with nearly everything but the dies to get you started. Then you can upgrade pieces as you learn what features you would like on things. After 30+ years I still use that rock chucker press. I have accumulated dies for ~15 different calibers. Start out by buying one or more reloading books, (the rock chucker kit comes with a Nosler book so get different ones) you will need then anyhow to have safe recipes to load, most of them have a wealth of info in the beginning of the book explaining exactly how a round works and WHY you need to do all of the steps that you do. You will want an area that is cool, dry and free of distractions for your reloading area. cool so that it is comfortable, dry because you do not stuff to rust and the powder and primers do not like humidity, and free of distractions because mistakes can be VERY dangerous, you do have to pay attention to what you are doing. Many rounds have room in the case for a double load of powder, firing this could blow the gun apart right in your face. If you forget to put powder in a round, the primer will move the bullet out of the case and into the barrel and the next round would be going into a plugged barrel, also not good for you or the gun. It is not hard, but you do need to pay attention to what you are doing. I also make it a point to NEVER remember a loading, I have all of my favorite loads written down, If you remember a load and mix up details from 2 different loads, bad things can happen. It is easy to mix things up as you load for more different calibers that use similar amounts of powders with similar names.
-
It only looks a bit like a 1911, they are very clear that there are only like 3 small pieces that are interchangeable with a 1911 and it can NOT be converted to any other caliber.
-
Now just for giggles I did download the installation manual and setup manual for my tuner, the ones made for the doc. In that manual it does say that for battery replacement the entire unit is to be removed and returned to Medtronics for evaluation, the leads are to be tested and can be reused if they test good, and the ends are compatible with the new tuner, then the new tuner is installed in the existing pocket and the hole sewed back shut. This also agrees with what my Doc told me. Of course each person has their own unique situation and your requirements may be different than mine.
-
I also wondered about making them rechargeable thru the skin. The tech is certainly around and many products have cordless recharging, like tooth brushes, cell phones and such. BUT then the engineer in me wakes up and the only reasons that I can come up with is that rechargeable cells have a much lower power density than non rechargeable cells. In other words the single use cell that is in the tuner may last 10 years, but a rechargeable one with the same electrical capacity would be sever times bigger, or a rechargeable that is the same size as the non rechargeable would need to be recharged a lot more often, like every 2 or 3 years. The whole pacemaker would also have to either be made bigger to accommodate the charging circuitry, or the battery be made even smaller. Rechargeable batteries also have a useful life. There are not many that will live much more than 10 years before they need replacement anyhow. Then there is the charging its self, A phone that uses wireless charging can take over night to charge and has to be very close to the charger. SO to charge the tuner you would need to wear something that would hold the charger tight to your skin for many hours. Another issue is that the new tuners like mine, are immune to strong magnetic fields like an MRI. The wireless chargers use magnetism to transfer the energy wirelessly. The magnetic shielding of the tuner would prevent that. Now that I have put this all in writing, I can see where it may just not be practical to to make a rechargeable tuner. As for replacement time, I was told that the new one will go into the exact same spot and the old one. When that time comes. AND in many cases they will reuse the wires that are already installed in the heart. So far the score is 2 awake and one sleeper.
-
please help, what would you do?
Flyinfool replied to made2care's topic in Venture and Venture Royale Tech Talk ('83 - '93)
WAY BACK when I was racing stock cars, at the beginning of the season during the tech/safety inspections they always checked the thickness of the tubing used to make the roll cages. They did this by drilling a 1/8 inch dia hole and using a short rod with a hook on the end to reach in to hole and hook the back side of the wall and then measure how mush rod was sticking out. This may be a way to check to see how much internal corrosion you have in that area. The frame can rust out from the inside and still look wonderful on the outside until it fails. I never looked close at a naked frame, As long as it is out and naked how hard would it be to completely seal it so that there can be no internal corrosion. Whenever I build something structural I always seal weld everything to prevent corrosion from disassembling it over time. If it is not appropriate to seal weld everything air tight I will at least fully caulk it to get as close as possible to the same effect. If no Oxygen can get to the bare inside metal then further oxidation is not possible. -
Well ya know Puc, I can not make changes to the nozzles right now since they are way up at the top of the machine and for the next month I am not supposed to raise my arms above my shoulders. That means that the IMP CYL choke tubes will have to stay in and they will have to remain pointed due east. But I will at least see what I can do about the part of "let her rip". Hey Puc (and others with tuners also). When they did mine I was wide awake thru the whole thing, just a local at the site where they were carving. So I got to make comments all the way thru the procedure. There was 5 or 6 times that I had to tell them to use more numbing because they were starting to cut outside of the numb area. (DANG those scalpels are sharp:scared:) The docs were also quite surprised when I said "I felt that" as they were screwing the wires to the wall of my heart. The heart is not supposed to be able to feel anything. It was not pain that I felt, It was a sensation like you would expect from a pin prick but it was dead center in my chest. I am just curious how common it is to be wide awake while someone is carving on you and messing with your ticker.