Flyinfool
-
Posts
13,152 -
Joined
-
Last visited
-
Days Won
7
Content Type
Profiles
Forums
Gallery
Events
Store
Everything posted by Flyinfool
-
There was a home near me that recently had a rummage sale. They put out a sign on a main road that said TOOLS RUMMAGE, they were swamped with buyers and most was gone in a weekend. They had signs out for a week before the sale to plant the seed into the minds of all the guys that drove by. No nothing got top dollar, but it all went away. lots of package deals. Like a tool chest was sold full of whatever was in it, if someone wanted to cherry pick a couple of items out of a chest it went for top dollar. It is the package deals that will get rid of the small cheap parts. I had to make several trips there with my truck ........
-
I thought I remember Bob buying a Marks collector for Blondie a few years back? If that is there somewhere that would be a selling point.
-

Not MC, but fun for the gearheads, Surface Grinder build.
Flyinfool replied to Flyinfool's topic in Watering Hole
So lets see, bearing 149° and range 546 miles....... Sorry cowpuc, you might get some fallout from this one, you are not real far off the trajectory. -
Whats a little "a" among friends? So lets see now nozzle bearing 202.53° range 439.57 miles........... @cowpuc might not even get any fallout from this one.
-
Not MC, but fun for the gearheads, Surface Grinder build.
Flyinfool replied to Flyinfool's topic in Watering Hole
@cowpuc I guess you will know the answer to that in just a few short months. Yesterday was the last time this year you will see a sunset after 8:00 pm, winter is coming....... @Argo The handle spins on a pin that is pressed in and peened over into the wheel. I am not sure if I can or want to remove it. It might be easier to make a removable guard for the wheel. The impact of the handle is something that I had not really given a lot of thought to. Now that you mentioned it, I will have to give it some more thought.
-
Not MC, but fun for the gearheads, Surface Grinder build.
Flyinfool replied to Flyinfool's topic in Watering Hole
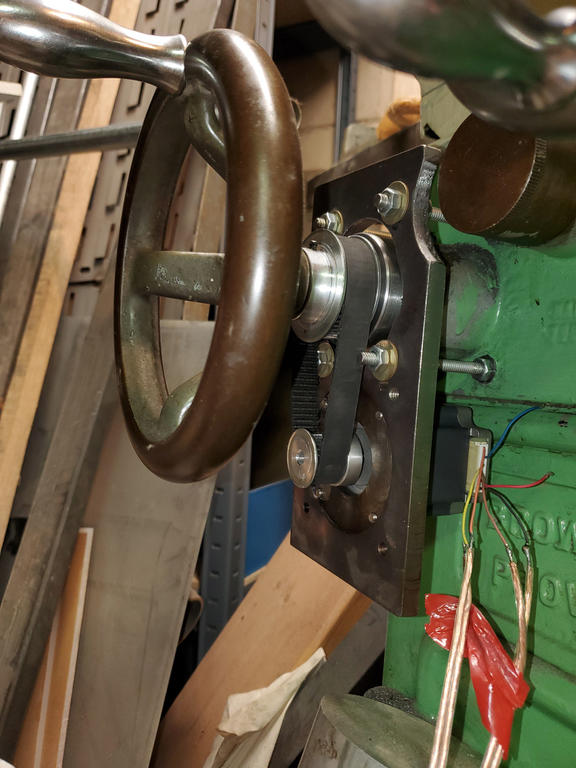
We have more progress. I have the stepper motor and the belt drive all mounted up on the grinder. Plugged in the electronics I built earlier and the table even moves back and forth now. WOOOOOO HOOOOOO I still have to mount the switches for the table reversing. Right now I am just holding one switch in each hand and clicking to reverse direction. But I just had to see the table move under its own power. There are still some issue to sort out. The motor that I have, the ones I got for free, is not quite enough torque to do the table reversing. If I slow the motor speed down to a crawl then the motor can do the job. I am still playing with various setting in the electronics to see if I can up the torque enough without loosing any speed. It is real close to being enough. Remember these motors are different, the peak torque is holding at 0 RPM and the torque drops as you get faster, Opposite of "normal" motors. I did drill and tap the mounting plate, while it was all set up in the milling machine, to be able to mount the next bigger size of motor if needed, so there is also that option still easily available. But that bigger motor option cost more money. But at least we have table movement. That is a big step in the right direction.
-
Reserve lighting unit?
Flyinfool replied to s.tyler58's topic in Venture and Venture Royale Tech Talk ('83 - '93)
Cracked solder joints on the circuit board of the CMU are fairly common. I would guess that this is your problem. The headlight wires that run thru the dash are for the CMU to be able to monitor the amps going to the headlight, once you bypass it the computer sees this a a bulb out and lights up the warning. There are some threads with good pics on how to bypass the warning on the computer board. You also may need to do the CMU bypass if you put in LED or HID headlight. The CMU also monitors the High beam, Low Beam, Tail lights, and Brake lights. If you have any intention of ever going LED then you will need to jumper all of the monitors to be able to avoid bulb out warnings. -
On my 88 I had to take it to a pint store to get color matched, Your paint is 31 years old, it no longer matched what the color code says it should. The paint store was able to match the fading that had occurred over the years so the new paint was undetectable. To really hide the repair you need to put a new coat of clear on all the parts that are nearby so that the shine will match. OR Once you have the new panel all painted and cleared then scuff sand it and the mating parts with 1000 grit wet and polish it back up, this will give everything the same shine.
-
Bouncy carb slides
Flyinfool replied to kansa737's topic in Venture and Venture Royale Tech Talk ('83 - '93)
No it is not normal to have one slide bouncing, they all should be bouncing. Since you say they all move freely, I would start by checking your diaphragms for pin holes. If no one has already replaced the diaphragm cover screws, there is one security screw on each cover. Harbor freight sells a cheap set of security screwdriver bits that will get that one out. Then replace all the screws with Stainless steel hex socket head cap screws to make the job much easier next time, Murphy says that if you make it easy for next time that there will never be a next time. -
Don I am a moderator on a Chevy truck forum, we recently went thru the spam attack thing. At one point the spam got so bad it almost permanently took the site down. We were in the same boat where the only way to get it under control was to make things less convenient for the members. In the grand scheme of things the members understood and were willing to live with the changes to get rid of the spam. saddlebum Of the 4 puters I have at work 3 of them are XP PRO and one is still on NT. At home I have 4 puters, the 2 I use the most are on XP Pro and the other 2 are on WIN 7. People would be surprised at how many major corporations are still running XP due to its stability, and how many things with embedded software that you buy to day still have XP as the base OS.
-
I was never silly enough to leave XP. As I type this on my 20 year old laptop.
-
Not MC, but fun for the gearheads, Surface Grinder build.
Flyinfool replied to Flyinfool's topic in Watering Hole
Thanks Sly, The machining hobby is one where one will spend hundreds to make a part that they could have bought for 20, and love every minute of it. It is usually not the finished part that is the goal, it is the journey to get there. Kind of like motorcycles, it is not the destination, it is the getting there that is fun. -
The bench has gone to a new home.
-
Not MC, but fun for the gearheads, Surface Grinder build.
Flyinfool replied to Flyinfool's topic in Watering Hole
Well I was delayed again, had to deal with dad going into hospice and finally passing and then the funeral stuff. That is all behind me now and it is time to get back to life. I did make the mistake of working on this some while all this was going on, my brain must have not been functioning properly because 2 of the holes in the stepper mounting pattern are drilled and tapped exactly .100 off from where they should be. SO now my choices are to slot those 2 holes and just use a screw and nut to attach the stepper, or weld the holes closed, clean up the weld, anneal the weld, and then drill and tap in the correct spot. I am leaning toward just slotting the 2 offending holes since once the nuts are on, no one will ever see the slots and this will be a LOT faster. -
PCW Clutch upgrade
Flyinfool replied to DaNetFlunky's topic in Royal Star Venture Tech Talk ('99 - '13)
As mentioned, if you replaced the half disc with a full disk, the friction zone will get a lot narrower and be moved out toward the beginning of lever travel. It only takes a couple good days of tooling around in heavy city traffic to teach your fingers the new clutch engagement point, after that you will not even notice it much. -
PM answered.....
-
Yes I still have it.
-
GONE! I have an all stainless steel workbench with a shelf that is mounted on casters. It is very sturdy. I will give it free to any member that is willing and or able to come and get it. I can not ship it. It is located in Cudahy WI 53110. I can help get it out of the basement but it will take at least one more good strong person to get it out. If no one wants it I will cut it up and put the metal in my stock rack. I need the space it is occupying for my new tool chest. For me right now it is just a horizontal surface that collects stuff. The dimensions. 48" Long 31.5 wide (I had to cut it down to get thru my 32" door) 33.25 tall Right now I have no room to get any decent pics, but then the price is right.
-
clutch mystery
Flyinfool replied to saddlebum's topic in Venture and Venture Royale Tech Talk ('83 - '93)
I am thinking that you have 2 distinct and separate issues that both happen to be heat related which makes it look like they are tied together. I am still thinking on the clutch part so start with the electrical. The gear indicator switch goes to a 6 pin connector. Get the bike hot so that the neutral light is not working. Then test the light blue wire to see if there is 12 volts on it. If there is then connect a jumper from the light blue to ground to see if the light comes on. If it does then you have a bad ground at the neutral switch to fix. It could be that once it gets hot something is expanding in the switch and opening a connection. If there is not 12 V at the light blue wire then you will have to start following that wire back to see where the break is. Do you still have the glass fuses? -
I mounted my driving lights to the original horn brackets, I mounted a Bad Boy on each side to the saddlebag crash guards. I used purchased chrome handle bar mounts to make the attachment. Worked great. 2 is better than one. I started with one and then a year later I upgraded to a second one. I ran them both off the same relay so it was really easy to add the second one. If I had not sold the bike I was going to upgrade to train horns, a tank and a compressor running at 200 PSI.
-
That is like the trailer that I worked, the factory wiring was a disaster so I stripped it all off and started over. All those crimp connections are issues just waiting to happen when they get wet and start to corrode. It will be faster and cheaper to rewire from scratch than to fix everything that is there.
-
I worked on a timeout for a member once, the factory wiring was horrible, ALL of the wires were red with crimp splices everywhere. I took it all out and started over and did it right. Are you saying that the trailer is wired as a 4 wire with backups or the testers were for a 4 wire with backup. The one that i worked on also had the turns wrong but the bike side was just wired to match so I had to find and fix that too.
-
His time has come.
Flyinfool replied to Flyinfool's topic in Inspirational, Motivational, Prayer Requests, Etc.
Well our prayers have been answered, Dad passed peacefully this morning at 8:00am, with My Mom and all 5 of his children around him. Yes we all already miss him a lot, and will continue to miss him a lo for a very long time, but we all are sure he is now in a much better place, and all of the pain and anguish are gone. -
My dad was moved to Hospice on Wednesday 7-16, Today at 1:30 am we were all called in because they felt his time was very close. It is now 8:40PM and we are still in vigil with Dad. He is now down to taking 5-6 breaths and then stops breathing for a full minute. With every stop we are praying that it will be the last. Would appreciate your prayer and good thoughts that Dad may very soon be free of the pain and suffering. My Mom and all 5 of his children will be at his side till the end.
-
Not MC, but fun for the gearheads, Surface Grinder build.
Flyinfool replied to Flyinfool's topic in Watering Hole
I now have the mounting plate nearly done. The original mounting holes were drilled with a #7 drill bit so that they would work as drill bushings for the drill and tap of the machine, they have now been opened up to 1/4 by 1/2 slots to allow for belt tightening. I just have to open up the hole that the machine shaft goes thru. I initially made it to match the shaft so that I could use the plate as a drill guide for putting the mounting holes in the machine. Now I have to open it up for the machine boss and the spacers that will line everything up. Size and finish is not critical and no one will see it once installed, So I will just use around a 2 inch hole saw with 2 holes spaced 1/2 inch apart and clean up the points with an end mill to make it a 2 inch wide x 2-1/2 long slot to match the mounting slots, and call it close enough. Then I can start with mounting the motor to the plate and the plate to the machine. Once I get that done I can take the final measurements for the length of spacers that will be needed to finish the stack up on the machines table drive shaft. For the motor end of the plate, I drilled and tapped mounting holes and nose relief for a NEMA 23 on one side of the plate and a NEMA 34 on the other side of the plate. Just in case the 23 is not strong enough to do the job. It was a lot easier to add the relief and hole for the 34 as long as it was all set up and indicated in on the rotary table. T It has been slow going, temps are supposed to be pushing 100°F with super high humidity (dew point hitting 80°F) for good measure. I am old and can not tolerate that kind of heat anymore. It is supposed to be cooler next week. Pics of the plate will be coming as soon as I can get that last hole done and some paint squirted on it to match the paint I used on the rest of the machine. OR maybe I'll just clean it up and use some gun bluing on it. I did machine all of the outside edges just to true it up. I could slap it on the surface grinder to make the front pretty and then just leave it looking like a ground surface. Hmmmmmmm........... decisions, I have never had any artistic flair as to what would look good. This plate is steel, if it were aluminum I would leave it plain. I just happened to have a chunk of 3/8 thick steel plate laying around when I started this, and no aluminum plate laying around.