garyS-NJ
-
Posts
592 -
Joined
-
Last visited
Content Type
Profiles
Forums
Gallery
Events
Store
Everything posted by garyS-NJ
-
Aux led lights
garyS-NJ replied to garyS-NJ's topic in Venture and Venture Royale Tech Talk ('83 - '93)
Djh3, i think thats a slightly smaller and lower power light (older tech 10w). But I bet they are good for seeing potholes around town. I wanted something to see the road surface at highway speed. Didn't do that run the other night and doubt I hit the mark.. -
Aux led lights
garyS-NJ replied to garyS-NJ's topic in Venture and Venture Royale Tech Talk ('83 - '93)
And cimmer, PIAA makes good stuff. I forgot about them but was considering their housing for an hid some time ago.. $300 pricey for those 6w spots but I bet I'm loosing 30% of my available light with the black tape cut off shield. I'll watch the PIAA video later but do they have a high a low beam control? (So that's one 3w led for the low and both for the high?). Problem with rear facing led is you can't sink enough heat from high power lights. -
Aux led lights
garyS-NJ replied to garyS-NJ's topic in Venture and Venture Royale Tech Talk ('83 - '93)
The brackets are angle aluminum. I had to shave it to fit next to the upper fairing and counterbore the top holes and clearance the upper side mount. And needed longer bolts with a Phillips or Allen for that clearanced upper bolt -
Aux led lights
garyS-NJ replied to garyS-NJ's topic in Venture and Venture Royale Tech Talk ('83 - '93)
Hard to see in that pic but my light has two Allen bolts mounting light pod to the tube mount half. The single bolt mount would allow rotation to aim. -
Aux led lights
garyS-NJ replied to garyS-NJ's topic in Venture and Venture Royale Tech Talk ('83 - '93)
Great adventure- no shadowing as the beam is very tight as evidenced by the light shot with two spots mounted (& that yellow light is the headlight.) I think rather than caliper mount it's best to mount spots high up and angled down at the road. There is at least one set of hid projectors out there for bikes with a movable window inside to have a low beam cut off then high beam (else you can buy the fixed high beam or fixed low beam). Somebody bought the company that I bought those hids from and I really like those lights.. oh and BTW if you buy spots like mine , look for the ones with a single bolt mount of light within frame to allow side to side aim this way you could mount them on the lower legs or maybe fork tubes -
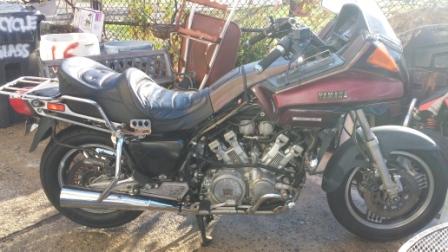
I ride a lot at night and feel I can never see enough.. so I want more light. In this quest i just added some ebay Chinese led motorcycle spots (think I got them from a US reseller for about $40/pair. They are advertised as 125w but 15w actual power and actually ran at 11w with a 12v supply (will probably run proportionally hotter around 14v). They are tight spots (about 15 deg) & I bought them with plans to light the road forward (one beam a little forward if the other but I didn't achieve that yet). Test rode last night and I'm happier but would like a little more light. And I added a 3/4" wide strip og black electrical tape across the bottom to keep spill out of oncoming traffic eyes. I mounted to my frame so I can't point light with my handlebars and would like more flood light near in do thinking a small flood on top of the fork brace. But big picture I really want more light up front like the newer bikes with led headlights.. but those led headlights are mad expensive and I haven't found one to fit my oem rectangular light mount. I did get enough light on my 78 cb750f adding a pair of aux hid projector pods running at 35w each. Ideas?? Links?? I'd like not to add a lightbar and defiantly not incandescent lights!!!http://images.tapatalk-cdn.com/15/12/01/03e5c66cdff5e0a0965ba4cd0c3d974f.jpg http://images.tapatalk-cdn.com/15/12/01/16ed9ac0136a905a6038af9493c97dcf.jpg http://images.tapatalk-cdn.com/15/12/01/ded0c246cab18bccf3e164c859026978.jpg http://images.tapatalk-cdn.com/15/12/01/bad2b8dbbf521200a12ba6bd19405de7.jpg http://images.tapatalk-cdn.com/15/12/01/2cc746445be113f48ddabc136642d0b6.jpg
-
I have a 76 Harley FL i bought with 2" over front tubes and it has 2" spacers on top of the springs.. think I put progressive springs in there many years back.
-
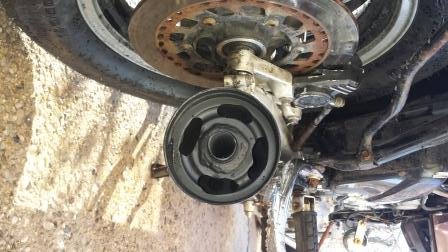
Nice work Frankenstein in your brakes. Cam you talk more on your antidote work? My bike sometimes feels a little funny on bumps in turns like the front wheel axel shifts and I think antidives.. I resurrected this bike after PO let it sit and haven't touched the front end or suspension. Much better now after some riding with new tires... anyway looks like a pita to get the fork tube nuts off to change fork oil or springs... fairing come off?? & your nuts in the antidives keep it in antidives mode (like brakes are on) but it OK for riding? Anyone else do this with or without progressive springs? I used a 87 front master and split my brakes and front still a little weak
-
Left handlebar aux switches
garyS-NJ replied to garyS-NJ's topic in Venture and Venture Royale Tech Talk ('83 - '93)
Haha thanks. I found the black common and the yellow to rocker and orange to the momentary.. I used the rocker to drive the pair of leds -
Left handlebar aux switches
garyS-NJ replied to garyS-NJ's topic in Venture and Venture Royale Tech Talk ('83 - '93)
http://images.tapatalk-cdn.com/15/11/30/139359fda251c3afd7d171dec1a735f4.jpg -
Left handlebar aux switches
garyS-NJ replied to garyS-NJ's topic in Venture and Venture Royale Tech Talk ('83 - '93)
Awesome. Idk why I was too lazy to check the schematic last night. Guess just excited and time pinched. The aux lights are low watt led (actual 12w each) & those oem wires are twice the wire pigtails coming off the lights. But Chinese leds typically undersized wirehttp://images.tapatalk-cdn.com/15/11/30/885752da8bb4a69ade7e76c49ecffca9.jpg -
On my '84 xvz12d Royale there's a pair of aux switches on the left handlebar that don't seem to control anything. I'd guess they were for a stock light bar or something because the switches look very oem add on. But the top switch is a rocker and the bottom switch is a momentary on?? See pic. What are/were they? Theres 3 wires (orange, black, yellow) going from the switches down the handlebar cover to the back of the headlight. like to use the rocker for a pair of aux lights (then maybe the momentary for an air horn?)http://images.tapatalk-cdn.com/15/11/29/2b7e69bdf8f48a6281043c43e0ed56c1.jpg
-
Road Kings on my 89....Take #2.
garyS-NJ replied to KIC's topic in Venture and Venture Royale Tech Talk ('83 - '93)
for my 1984 I used a harbor freight pipe bender & bent a piece of fence pipe by eye, just tweeking it up more and more until I got the right angle. then I traced it on cardboard. It slips right into the RK muffs but even expanded (another harbor freight tool) it wouldn't go over the OEM collector gaskets. then I made gaskets from copper pipe (type K) but found I need type L or M (thicker wall). I bailed on the job when I looked at fabbing the mounts (too frigging ugly), and modified my oem muffs. I like the way they sound and perform (posted a thread with pics) but will also bend a few pipes to run straights or some other kind of light free flowing can.. -
guess I'll just stuff them. I painted the front fender flat black and swapped the rear with a base model black unpainted fender (and ditched the mudflap). My plan is to paint the fairing and tank cover black also so I'd hesitate to put the red lower fairings back on. think it's just a rag and duct tape for now. BTW, I just trimmed my oem fairing ('84 venture royale) about 5-6 inches and I love it as I can now se over it (or duck a little to see through it) and it gets a lot les drag on the highway and also of interest a lot less back pressure vacuum buffeting on the highway. If I had a spare windshield I'd probably experiment putting for 1.5" holes in the center bottom in an effort to further reduce the vacuum buffeting but certainly its better with the smaller fairing..
-
Loosing rear brakes
garyS-NJ replied to garyS-NJ's topic in Venture and Venture Royale Tech Talk ('83 - '93)
I swapped rear master cylinder and ditched the proportioning valve connecting the rear line directly where the proportioning valve connected (I plugged the port for the front brake. of course then I bled it and it seems to work fine.. -
Road King mufflers on my '91.
garyS-NJ replied to OldGazer's topic in Venture and Venture Royale Tech Talk ('83 - '93)
Oh and after looked closely at how I would fab the mounting bracket, and how far back the muffs had to sit (after bending some fence pipe for the transistions), I scrapped the RK muffler plan (they did sound good attached directly to the collector for a test), & I modified my oem muffs by cutting off the cones and drilling the rear baffle plate and punching some 3/8" holes through inner baffles. Sounds great. Runs good, but have some slight popping out exhaust. Think it runs slightly lean like this.. I put pics on another thread. -
I didn't see any engine vents but do feel the heat coming off motor onto my legs.
-
With the lower fairings off I see only one vent allowing cold air into the front of the top fairing on each side. These vents are not closable at the front. Looks like the outlet would go into the lower fairing. I'm just going to stuff some rags or something in there
-
Road King mufflers on my '91.
garyS-NJ replied to OldGazer's topic in Venture and Venture Royale Tech Talk ('83 - '93)
I fabled bends from fence pipe and then made new copper band seals from 1.5" copper pipe. Type k was smallish leaving a gap but I think thicker wall type L or M would fit. -
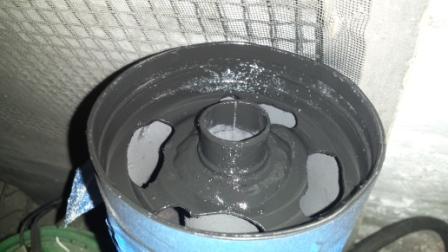
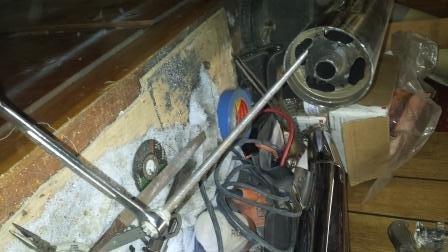
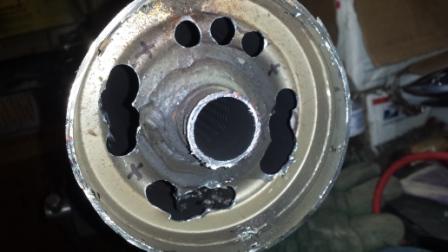
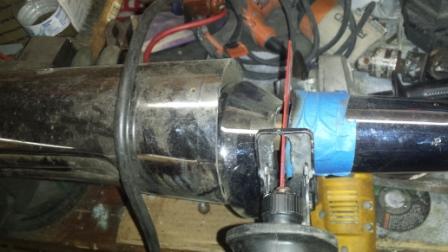
I have some very nice condition Road King Mufflers for sale. I'm such an idiot but eventually I get there anyway. I just had to do something with the oem muffs on my '84 XVZ12 and looked into modifying them (and ran a piece of 3/8" rod through each end punching through one baffle wall without much noticeable difference..). I then bought a set of road king muffs and a pipe bender and spreader.. worked out some short bent pipes that had the RK muffs in the right place (oh and BTW, I slipped them onto the collector for a listen and a very nice sound..). but then I was having a time spreading the galvanized fence pipe to fit the OEM collector copper gaskets... and so cut off one gasket and made gaskets from type K copper pipe realizing I needed type L or M and couldn't find a piece of that... ARGHHHH!!!! then I'm looking at a mounting bracket design, I bought 1/2" square steel tubing, and I decided that whatever I made would be mad ugly. Fed up at all the wasted time I went and kicked the dog and the next day I cut the end cap cones off my oem muffs and drilled 1/2" holes, and ran my 3/8" threaded rod (grinded pointy) through the baffles. Specifically: two holes through the center tube crossing through two baffle walls, then two holes through one baffle wall via two of the tubes observable via my 1/2" drilled holes. As for the process: I used an angle grinder with cutoff wheel and carefully cut at the cone interface. then a sawzall to cut at the straight portion (see pic with tape mark). then the cone cover drops off and the sawzall to cut the tube short and angle grinder to smooth all edges.. then I marked I think 8 holes and drilled with a small bit and then a 1/2" bit. then I just leaned on the bit to cut sideways between pairs of holes (yes, a little ugly but I didn't have a metal bit for my jigsaw and sawzall blades too wide). and some files to round off the oval holes. from there looking into the oval holes, I could see two tubes (besides the center tube) that go through to another baffle plate. So I punched my 3/8' rod through the two tubes and the center. NOTE: I got lucky with my oval holes in terms of the pairs I picked which allowed me a straight shot to the two inner tubes (see pic). make sure you look into your 1/2" drill holes and pick pairs to oval accordingly the muffs mount right up of course, look better chopped, and sound almost like the RK muffs. I was crossing my fingers hoping with the oem intake restriction, the opened muffs would not demand rejetting but I think it might be close as I hear a lot of popping out the pipes as it's warming and also some on cruise and deceleration. will see, gotta check the plugs, but it is probably close enough. I probably rejet and run open pipes next year. pics attached.. I'll sell the RK muffs for same price I got them, (cheap shipped on ebay).

-
Haha. Not vane.. I'm just trying to keep it kinda naked and not sure the lowers would go on that easy seeing as I wasn't keeping track of the stuff coming off.. but I'll look
-
On my 1984, i split my uni brake by running two lines to the front and blocking the front line where it goes to the front at the proportioning valve at the rear master cylinder. After that I swapped the front master cylinder with a 1987 master which has a slightly larger bore. The fronts seem a little soft (I attribute to the long rubber line going to the front left caliper and perhaps the marginally sized front master) & the rear was very "wooden" as it was very touchy easily skidding when I touched the pedal. That was fine for a little while but then I lost the rear brake, pedal goes all the way down.... I didn't see a leak so I added some fluid and re-bled it (with the speed bleeder I recently swapped in). I bled out some air and brakes fine for one ride but now the pedal is almost all the way down. Still no leaks but I hear a squishy sound at the rear master cylinder. I thought a leaky master would do this but only with a visible leak (nothing either under the boot). That said, can a master cylinder fail like this or is it more likely the proportioning valve (or my Teflon taped plug allowing air in without allowing fluid out?)??. Do most folks splitting the unified brake also remove and block the proportioning valve then stretch the rear brake line to the front brake line spot on the rear master cylinder???
-
I took off my lower fairings for cool points. I want to block the air vents and perhaps add a leg shroud of sorts to protect my legs (Harley guys have leather ones between fairing and highway peg mounts). Ideas?
-
Road King mufflers on my '91.
garyS-NJ replied to OldGazer's topic in Venture and Venture Royale Tech Talk ('83 - '93)
Thanks, I have ultra copper and thought it might make it too difficult to pull the pipes. Guess I can put it on just the muffler side and see.. And add it to the collector side if necessary.. -
Road King mufflers on my '91.
garyS-NJ replied to OldGazer's topic in Venture and Venture Royale Tech Talk ('83 - '93)
I got my road king muffs today and see I have a piece of galvanized fence pipe that fits nicely into the muffler (no flat copper band gasket) but this same pipe does not fit over the collector while the copper gasket is in place.. I didn't have much luck trying to tap it off. will torch heat help this? And while we are at it, is there a real need for the flat copper gaskets if the pipe fits nice??