Carbon_One
-
Posts
4,051 -
Joined
-
Last visited
-
Days Won
3
Content Type
Profiles
Forums
Gallery
Events
Store
Everything posted by Carbon_One
-
Can't visualize that right off but there's always more than one way to do the job. Larry
-
Hi Salty Ok I just took a look at the DiamondR horn plate. While I do think you could use that plate with the Stebel air horn it's not compatable with my bracket. Also that plate would cause the air horn to protude out further than my bracket & horn combination. My bracket will allow the Stebel horn to be tucked back into the horn area more. Basicly it's a "L" shaped piece of stainless steel that will bolt to the same bolt that is the battery ground strap bolt. Go to page 4 post #32 of this topic and you'll see the pics I put up of my bracket fastened to the air horn before and after it's mounted to the bike. Larry
-

RSV lift frame adapters - improved model
Carbon_One replied to Carbon_One's topic in Royal Star Venture Tech Talk ('99 - '13)
Go to the classified section for all the info. Here's a link for ya -- http://www.venturerider.org/classifieds/showproduct.php?product=69&cat=7 Current prices are in this thread -- http://www.venturerider.org/forum/showthread.php?threadid=6196 Or just e-mail me for the details at lskeels@wowway Larry -
RSV lift frame adapters - improved model
Carbon_One replied to Carbon_One's topic in Royal Star Venture Tech Talk ('99 - '13)
Hi everyone. Got another update addded to page #1 of this post plus in the classified ads. What it is about is for those of you who have a Larin jack for lifting the bike. Those jacks have shorter lift arm pads than others do, so they're about 1/2" shorter than the adapters width in fact. Thus it's much harder to get that jack centered as it should be. And then there's the possiblity of the bike slipping off. So what I've done is come up with a modification that'll allow you to still use the Larin jack and center the lift arms each & every time. Bottom line is if you have a Larin jack and want to buy one of my adapters I'll add the modification to the adapter at no extra cost for you. I need to know this when you order an adapter thou. Thanks in advance, Larry -
Ok folks I'm going to offer mounting brackets for these air horns to be mounted where the right side stock horn currently sits. I should know in a day or two how much they'll cost you all. They'll be made of stainless steel and polished. I'll post back here with pics and details later. look for my ad in the classified as well once I get this off the ground. Larry
-
Improving Lines of the Saddlebag Guard Rails
Carbon_One replied to Freebird's topic in Body, Plastic, Paint and Seats
My bag rails are uneven as well so looks like another repair mod to do when I get a chance. Larry -
Good idea on saving that back cover. Like you say it's hardly noticable. Larry
-
Boomer I have one made up for you. I'll send it out tomorrow. More info to follow later. Larry
-
My thoughts exactly too. I had to go back and resize the pics as they were too big Larry
-
I finally got my Stebel air horn mounted up. After making a small bracket I mounted it where the stock horn was at on the right side of the bike. Pictures are below of the install and what the bracket looks like. I didn't use the stock horn wiring thou as I wanted to give the horns as much power as was possible from the battery. I ran a completely separate wiring set up by running a 16 gauge wire from the battery , thru a covered rubber mini-fuse holder, and then to the relays #30 post. For the activation wire I used the right side stock horn wire which has power on when the key is on which goes to the #86 post of the relay. Going from the #87 post of the relay I ran the wire to the + post of the air horn. The - post of the air horn I grounded at the air horn mounting bolt. To activeate the horn I then run a 20 guage wire from the other stock horn terminal (That wire runs to the horn button) to the #85 post of the relay. Once you press the horn button it'll ground the horn relay allowing power to flow thru from the battery to the horn IF you turn on the key first. The bracket is 1/8" ( 10 gauge) stainless steel x 3" long bent in the middle at 90*. A 1/4" hole for the mounting bolt at the engine case ( where the groung strap is at) and a 5/16" hole for the bolt attaching the air horn to it. If you look closely you'll also see a notch I cut out to clear the rib of the clutch housing. I also have a second set of Stebel magnum horns (electric) mounted on the bike too. One is under the fairing and the other is under left lower cowling in the stock location. I had these mounted previously but wasn't sure if they were as loud as could be being under cover. Yes they are louder than the stock beepers were. Did I need both set ups? Probably not but if for any reason the air horn fails there's the other two to for back up. All are on the same circut described above. To me the sound level appears to be about the same. Maybe the air horn a bit more which I attribute to being out in the open. Larry
-
Improving Lines of the Saddlebag Guard Rails
Carbon_One replied to Freebird's topic in Body, Plastic, Paint and Seats
Neat idea there Boomer. I too have been unhappy with the way the turn lights touch the bars at times. This does look like a much better fit and soluation. Larry -
4 gallons to reserve then have to switch the valve here. Larry
-
tach for 06 RSV
Carbon_One replied to mrb's topic in Royal Star and Royal Star Tour Deluxe Tech Talk
I bought a Drag Specilities tach. It's one of the 1 7/8" models. I paid around $75 for it with shipping I believe. I mounted it inside a bullet cup ($60-65) and then used a Kurykyn "P" clamp as pictured in Rosebud's post. Those clamps cost $20 I also mounted a voltage gauge on the left handlebar with the same bullet cup & clamp. Larry -
I have decided to off a small discount to anyone purchasing either one of the Lift Adapter models during the month of Feburary. Standard adapters will be $70 and the freestanding model will be $120 and I'll include foot pads all that are sold then as well. As before shipping is included as well. Canadian members will have to make up any actual differences in shipping coasts. As they have in the past. Thanks one and all for your comtinued support. Larry
-
You might get lucky and find that the ground cable is loose as was mine was. Shortly after getting the bike it was dead- nothing. After checking things over I found that the ground cable was loose. Tightened it back up and since then no problems. Or Buddy's info may be right. You'll just have to check things over first. Larry
-
Good info to know. Keep it coming for those of us who wouldn't know the differences otherwise. Larry
-
Passing Lamp Spacer Update
Carbon_One replied to BMW's topic in Royal Star Venture Tech Talk ('99 - '13)
Good question and never even thought of that. I lost a rubber bumper on one of my lowers, haven't replaced it yet but so far haven't had and problems with the lower cracking or breaking. Probably only a matter of time you think? Larry -
Crash bar supports
Carbon_One replied to Carbon_One's topic in Royal Star Venture Tech Talk ('99 - '13)
I bought mine from a local Harley custom shop. J&P Cycles have several styles to chose as well. Here's a few links -- http://www.jpcycles.com/productgroup.aspx?GID=BFE7A495-6D65-4619-9570-B7C67EFA65E4&search=1"%20clamps&store=Metric&page=8 (these are the type I used) http://www.jpcycles.com/productgroup.aspx?GID=A8E1B84F-0208-431D-B3CE-A240CA1AEBC8&search=1"%20clamps&store=Metric&page=5 http://www.jpcycles.com/productgroup.aspx?GID=2B4E94E0-2E56-496A-A09D-C5FA0552753A&search=1"%20clamps&store=Metric&page=1 -
Crash bar supports
Carbon_One replied to Carbon_One's topic in Royal Star Venture Tech Talk ('99 - '13)
10 gauge is what I used. It's a bit under 1/8" thick. I'll go back and edit the first post to refect it's thickness. BTW I put a set of these on DenDen's bike last year. He dropped his bike on an off chamber slope and he felt then that this mod saved him a bunch of grief and money. Larry -
Passing Lamp Spacer Update
Carbon_One replied to BMW's topic in Royal Star Venture Tech Talk ('99 - '13)
I've got one on order and am awaiting it's arrival anytime as well. I'm sure that Bill's spacer is well worth it's costs even with the price increase. From the looks of it and the reports from others I just know it'll be top quality too. I know I could have made one but why reinvent the horse. Besides it does help another member here and I have enough going in my shop. Larry -
Crash bar supports
Carbon_One replied to Carbon_One's topic in Royal Star Venture Tech Talk ('99 - '13)
No Thank you Charlie. I don't even want you thinking of testing on your bike either. You'll have a whole lot of explaining to everyone on why ya messed up. Larry -
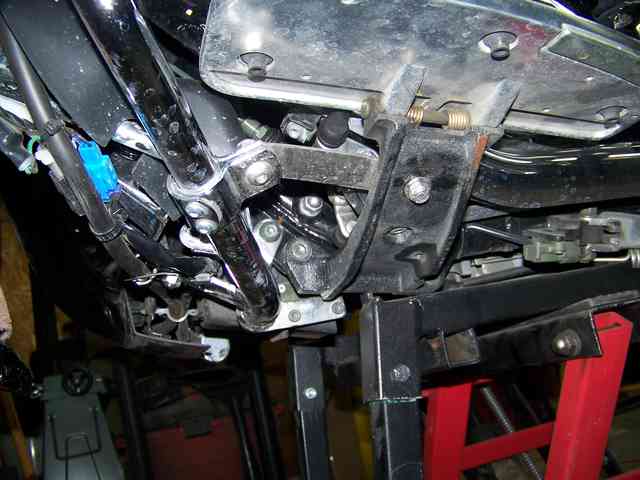
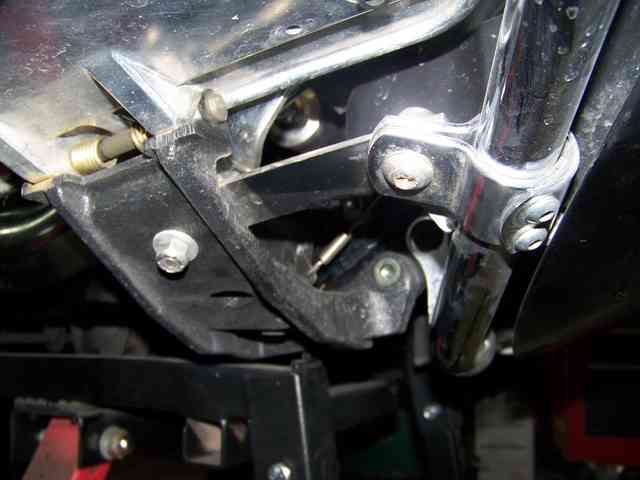
I posted this info once before but it's been lost since the sites crash so will put it up once again. Hopefully others can benefit from this idea. Ok we all know how flimsy the front crash bars are, especially if you've added foot pegs. I made up a set of supports to my bike to add some rigidity to them. There's a couple of advantages to adding these supports. One is no flexing the lower cowlings thus reducing chances of cracking them as some have posted. Another is in the event of either crashing or dropping the bike the bars won't fold back and cause more damage. What I did was to purchase a pair of 1" chromed clamps, cut two strips of 10 gauge (1/8") flat stock 1" wide x 5 1/2" long, and bought 4 stainless steel button head bolts with nylon lock nuts. I used three piece clamps but other types can be used as well. Stainless steel can be subistuted with chromed or plain steel as well. Next was mounting the each clamp to the front bars, adding the strip steel after drilling holes on each end. Then positioning the other end of the strip steel on top of the floorboards b mounting bracket. Locate the end of the hole where you can add the other bolt. Drill a hole thou the floorboard bracket and finish the install. On the bolt that goes thru the floorboard bracket I put the button head on top. There's only a little room there thus that's why I used button head bolts ove hex head types. You'll also find it easier to drill the holes after taking off the bracket too and it also gives you more working room getting the bolt there in place. Here's a couple of pics. I'll add a couple more later with more detail. Larry

-
I posted this info once before but it's been lost since the sites crash so will put it up once again. Hopefully others can benefit from this idea. Ok we all know how flimsy the front crash bars are, especially if you've added foot pegs. I made up a set of supports to my bike to add some rigidity to them. There's a couple of advantages to adding these supports. One is no flexing the lower cowlings thus reducing chances of cracking them as some have posted. Another is in the event of either crashing or dropping the bike the bars won't fold back and cause more damage. What I did was to purchase a pair of 1" chromed clamps, cut two strips of 10 gauge (1/8") flat stock 1" wide x 5 1/2" long, and bought 4 stainless steel button head bolts with nylon lock nuts. I used three piece clamps but other types can be used as well. Stainless steel can be subistuted with chromed or plain steel as well. Next was mounting the each clamp to the front bars, adding the strip steel after drilling holes on each end. Then positioning the other end of the strip steel on top of the floorboards b mounting bracket. Locate the end of the hole where you can add the other bolt. Drill a hole thou the floorboard bracket and finish the install. On the bolt that goes thru the floorboard bracket I put the button head on top. There's only a little room there thus that's why I used button head bolts ove hex head types. You'll also find it easier to drill the holes after taking off the bracket too and it also gives you more working room getting the bolt there in place. Here's a couple of pics. I'll add a couple more later with more detail. Larry
-
RSV lift frame adapters - improved model
Carbon_One replied to Carbon_One's topic in Royal Star Venture Tech Talk ('99 - '13)
How about putting caster wheels under the legs in order to roll the bike and stand to where you want it witout the jack? With the foot pad in place you could easyly attach some swivel caster wheels. Not my idea but was suggested by Dale Weber. I can see where that idea would have it's merits too. In fact I already checked at one place for 4" swivel wheels. Cast steel with rubber thread would cost about $6 each. The ones I looked at were rated for 275 lbs. each so a set of four would easly handle the bikes weight. They also had 5" wheels rated at 350 lbs each but I thought those might be a bit too tall. As I've said before you guys get any ideas to improve on these adapters or have a special request just tell me and we'll go from there. Larry -
I had a VW trike back in the early 70's. That machine sure was a lot of fun. Until someone actualy rides one I would say it's hard to judge one. Just my thoughts here. I do know that when the 2 wheeled horse gets a bit too much to handle I'll convert to a trike again in the blink of am eye. I've ridden sidecar rigs before too but those are a horse of a different color so to speak. Myself I prefer the trikes. One thing I'd like to see for the Venture trikes is an operational reverse for times whem you really need to back up. I know there's a post somewhere around here about that too but as far as I know no conclusive option has been offered. Oh well maybe by the time I'm ready for that 3rd wheel someone will have that figured out. If not I'll build something. Larry http://img.photobucket.com/albums/v213/21651/VWTrike-mail.jpg