-
Posts
4,224 -
Joined
-
Last visited
-
Days Won
12
Content Type
Profiles
Forums
Gallery
Events
Store
Everything posted by videoarizona
-
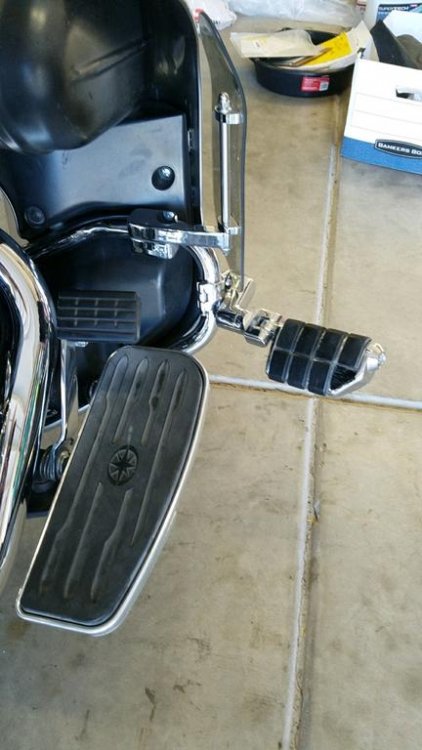
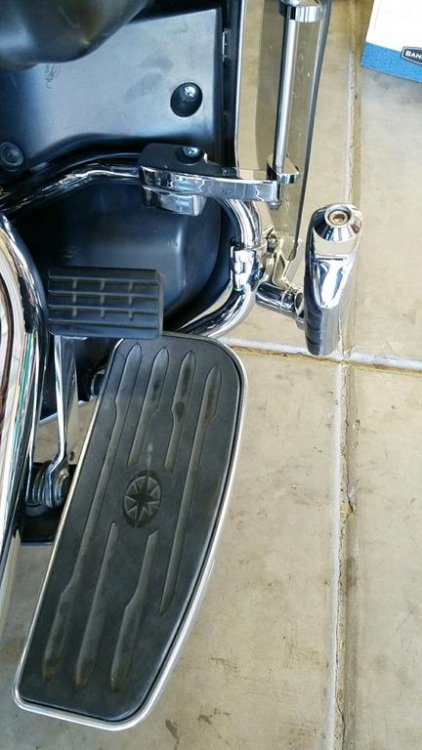
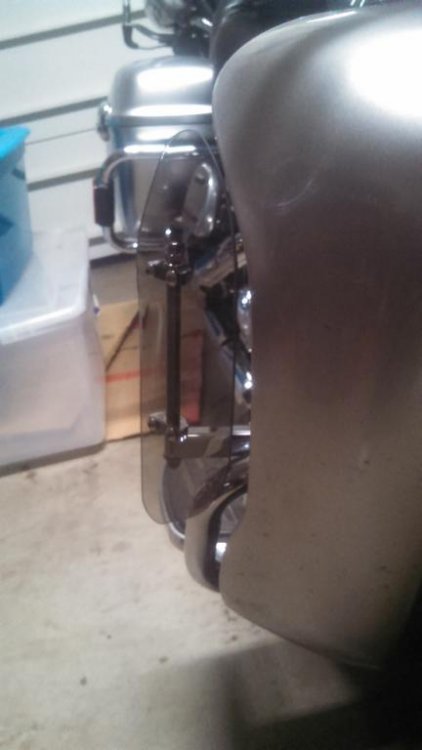
Sorry...I'm not near the bike so I can't take any pictures. But Bob has it right. The vertical round bar holds the vent and allows you to move it in/out. At the bottom it's connected to a flat bar that runs across the engine guard. Another smaller bar mounts opposite it and is bolted to it. At first glance, I didn't think it would hold more than 5 minutes....so I put the strongest tie wrap on it. But it's held up for over a year now without troubles. They were expensive...I think I paid $160 for mine brand new. But they are worth it. The build is top quality befitting a Yamaha product. And with a slight adjustment, mine is easy to change position but still holds it's position despite very heavy winds. I can even change it while on the move....but don't let anyone know I do this! I'll be home next week. If you need a close up picture, just let me know. Found 2 that should help!
- 18 replies
-
- fairing trim removal
- rear tire noise
-
(and 1 more)
Tagged with:
-
These helped a lot. 3 weeks on the road last month across country in the heat.....a godsend! Took a while to find though....I finally found mine at a dealer in Florida...was posted on Ebay.
- 18 replies
-
- fairing trim removal
- rear tire noise
-
(and 1 more)
Tagged with:
-
Regarding jumpering the RLU....I found that my 89 must be different as I tried 3 different combinations of jumpers before I got everything to work. But I don't think that's your problem. I think the RLU is working and you may have a bad solder joint in the computer. I could be wrong so let's start over. Put the RLU back in. Download the PDF here for the switches on the handlebars....see if they are good and clean. http://www.venturerider.org/forum/showthread.php?43025-1983-1985-Clutch-Side-Electrical-Switch-Disassembly-and-Cleaning Next we will look at the CMS computer....a bad solder joint at the connector can cause the problems you are having... weird right? http://www.venturerider.org/forum/showthread.php?33328-Information-Display-Repair Last, go here and download the service stuff for your year. Maybe this will help follow the circuits... http://www.venturerider.org/forum/showthread.php?42358-1st-Gen-Wiring-Schematics-1983-1993 finally, @cimmer posted the properr sequence for me to jumper my RLU.....(just in case I'm wrong!) +++++++++++++ "Looking over my RLU wires, I think the Green/White should be the Green/Red. My RLU doesn't have the G/W in its wiring harness but it does have a G/R. My high beams indicator does function properly and I dont have any alarms showing on the computer panel either. Also looking closing at the picture in post #1 of this tread, http://www.venturerider.org/forum/sh...+lighting+unit , you can tell he actually used the Green/Red. Try that and see if that makes a difference for you. So connect the wires like this: Tie Green/Red + Blue/Black + Blue/White together. Tie Yellow/Green + Blue/Red together Tie Black + Light Green together" +++++++++++++ lets see if any of this helps.....
-

Lots more room in the garage now..................
videoarizona replied to DragonRider's topic in Watering Hole
Rats! You are keeping it! (Kidding!) Good choice! I'm sure you will love riding that scoot...!! Firm up the seat and you should be good to go! -

3d printing replacement fairing and parts
videoarizona replied to Harddrv1's topic in Poor Man Tips and Fixes
> The 12 volt box....hmmm wondering if that's the CLASS controller, or did previous owner strip all that out and add something. Find your VIN and look for a post at the top of the 1st Generation folder from Prairiehammer. he collects Vin numbers for our group and can hopefully tell you something about your bike... I bet with some help you can bring that scoot back to stock or close to it! Many parts you can make a simple form and make yourself with ABS plastic. Plus, keep your eye out in junkyards nearby for Ventures. I would suggest EBay but it seems those parts are getting a bit expensive these days... [/color] -
I bought the digital unit from @tz89. Simple and easy. Accurate as can be!
- 22 replies
-
- calibration
- goose
-
(and 3 more)
Tagged with:
-

Few Last Kinks For Running Bike
videoarizona replied to .45Cole's topic in Venture and Venture Royale Tech Talk ('83 - '93)
E1 on the shock adjust, will not run in auto but will eventually switch over to manual and pressure up. Anybody have an idea/ common failure? Not as common as the E4 failure. But I think KIC had the same problem. He fixed it (I think?) by doing something under the Tour Pack...solenoid??? Search for his posts.... Loud gear winning noise on deceleration (when compression braking), seems like it's coming from right under me, any thoughts? I saw the rear shaft grease service, will check there and fluid in drive shaft On my 89 it was a broken drive shaft. The shaft is splined so it will work just fine running loose. At the front of the shaft, there is the U joint. The bolt from the intermediate gear(?) that drives the Ujoint can break off...leaving the nut and end of the bolt inside the U joint just spinning around. On the other end of the drive shaft, the shaft ends with another threaded end that bolts into the drive gear for the rear end. Mine broke there. You can see the first possibility by peeling back the rubber dust cover over the U joint and spin the rear wheel...with scoot in neutral. If you see something loose tumbling around inside, it's the end of the intermediate gear...or whatever it's called. That's a big repair. For the latter possibility, you have to drop the rear wheel, unbolt the drive from the shaft assembly and pull out the shaft. Look for my posts about my whine. I repaired mine by buying a used rear end off of EBay and using the drive shaft out of it. Those are two possibilities.... Battery indicator warning, PO told me he replaced orig batt with one without accomodation for fluid level wire. Any workaround? Simple to do..I see a post has already been sent to you. Stereo, will not work without being hooked up to cassette player via din cord, will eventually link to mp3, but would like workaround for now It won't work because the stereo is looking for a signal from the tape unit. As long as the tape is connected by the Din plug, the radio works. You need to jumper the pins at the tape deck/radio din plug connection. There is a posting about that somewhere as well. There isn't a schematic for the electrical side (I don't think we ever found one) of the tape/radio connection, but I bet you could take an mp3 player...turn it on and using the headphone output...strip the wires off of a bad plug and with the bare ends...touch the pins of the din plug and you should get a signal coming out of the radio at some point. There was a device made in Spain by a member that sat between the two and and allowed you to plug in an MP3 player or phone, but they stopped making it a few years ago. Sorry I don't have time to search for those posts as I'm trying to get up to Phoenix for the week....gotta get going. hope this helps... OH, BTW, none of these are "common" problems. The 1st generation Venture Royale was pretty much a bullet proof scoot. With age comes problems...and these bikes are no exception. But it amazes us how well built these bikes are...still! -
I just noticed in the upper left where my avatar is, my 2 scoots don't show up anymore? @Freebird, is this changed?
-
Let me try to set this up for you without visuals... The coil has a screw type nut that screws onto the coil. There is an O ring as well. You push the screw type nut onto the spark plug wire, then push an O ring onto the wire. Visualize the end of the spark plug wire with a nut then an O ring on it. In this order...the end of the wire, the O ring, then the nut. Nut threads facing toward the end of the wire. To assemble: You push the end of the wire into the coil. Push hard as its going to be pushing against a pin inside the coil. This pin gets pushed into the middle of the wire, making contact with the center conductor. Then you push the O ring up to the coil, then push the nut up to the coil as well. Now, by pushing and turning the nut onto the end of the coil, once you get the threads engaged, then nut will pull in and seat the O ring...compressing the O ring which now will hold the wire snug in the coil. It's a simple but effective system. Nice part is, if you live in an area where wire corrosion is a given, you just loosen the nut, pullo the wire out of the coil, snip off about 1/2 inch of wire...or enough to where the wire is clean and not green colored....then push the wire back in, the O ring in and the nut in...tighten nut and done again for another year! I wonder if a little dialetric grease on the outside of the cable would help slip the cable in and at the same time provide corrosion resistance...I don't know..just thinking out loud.
-
-
Reviews are starting to come in. https://www.yamahamotorsports.com/transcontinental-touring/pages/2019-yamaha-niken-media-buzz?utm_source=SingleMessage&utm_medium=Email&utm_campaign=Product&utm_term=NIKENReserveToday&utm_content=NIKENMediaBuzz
-

Single Track and old dudes. anyone over 50 still doing this?
videoarizona replied to CaseyJ955's topic in Watering Hole
I grew up running through the woods..... Do miss that. Not sure I could handle very much riding on the pegs anymore. I still do it for grins on my 1st Gen, but don't think the hips and knees could handle much of that now! -

Adding horsepower to a Venture with a sidecar - Hey Puc...??
videoarizona replied to KIC's topic in Watering Hole
That's ok Bill... We like horsing around.... -

uclear bluetooth
videoarizona replied to copper5839's topic in Star Venture and Eluder Tech Talk ( '18 - Present)
Well thats a bummer. -
Boy does that being back memories!!! But watching both the kidlet and the scoot go bye bye... That twice as hard! Have youngest look into TCU for engineering....(got the wrong college). Now correct.
-
My metz 880 on the rear of my 1st gen delaminated with less than 4k miles. Pictures on this site in an old Post. They would not warrantee the tire. It was unridable...unsafe. Other members have had same issue. I believe one crash was directly related to Metz. cowpuc lost his rear as well...chunks came off. That's when I switched to Shinko on my 1st gen...4 years ago. The 230 Tourmaster. Shinkos are Yokohama motorcycle racing technology bought by Shinko and successfully being produced by them. The 230's are excellent tires for the 1st gens. They are comfortable and handle rain nicely. Downside is they wear faster. I'm at 5k on my 1st Gen and have about 1/2 read left on rear. Front looks new. I keep pressure at 38/42. My 2nd Gen had Pirelli Routes and they got squirrelly after about 5k. I switched to the Shinko 777HD in stock sizes and put around 1k miles on them then took off across country. Riding through a storm in Oklahoma City at 65mph with traffic...I was tense about the tires, but after a few miles, I realized they were solid on the road. Very impressed with how they handle the rain. If I hadn't picked up a nail that we changed out at cowpucs, I would still have that 777HD on and bet it would still look brand new! At 3k miles when we took it off, it looked new then. And I was heavily loadedl! I wish we had taken a picture of it to show. I run 38/42 on those as well. Replaced rear with a Shinko 230 in stock size. We shall see how long it lasts. With exception of this last tire bought in Michigan, my Shinkos have also been the freshest tires purchased!! I ride both scoots in the deserts of Arizona as well as the mountains. We have heat, rain and such.... Heat in spades!! As far as feeling squirrily at speed, almost all of that can be atributed to air pressure. In some cases it is a bad tire. But tires are like oil..... Everyone has experience and opinions.... So above is my experiences.
-
The only solution we've found is to take a picture of weed and email to local college agriculture people and ask what it is. Once we learn what it is we can look up weed and find best product to kill it. Regular store stuff doesn't do a thorough job on some types of weed. Amine is a decent broadleaf killer for large lawns... And the black bottles of Ortho for normal lawns or spot treatment..... But none work on all weed.
-
Could be... Hard to tell. That board is one of the cleanest I've seen from members posts. Solder joints look quite good for it's age. I agree that there are a few joints that need checking, but overall it's in decent shape.
-
At 1st glance.....I see a couple of resistors that look like they got to hot. They also may not have a solder connection to the component side of the board....I would replace any resistors that look burnt, being careful to make sure you maintain solder integrity on both sides of the board. Is that a diode "zd1"(?) that looks burnt?
-

Ride report Joe Rocket Alter Ego 4.1 - I love it
videoarizona replied to VentureFar's topic in Watering Hole
Perfect timing. I'm in need of a new mesh jacket and was looking for all season usage. The only part I must have missed was how is the rain liner? Can it be worn over the jacket? -
What did I do today? I patted them both on the tank and told them to be good while I was gone. Up in Phoenix for a few days.


