dna9656
-
Posts
1,124 -
Joined
-
Last visited
Content Type
Profiles
Forums
Gallery
Events
Store
Everything posted by dna9656
-

Shift Shaft Seal
dna9656 replied to dna9656's topic in Venture and Venture Royale Tech Talk ('83 - '93)
Well I was sure it was until some said it could be something else....I'll fix the profile....A few days ago I wiped down the lower left side of the engine so any oil I would find after would be new and easier the trace to it's origin. I just went out to the bike, I didn't see any oil FWD of the shift shaft though some oil came off on my finger when I wiped the bottom of the shaft so for the $6.and change I got paid for the seal I'll go ahead and change it. -
Shift Shaft Seal
dna9656 replied to dna9656's topic in Venture and Venture Royale Tech Talk ('83 - '93)
Gary; I have 2 Venture Royales an '84 and a '85. Thanks all the same Gary but I have a new seal, P/N (new) 93102-12321, for the 1200CC engine. Any wisdom removing/installing you'd care to impart would be most appreciated! -
So I read the instruction on replacing the Shift Shaft Seal in the library; I also read the post on it in the forum from last April. In the Library it talks about major work, in the post it talks about pulling the seal with a hook and driving in the new one with a block of wood (or other tools would work as well) without removing the shaft. Anyone got experience or advice to offer?
-
So I get my LEDs, get the load resistors installed, and now the polarity of the light socket is wrong. I got no running light and a dim blinker, reverse the bulb and Ii get the dim running light. I would like to pull the wires from the plug and reverse them, I know there is a little tongue in there that won't let the terminal come out the back of the plug housing, it works much like a wire tie locking mechanism, I'm SURE there is a $85.00 tool that will pop right in there and do what I need done, I'd rather cut wire and re-solder than spend that kind of money on this. Paper clip is too big, my 1.4mm precision screw driver is too big but will slip in along side the terminal end. So If I reverse the wires (one way or the other) what will (if anything) happen at the rear blinker? I don't think anything will... I'm just askin'. Any ideas?
-
Coolant bypass valve
dna9656 replied to DesertRider's topic in Venture and Venture Royale Tech Talk ('83 - '93)
I do not have any great secret to reveal about the removal of the valve. I can tell what may be binding it the hole is most likely dried anti freeze and/or crud from the motor that's in suspension in the anti freeze (AKA crud); the screw could be broken off at a point you can't see it but it's sticking up far enough that it catches on the steel housing (tube) keeping it in place, also there may be a dent or other distortion in the steel tube that makes the tube out of round or won't allow the valve to pass through the tube. BTW E-Bay and Amazon are excellent sources of used parts. -
Take that with a pound of salt.....
-
I feel for ya on those circlips....I have a '67 GTX that had worn out outer rear axle bearings. Now these bearing aren't ROLLER or BALL, they are just hardened steel... When I got in there I found the PO had "shimmed" the bearings with a cut up Coca-Cola can....
-
So adapting a fuel injection setup from a 4 banger Honda or other would require the injectors... (if multiple injector(s) you'll need to place them into the intake...or a throttle body could be mounted much like a carb making things a bit simpler. You'll need the computer (and a place to mount it) and what ever sensors it uses to function too. All the sensors will have to be located in a correct place something that I'm sure will require some experimentation. Sensors like a MAP sensor, engine temperature, possible ambient temp sensor, throttle position sensor, maybe a fuel pressure sensor too. You'll need a fuel return line as well. You'll also need a proper fuel pump, it will have to achieve the volume/pressure required AND fit someplace. Most cars use a pump located in the fuel tank because it's easier to "push" a liquid than it is to draw one...Holley had an external one for there "Pro-Jection" system a while back, I have 2 of those, I don't think that are big pressure producers though.
-
Boy howdy do I get simplifying things! You need to know the CFM and fuel requirements of the M/C engine and if this carb can deliver, what about the vacuum advance? You need that to input into the ignition, Gary has an after market ignition that is tune-able, he'd be the one to ask but I think he'd be skeptical. This would be way better than a car; on V-6s and V-8s the outer cylinders get less air/fuel (in theory) that the cylinders closer to the plenum; the V- 4 cylinder on our bike(s) has all the cylinders equal-distant from the plenum so the cylinders would have the same vacuum draw hence (in theory) get the same amount of fuel. Multiple carbs are A solution to that problem, BUT like most things involving a carb there are (at least) a few compromises where fuel injection has LOTS of advantages. I saw one like this on E-Bay for $500.00 (I thought) but do not recall what brand of carb it had on it.
-
LED Flasher Part Number/source
dna9656 replied to dna9656's topic in Venture and Venture Royale Tech Talk ('83 - '93)
Thanks for keeping everything clear Neil! -
LED Flasher Part Number/source
dna9656 replied to dna9656's topic in Venture and Venture Royale Tech Talk ('83 - '93)
BIKES that use LEDs that have the combined starter/flasher I think this started in 2004, bikes for 2014 and 15 that use LEDs have this relay... -
LED Flasher Part Number/source
dna9656 replied to dna9656's topic in Venture and Venture Royale Tech Talk ('83 - '93)
I still wonder if the combination flasher/starter relay on the newer bikes (with LEDs from the factory) wouldn't work.....thoughts? -
LED Flasher Part Number/source
dna9656 replied to dna9656's topic in Venture and Venture Royale Tech Talk ('83 - '93)
OH yeah!!!!! Thanks Neil! -
LED Flasher Part Number/source
dna9656 replied to dna9656's topic in Venture and Venture Royale Tech Talk ('83 - '93)
HI ALL! I have (what I thought was) the starter relay right up next to the POS terminal on the battery, (you know I have a 83.5 DKC2) so I THINK I have the separate setup...Reason I want the LEDs in the blinkers is for the quality of the light the LEDs give. It travels way further in fog and the light is better in rain conditions too. I want my running lights to be LEDs for the same reason PLUS the lower current draw from the running lights will contribute to cell phone charging radio etc. The other reason is LEDs look way cool! I realize I would loose the auto cancel, I can live without it but I don't want to hold the switch in the on position to use the blinker. So Neil is that for sure? does anyone have any exp. with this? Thanks! -
I need a source (auto parts store, amazon, etc) and a part number for a LED Flasher for my 1st gen bike. Do I need a 2 wire or 3 wire flasher? Where is the stock flasher located in the fairing? I read about a dual component flasher and a starter circuit unit that's combined into ONE unit together; then I read of a individual flasher; I'm just a little confused. Does my bike have the dual component or the single flasher? Thanks in advance.
-
You can get a piece of the ABS you want to paint and test the different thinners on it for compatibility. Yamaha painted (or had them painted) the fairings so SOMETHING is out there that works. Check my prev. post. To thin fingernail polish (see prev. post by others) you can use FNP (fingernail polish remover), My Theory: FNP could be lacquer; my reasoning: it dries fast and you can later liquify it (lacquer) with lacquer thinner. It might be that FNP is enamel and it's remover is so hot (powerful) it dissolves it (like MEK does to enamel) I don't really know. We do need to know if FNP is lacquer or enamel, then you can go from there. To polish you can get REALLY sine sandpaper, it'd available in 800, 1000, 1200, and maybe 1400 grit. Fingernail polishing sticks (used to polish unpainted finger nails) have some of these grit ratings and to me if it's fine enough to polish a finger nail to the same reflectivity as polished paint (they do trust me) it's a safe bet you can use the same grits on the bike. To re-cap: I used epoxy primer (thinned with lacquer thinner) to prime an after market ABS "bucket" on my road star and I had no problems with the enamel I painted over the primer. Over scratches you can do this with un-thinned primer and the primer will fill most if not all the finer scratches. I use ABS pipe glue to repair and fill deeper cracks and scratches but if it's this bad you'll be sanding, priming, sanding over and over till you get an absolutely blemish free surface but keep in mind the final primer-ed surface should be sanded with no finer than 400 to 600 grit so the paint you put on will have a "profile" (tooth) to help it stick, the paint will fill any 400 grit scratching. The decals are a good idea and the guards are too if you can find them in a complementary shape...but that's subjective of course.
-
So Gary the 1st pic is all I need to do to jumper the high AND low beam, OK, the other pics confuse me, I'ma monkee see monkee do electrician.... I don;t have to understand WHAT I'm doing so much as doing the correct thing....so in a pic like the first one could you show where the jumpers go please?
-
Getting harder to start
dna9656 replied to dna9656's topic in Venture and Venture Royale Tech Talk ('83 - '93)
It's never done this before; even before I replaced (only God knows how old that thing was) the fuel filter. I'm leaning towards the plugs being fouled out or the Ignition is going south....I'm still waiting on more feedback here. -
Getting harder to start
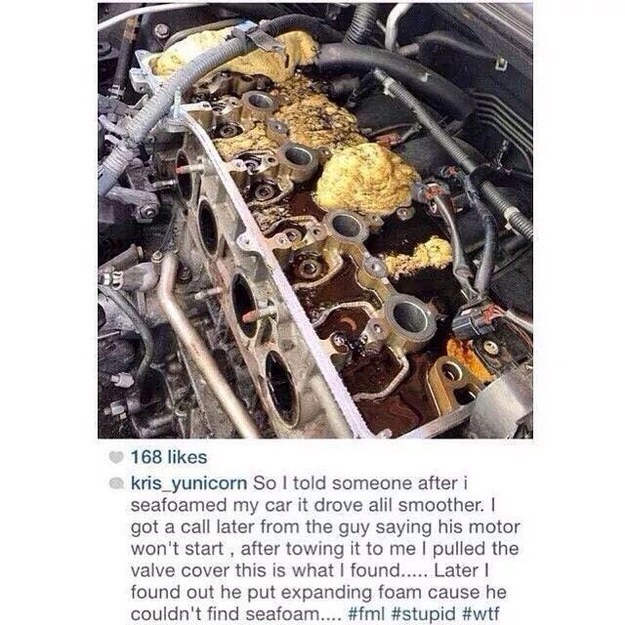
dna9656 replied to dna9656's topic in Venture and Venture Royale Tech Talk ('83 - '93)
This guy couldn't find the Sea Foam so he used the only foam he had on hand... I don't think it's a fuel issue I think it's a ignition issue. But I will Sea Foam it with REAL Sea Foam.
-
How do you jack up your Gen 1s?
dna9656 replied to BlueSky's topic in Venture and Venture Royale Tech Talk ('83 - '93)
I bought Harbor Freight's table lift. best $300.00 I ever spent on tools. Problem: getting it on the stand when it's on the table. The table isn't wide enough for the footing necessary to get the bike up on the center stand. So I got a screw lift made for bikes with adapters to lift on the frame, there is ONE spot this works but it is a little dicey but with some CUSTOM brackets it would be better. The rear tire area has a trap door you can remove to get the tire off, it'll go through the opening onto the rack and out. I got the jack screw lift so I can get the bike UP by myself, and btw the sweet spot is next to the center stand soooo.... Get the front tire M/C stand at HF, I have a #69026 and a #61670, I like the #61670 because it has outriggers I use with tie downs to MAKE SURE that 754lbs. bike doesn't fall. HF has 2 other stands that look identical to these I listed (the others are #60392 and #97841). I don't know what the differences beyween them are. RIGHT now i have a internet coupon for 25% off any item at HF, NOW would be a great time to get that lift! it goes on sale for $300.00 all the time, if this coupon is good for that price that's a killer deal. Tip a little whining and they will honor the coupon for "Customer satisfaction" If you buy this thing beware it's HEAVEY. I took mine off my truck alone ONE piece at a time andf I still had to lever the major assembly down off the truck. -
My Brother-in-Law gave it back.
dna9656 replied to MasterGuns's topic in Venture and Venture Royale Tech Talk ('83 - '93)
The second thing (after the clutch) I did to my 84 was the brakes. I re-built the calipers and bled the brakes. My bike doesn't have the bleed valve on the triple tree(soon though along with the divider to make the front right independent of the rear brake) so it was a major PIA. After checking for leaky brake lines this what I would do: Get a vacuum bleeder, the kind you squeeze with your hand, it has a gauge on it, it should come with a jar so you can apply a vacuum to the caliper bleeder and draw the air out. After FLUSHING all the old fluid out all three brake lines I did the following: MAKE SURE THE RESERVOIR IS FULL and KEEP it that way! On the rear caliper I got a CLEAN, clear hose and fit it on the bleeder screw, inserted it in to a CLEAN jar half full of CLEAN brake fluid and opened the bleeder. I put my bleeder tool (with the jar between the caliper and pump) on the left front caliper, pumped the brake pedal a few times till it firmed up, applied a little vacuum and opened the bleeder, got some air (as expected) out. Keep pumping the pedal and re-filing the reservoir. Like shampooing your hair, refill and repeat as necessary. The rear caliper was getting fluid too and as I released the brake it would (or could) draw air back into it self if the bleeder was open but since the hose was in clean fluid the air inside bubbled up into the jar but clean fluid was drawn in the caliper instead of air. You will have to tape the jar in the rear to the bike as you want to keep that little hose as short as possible. The right front: The right front bleeds independent of the left front. Get a bungy cord or some duct tape to hold the front brake handle in the applied position to allow the front brake line to "gravity" bleed the night(s) before. Then I used my bleeder pump to suck out any remaining air through the bleeder screw on the front calipers. This is a simplification; it took a lot of fluid and time, I used the vacuum pump on the front before I learned about holding the brake handle open for hours on end to let the fluid find it's lowest level (thus driving the air up and out) and I got downward flow of bubbles to the bleeder but never ALL of it. I think if you have a reservoir cap and put a fluid coupling on it, connected THAT to a reservoir of fluid, PUMPED the fluid into the master cylinder you would power fill the system and drive all air out. the rear master cylinder would only need a fitting in the fill hole. I suspect this is how it's initially serviced at the factory but what do I know? I believe this is how car MFRs do it on the assembly line. -
Getting harder to start
dna9656 replied to dna9656's topic in Venture and Venture Royale Tech Talk ('83 - '93)
Battery: GREAT Choke: Story: One night I used the choke, I got so much gas in the the mufflers they went BOOM! I thought the cops were going to come investigate because it sounded like a weapons discharge. Plugs: Less than 4k miles, of course that doesn't mean they aren't fouled from choking. I have a new set on hand. It has been stated here on the forum that 1st Gens don't need much choke, I have found that to be true, it starts way easier with NO choke or VERY little choke. Starter: 4 brush model. I replaced all the starter/battery related wiring with No. 4 stranded wire, soldered the terminals to the wire(s) too. The starter spins real nice, no voltage or amp issues there. I wonder if the Ignition isn't going bad....sure would be a good reason to get (authorization from she who must be obeyed (swmbo) to buy) that electronic one offered here on the site....(looks around in a sneaky way) It IS 30 years old..... When cold it takes 4 to 7 tries before it catches enough to stay running, then the RPMs increase as the oil gets flowing. I have LUCAS 10W30 M/C oil in it. When it's warm it re-starts just fine. I am pretty sure all the choke parts move and move equally, well i know the MOVE...I have never fooled with them except to get the crud off the out side of all the carbs,,,Pete has seen the carbs (when he kindly sync'ed them for me last summer) and I would be flabbergasted if he didn't notice something like the enrichers being out of whack but I'm sure it's possible he didn't but I have my doubts about that. Pete KNOWS these carbs; trust me. -
My 84 is getting harder to start. I thought it was the cold, then the hi-test gas. I run regular in it in the cold months for it's lower flash point. Now regardless of the temp or gas it takes a while to get it started. I think the ignition module (original so far as I know) is on it's way to the trash can. Opinions please!
-
Tire life and conditions of age
dna9656 replied to Brenner's topic in Venture and Venture Royale Tech Talk ('83 - '93)
When in doubt replace. Nothing like peace of mind. You'l find the 1st gens use a size that's not too popular (the front I think) so there is Dunlop and Bridgestone that make the right size the last time I checked. So far as M/C tires being "better" than automotive tires... it's not about being BETTER but about a different mission. Cars don't use the side walls of their tires like a bike does, so the tread on car tires doesn't go around 1/2 way around each side of the tire.. M/C tires are way narrow/car tires NOT so a narrow tire has to do more....Buy some new tires and have peace of mind. -
That's a bit too much brake i think.....