dna9656
-
Posts
1,124 -
Joined
-
Last visited
Content Type
Profiles
Forums
Gallery
Events
Store
Everything posted by dna9656
-

She RUNS, She RUNS, She RUNS!!!!
dna9656 replied to dna9656's topic in Venture and Venture Royale Tech Talk ('83 - '93)
The original air box to twinkie hose was pretty hard from heat and age; so having a new one on hand I replaced it. This made pushing the hose on to the fittings easier; WAY easier BUT it's still a ***** to do. I'd like to see how Yamaha does this but as usual the manual is long on WHAT TO DO but pretty short on HOW TO DO. How come you can't buy thin wall tubing (like the twinkie hose is made of and the fuel hose as well) in bulk? EVERY auto house around just shakes their collective head when you show them this stuff and they say " I can't get that thin wall tubing..." except the stuff for some windshield washer setups but then that tubing can't stand up to gasoline and oil. -
She RUNS, She RUNS, She RUNS!!!!
dna9656 replied to dna9656's topic in Venture and Venture Royale Tech Talk ('83 - '93)
She cranked but no start, not even a try. I think I missed something in the install. Now I have the written instructions Dingy provided and will try again; just not too soon. lemme know your thoughts! -
She RUNS, She RUNS, She RUNS!!!!
dna9656 replied to dna9656's topic in Venture and Venture Royale Tech Talk ('83 - '93)
OK; she starts fine with the TCI running things. THEN I Connected the Ignitec, I hooked up the vacuum with the restricter to the MAP sensor. Plug the MAP sensor into the Ignitec, The BIG and little plugs from the TCI to the Ignitec\BIG and little plugs. Hit the start button........yeah I turned the ignition key on.... Now I got what ya call a NO START CONDITION; but it does crank... DIS connected all that stuff, RE connected the TCI and she starts fine. Because I removed the air box to get to the TCI I now have to re-connect the air cleaner box BIG hose to the twinkie. I fought that fight for 1.5 hours; finally getting that connected, now I have the hose that goes from the "T" above the twinkie to the corner of the air box line to connect. Any ideas where I went wrong with the TCI? I made no mods to any plug. -
She RUNS, She RUNS, She RUNS!!!!
dna9656 replied to dna9656's topic in Venture and Venture Royale Tech Talk ('83 - '93)
FYI I had this set up on the old # 1 Ignitec TCI and the COPs; they worked just fine. -
She RUNS, She RUNS, She RUNS!!!!
dna9656 replied to dna9656's topic in Venture and Venture Royale Tech Talk ('83 - '93)
Well if you should need a OEM coil PM me. -
She RUNS, She RUNS, She RUNS!!!!
dna9656 replied to dna9656's topic in Venture and Venture Royale Tech Talk ('83 - '93)
I needed no hold downs; I pushed the COP into the plastic/rubber cover over the head and it stays there just fine...maybe this person has something though... -
She RUNS, She RUNS, She RUNS!!!!
dna9656 replied to dna9656's topic in Venture and Venture Royale Tech Talk ('83 - '93)
I used the OEM plugs on my wires that go from the TCI through the bike's wire harness to the OEM coils. I disconnected the coils, cut the plugs from them and using these same OEM plugs I made a jumper to go from the the wire harness plug(s) that went TO the coils to now GO TO the COPs, they fire just fine. The COPs are Denso units, (yes the P/N is on them). You'll need the OEM harness plugs from the Honda bike (see above); one end of the jumper has the Honda wire harness plug on it and the other has the Yamaha wire harness plug on it. You plug the Yamaha end into the harness plugs that formerly plugged into the coils, then you'll use the Honda end to plug into the COPs. -
Premium fuel has more anti knock properties, NO more energy that regular; it is formulated to NOT prematurely burn (due to higher compression) than regular gas. So buying it for an engine with less than HIGH compression is a waste of money.
-
Be careful of berryman's full strength. It has been known to EAT the floats....Feed ME, Feed ME, FEED ME!
-
Well I got the COPs on and she started right up like she's 'sposed to! HOORAY!!! She's got that funny little whistle at idle but she purrs just right! Next is the TCI (Thanks Yamagrl), some odds and ends, I guess I should check the drive shaft/drive gear for lube huh? She's got new tires (the nubs are still on them) so I know I shouldn't assume the last mechanic that was in there did what should be done...like checking the bearings and the gear for lube.... Thanks to all for encouragement and help! Doug
-
Where would an aux gas tank be located? Would aux tank's fuel be routed to the main tank, a "TEE" installed behind the fuel filter, or is there a manifold involved? What is used to monitor the fuel level in the aux tank? Seems to me of it gravity drains to the main tank the bike's fuel gauge would suffice...
-
Clutch basket remove
dna9656 replied to dna9656's topic in Venture and Venture Royale Tech Talk ('83 - '93)
Thanks Rick! I'll do that next time I have them out.... -
re programming ignitec for a 91
dna9656 replied to Black wing's topic in Venture and Venture Royale Tech Talk ('83 - '93)
OK guys I have the software but thought all I needed a USB cable, I can't find the one Gary sent of course...is there something special for the Ignitec I got from Gary? He programmed it for my 83.5 which is sadly no longer capable of running... -
Clutch basket remove
dna9656 replied to dna9656's topic in Venture and Venture Royale Tech Talk ('83 - '93)
Thanks for responding Gaj! I read all I could find on this forum and others on Barnett clutch installations and couldn't find a word about the lack of notches on the Barnett disks; so I didn't know if I got the wrong part (they fit but...) or I got some sort of factory mistake. They are installed as of yesterday afternoon (late) but I was waiting to hear form some one here before I installed the cover. Now I can proceed with other stuff. I did get the COP ignition coils installed; I had to UN install the wires that lead to the COPs from the old #1 bike to the "new" #1 then fight the coils onto the spark plugs. With the plastic covers over the top of the engine the coils are a tough install. Do those covers serve any real purpose besides guiding the plug wires? -
Clutch basket remove
dna9656 replied to dna9656's topic in Venture and Venture Royale Tech Talk ('83 - '93)
I stated before what barnett said, "follow the MFR's instructions" well there are no marks or notches on the Barnett disks so again, I'm looking for advice. -
Clutch basket remove
dna9656 replied to dna9656's topic in Venture and Venture Royale Tech Talk ('83 - '93)
OK my Barnett disks have no dots or notches to line up with the basket, so now what? Is there some voo-doo I don't know? Do I install them in any manner? I did put the narrow one on first, then the steel, wire, friction/steel till I ended up with a friction for the pressure plate. Barnett says install IAW (In Accordance With) MFR's instructions; well Yamaha says line up the notches with the dots/ or if they don't fit well turn them 180 degrees; well there are no notches so now what? -
Clutch basket remove
dna9656 replied to dna9656's topic in Venture and Venture Royale Tech Talk ('83 - '93)
I didn't buy the steels....I'm using the originals, is that going to be a problem for me? -
Clutch basket remove
dna9656 replied to dna9656's topic in Venture and Venture Royale Tech Talk ('83 - '93)
So I got a clutch problem; When installing the steels and friction disks I'm not ending with a friction disk, so I'm thinking the box of frictions (in a factory box but no cellophane) I found in one of my parts bikes was missing a disk, no; I already trash-caned the old set....So I bought a set of Barnette friction disks, So after removing the outter pack of steels and disks I remove the little wire, the steel and find a narrow steel and narrow friction disk. I know; a lot of guys don't replace it, I am. So how does it go back together? I think it goes 1/2 friction, steel washer, steel, wire, friction/steel till full ending with a friction disk. Yes? -
Aftermarket TCI available!
dna9656 replied to tvking63's topic in Venture and Venture Royale Tech Talk ('83 - '93)
I got a CD however; it's in the garage someplace and I'm in the middle of a re-model and the garage is FUBAR due to all the activity of the remodel. hit me up in 2 weeks via PM. -
The torque for the clutch is in the engine re-assembly page (right side lower) 3-51; 8Nm or 5.8 ft lbs.
-
I don't really know, but how big it is isn't really important is it? I mean it's FREE and you're gonna NEED it! Be sure to check out the tech library, and ALL associated links to learn how to fix stuff, things to check etc. here on the forum.
-
Clutch basket remove
dna9656 replied to dna9656's topic in Venture and Venture Royale Tech Talk ('83 - '93)
Can I get a recommendation for a inch pound/Nm torque wrench that will do 5 lbs/ft and up, preferably in 1/4 drive. I found these: ACDelco ARM601-3 3/8-inch Digital Torque Wrench (2-37 ft-lbs) by ACDelco ($100.00) TEKTON 24320 1/4-Inch Drive Click Torque Wrench, 20-200-Inch/Pound by TEKTON ($36.00) on Amazon. Opinions please! -
Clutch basket remove
dna9656 replied to dna9656's topic in Venture and Venture Royale Tech Talk ('83 - '93)
Thanks Cow! So now I have to put the right side case back on, drain the carbs and fill with Sea Foam; let soak. Install the plugs & COPS, fill it with oil (new filter already on), drop the rear wheel and grease the gears & check the wheel bearings, do same for front wheel, find the disk for the Ignitec and reprogram it for the 1985 model. Drain the carbs, turn on the gas, hit the starter button and see what happens.... -
Clutch basket remove
dna9656 replied to dna9656's topic in Venture and Venture Royale Tech Talk ('83 - '93)
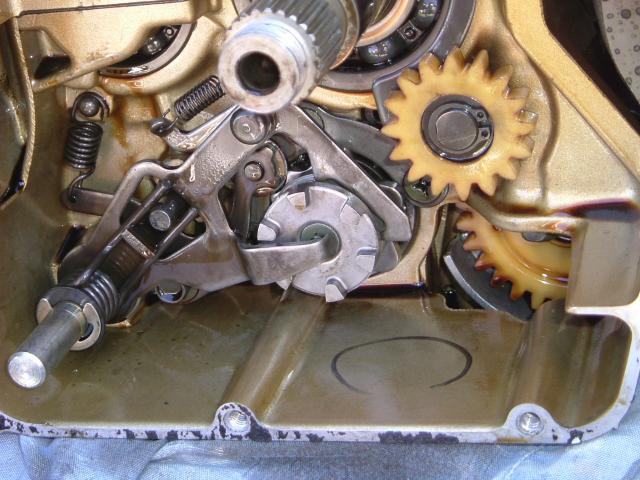
UPDATE!! That clutch tool arrived and did a bang up job! PERFECT! It locks on to the teeth of the basket and I allowed it to bind on the passenger floor board as I turned the 30" breaker bar. She came loose! OH yeah; WAIT; there's more! Something you won't read in the tech library on this project: You'll need a 30mm socket to get the clutch basket off; maybe we should add that huh? Now then for the Lesson of the day! NEVER leave the "C" clip and washer that hold the shift lever in place below clutch location. One or both the "C" Clip and/or the black washer that goes behind it will slip into the oil pan. I got mine out with a magnet on a piece of safety wire. I used up my luck for today... Look close on the left at the "C" clip and washer....they slipped off the section there between the 2 screw bosses into the pan to the right under that large plastic gear. Also today I was working on my GMC Yukon....replacing the upper radiator hose joint that screws into the fwd right (passenger side) intake manifold; the hose has a fitting that pops into the joint. The joint leaked so I got a new one. On turning the ratchet to remove the old joint the joint broke! OH NOOOOo!!! So I got a chisel, and IT CAME RIGHT OUT!!! It was so corroded little was left to be stuck/frozen/corroded together! The new one screw right it there just right! Wheeew! Talk about a close call!!!!
-
Need Rear Brake Rotor
dna9656 replied to GaryZ's topic in Venture and Venture Royale Tech Talk ('83 - '93)
So has anyone contacted EBC and asked them about the discrepancy? Those catalogs are printed in the smallest font known to man and I bet they are not researched for every edition.