Leaderboard
Popular Content
Showing content with the highest reputation on 08/20/2021 in all areas
-
2 points
-
Hey Wayne, This doesn't work as well if you are in a "Rush" to get it done, but if you have the time, Clean the Valve Covers well, put a light coat of the blue RTV in the groove of the Valve Cover. Install the Gasket, then flip the Valve Cover over on a flat surface, (Table Top, piece of glass, etc.) and place a pretty good sized book on top of the Valve Cover and let it sit overnight. Because these covers are a bear to reinstall, I like knowing that the gasket is going to stay put while I fight the covers back on. Here's another tip, The Second Gen. Valve Cover Gaskets will fit the First Gen, Valve Covers! They are wider, and have a Horizontal Rib that makes them a better Valve Cover Gasket in my opinion. When installed, there will be a bit of rubber gasket sticking out from the Valve Cover/Cylinder Head Joint. If this bothers you Wayne, just trim it off with a razor blade. I don't use the First Gen. Valve Cover Gaskets on either of my Ventures any more. The Second Gen. ones seem to last much longer, and are easier to install. This is just my opinion Wayne. Good luck with this project! Earl2 points
-
Many of us have had the desire to own a Corvette. But, I never got around to buying one. Back in my misspent youth in the 60's, I was plotting very hard to buy a 66 or 67 Corvette but it was not to be. This was in 68 and the abused looking 66 with a 396 big block was available used at the dealer for about $2200. The 67 was like new with low miles and the 350hp 327 engine, both 4 speeds of course. The 67 was priced at $3300. But when you are a PFC in the Army with a take home pay of $125/month they were out of reach even though I had my 65 Chevelle to trade in. It was just as well though because a few months later I got shipped to S. Korea. The Army years were not my happiest but it was an experience that I'm very glad to have had. The training I got, 40 weeks of school to learn my job to repair the radars and analog computer for the Nike Hercules Missile System and on site experience have been a great benefit to me the rest of my life, I matured a bunch, and got in much better shape.2 points
-
Some of you may have followed my effort to sell my Goldwing, after it sold I wondered what I would do to fill the void , well about a month ago I figured it out and went and bought this, just spent the whole day washing , clay baring and waxing it. Certainly gave me something to do and it is fun to drive. I am sticking around monitoring the forums, hoping I can still be of help from time to time.1 point
-
The 2nd Gen Ventures are generally considered to be the '99 to 2014 Royal Star Ventures or RSV's as we call them here on the site. There was a design predecessor that started in 1996, but those were not designated as the Venture. They had the same basic engine design, but not everything was a direct fit to the later RSV's.1 point
-
Thank you, I already purchased two gaskets for $22 a piece on ebay, I had heard about the second gen being a better fit, but I wasn't sure what second gen was, are those newer than '93? I'll try out what you said with the book, it was a pain just trying to get it in place with the gaskets coming off, especially since there was a hose blocking the way of the front one.1 point
-
Well, I think I have all the parts that I need to try to internally reseal these carbs. I already had the gasket between the jet block and carb body with the car kits I had gotten from SCI, and recently have ordered the jet block plugs from them as well. I did also buy new o-rings that are installed on the emulsion tubes (which wasn't cheap) but figured I better cover that base as well. Another possibility that I just thought of that has me worried is possible internal damage to the carb. We had the super cold snap this last February and we got down to -17°F here. Really hoping there wasn't any water in any of the carbs that caused a crack if it froze. I might just be getting myself worked up but am thinking that this is possible. I am thinking I will probably be working on this in October at the earliest. For some reason, it runs perfect with some B12 Chemtool in the tank. I definitely don't want to do this long term as I am sure it will have a detrimental effect on the fuel system components eventually. For now, it has been fine though. I have been running it around the recommended dosage in every other tank. We have a ride to Eureka Springs planned for labor day weekend so hopefully all will be well to at least that trip is over. Once again, thanks for all the suggestions. Once I get the new rubber in the carbs I will let you know if it seemed to fix it or not. Have a good weekend!1 point
-
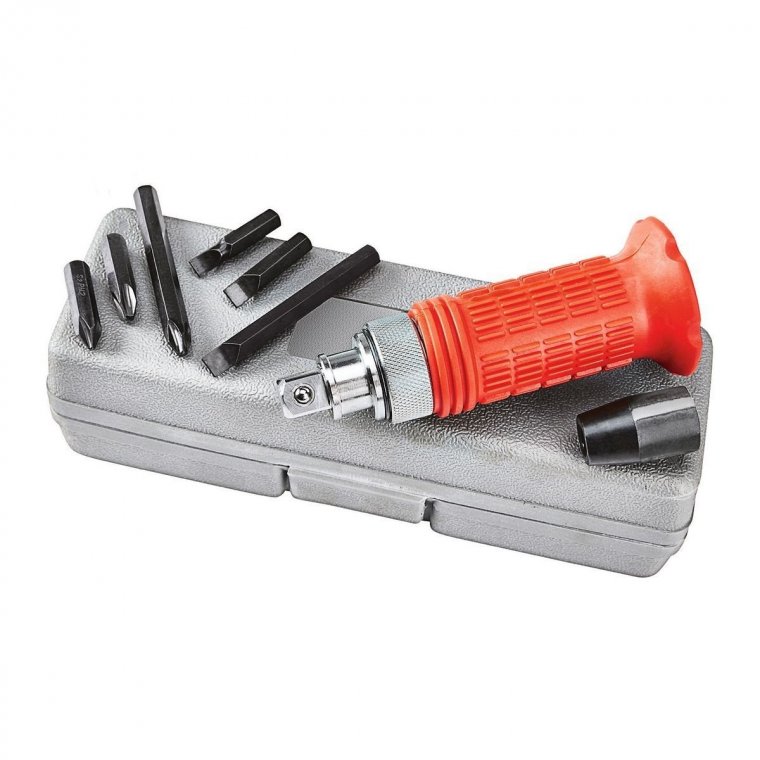
The impact tool Skydoc mentions is a very useful tool to have on hand not just for the drain plug. I have one in my box at work, one in my mobile tool box and 2 in my home garage tool box. The second one of the two at home I welded on to it the handle I cut from a worn out adjustable wrench. It keeps it from twisting in my hand when I use it with a heavy mallet to break loose heavy bolts up to 5/8 " and have broken loose bolts a breaker bar would not budge. When putting the valve covers back on 1st check to be sure none of the rubber plugs that sit on top of the cams came out while removing the valve covers and be careful not to do the same as you put the valve covers back in place. I once discovered one in the bottom of an engine while replacing the clutch. Oil pressure can escape through the holes these plugs fill and they are held in place by little nubs molded into the underside of the valve cover.1 point
-
Use what Skydoc mentioned in his post. Works very well and thats how have installed the majority of the ones I've installed over the years.1 point
-
Use some High Tack or Indian Head gasket sealer to stick them to the covers. I've never changed the breather hose, but that doesn't mean it wouldn't be a good idea.1 point
-
1 point
-
I have always had good luck just using a 24" cheater or breaker bar on the drain plug and oil filter bolt.1 point
-
Because I have the "Luxury" of putting all of the bikes I work on, on a lift I can easily use a hand held "Impact Driver". This is the perfect place to use one. The Oil Filter Cover is another one. I don't usually sing the praises of Harbor Freight Tools, but you can pick up a hand held Impact Driver there for under $10.00. This is an excellent investment for anyone that has a motorcycle! It comes with an adapter that holds a Phillips and Flat Blade Screwdriver tips, and if you remove the adapter, you can put a 3/8 drive socket on it as well. Do yourself a favor and pick up one of these handy devices because "Plan B" is you wring off the bolt, and have to remove the oil pan to get the bolt out! Earl1 point
-
Hey Jason, Well, my friend, we meet again! I wrote this post some years ago for a member that posted a question very much like yours! Take from this article the items you need to address, and leave the rest. This article will give you a much better idea of the condition of the bike you are looking at, and will give you a head's up to look for. I personally would scoop this bike up at $800.00, (offer him $600.00) and settle at $700.00. CHECKLIST for 1st Generation VENTURES The 1989 VR is the last year of the "Old Style" TCI in 1990, Yamaha went to the "improved version". This should not be a problem, plenty of them out there! (1984 to 1989 all fit) Check all three brake rotors for "bluing", which means that they have been overheated from a dragging Caliper. The left front and rear Rotor are not available from Yamaha any more, and were spendy when they were. This bike is also the last year that came with the "Two Brush" starter motor. 1990 to 1993 had the "4 brush starter". Run the bike for a while, shut it off, and try to restart it. If the starter drags, you will need to address this issue once you have purchased it. I have seen these bikes get 300,000 miles with proper care, so at 65,000 miles I would have a good close look at the front fork seals, (thin, black oil ring above the lower aluminum fork tube) be sure to check BOTH tubes! Also steering head bearings will start to be an issue at this mileage point, check them closely. Check the coolant overflow bottle which is located under the "door" above the CB Radio on the upper right side of the fairing. If the bottle is empty, then you have a "weeper" coolant system. Have a close look at the "fish eye" glass in the front Brake and Clutch Master Cylinders, if the fluid is not clear like water, (cola colored) then this needs service Since you can't see into the rear Master Cylinder, I would "draw" a sample of the brake fluid from the rear reservoir and check the color. (looking for clear color here) Remove the false tank cover and remove the fuse box lid, if any fuses are missing, or are "jumpered" with wire, then this is a major issue, but can be repaired. Remove the air box cover and check the air box for engine oil in the bottom of the box, and bugs and dirt in the air filter folds. Put the bike on the center stand and roll both tires, listening for dragging calipers and dry bearings. Sit down behind the rear of the bike, and hold on to the chrome side bag guard, and place your right foot on the rear tire. (bike in 1st gear helps) Push side ways on the tire firmly, you are looking for the tire and swing arm to move sideways, meaning the swing arm bushings and or bearings are shot! If this bike has spent most of it's life in AZ., then it has seen some pretty high coolant temps. Look under the water pump, at the weep hole, (right side of bike, in front of and below the foot brake) for signs of anti-freeze staining or leakage. While you are there, look at the front of the water pump where the "Elbow" exits the water pump and turns left to the Thermostat Housing, MAKE SURE that the engine crash bar has not cut a gash in this plastic elbow! If there is a gash on the plastic elbow, then most likely, this bike has been down on the right side at some point. Check right side fairing corner for cracking. With the bike on the center stand, start the bike and let it run until the electric fan comes on. If the temp gage gets close to the red area with no fan turn on, (fan should come on at 3/4 on temp gage+/- a bit) then this bike has been ridden HOT in stop and go traffic. While on the right side of the bike, look below the water pump for the "oil level sight glass". With the bike not running, the oil level must be half way up the sight glass. If the oil level is too high and there is no oil level line, then you have an issue. If the sight glass is so "foggy" that you can't see the oil level at all, this is a sign that the oil changes have been neglected. Cracked frames. Early Ventures, '83 models specifically, have been know to develop cracked frames. This occurs just above the area where the center stand attaches. Second Gear. In models from '83 through mid '85 there is a problem with the bikes losing second gear. It does not happen on all bikes but is very common. Usually starts by slipping out of second gear on hard acceleration. Can be repaired by a savvy home mechanic but does require the removal of motor. Expensive fix if you have it done at a dealer. I've seen estimates approaching $2,000.00 Stators. Early models suffered from stator failure due to over heating. Later models incorporated an oil cooling system. Cracked trunks. Very common to find the bottom of the trunks cracked out. Class air suspension controller. E4 errors are common. Caused by bad solders on the circuit board within the controller. Easy fix if you are familiar with using a soldering iron. Front end wobble. Pretty common. Various causes but usually either a slightly cupped front tire or loose steering head bearings. Repacking and proper tightening of the head bearings is highly recommended whether you have experienced the wobble or not. Exhaust collector. Baffles become loose and cause a rattle. There is a tech article on opening up the collector and repairing. There is also an after market system out that does away with the collector. Everything mentioned here can be corrected. The point of this inspection is to see if the current owner is being honest with you about the condition of the bike. If everything checks out OK, with NO broken plastic, then this is a $3500.00 bike. If you can't see the oil level, it has at least one blued rotor, the water pump elbow has a gash in it, and the right side fairing has damage at the corner, and the coolant overflow bottle is dry, then this is an $800.00 bike, and will be a $2700.00 bike when you repair everything. Because the owner wants to sell this motorcycle, he/she will say "anything" to make the sale. Print this sheet off, check everything mentioned, deduct for the issues found, and if he is still firm on the price once you have proved that the 2K service is BS. Then WALK AWAY! In my honest opinion, paying $800.00 for an 89'VR and putting $1700.00 into it to cherry it out is a "fun winter project"! Paying $3500.00 for the same bike and putting $1700.00 into it just to get it to stop and go properly is getting RIPPED OFF! My thoughts, for what they are worth. I hope you will find this info useful, and "Happy Hunting"! Earl1 point
-
I have progressives but still make minor adjustments on the class to fine tune it to were I want it, take air out on rough roads and add a little on smooth roads and hard surface twists. Do I have a sweet spot ? Can't say as I have found it yet. On the other had we don't have a lot of challenging twisties here and often the ones that are often have fine gravel or sand so you don't often push the limit.1 point
-
Bob K. - Thanks for the detailed information. Curious names Yamaha chose to use for some of these parts, but so be it. So if I'm reading your information correctly, there's only 1/4" difference between the factory "cap" and the PVC spacer that Progressive provided. While that might make some amount of difference, I don't expect it to be worlds difference in terms of feel/handling with such a slight increase in preload. Since it is easy to do, I might try using the CLASS to add a few more pounds of pressure up front and increase the preload that way. It's cheap and it's easy, so worth a try I suppose. From what I read in other threads, most with Progressives are running with the minimum pressure up front (4 PSI as I recall), or on the "LOW" setting which is a few PSI higher. Anyone else experimented with this with results they can share? Skydoc, I have no doubt you're correct in your assessment of the spindly front forks. This is something that seemed to plague all Japanese bikes at least until the mid to late 1990's when beefier forks began showing up on sportbikes. Of course it's taken longer for that to spread out to other models. I have no idea if a "mid brace" would improve things or not. If you try it though, I'd be keen to learn of your results. I'm certainly envious of your skills and access to tools as a machinist to create custom parts. I'd try it myself, but only limited by my lack of skills, lack of training/experience, lack of access to tooling, and lack of ready access to materials. LOL1 point
-
Hey Guys (and Gals) lets crunch some numbers for a moment and see if we can come to the same conclusion I came to about the front forks of the First Gen. Yamaha Venture Royale. With the VMAX weighing in at around 579 pounds, and having 40MM fork tubes, and the Venture Royale weighing in at 785 pounds, and having, (you guessed it) 40MM fork tubes to say that the front end on the Venture Royale is on the "Light Duty" size is, in my opinion an understatement! Now Yamaha attempted to deal with this issue with the introduction of the Yamaha Royal Star Venture, but at 41MM the front forks on the Second Gen. are laughable at best! Of course, the riding style of the Second Gen. is different from the riding style of the First Gen. (In my opinion) A set of 50MM front fork tubes on a First Gen. would have suited me just fine. (1 9/16" vrs. 1 15/16") Considering that the First Gens. used the same fork lowers that were used on the XS1100 (which were 39MM lowers) Yamaha had enlarged the fork tube bore in the lowers as far as they dared to go in the 80's, early 90's. If they would have gone to a 50MM upper fork tube (as they should have, given the increased weight of the bike) that would have required the recasting of the upper and lower triple trees, the lower fork tubes, not to mention the increased 50MM upper fork tubes, which at the time, would have been the largest fork tubes that were ever used on a production motorcycle in their product line. (And still is to this day!) Plus you would have added 10 pounds to the weight of the bike, with ALL of it being on the front end. With my own personal riding style being that of "I am only vertical when I am at a stop light", I have learned to embrace the "horror" of the sloppy front end of a First Gen. in those sweeper turns where parts of your bike that should not touch the ground sometimes do. I have often though of adding a "Mid Brace" between the top of the lower fork tube travel and the bottom of the triple tree to see if that would firm up the front end. If there was some interest in this from the other forum members, I may try to introduce one as I plan to retire in early 2022 and will be able to turn all of my attention to my "Little Shop By The Creek". Feel free to comment on this upgrade that I plan to at least make for my 87'VR, and if it pans out, I will add one to my 89'VR as well. If you are so inclined, maybe I will add one to your bike as well. As a Machinist, I have lived my life making my bikes "Better". If the upgrades were solid, I offered them to the other forum members. Many have used them, some have not. If there was another front end from ANY other motorcycle on the planet that would improve the high speed handling of a First Gen. I would have figured out a way to adapt it to my 87'VR. (And believe me I have looked!) ALL of the sport bike front ends are WAY to short, and can't handle the extra weight of the First Gen. So, short of adding a totally custom Olins, multi-thousand dollar front end to a bike I paid $800.00 for, "I am stuck with what I got", so to speak. I hope I didn't steal this thread with this post. These were just my thoughts, for what they were worth. Earl1 point
-
Have had the pleasure of meeting and sharing good times with Puc and Tips on several occasions. Great folks with a great sense of humor.1 point
-
1 point
-
For those of you that remember Angel (DarkAngel) and Lori Delarosa, they could use our help and prayers right now as they battle Covid. They are both hospitalized and stand to loose their business if recovery takes too long. https://m.facebook.com/story.php?story_fbid=10221152862556747&id=14003135720 points


